代码在Task3目录下面
这是我们学校的一次计算机网络课程设计,要求如下:用户可以登录注册,基于SMTP协议发送邮件,基于POP3协议接收邮件。
使用技术及版本如下:Springboot 2.2.2,mybatis 2.1.2,shiro 1.5.3,javax.mail。
Maven依赖如下:
<dependencies>
        <dependency>
            <groupId>com.sun.mail</groupId>
            <artifactId>javax.mail</artifactId>
            <version>1.6.2</version>
        </dependency>
        <dependency>
            <groupId>com.huaban</groupId>
            <artifactId>jieba-analysis</artifactId>
            <version>1.0.2</version>
        </dependency>
        <!--整合数据库-->
        <dependency>
            <groupId>org.mybatis.spring.boot</groupId>
            <artifactId>mybatis-spring-boot-starter</artifactId>
            <version>2.1.2</version>
        </dependency>
        <dependency>
            <groupId>com.alibaba</groupId>
            <artifactId>druid-spring-boot-starter</artifactId>
            <version>1.1.10</version>
        </dependency>
        <dependency>
            <groupId>mysql</groupId>
            <artifactId>mysql-connector-java</artifactId>
            <version>8.0.18</version>
        </dependency>
        <dependency>
            <groupId>org.projectlombok</groupId>
            <artifactId>lombok</artifactId>
            <version>1.18.12</version>
        </dependency>
        <!--spring整合shiro-->
        <dependency>
            <groupId>org.apache.shiro</groupId>
            <artifactId>shiro-spring</artifactId>
            <version>1.5.3</version>
        </dependency>
        <dependency>
            <groupId>log4j</groupId>
            <artifactId>log4j</artifactId>
            <version>1.2.17</version>
        </dependency>
        <dependency>
            <groupId>org.springframework.boot</groupId>
            <artifactId>spring-boot-starter-thymeleaf</artifactId>
        </dependency>
        <dependency>
            <groupId>org.springframework.boot</groupId>
            <artifactId>spring-boot-starter-web</artifactId>
        </dependency>
        <dependency>
            <groupId>org.springframework.boot</groupId>
            <artifactId>spring-boot-starter-test</artifactId>
            <scope>test</scope>
            <exclusions>
                <exclusion>
                    <groupId>org.junit.vintage</groupId>
                    <artifactId>junit-vintage-engine</artifactId>
                </exclusion>
            </exclusions>
        </dependency>
        <dependency>
            <groupId>org.apache.shiro</groupId>
            <artifactId>shiro-core</artifactId>
            <version>1.5.3</version>
        </dependency>
    </dependencies>
配置文件如下:
spring:
  datasource:
    username: root
    password: root
    url: jdbc:mysql://localhost:3306/MailUser?serverTimezone=UTC&useUnicode=true&characterEncoding=utf-8
    driver-class-name: com.mysql.jdbc.Driver
    type: com.alibaba.druid.pool.DruidDataSource

mybatis:
  mapper-locations: classpath:mapper/*.xml
  type-aliases-package: cr553.task3.pojo
效果图如下:
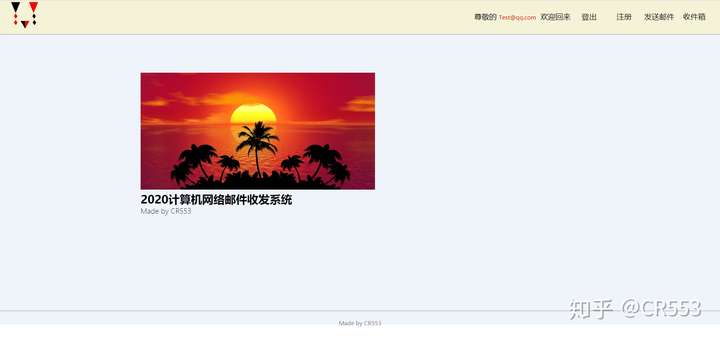
首页
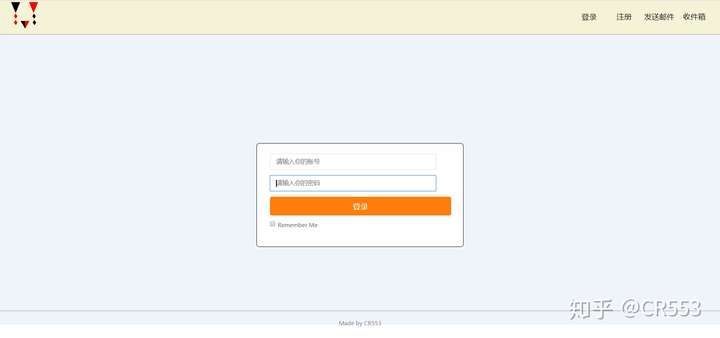
登录
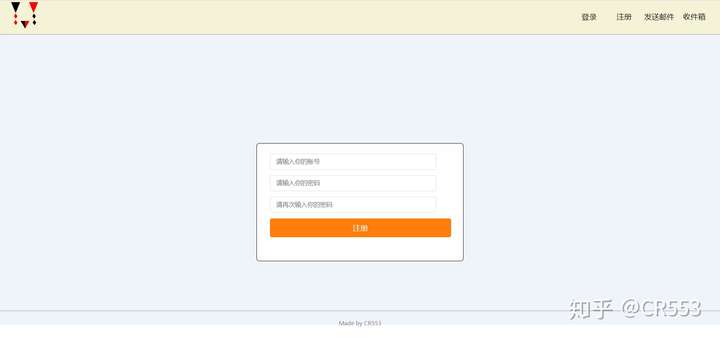
注册
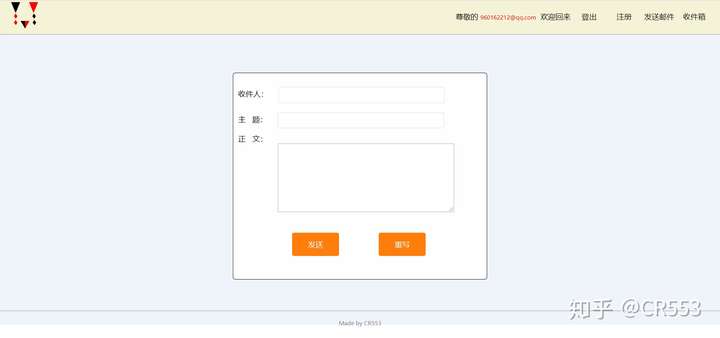
发送邮件
查看邮件
shiro的权限管理主要在这两个类中,自定义UserRealm和配置类中。实现权限配置的操作主要在getShiroFilterFactoryBean()方法中,将要配置的路径和权限保存在一个map中。authc表示只有登录才能够访问,setLoginUrl用来设置登录路径。
@Configuration
public class ShiroConfig {

    @Bean
    public ShiroFilterFactoryBean getShiroFilterFactoryBean(@Qualifier("securityManager") DefaultWebSecurityManager securityManager )
    {
        ShiroFilterFactoryBean bean = new ShiroFilterFactoryBean();
        bean.setSecurityManager(securityManager);
        Map<String, String> filters = new LinkedHashMap();
        //user下面的操作只有登录才能访问
        filters.put("/user/*","authc");
        filters.put("/toReceiveMail","authc");
        filters.put("/toSendMail","authc");
        bean.setFilterChainDefinitionMap(filters);
        //设置登录路径
        bean.setLoginUrl("/toLogin");
        //设置未授权路径
        bean.setUnauthorizedUrl("/noauthc");
        return bean;
    }


    @Bean("securityManager")
    public DefaultWebSecurityManager getDefaultWebSecurityManager(@Autowired UserRealm userRealm)
    {
        DefaultWebSecurityManager securityManager = new DefaultWebSecurityManager();
        securityManager.setRealm(userRealm);
        return securityManager;
    }

    @Bean
    public UserRealm userRealm()
    {
        return new UserRealm();
    }
}
用户登录操作会转到自定义UserRealm中的认证中,此时用户账号和密码都在userToken中。认证阶段主要包括用户名认证和密码认证,将从前端获取的和数据库中查询的做个比较即可。
public class UserRealm extends AuthorizingRealm {

    @Autowired
    private UserService userService;

    //授权
    @Override
    protected AuthorizationInfo doGetAuthorizationInfo(PrincipalCollection principalCollection) {
        return null;
    }

    //认证
    @Override
    protected AuthenticationInfo doGetAuthenticationInfo(AuthenticationToken authenticationToken) throws AuthenticationException {
        UsernamePasswordToken userToken = (UsernamePasswordToken) authenticationToken;
        User user = userService.queryUserByName(userToken.getUsername());
        if(user==null)//用户名认证
        {
            return null;
        }
        //用户登录后隐藏登录按钮
        Subject subject = SecurityUtils.getSubject();
        Session session = subject.getSession();
        session.setAttribute("LoginUserName",user.getName());
        session.setAttribute("LoginUser",user);
        //密码认证
        return new SimpleAuthenticationInfo(user,user.getPwd(),"");
    }
}说注册登录之前先把实体类,dao,service层简单贴一下。
实体类,用了Lombok
@Data
@NoArgsConstructor
@AllArgsConstructor
public class User {
    private String name;
    private String pwd;
    private int id;
}
Dao层
@Mapper
public interface UserDao {
    User queryUserByName(String username);
    void createUser(String username,String password);
}
service层
@Service
public class UserServiceImpl implements UserService {

    @Resource
    private UserDao userDao;

    @Override
    public User queryUserByName(String username) {
        return userDao.queryUserByName(username);
    }

    @Override
    public void createUser(String username, String password) {
        userDao.createUser(username,password);
    }
}
登录和登出在controller中实现。这里将前端获取的用户名和密码封装到token中,传入上面说的userRealm中,第一个异常是抓用户名错误,第二个抓密码错误,统一表述为用户名或密码错误。登录核心方法:subject.login(token);登出核心方法:subject.logout() 。
//登录
@RequestMapping("/login")
public String login(String username, String password, Model model)
{
    //获取当前对象
    Subject subject = SecurityUtils.getSubject();
    UsernamePasswordToken token = new UsernamePasswordToken(username,password);
    try{
        subject.login(token);//执行登录方法
        return "index";
    }
    catch (UnknownAccountException e){
        model.addAttribute("msg","你输入的用户名或密码不正确,请重新输入。");
        return "login";
    } catch (IncorrectCredentialsException e){
        model.addAttribute("msg","你输入的用户名或密码不正确,请重新输入。");
        return "login";
    }
}

//登出功能
@RequestMapping("/logOut")
public String logOut()
{
    Subject subject = SecurityUtils.getSubject();
    subject.logout();
    return "index";

}注册功能实现在controller层中,注册常规操作,检查前端输入的表单的规范性,全满足后存入数据库。
//注册
@RequestMapping("/register")
public String register(String username, String password,String confirmPass, Model model)
{
    //用户名格式检验
    String regex="^\\w+@\\w+.\\w+\\.?\\w+$";
    Pattern pattern=Pattern.compile(regex);
    if(!pattern.matcher(username).matches())
    {
        model.addAttribute("msg","用户名应该符合邮箱格式!");
        return "register";
    }
    User user = userService.queryUserByName(username);
    if(user!=null)
    {
        model.addAttribute("msg","用户名"+user.getName()+"已存在,请更换!");
        return "register";
    }
    if(password.length()<3)
    {
        model.addAttribute("msg","密码长度必须大于3位数");
        return "register";
    }
    if(password.equals(confirmPass))
    {
        model.addAttribute("msg","两次密码输入不一致,请仔细核对!");
        return "register";
    }
    userService.createUser(username,password);
    return "RegisterSuccess";
}send方法为核心方法,先创建一个session域,设置好用户和密码,qq邮箱的服务器地址和端口之类的信息。在MimeMessage 中设置好内容,发件人,主题等信息,利用transport类依照smtp协议发送邮件。sendMail方法中主要是对前端表单进行一个校验,调用send()方法而已。
@Controller
public class SendMailController {

    @RequestMapping("/toSendMail")
    public String toSendMail()
    {
        return "user/sendMail";
    }
    //发送邮件方法
    public void send(String receiverName, String titleName, String infoName, User LoginUser)
    {
        try {
            String host = "smtp.qq.com";//这是QQ邮箱的smtp服务器地址
            String port = "25"; //端口号
            /*
             *Properties是一个属性对象,用来创建Session对象
             */
            Properties props = new Properties();
            props.setProperty("mail.smtp.host", host);
            props.setProperty("mail.smtp.port", port);
            props.setProperty("mail.smtp.auth", "true");
            props.setProperty("mail.smtp.ssl.enable", "false");//"true"
            props.setProperty("mail.smtp.connectiontimeout", "5000");

            final String user =LoginUser.getName();//邮箱账号
            final String pwd = LoginUser.getPwd();//smtp/pop3授权密码
            /*
             *Session类定义了一个基本的邮件对话。
             */
            Session session = Session.getInstance(props, new Authenticator() {
                @Override
                protected PasswordAuthentication getPasswordAuthentication() {
                    //登录用户名密码
                    return new PasswordAuthentication(user, pwd);
                }
            });
            session.setDebug(true);
            /*
             *Transport类用来发送邮件。
             *传入参数smtp,transport将自动按照smtp协议发送邮件。
             */
            Transport transport = session.getTransport("smtp");//"smtps"
            transport.connect(host, user, pwd);
            /*
             *Message对象用来储存实际发送的电子邮件信息
             */
            MimeMessage message = new MimeMessage(session);
            message.setSubject(titleName);

            //消息发送者接收者设置(发件地址,昵称),收件人看到的昵称是这里设定的
            message.setFrom(new InternetAddress(user, user));
            message.addRecipients(Message.RecipientType.TO, new InternetAddress[]{
                    //消息接收者(收件地址,昵称)
                    // 不过这个昵称貌似没有看到效果
                    new InternetAddress(receiverName, "Test"),});
            message.saveChanges();
            //设置邮件内容及编码格式
            // 后一个参数可以不指定编码,如"text/plain",但是将不能显示中文字符
            message.setContent(infoName, "text/plain;charset=UTF-8");
            //发送
            Transport.send(message);
            transport.close();
        } catch (Exception e) {
            // TODO Auto-generated catch block
            e.printStackTrace();
        }
    }
    //发送邮件
    @RequestMapping("/user/sendMail")
    public String sendMail(String receiverName, String titleName, String infoName, Model model)
    {
        //获取当前用户
        Subject subject = SecurityUtils.getSubject();
        org.apache.shiro.session.Session ShiroSession = subject.getSession();
        User LoginUser = (User) ShiroSession.getAttribute("LoginUser");

        //验证表单
        if(titleName==null||infoName==null||receiverName==null||infoName.equals("")||titleName.equals("")||receiverName.equals(""))
        {
            model.addAttribute("msg","内容不能为空!");
            return "/user/sendMail";
        }
        //用户名格式检验
        String regex="^\\w+@\\w+.\\w+\\.?\\w+$";
        Pattern pattern=Pattern.compile(regex);
        if(!pattern.matcher(receiverName).matches())
        {
            model.addAttribute("msg","收件人名称应该符合邮箱格式!");
            return "/user/sendMail";
        }
        try {
            //发送邮件
            send(receiverName,titleName,infoName,LoginUser);
        }catch (Exception e)
        {
            model.addAttribute("msg","发送邮件失败");
            e.printStackTrace();
            return "/user/sendMail";
        }
        return "/user/SendSuccess";
    }
}getAllMails()是主要实现方法。和发送邮件相似,创建一个session,设置好服务器地址和端口,用户名密码等信息,利用store类获取folder类,在folder类中可以获取该用户所有邮件。receiveMail()方法中主要是调用了getAllMails()方法,和一系类解析邮件的的静态方法。将每个邮件的信息封装到自定义ReceiveMessage类中,为了前端thymeleaf渲染。
@Controller
public class ReceiveMailController {

    //接收邮件
    public static Message[] getAllMails(User LoginUser) {
        String protocol = "pop3";//使用pop3协议
        boolean isSSL = true;//使用SSL加密
        String host = "pop.qq.com";//QQ邮箱的pop3服务器
        int port = 995;//端口
        final String user = LoginUser.getName();//邮箱账户
        final String pwd = LoginUser.getPwd();//smtp/pop3授权密码
        /*
         *Properties是一个属性对象,用来创建Session对象
         */
        try{
            MailSSLSocketFactory sf = new MailSSLSocketFactory();
            sf.setTrustAllHosts(true);
            Properties props = new Properties();
            props.put("mail.pop3.auth.plain.disable",true);
            props.put("mail.pop3.ssl.enable",true);
            props.put("mail.pop3.auth", "true"); //这样才能通过验证
            props.put("mail.pop3.ssl.socketFactory", sf);
            props.put("mail.pop3.host", host);
            props.put("mail.pop3.port", port);

            Session session = Session.getInstance(props, new Authenticator() {
                @Override
                protected PasswordAuthentication getPasswordAuthentication() {
                    //登录用户名密码
                    return new PasswordAuthentication(user, pwd);
                }
            });
            /*
             * Store类实现特定邮件协议上的读、写、监视、查找等操作。
             * 通过Store类可以访问Folder类。
             * Folder类用于分级组织邮件,并提供照Message格式访问email的能力。
             */
            Store store = null;
            Folder folder = null;
            try {
                store = session.getStore(protocol);
                store.connect(user, pwd);

                folder = store.getFolder("INBOX");// 获得用户的邮件帐户
                folder.open(Folder.READ_WRITE); // 设置对邮件帐户的访问权限
                Message[] messages = folder.getMessages();
                return messages;
            } catch (Exception e) {
                e.printStackTrace();
            }
        }catch (Exception e){
            e.printStackTrace();
        }
        System.out.println("接收完毕!");
        return null;
    }

    //接收页面
    @RequestMapping("/toReceiveMail")
    public String toRevice()
    {
        return "user/receiveMail";
    }

    @RequestMapping("/user/receiveMail")
    public String receiveMail(Model model) throws Exception {
        System.out.println("receiveMail开始了");
        //获取当前用户
        Subject subject = SecurityUtils.getSubject();
        org.apache.shiro.session.Session ShiroSession = subject.getSession();
        User LoginUser = (User) ShiroSession.getAttribute("LoginUser");
        Message[] allMails = getAllMails(LoginUser);
        ReceiveMessage[] messages=new ReceiveMessage[allMails.length];

        for(int i=0;i<allMails.length;i++)
        {
            MimeMessage msg= (MimeMessage) allMails[i];
            String Msubject=getSubject(msg);
            String FromUser=getFrom(msg);
            String receiveAddress = getReceiveAddress(msg,null);
            String sentDate = getSentDate(msg,null);
            boolean seen = isSeen(msg);

            /*System.out.println("------------------正在解析第"+i+"封邮件!------------------");
            System.out.println("主题:"+Msubject);
            System.out.println("发件人"+FromUser);
            System.out.println("收件地址"+receiveAddress);
            System.out.println("发送日期"+sentDate);
            System.out.println("是否已读"+seen);*/

            StringBuffer content = new StringBuffer(30);
            getMailTextContent(msg, content);
           /* System.out.println("邮件正文:" + (content.length() > 100 ? content.substring(0,100) + "..." : content));
            System.out.println("------------------第" + msg.getMessageNumber() + "封邮件解析结束-------------------- ");
            System.out.println();*/

            ReceiveMessage rcMsg = new ReceiveMessage();
            rcMsg.setContent((content.length() > 100 ? content.substring(0,100) + "..." : content).toString());
            rcMsg.setFromUser(FromUser);
            rcMsg.setSeen(seen);
            rcMsg.setReceviceAddress(receiveAddress);
            rcMsg.setSendDate(sentDate);
            rcMsg.setSubject(Msubject);
            messages[i]=rcMsg;
        }
        model.addAttribute("mailList",messages);
        return "/user/receiveMail";
    }

    /**
     * 获得邮件主题
     * @param msg 邮件内容
     * @return 解码后的邮件主题
     */
    public static String getSubject(MimeMessage msg) throws UnsupportedEncodingException, MessagingException {
        return MimeUtility.decodeText(msg.getSubject());
    }

    /**
     * 获得邮件发件人
     * @param msg 邮件内容
     * @return 姓名 <Email地址>
     * @throws MessagingException
     * @throws UnsupportedEncodingException
     */
    public static String getFrom(MimeMessage msg) throws MessagingException, UnsupportedEncodingException {
        String from = "";
        Address[] froms = msg.getFrom();
        if (froms.length < 1)
            throw new MessagingException("没有发件人!");

        InternetAddress address = (InternetAddress) froms[0];
        String person = address.getPersonal();
        if (person != null) {
            person = MimeUtility.decodeText(person) + " ";
        } else {
            person = "";
        }
        from = person + "<" + address.getAddress() + ">";

        return from;
    }
    /**
     * 根据收件人类型,获取邮件收件人、抄送和密送地址。如果收件人类型为空,则获得所有的收件人
     * <p>Message.RecipientType.TO  收件人</p>
     * <p>Message.RecipientType.CC  抄送</p>
     * <p>Message.RecipientType.BCC 密送</p>
     * @param msg 邮件内容
     * @param type 收件人类型
     * @return 收件人1 <邮件地址1>, 收件人2 <邮件地址2>, ...
     * @throws MessagingException
     */
    public static String getReceiveAddress(MimeMessage msg, Message.RecipientType type) throws MessagingException {
        StringBuffer receiveAddress = new StringBuffer();
        Address[] addresss = null;
        if (type == null) {
            addresss = msg.getAllRecipients();
        } else {
            addresss = msg.getRecipients(type);
        }

        if (addresss == null || addresss.length < 1)
            throw new MessagingException("没有收件人!");
        for (Address address : addresss) {
            InternetAddress internetAddress = (InternetAddress)address;
            receiveAddress.append(internetAddress.toUnicodeString()).append(",");
        }

        receiveAddress.deleteCharAt(receiveAddress.length()-1);    //删除最后一个逗号

        return receiveAddress.toString();
    }
    /**
     * 获得邮件发送时间
     * @param msg 邮件内容
     * @return yyyy年mm月dd日 星期X HH:mm
     * @throws MessagingException
     */
    public static String getSentDate(MimeMessage msg, String pattern) throws MessagingException {
        Date receivedDate = msg.getSentDate();
        if (receivedDate == null)
            return "";

        if (pattern == null || "".equals(pattern))
            pattern = "yyyy年MM月dd日 E HH:mm ";

        return new SimpleDateFormat(pattern).format(receivedDate);
    }
    /**
     * 判断邮件是否已读
     * @param msg 邮件内容
     * @return 如果邮件已读返回true,否则返回false
     * @throws MessagingException
     */
    public static boolean isSeen(MimeMessage msg) throws MessagingException {
        return msg.getFlags().contains(Flags.Flag.SEEN);
    }

    /**
     * 获得邮件文本内容
     * @param part 邮件体
     * @param content 存储邮件文本内容的字符串
     * @throws MessagingException
     * @throws IOException
     */
    public static void getMailTextContent(Part part, StringBuffer content) throws MessagingException, IOException {
        //如果是文本类型的附件,通过getContent方法可以取到文本内容,但这不是我们需要的结果,所以在这里要做判断
        boolean isContainTextAttach = part.getContentType().indexOf("name") > 0;
        if (part.isMimeType("text/*") && !isContainTextAttach) {
            content.append(part.getContent().toString());
        } else if (part.isMimeType("message/rfc822")) {
            getMailTextContent((Part)part.getContent(),content);
        } else if (part.isMimeType("multipart/*")) {
            Multipart multipart = (Multipart) part.getContent();
            int partCount = multipart.getCount();
            for (int i = 0; i < partCount; i++) {
                BodyPart bodyPart = multipart.getBodyPart(i);
                getMailTextContent(bodyPart,content);
            }
        }
    }
    /**
     * 读取输入流中的数据保存至指定目录
     * @param is 输入流
     * @param fileName 文件名
     * @param destDir 文件存储目录
     * @throws FileNotFoundException
     * @throws IOException
     */
    private static void saveFile(InputStream is, String destDir, String fileName)
            throws FileNotFoundException, IOException {
        BufferedInputStream bis = new BufferedInputStream(is);
        BufferedOutputStream bos = new BufferedOutputStream(
                new FileOutputStream(new File(destDir + fileName)));
        int len = -1;
        while ((len = bis.read()) != -1) {
            bos.write(len);
            bos.flush();
        }
        bos.close();
        bis.close();
    }
    /**
     * 文本解码
     * @param encodeText 解码MimeUtility.encodeText(String text)方法编码后的文本
     * @return 解码后的文本
     * @throws UnsupportedEncodingException
     */
    public static String decodeText(String encodeText) throws UnsupportedEncodingException {
        if (encodeText == null || "".equals(encodeText)) {
            return "";
        } else {
            return MimeUtility.decodeText(encodeText);
        }
    }
}页面实现我就只说一下查看邮件页面和首页页面。
<!DOCTYPE html>
<html lang="en" xmlns:th="http://www.thymeleaf.org">
<head>
<meta charset="UTF-8">
<title>首页</title>
<link href="css/index.css" rel="stylesheet">
<style>
#backgroundPic{
width: 700px;
height: 400px;
margin-left: 300px;
margin-top: 80px;
}
#backgroundPic .p1{
font-size: 20px;
font-family: 微软雅黑;
}
#backgroundPic .p2{
font-size: 15px;
font-family: "微软雅黑 Light";
}
</style>
</head>
<body >
<div id="header">
<div id="logo"><a th:href="@{/index}"><img src="/photo/CLogo.png" height="65px" width="65px"></a></div>
<div id="nav">
<span th:if="${session.LoginUserName}!=null">
<span >尊敬的 <span id="userStyle" th:text="${session.LoginUserName}"></span>
欢迎回来</span>
<span><a th:href="@{/logOut}">登出</a></span>
</span>
<a th:if="${session.LoginUserName==null}" th:href="@{/toLogin}">登录</a>
<a th:href="@{/toRegister}">注册</a>
<a th:href="@{/toSendMail}">发送邮件</a>
<a th:href="@{/user/receiveMail}">收件箱</a>
</div>
</div>
<div id="box">
<hr>
<div id="backgroundPic">
<img src="photo/bg1.jpg" height="250" width="500">
<h2>2020计算机网络邮件收发系统</h2>
<p class="p1">网络(国际)1801 梅海迪</p>
<p class="p2">Made by CR553</p>
</div>
</div>
<div id="footer">
<hr>
<p class="producer">Made by CR553</p>
</div>
</body>
</html>css样式
*{
    margin: 0;
    padding: 0;
}
#nav a {
    display: inline-block;
    font-family: "Helvetica Neue", Helvetica, Arial, sans-serif;
    width: 70px;
    height: 30px;
    color: #0a0a0a;
    text-align: center;
    line-height: 20px;
    text-decoration: none;
}
#header {
    width: 100%;
    height: 72px;
    background-color: #F5F3D7;
}
#nav{
    float: right;
    margin-right: 20px;
    line-height: 70px;
}
#box{
    width: 100%;
    height: 590px;
    background-color: #eff4fa;
}
#footer{
    width: 100%;
    height: 30px;
    background-color: #eff4fa;
}
#logo{
    float: left;
    margin-left: 20px;
}
.producer{
    text-align: center;
    font-size: 12px;
    line-height: 50px;
    color: #868686;
}
#userStyle{
    color: red;
    font-size: 12px;
}
顺便贴一下自己随手画的Logo:
感觉还挺帅的Q.Q
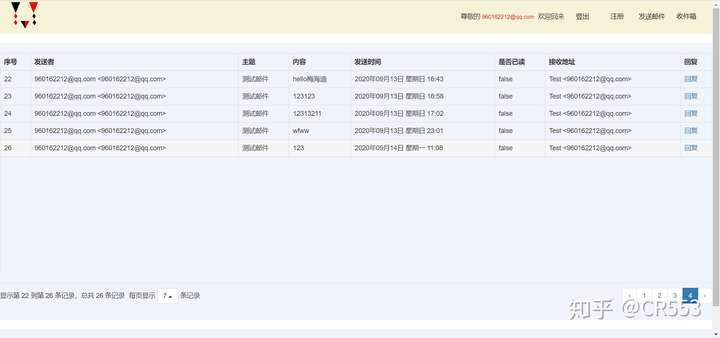
receiveMail.html中用thymeleaf模板引擎获取从上面receiveMail()方法中传过来的mailList。用th:each遍历一下即可,这里我偷了个懒,使用了bootstarp table实现分页效果,具体如何实现可以百度。大概就是下好文件,引入一下,在js中配置一下第一行信息,分多少页之类的。
<!DOCTYPE html>
<html lang="en" xmlns:th="http://www.thymeleaf.org">
<head>
<meta charset="UTF-8">
<title>接收邮件</title>
<!-- 引入的css文件 -->
<link href="/bootstrap/css/bootstrap.min.css" rel="stylesheet" />
<link href="/bootstrap-table/dist/bootstrap-table.min.css" rel="stylesheet">
<link href="/css/receivce.css" rel="stylesheet">
<!-- 引入的js文件 -->
<script type="text/javascript" src="/js/jquery.min.js"></script>
<script src="/bootstrap/js/bootstrap.min.js"></script>
<script src="/bootstrap-table/dist/bootstrap-table.min.js"></script>
<script src="/bootstrap-table/dist/locale/bootstrap-table-zh-CN.min.js"></script>
</head>
<body>
<div id="header">
<div id="logo"><a th:href="@{/index}"><img src="/photo/CLogo.png" height="65px" width="65px"></a></div>
<div id="nav">
<span th:if="${session.LoginUserName}!=null">
<span >尊敬的 <span id="userStyle" th:text="${session.LoginUserName}"></span>
欢迎回来</span>
<span><a th:href="@{/logOut}">登出</a></span>
</span>
<a th:if="${session.LoginUserName==null}" th:href="@{/toLogin}">登录</a>
<a th:href="@{/toRegister}">注册</a>
<a th:href="@{/toSendMail}">发送邮件</a>
<a th:href="@{/user/receiveMail}">收件箱</a>
</div>
</div>
<div id="box">
<hr>
<div class="AllBox">
<table border="1" id="table_page" >
<tr th:each="mail,mailStu:${mailList}">
<td th:text="${mailStu.index}+1"></td>
<td th:text="${mail.getFromUser()}"></td>
<td th:text="${mail.getSubject()}"></td>
<td th:text="${mail.getContent()}"></td>
<td th:text="${mail.getSendDate()}"></td>
<td th:text="${mail.isSeen()}"></td>
<td th:text="${mail.getReceviceAddress()}"></td>
<td><a th:href="@{/toSendMail}">回复</a></td>
</tr>
</table>
</div>
</div>
<div id="footer">
<hr>
<p class="producer">Made by CR553</p>
</div>
<script>
$(document).ready(function () {
$("#table_page").bootstrapTable({
height: 550,
pagination: true,
pageSize: 7,
pageList: [5, 7, 10,],
clickToSelect: true,
columns: [{
field: '序号',
title: '序号'
},{
field: '发送者',
title: '发送者'
},{
field: '主题',
title: '主题'
},{
field: '内容',
title: '内容'
},{
field: '发送时间',
title: '发送时间'
},{
field: '是否已读',
title: '是否已读'
},{
field: '接收地址',
title: '接收地址'
},{
field: '回复',
title: '回复'
}]
});
})
</script>
</body>
</html>css样式参考一下吧
#content{
    background-color: rgba(255, 255, 255, 0.95);
    width: 420px;
    height: 230px;
    border: 1px solid #000000;
    border-radius: 6px;
    padding: 10px;
    margin-top: 15%;
    margin-left: auto;
    margin-right: auto;
    display: block;
}

.register-input-box{
    margin-top: 12px;
    width: 100%;
    margin-left: auto;
    margin-right: auto;
    display: inline-block;
}

.register-input-box input{
    width: 340px;
    height: 32px;
    margin-left: 18px;
    border: 1px solid #dcdcdc;
    border-radius: 4px;
    padding-left: 12px;
}

.register-input-box input:hover{
    border: 1px solid #ff7d0a;
}

.register-input-box input:after{
    border: 1px solid #ff7d0a;
}

.register-button-box{
    margin-top: 12px;
    width: 100%;
    margin-left: auto;
    margin-right: auto;
    display: inline-block;
}

.register-button-box input{
    background-color: #ff7d0a;
    color: #ffffff;
    font-size: 16px;
    width: 386px;
    height: 40px;
    margin-left: 18px;
    border: 1px solid #ff7d0a;
    border-radius: 4px;
}

.register-button-box input:hover{
    background-color: #ee7204;
}

.register-button-box input:active{
    background-color: #ee7204;
}这个程序较为适合新手入门吧,业务逻辑简单,两个SQL,两个核心功能,数据交互也不复杂,表单提交前端数据,thymeleaf提交后端数据。在网上关于这个的博客大多没有界面,或者说是技术栈太老套,因此做这个的目的一个是为了应付一下课程设计,一个是为了填补一下邮件收发系统在SSM中的空白,方便后者迭代更新。
