Connecting Cyglidar to RPI doesn't work #31
Comments
In Code2, baudrate originally set to 250,000. We guess you executed the code using cyglidar d1 with 3,000,000 baudrates. So the code in the while loop. Please one more check your cyglidar d1's baudrate and try to change the speed.
3,000,000 baudrate speed will not work proper data in Python. So, after set up with 250,000 baudrate, try the other code again.(revise the code as well) |

|
I changed the baudrate of the cyglidar d1 to 115200 and ran the code again, but it still didn't work, and I received the following error: I also tried changing the baudrate to 250000 then got this error: I tried running this code, but it's still not working, and I'm not sure what should be done in it to solve the issue that I'm getting. |


|
I'm trying to run code 2 from the pdf in Visual Studio, and I used COM3 with baud rate 38400. It shows that it's entering the while loop, but it fails to display the OpenCV window with the 2D_image. Also, when I tried to print the data received from the cyglidar_d1, it displayed zeros. This is the output that I got:
|


|
Q1.
A1 : 'baudrate' operates with value entered in the python code. Some baud rates used by Cyglidar D1 may be the "baud rates not supported" by the serial driver of the linux system being used as non-standard baud rates. If you try to change the baudrates to the serial driver with the stty speed command, you will get an error. if you specify is not one of the standard ones on pyserial, it calls _set_special_baudrate. If the platform(like Ubuntu) has not implemented it, the base class throws NotImplementedError('non-standard baudrates are not supported on this platform'). So if you're not seeing that error, then the platform (attempts to) supports it. The below is the contents of the Pyserial documents.The parameter baudrate can be one of the standard values: 50, 75, 110, 134, 150, 200, 300, 600, 1200, 1800, 2400, 4800, 9600, 19200, 38400, 57600, 115200. These are well supported on all platforms. Standard values above 115200, such as: ##230400##, 460800, 500000, 576000, 921600, 1000000, 1152000, 1500000, 2000000, 2500000, 3000000, 3500000, 4000000 also work on many platforms and devices. Non-standard values are also supported on some platforms (GNU/Linux, MAC OSX >= Tiger, Windows). Though, even on these platforms some serial ports may reject non-standard values. Custom baudrates are set the same way as standard baudrates, with the baudrate option. So if it does not match, then it is likely that the port does not support non-standard baud rates. Q2.
A2 : ser = serial.Serial() -> If you encounter an error when opening the port, make sure that the port is correctly set to the port of cyglidar D1. When connecting from Raspberry Pi to GPIO, the port is "/dev/ttyAMA1". Please connect to "/dev/ttyUSB0" when connecting to the usb converter we provided with Cyglidar D1.(Number is variable) If there is an error in the serial port open when connecting to "/dev/ttyUSB0", it is highly likely that you tried to connect to a USB device other than the Cyglidar D1, so please check it. (Mostly Mouse, Keyboard, etc.) Q3.
A3 : If OpenCV fails to display in Window, it is likely that OpenCV installation has not been done properly on your PC. |
Hello. I followed the steps of the article you provided in cygbot downloads website about how to connect CygLiDAR D1 directly to Raspberry Pi via UART without USB Converter but it didn't work for me. There were 3 codes provided to use and when I tried to run code 2 on RPI it's showing that it's sending the [90, 119, 255, 2, 0, 8, 0, 10] data bytes but it is not receiving any complete data. So, I tried to run code2 on ubuntu instead to check it using USB connection and I got the same issue. I checked the baud rate of the cyglidar, type of USB port am connecting to and installed the needed libraries but still am not being able to connect the lidar on RPI nor Ubuntu.
This is the output that I got on Ubuntu after running code2:
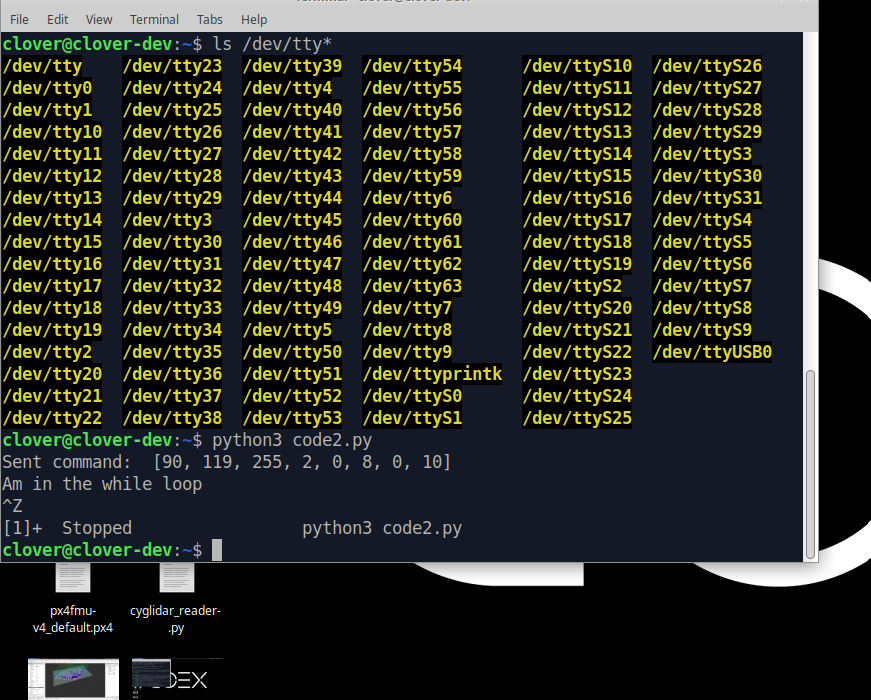
I added a print statement after the while loop to trace the code, and it showed after executing the code, but the code halted after this print statement, and it didn't get any complete data.
When I run the code on RPI, I got the same output as well.
The text was updated successfully, but these errors were encountered: