-
Notifications
You must be signed in to change notification settings - Fork 0
Using Grbl
This wiki is intended to provide various instructions on how to use Grbl. Please feel free to contribute and help keep this page up-to-date!
After flashing Grbl to your Arduino, connecting to Grbl is pretty simple. You can use the Arduino IDE itself to connect to Grbl. Experiment or play with it, just to see if you like it. Other serial port programs, like CoolTerm or PuTTY, work great too. The instructions are pretty much the same.
- Open up the Arduino IDE and make sure your Arduino with Grbl is connected to your USB port.
- Select the Arduino's Serial Port in the Tools menu, as you would normally with an Arduino.
- Open up the 'Serial Window' in the Tools menu.
- Once open, you should see a Grbl welcome message like
Grbl v0.8c ['$' for help]. This means all is good! You're connected! - Make sure you change the "No line ending" drop-down menu to "Carriage return". If you are using any other serial port program, you must do the same.
- If you haven't received the welcome message or some garbled characters, make sure that the baud rate is set at 9600 (our standard build baud rate).
From here, you can simply start sending Grbl some g-code commands, and it'll perform them for you. Or, you can type $ to get some help on what some of Grbl's special commands are or how to write some of your machine settings into Grbl's EEPROM memory.
When have started to feel comfortable with g-code/CNC and you're ready to run a whole g-code program, we recommend that you use one of the many great GUIs that users have written to stream your g-code programs to Grbl and to fully harness all of Grbl's capabilities.


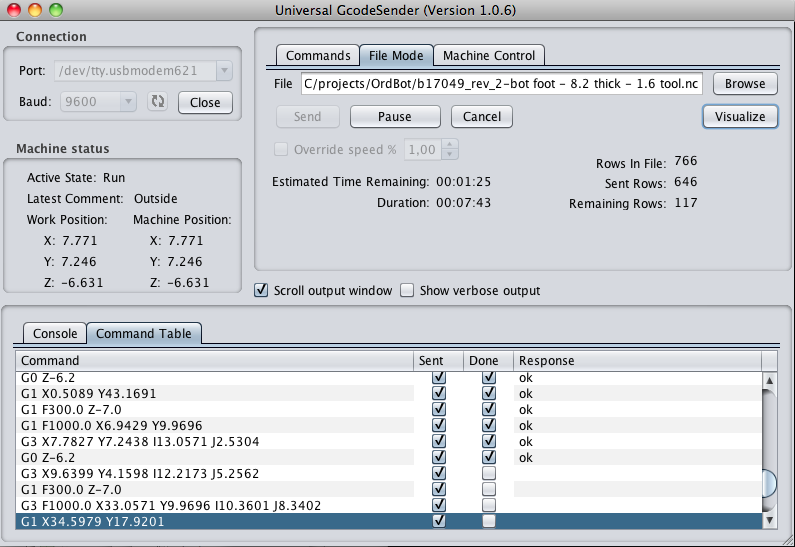
A full-featured GUI, developed by @wwinder, that streams, g-code visualizer, and has complete control and feedback functionality for Grbl's higher level features. It's written in Java, which means it can be run on any Java-capable machine including the RaspberryPi! The Grbl group works closely with this project and highly recommend using this GUI. If you find any issues or would like to request more GUI features, @wwinder has done a wonderful job in completing many of the requests.
Included with the source code and officially supported by Grbl, two Python streaming scripts are supplied to illustrate simple and more complex streaming methods that work well cross-platform. These scripts don't fully support all of the Grbl's features, but are intended more as a way to compare or troubleshoot other garden variety or newly-written GUIs out there. These are located in the 'script' folder on the main repo. Note: The streaming scripts require the pySerial module installed.
- Install the pySerial module.
- Download simple_stream.py Python script.
- Open the script in a plain text editor and change the following line to reflect your system:
s = serial.Serial('/dev/tty.usbmodem1811',9600)
- In place of /dev/tty.usbmodem1811(Mac), you should put the serial port device name of your Arduino. This will be different for each machine and OS. For example, on a Linux system this would look like /dev/ttyACM0. Or on a Windows machine, this may look like COM3.
- The script looks for and reads gcode from a file named grbl.gcode, you should create this file and put the gcode you want to execute in it. Or simply change this name in the script to your needs.
- Open a terminal/command window and change directories to the location of the Python script and execute the Python script with the following command:
./simple_stream.py (Mac/Linux)
python simple_stream.py (Windows)
- You should now see the gcode being streamed to grbl along with 'ok' messages and your machine should begin moving.
The other, more advanced streaming script stream.py has command line arguments and does not require modifying the script itself, unlike simple_stream.py. The main difference is that stream.py uses a character counting scheme to ensure the Grbl's serial read buffer is full, which effectively creates another buffer layer on top of Grbl's internal motion queue. This allows for Grbl to access and parse the next g-code block immediately from the serial read buffer, rather than wait for the 'ok' send and response in the simple_stream.py script. This is very useful for motions, like curves, that have very rapid, short line segments in succession that may cause buffer starvation, which can lead to strange motion hiccups. In other words, it ensures a smoother motion. Use this script, if you are not afraid of command line or are experiencing weird motions.
A simple graphical user interface: https://github.com/jgeisler0303/grblUI. Programmed in Java, using rxtx for serial communication. Should theoretically run on Linux, Mac and Windows alike. Apparently some problems on Mac. Any feedback, tips and tricks appreciated (Issues or Wiki in grblUI). Check out the ready to use jar in the Downloads.
A graphical G-Code Streamer: https://github.com/cody82/grblgui. Programmed in Java, using rxtx for serial communication and OpenGL 2.0 for rendering.
Notable features:
- It displays the job duration and remaining time to complete in minutes.
- It displays current speed.
- You can toggle feed hold and enter G-Code commands.
- It displays the buffer status graphically on the toolpath!
In development:
- Simulate the milling process and display the resulting model.
Last updated: 2014-01-20 by EliteEng (Tested on Ubuntu 13.04)
The Best way I have found is to use "screen"
apt-get install screen
If your device is connected on /dev/ttyACM0
screen /dev/ttyACM0 9600
To get out of the screen interface
crtl-a
k
y
Last updated: To be done.
CNCinfusion - currently under development in C# https://github.com/nm156/CNCInfusion
Gcode Sender https://github.com/downloads/OttoHermansson/GcodeSender/gcodesender.exe
http://www.contraptor.org/forum/t-287260/gcode-sender-program
Last updated: Mar 4 2012 by patgadget