First off, thanks for taking the time to contribute! We gladly support and appreciate anyone is interested to contribute to the OWASP Honeypot Project. Overall developers may focus on developing core framework or modules. Please consider that we are using PEP8 python code style and using Codacy to figure the code quality. In addition, Github Actions will test your PR automatically on several Python versions (3.x). Before sending your PR, make sure you have added code-based documentation to your codes. If you use any code/library/module with a license, add the license into external license file.
We love your input! We want to make contributing to this project as easy and transparent as possible.
You can get your own fork/copy of OWASP-Honeypot by using the Fork button.

You need to clone (download) it to local machine using
git clone https://github.com/Your_Username/OWASP-Honeypot.gitThis makes a local copy of repository in your machine.
Once you have cloned the OWASP-Honeypot repository in GitHub, move to that folder first using change directory command.
# This will change directory to a folder OWASP-Honeypot
cd OWASP-Honeypot
Move to this folder for all other commands.
Run the following commands to see that your local copy has a reference to your forked remote repository in GitHub ![]()
git remote -v
origin  https://github.com/Your_Username/OWASP-Honeypot.git (fetch)
origin  https://github.com/Your_Username/OWASP-Honeypot.git (push)
Now, add a reference to the original OWASP-Honeypot repository using
git remote add upstream https://github.com/zdresearch/OWASP-Honeypot.gitThis adds a new remote named upstream.
See the changes using
git remote -v
origin    https://github.com/Your_Username/OWASP-Honeypot.git (fetch)
origin    https://github.com/Your_Username/OWASP-Honeypot.git (push)
upstream  https://github.com/zdresearch/OWASP-Honeypot.git    (fetch)
upstream https://github.com/zdresearch/OWASP-Honeypot.git (push)Always keep your local copy of repository updated with the original repository. Before making any changes and/or in an appropriate interval, run the following commands carefully to update your local repository.
# Fetch all remote repositories and delete any deleted remote branches
git fetch --all --prune

# Switch to `master` branch
git checkout master

# Reset local `master` branch to match `upstream` repository's `master` branch
git reset --hard upstream/master

# Push changes to your forked `Plant_Disease_Detection` repo
git push origin masterOnce you have completed these steps, you are ready to start contributing by checking our Help Wanted Issues and creating pull requests.
Whenever you are going to make contribution. Please create separate branch using the following command and keep your master branch clean (i.e. synced with remote branch).
# It will create a new branch with name Branch_Name and will switch to that branch.
git checkout -b Branch_Name
Create a separate branch for every contribution and try to use the same name of the branch as of folder.
To switch to desired branch
# To switch from one folder to other
git checkout Branch_Name
Now make your changes in this branch.
If your changes required addition of functions/ API endpoints/ features that are not being tested in the unit tests, then add corresponding tests to it in the tests directory.
Once you are finished implementing your changes, test your changes locally using the following commands:
# Run Modules Test
python3 ohp.py -m all --test
The above command will take some time, so be patient. When it ends, ensure that no errors were printed on the terminal.
# Run API
python3 ohp.py --start-api-server
# Run Unit tests on a separate terminal
python3 -m pytest -rPpEnsure that all the units tests passed before creating a pull request.
To add the changes to the branch use:
# To add all files to branch Branch_Name
git add .
Type in a message explaining the changes in brief using:
# This message gets associated with all files you have changed
git commit -m 'relevant message'
Now, Push your awesome work to your remote repository using
# To push your work to your remote repository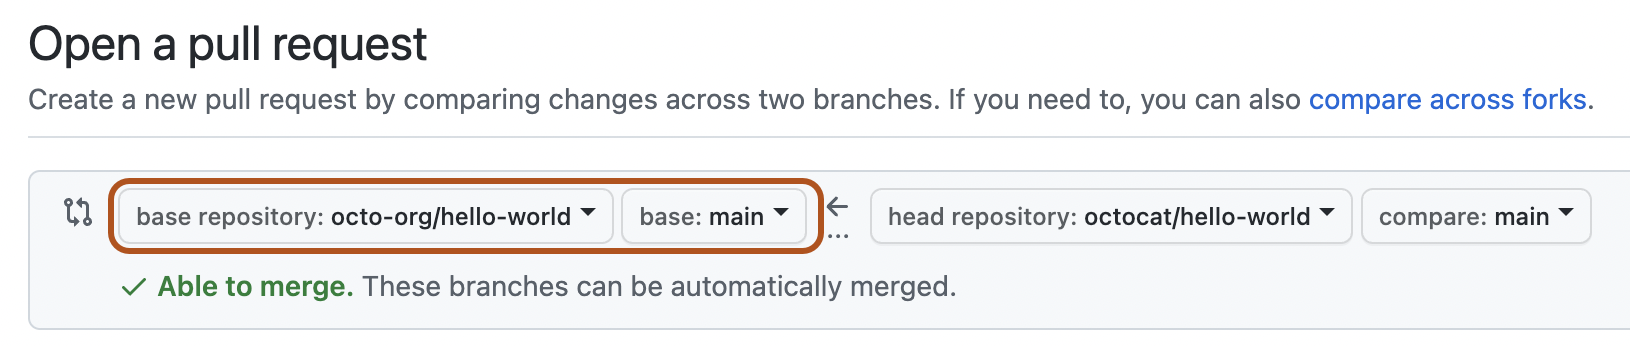
git push -u origin Branch_NameFinally, go to your repository in browser and click on compare and pull requests and select the compare across forks option.

Change the base fork branch to development branch.
Add a title and description to your pull request that explains your precious effort.
Sit and relax till we review your PR, you've made your contribution to our project.
OWASP Python Honeypot Project currently uses MongoDB to store the data in the server where the OWASP Honeypot is running. That means the server where OWASP Honeypot is running should have MongoDB installed.
Running the honeypot modules would result in the creation of two databases-
ohp_events: for storing event dataohp_file_archive: for storing network captured files
The following collections would be created in the database ohp_events:
There is Honeypot events queue which is being maintained for inserting all the honeypot events in the bulk insert as each bulk insert is faster than instantiating insert for each of the records. The format of the data inserted is:
{
    "_id" : ObjectId("5ed54f5c6beff391fc6ee022"),
    "ip_dest": "140.82.118.4",
    "port_dest": 22,
    "ip_src": "192.168.178.15",
    "port_src": 37638,
    "module_name": "ssh/weak_password",
    "date": "2020-06-01 20:56:27",
    "machine_name": "stockholm_server_1",
    "event_type": "honeypot_event",
    "country_ip_src": "-",
    "country_ip_dest": "US"
}All the network events data is separated from the honeypot events as they are not harmful to the server running. Network events can also be used for analysis and hence they are stored in a separate table. The format of data in the network events collection is:
{
    "_id" : ObjectId("5f2bf8918b7a80b68b617ae9"),
    "ip_dest": "49.12.156.199",
    "port_dest": "443",
    "ip_src": "192.168.178.15",
    "port_src": "59894",
    "protocol": "TCP",
    "machine_name": "stockholm_server_1",
    "date": "2020-08-06 14:33:20",
    "country_ip_src": "-",
    "country_ip_dest": "IN"
}There is a special type of event which stores credentials that are obtained from the modules like ssh/strong_password, ftp/strong_password, http/basic_auth_strong_password and smtp/strong_password. The format of data in the credential events collection is:
{
    "_id" : ObjectId("5d504507cb1355b3e3ed7e28"),
    "ip" : "172.18.0.1",
    "module_name" : "1",
    "date" : "22",
    "username" : "http/basic_auth_strong_password",
    "password" : "2019-07-24 09:37:40",
    "country" : "DE",
    "machine_name" : "stockholm_server_1"
}These are different type of events which is keeping track of the file path, modified by the hacker on the system as it is very easy to get into the system for weak password modules. Hence the file change events are integrated into modules like ssh/weak_password and ftp/weak_password. The format of data in file change events collection is:
{
    "_id" : ObjectId("5f18c1c3803c26c76f3c11bd"),
    "file_path" : "/root/OWASP-Honeypot/tmp/ohp_ssh_weak_container/.bash_history",
    "module_name" : "ssh/weak_password",
    "date" : "2020-07-23 00:46:27",
    "status" : "modified",
    "machine_name" : "stockholm_server_1",
    "is_directory" : False
}These are the events used to store data collected from modules like smtp and ics. The format of data in the data events collection is:
{
    "_id" : ObjectId("5f0904cda26d3357a820d564"),
    "ip_dest": "172.18.0.1",
    "module_name": "smtp/mail_honeypot",
    "date": "2020-07-11 00:16:13",
    "data": "helo client.mydomain.com",
    "country": "-",
    "machine_name": "stockholm_server_1"
}The file archive database is used to store the network captured files using the GridFS tool. GridFS is a specification for storing and retrieving large files (exceeding 16 MB). It uses two collections to store a single file:
fs.files: stores file metadatafs.chunks: stores binary chunks of the file
The format of the data stored here is:
{
  "_id": ObjectId("5f3453140c86f676b155b473"),
  "filename": "captured-traffic-1597264650.pcap",
  "date": "2020-08-12 22:37:30",
  "splitTimeout": 10,
  "md5": "c3c8dd5dc29f5ddcef552b6d3d8e2ce3",
  "chunkSize": 261120,
  "length": 16384,
  "uploadDate": "2020-08-12T20:37:40.757+00:00"
}The format of the data is:
{
  "_id" : ObjectId("5f33bab2e938f7803705a6c8"),
  "files_id" : ObjectId("5f33bab2e938f7803705a6c7"),
  "n" : 0,
  "data" : Binary('Cg0NCrQAAABNPCsaAQAAAP//////////AgA2AEludGVsKFIpIENvcmUoVE0pIGk3LTk3NTBIIENQVSBAIDIuNjBHSHogKHdpdGgg...', 0)
}OWASP Python Honeypot currently supports multiple types of protocols with different types and modules for various purposes like getting credentials, network events, files, honeypot events, and custom data coming from each module.
To add a new protocol you should create a new folder inside the /OWASP-Honeypot/modules directory of the project.
Each protocol has an __init__.py file which has the category configuration, below shown is the template for the same.
def category_configuration():
    """
    category configuration
    Returns:
        JSON/Dict category configuration
    """
    return {
        "virtual_machine_name": OHP_Module name,
        "virtual_machine_port_number": PORT NUMBER,
        "virtual_machine_internet_access": Bool,
        "real_machine_port_number": DOCKER HOST PORT NUMBER
    }
Then if the protocol has modules like weak and strong password then two separate folders should be created. Inside the module folder there should be:
- files folder if the modules require some extra scripts/config files which need to be moved to the module containers.
__init__.py
contains module processor and module configuration
class ModuleProcessor:
    """
    this is the processor to run after docker-machine is up to grab the
    log files or do other needed process...
    """

    def __init__(self):
        self.kill_flag = False

    def processor(self):
        """
        processor function will be called as a new thread and will
        be die when kill_flag is True
        """
        while not self.kill_flag:
            LOGGING INSTRUCTIONS go here
            time.sleep(0.1)


def module_configuration():
    """
    module configuration
    Returns:
        JSON/Dict module configuration
    """
    return {
        "virtual_machine_port_number": PORT NUMBER,
        "real_machine_port_number": PORT NUMBER FOR DOCKER HOST,
        "extra_docker_options": [""],
        "module_processor": ModuleProcessor()
}- readme.md: Describing the module
- Dockerfile: For setting up all the packages, libraries, scripts to run by the module.
For testing the module run the command
python3 ohp.py -m protocol/moduleOrTypeAlso one must make sure that the test for the module is passing.
python3 ohp.py -m protocol/moduleOrType --test