This plugin is a plugin base for others marketplace plugin.
Alone, it will only display a Dashboard link in the front end of the website.
But adding this plugin as a dependency for your plugin, and you will be able to easily insert links, ajax links, and raw html into the AdminBar.
The AdminBar handle infinite submenus and each list item and link is customizable.
First, be sure to add this plugin as a dependency of yours:
namespace Acme\Blog;

class Plugin extends \System\Classes\PluginBase
{
    /**
     * @var array Plugin dependencies
     */
    public $require = ['RomainMazB.AdminBar'];

    [...]
}Then, all you have to do, is to register into the romainmazb.adminbar.init event
which provides the $adminBar component and its $items:
// Somewhere in your plugin, here in the boot method
public function boot()
{
    // Add a basic shortcut, not really usefull
    Event::listen('romainmazb.adminbar.init', function ($adminBar, $items) {
        $links = [
            [
                'text' => 'Create a blog post',
                'url' => 'https://www.example.com'
            ],
            [
                'text' => 'Create a blog category',
                'url' => 'https://www.example.com'
            ]
        ];

        $adminBar->addItems($links);
    });
}
$items is passed by reference, so you can directly modify it if needed to add, remove or reorganize items:
Event::listen('romainmazb.adminbar.init', function ($adminBar, &$items) {
    $items[] = [
        'text' => 'Create a blog post',
        'url' => 'https://www.example.com'
    ];
});[adminBar]
==
{% component 'adminBar' %}For now, the plugin support this types of items: basic links, ajax links, raw html and submenu
    $link = [
        'type' => 'link', // Optional for basic links
        'text' => 'Dashboard',
        'url' => config('app.url') . '/' . config('cms.backendUri'),
        'title' => 'Go to the dashboard'
    ];
will render something like:
<a href="http://example.test/backend" title="Go to the dashboard">Dashboard</a> $admin_url = config('app.url') . '/' . config('cms.backendUri');
$link = [
'type' => 'ajaxLink',
'text' => 'Delete this post',
'form_action' => 'onDelete', // Needed for OctoberCMS form_ajax() render method
'datas' => [
'request' => "onDelete",
'request-url' => $admin_url . '/rainlab/blog/posts/update/4',
'request-confirm' => trans('backend::lang.form.confirm_delete'),
// All the data attributes is supported here
]
];will render something like:
<form method="POST"
    action="http://example.test/blog/post/4"
    data-request="onDelete"
>
    <input name="_session_key" type="hidden" value="6PNdjeFQdv3lgbm2TbvSntAikGbm4jh78sVbgGw3">
    <input name="_token" type="hidden" value="VyXnapUTb8XS5T7zwWAbIdUikL9LSv97UhhGL7dW">
    <a role="menuitem" tabindex="-1" href="#"
        data-request="onDelete"
        data-request-url="http://example.test/backend/rainlab/blog/posts/update/4"
        data-request-confirm="Delete record?"
    >
        Delete
    </a>
</form> $link = [
'type' => 'raw',
'content' => '<span style="color: red">A red text</span>'
];will render something like:
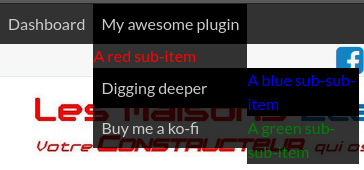
<span style="color: red">A red text</span>The plugin support infinite submenus, you can add a main menu for your plugin where you insert all your needed links:
    $links = [
         'type' => 'submenu',
         'text' => 'My awesome plugin',
         'title' => 'This menu contains much more than a simple link',
         'items' => [
            [
                'type' => 'raw',
                'content' => '<span style="color: red">A red sub-item</span>'
            ],
            [
                'type' => 'submenu',
                'text' => 'Digging deeper',
                'title' => 'This is where the fun begins',
                'items' => [
                    [
                        'type' => 'raw',
                        'content' => '<span style="color: blue">A blue sub-sub-item</span>'
                    ],
                    [
                        'type' => 'raw',
                        'content' => '<span style="color: green">A green sub-sub-item</span>'
                    ]
                ]
            ],
            [
                'type' => 'link',
                'text' => 'Buy me a ko-fi',
                'url' => 'https://ko-fi.com/romainmazb',
                'title' => 'You can buy me a ko-fi'
            ],
        ]
     ];
will render something like:
<a href="#" aria-haspopup="true">My awesome plugin</a>
<ul class="dropdown" aria-label="submenu">
    <li class="nested">
        <span style="color: red">A red sub-item</span>
    </li>
    <li class="nested">
        <a href="#" aria-haspopup="true">Digging deeper</a>
        <ul class="dropdown" aria-label="submenu">
            <li class="nested">
                <span style="color: blue">A blue sub-sub-item</span>
            </li>
            <li class="nested">
                <span style="color: green">A green sub-sub-item</span>
            </li>
        </ul>
    </li>
    <li class="nested">
        <a href="https://ko-fi.com/romainmazb" title="You can buy me a ko-fi">Buy me a ko-fi</a>
    </li>
</ul>
This will perfectly generate a double-level menu/sub-menu:
For each list item, whatever the type of item which is contained into, you can style is or declare some css class.
To do so, respectively use liStyle and liCssClass parameters:
    $link = [
        'type' => 'link', // Optional for basic links
        'text' => 'Dashboard',
        'url' => config('app.url') . '/' . config('cms.backendUri'),
        'title' => 'Go to the dashboard',
        'liCssClass' => 'primary is-large',
        'liStyle' => 'width: 300px; background-color: red;'
    ];
You can also customize the link itself with style and cssClass parameters:
    $link = [
        'type' => 'link', // Optional for basic links
        'text' => 'Dashboard',
        'url' => config('app.url') . '/' . config('cms.backendUri'),
        'title' => 'Go to the dashboard',
        'cssClass' => 'text-red bold',
        'liStyle' => 'letter-spacing: .2rem; font-style: underline;'
];The component gives you the ability with his property to display or hide:
- A dashboard link before all other links
- The back-end auth shortcuts: Account, Backend preferences and Sign out
To modify this behavior (displayed by default), just modify the component property with the CMS Layout manager or directly in your layout:
[adminBar]
display_dashboard_link = false
display_auth_links = falseI've first developed this plugin when I needed a front end top bar to create dynamic backend shortcut for a custom plugin's models, but I went to the idea where this part of my plugin (the admin bar) could be useful to everyone who want to add front end links, so I've separated it, and make it the more easy-to-use and generic I've could.
This plugin could perfectly fit for every OctoberCMS plugin which needs it. Don't lose your time to create a custom top bar just for your plugin: if all of us do that, the OctoberCMS based websites will look in near future like a 2000's browser with a dozen of toolbars:
If you need some personalized help, or have an idea to reach a level higher for this plugin, feel free to contact me , make a pull request or just submit your idea in an issue, and I will review it.
And if you want to show me your gratitude to saved your precious time, you can buy me a ko-fi

