- 地图准备:
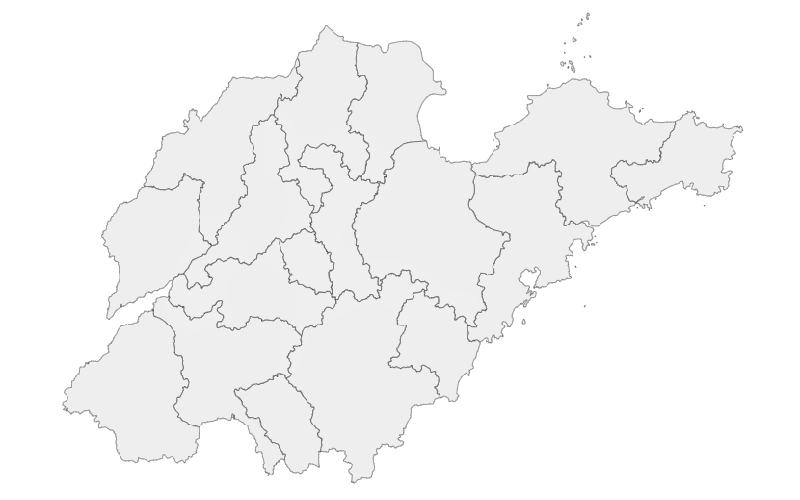
用 echarts.js 绘制山东省地图,并修改图片大小为 800×500 并保存,作为词云背景
- 初步确定 Geo Map 范围 实验初始阶段的想法是用山东的17个地级市(这样做结果更加直观)作为输入的标签数据,来测试词云对地理信息的反映程度,所以先用 Matlab App 中的 Image Viewer 大致测取各地级市的范围(单位为像素点),结果如下
City	min_x	max_x	min_y	max_y
威海		617		742		111		209
烟台		471		675		81		226
青岛		468		594		162		342
潍坊		354		509		141		324
日照		391		480		290		401
东营		360		448		42		183
淄博		311		380		147		301
临沂		285		439		275		479
滨州		276		364		26		210
莱芜		281		330		235		290
济南		186		310		115		284
泰安		170		335		240		321
济宁		153		302		299		474
枣庄		235		315		375		473
德州		144		301		79		246
聊城		108		209		177		319
菏泽 66 187 313 460- 最后根据各地市的面积比例以及限定的坐标范围来生成随机数据
- 确定实验流程
这一部分只简要介绍实验流程,实现的具体细节见代码实现部分
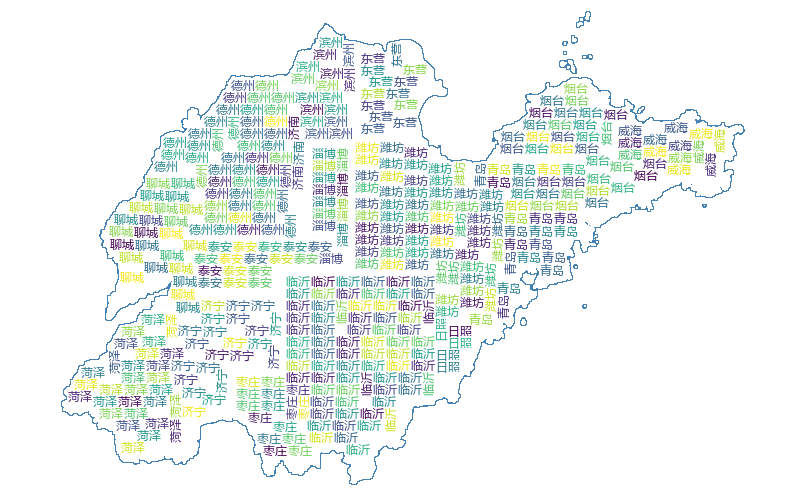
初始随机数据集在地图上的分布情况如下
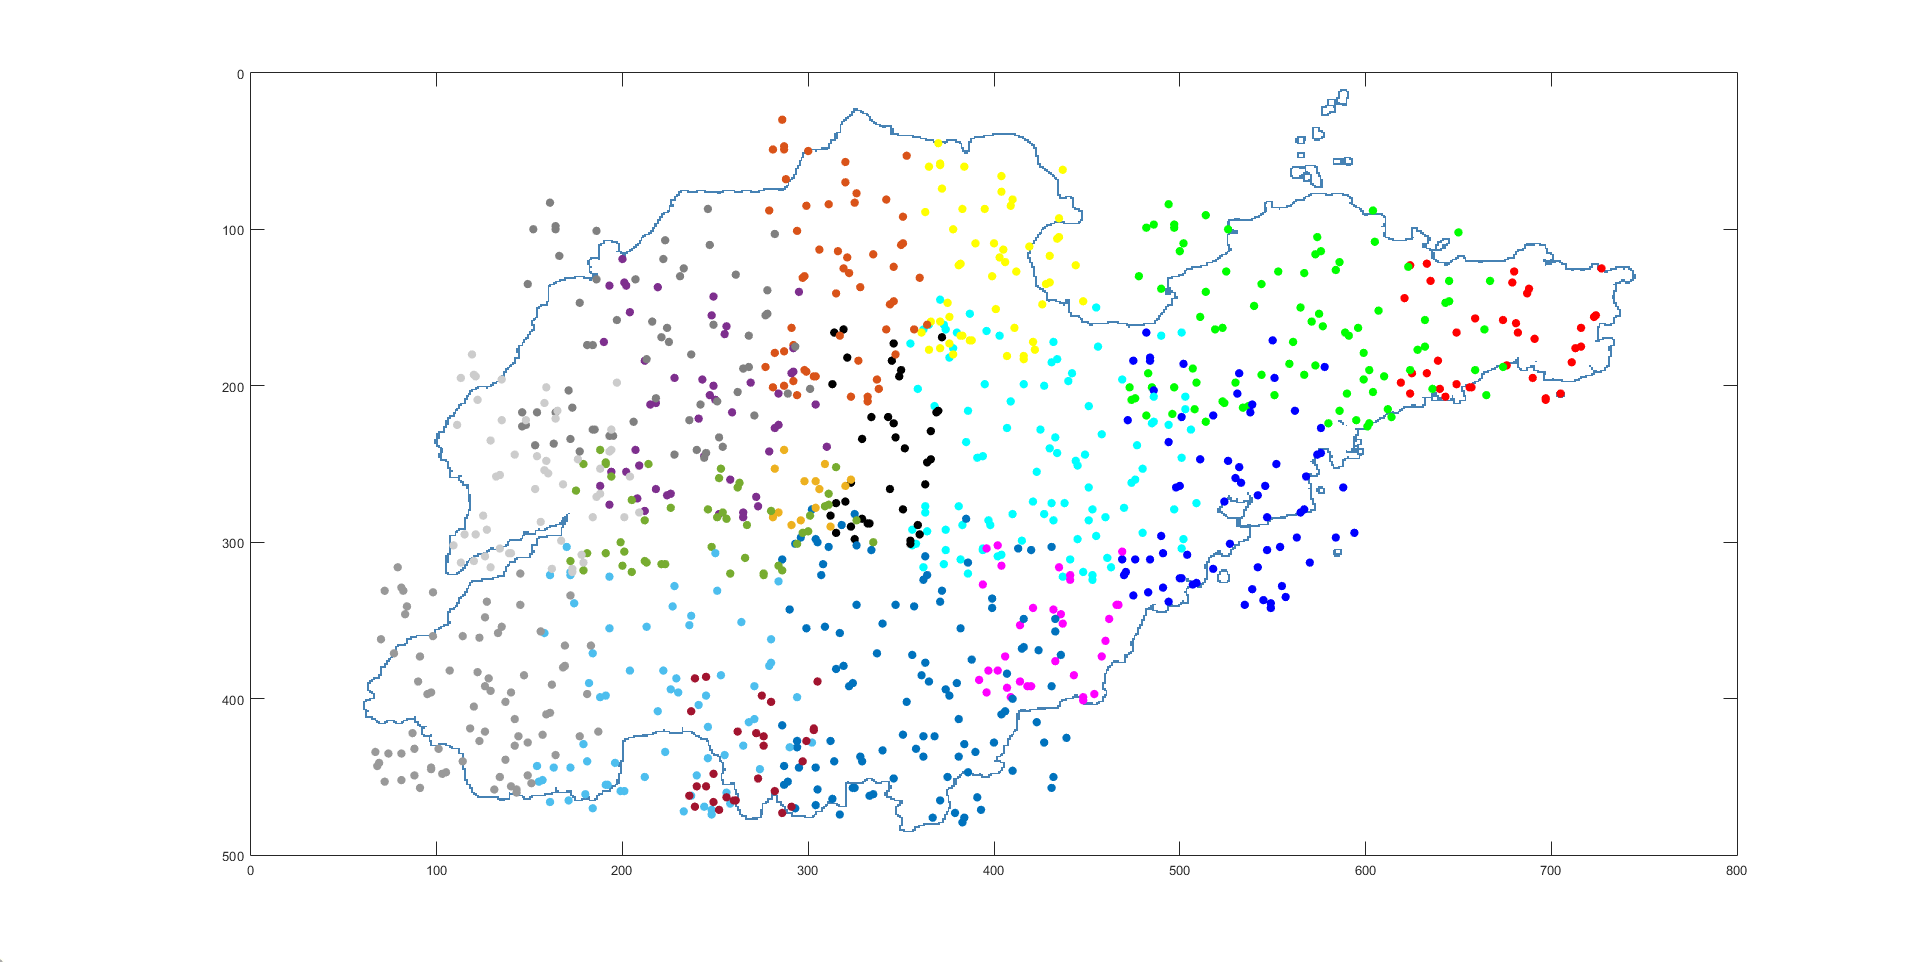
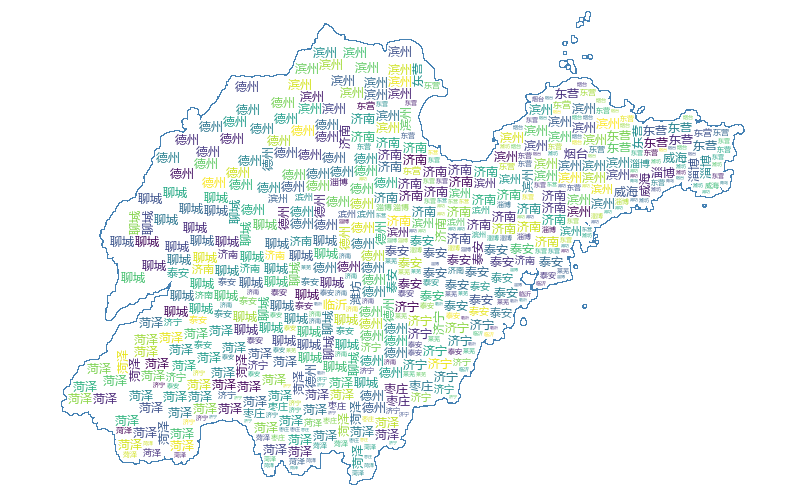
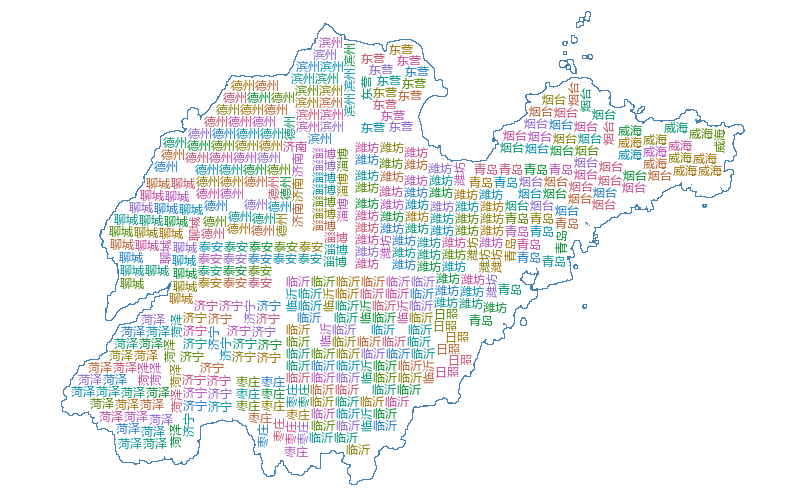
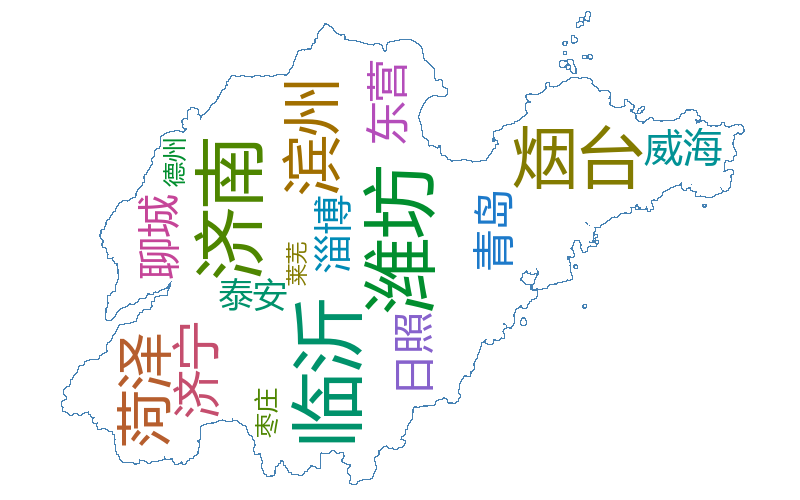
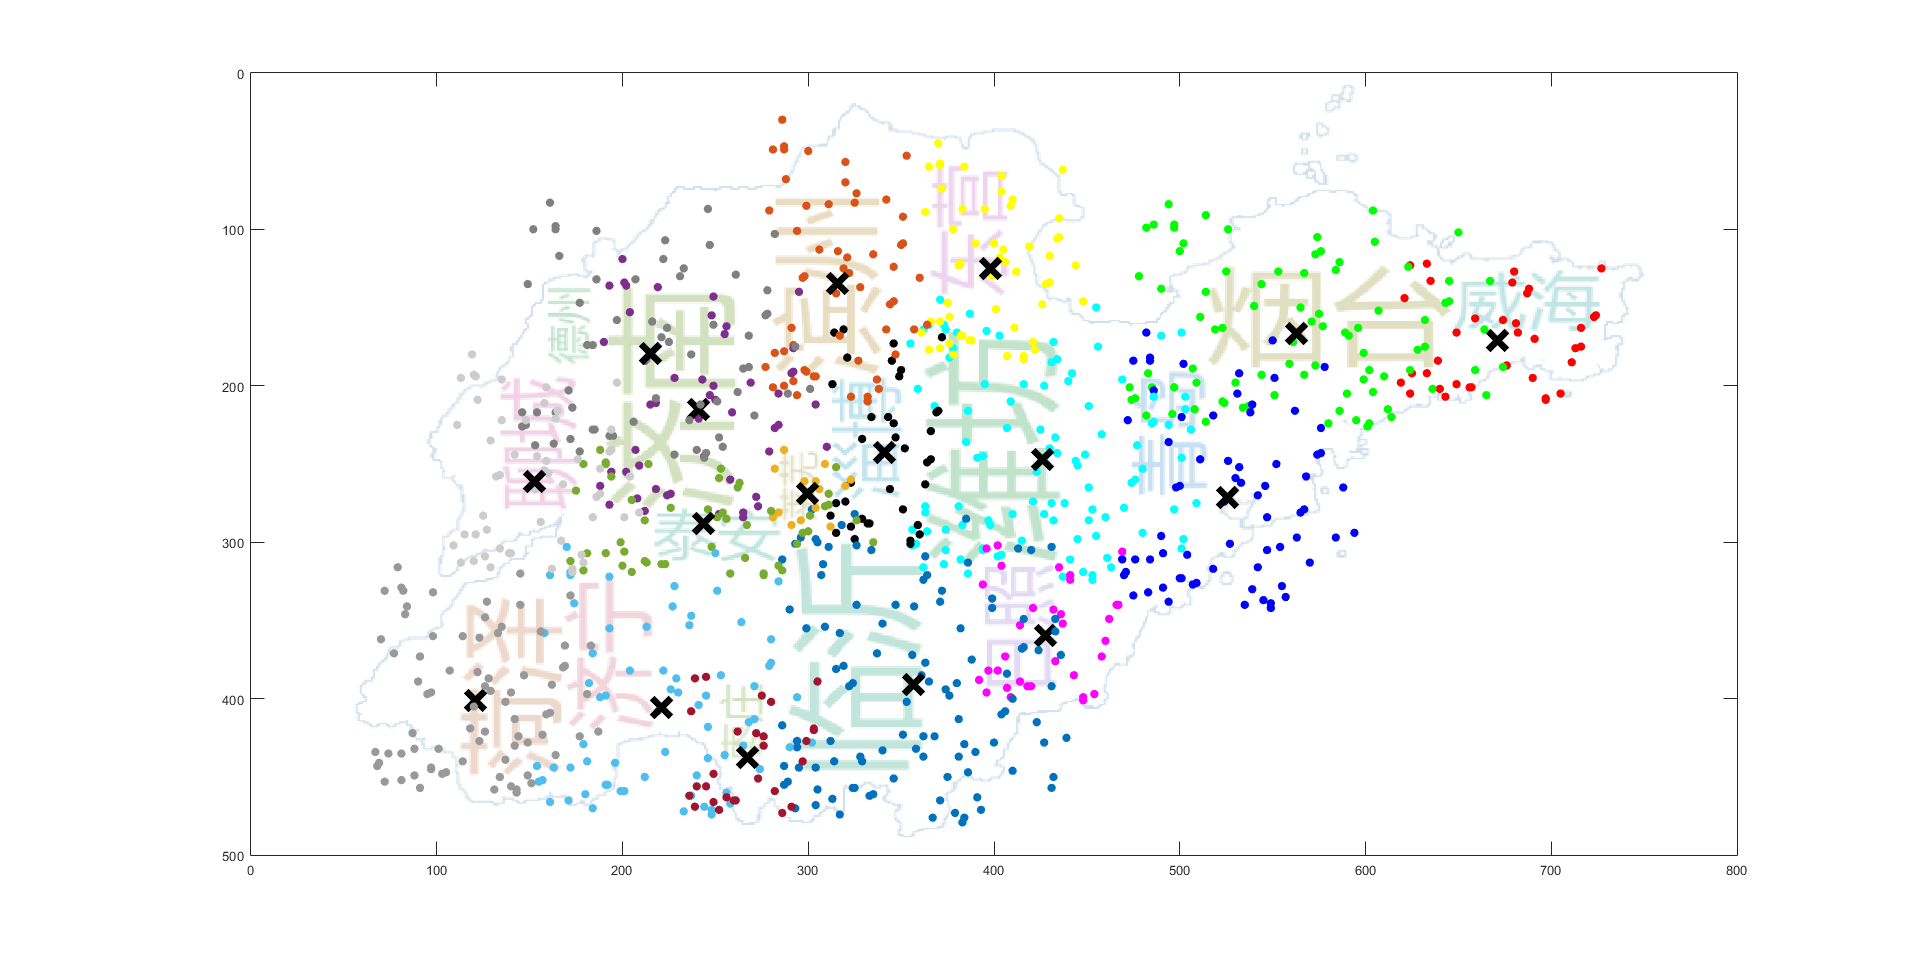
之后对初始数据集进行 K-means 聚类,继续绘制词云图,结果如下:
其中各单词的位置与实际地理位置相吻合,同时,单词的大小也在一定程度上反映了该地市的面积
(由于这里只着重测试地理位置,聚类较少,所以地图形状空缺较大,用户可以自定义填充单词进行形状填充)
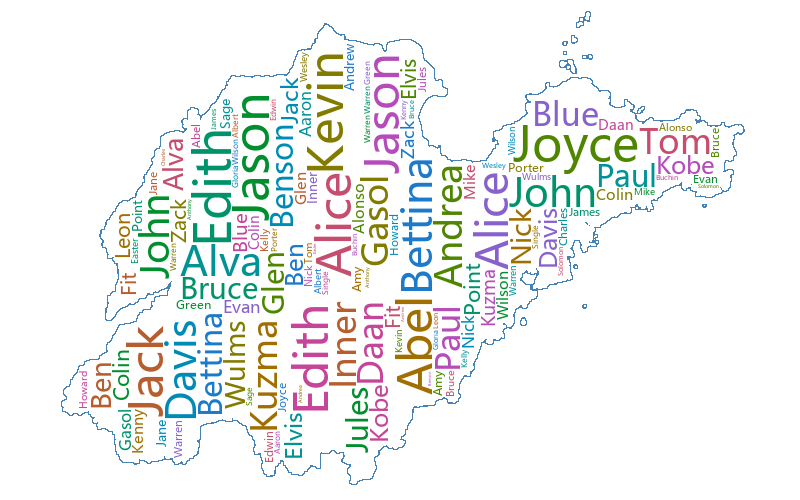
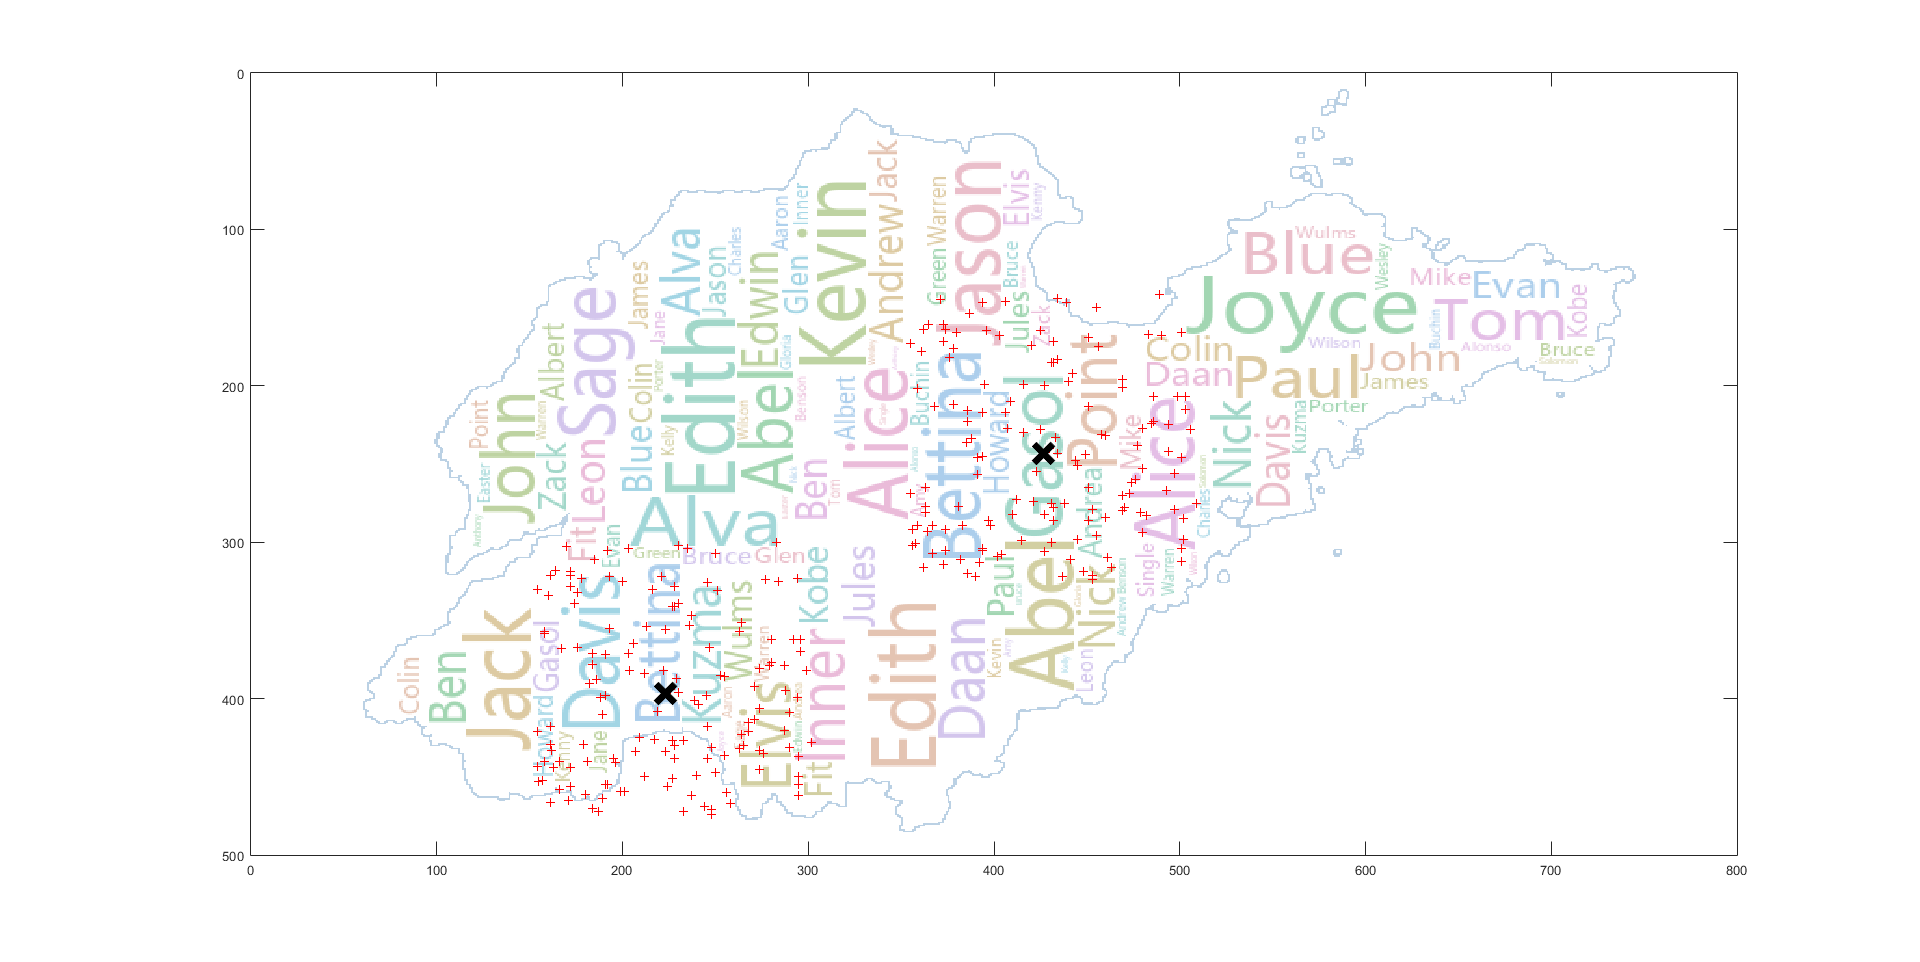
Edith
左边的聚类覆盖基本吻合,右边的聚类由于单词 Nick 在聚类中心,同时如果在聚类中心放置的话,由于 Alice 的字体较大,无法放置,所以偏移到了左边
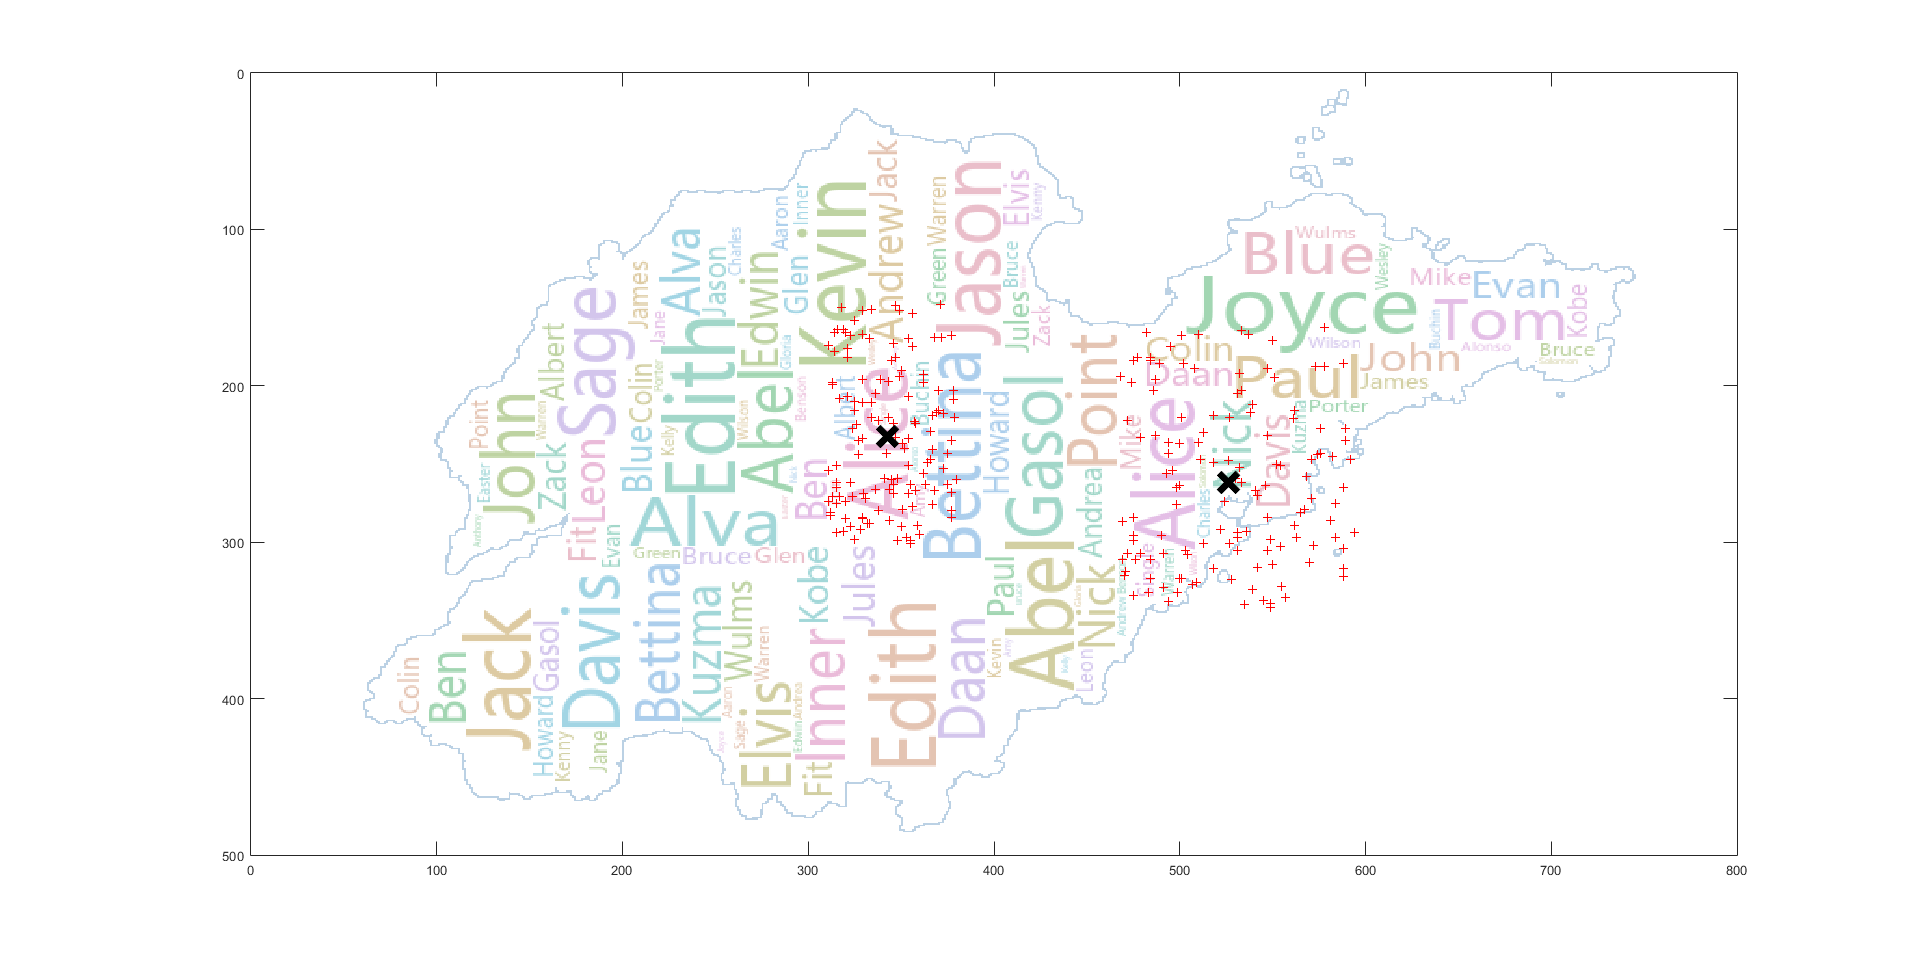
左边的聚类基本吻合,右边的聚类由于与 Gasol 冲突,进行了左移调整
为了方便实验,这里的坐标单位均为像素,实际应用的话,只需将经纬度坐标按一定比例转换即可。 输入山东省各地市的地理位置信息以及自己所指定的标签名称,来生成包含地理位置坐标的标签数据集
使用 C++ 中的 random_device 随机数引擎生成服从正态分布的随机数据: RandomData.cpp
#include <bits/stdc++.h>
using namespace std;

//Geo Info
struct Region{
	int min_x,max_x,min_y,max_y,area;
	void Output(){
		cout<<min_x<<" "<<max_x<<" "<<min_y<<" "<<max_y<<" "<<area<<endl;
	}
}Geo[20];

//Tags Info
struct Tags{
	string name;
	int num,sz;
	int idx[10];
	void Output(){
		cout<<num<<" "<<name<<" ";
		for(int i=1;i<=sz;i++){
			cout<<idx[i]<<" ";
		}
		cout<<endl;
	}
}tags[100];

int main()
{
	string city,TagName;
	int min_x,max_x,min_y,max_y,area;
	ifstream in;
	in.open("SDCities.txt");
	//Input Geo Info
	for(int i=1;i<=17;i++){
		in>>city;
		in>>Geo[i].min_x>>Geo[i].max_x>>Geo[i].min_y>>Geo[i].max_y>>Geo[i].area;
	}
	in.close();
	/*
	for(int i=1;i<=17;i++){
		Geo[i].Output();
	}
	*/
	freopen("TagsInfoVer2.txt","r",stdin);
	freopen("CityTags3.txt","w",stdout);
	// Total Points
	int Count=0;
	//Input Tags Region
	vector<int> a;
	string str;
	stringstream ss;
	bool flag=false;
	for(int i=1;i<=60;i++){
		str="";
		getline(cin,str);
		ss.clear();
		ss<<str;
		ss>>tags[i].num;
		ss>>tags[i].name;
		while(ss){
			int t;
			ss>>t;
			a.push_back(t);
		}
		a.pop_back();
		tags[i].sz=a.size();
		for(int j=0;j<a.size();j++){
			tags[i].idx[j+1]=a[j];
		}
		a.clear();
		Count+=tags[i].num*tags[i].sz;
		//tags[i].Output();
	}
	//Generate Data
	for(int i=1;i<=60;i++){
		for(int j=1;j<=tags[i].sz;j++){
			// Frequency
			int num=((double)tags[i].num/(double)Count)*10000;
			//cout<<num<<endl;
			random_device rd;
			mt19937_64 eng(rd());
			// Coordinate
			uniform_int_distribution<unsigned long long> distrx(Geo[tags[i].idx[j]].min_x, Geo[tags[i].idx[j]].max_x);
			uniform_int_distribution<unsigned long long> distry(Geo[tags[i].idx[j]].min_y, Geo[tags[i].idx[j]].max_y);
			// Tags x y frequency
			for(int k=0;k<num;k++){
				cout<<tags[i].name<<" "<<distrx(eng)<<" "<<distry(eng)<<" "<<tags[i].idx[j]<<endl;
			}
		}
	}
	return 0;
}- K-means 聚类
原文中只简单的提及了使用 K-means 算法对标签进行聚类,但没有具体说明实现的细节,而 K 值的选取对最后的聚类结果有着较大的影响。由于我们要在程序中对每一个标签都要执行 K-means 算法,所以,利用肘部法则,根据变化趋势选取 K 值是不可行的,或者通过不同 K 值轮廓系数的对比来选取合适的 K 值,但这样的话要对同一标签进行多次聚类后,再根据结果进行比较,时间开销偏大,这里选择的是根据地理位置进行聚类。即根据标签点所落在的区域来确定 K 值,比如某一标签落在了(威海,济南)那么我们选取 K 值为 2 即可,但节省时间的同时,这样也存在一些问题,比如某一标签落在了(济南,泰安),由于这两个区域距离很近,其实聚为一类结果可能是最佳的,现在解决这个问题的想法是:如果是做成交互式的自动可视化的应用的话,可以在绘制词云前,首先展示我们的聚类结果,然后用户可以根据聚类结果对某一标签进行调整。
K_means_Region_Cluster.m
clc,clear
[A,B] = xlsread('CityTags.xlsx');
[Geo,GeoName] = xlsread('Region.xlsx');
Geo = Geo(:,1:4);
num = length(A);
pre = B(1);
x = [];
y = [];
idx = [];
C = [];
D = [];
Region = [];
Tags = [];
Range = [];
% 单词方向 :水平 = 1,竖直 = 0
Dir = [];
% 第 cnt 个聚类
cnt = 1;
% 为输入信息 打上聚类标签
cluster_points = [];
for i = 1:num
    cur = B(i);
    if ~isequal(pre,cur)
        X = [x' y'];
        Region = unique(Region);
        Rsz = size(Region);
        Region = [];
        K = Rsz(2);
        [idx,D] = kmeans(X,K);
        for cluster = 1:K
            CurCluster = [X(idx==cluster,1) X(idx==cluster,2)];
            CurCluster_Size = size(CurCluster);
            tmp = zeros(CurCluster_Size(1),1);
            tmp = tmp + cnt;
            cluster_points = [cluster_points;X(idx==cluster,1) X(idx==cluster,2) tmp];
            direction = abs(PCA_Rotation(CurCluster'));
            if direction > 45
                Dir = [Dir;0];
            else
                Dir = [Dir;1];
            end
            sz = sum(idx==cluster);
            tmpX = sort(X(idx==cluster,:));
            min_x = tmpX(ceil(0.05*sz),1);
            max_x = tmpX(ceil(0.95*sz),1);
            min_y = tmpX(ceil(0.05*sz),2);
            max_y = tmpX(ceil(0.95*sz),2);
            Range = [Range;min_x,max_x,min_y,max_y];
            C = [C;D(cluster,1) D(cluster,2) sz cnt];
            cnt = cnt + 1;
            x = [];
            y = [];
            Tags = [Tags;string(pre)];
        end
    end
    x = [x A(i,1)];
    y = [y A(i,2)];
    Region = [Region A(i,3)];
    pre=cur;
end
X = [x' y'];
Region = unique(Region);
Rsz = size(Region);
K = Rsz(2);
[idx,D] = kmeans(X,K);
for cluster = 1:K
    CurCluster = [X(idx==cluster,1) X(idx==cluster,2)];
    CurCluster_Size = size(CurCluster);
    tmp = zeros(CurCluster_Size(1),1);
    tmp = tmp + cnt;
    cluster_points = [cluster_points;X(idx==cluster,1) X(idx==cluster,2) tmp];
    direction = abs(PCA_Rotation(CurCluster'));
    if direction > 45
        Dir = [Dir;0];
    else
        Dir = [Dir;1];
    end
    sz = sum(idx==cluster);
    Range = [Range;min(X(idx==cluster,1)),max(X(idx==cluster,1)),min(X(idx==cluster,2)),max(X(idx==cluster,2))];
    C = [C;D(cluster,1) D(cluster,2) sz cnt];
    cnt = cnt + 1;
    x = [];
    y = [];
    Tags = [Tags;string(cur)];
end
Map = [];
GeoSize = size(Geo);
InfoSize = size(C);
for i = 1:InfoSize(1)
    for j = 1:GeoSize(1)
        cx = C(i,1);
        cy = C(i,2);
        if cx >= Geo(j,1) && cx <= Geo(j,2) && cy >= Geo(j,3) && cy <= Geo(j,4)
            Map = [Map;string(GeoName(j))];
            break;
        end
    end
end
xlswrite('CityTagsCluster1.xlsx', [Tags,C,Dir Map,Range], 'A1')
xlswrite('CityTagsWithIndex1.xlsx',cluster_points,'A1')- PCA 确定聚类主方向
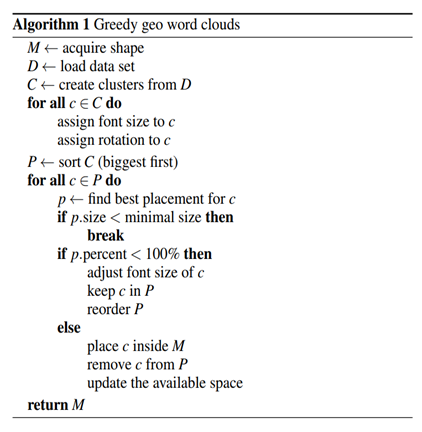
论文中 Placement Algorithm 的第三步需要确定单词的初始方向,方法如下所示
这里采用PCA算法来确定聚类的主方向: 参考 对协方差矩阵进行特征分解,按照特征值从大到小的顺序,有特征矩阵 V,其每一行对应一个特征向量,解方程 V * T = (1 0)' 向量 T 经过 V 的投影之后,在主方向上为 1,在垂直主方向上为 0。故 T 即指示了主方向。
PCA_Rotation.m
function [Dir,res] = PCA(Data)
% 以[-pi/2,pi/2]之间的角度pi表示方向
% 1.去除均值
[buf K] = size(Data);
miu = mean(Data')';
for k=1:K
    Data(:,k) = Data(:,k)-miu;
end;
sigma = zeros(2,2);
% 2.计算协方差
for k=1:K
    x = Data(:,k);
    sigma = sigma+x*x';
end;
sigma = sigma/K;
% 3.特征分解
[V,D] = eig(sigma);
if (D(1,1)<D(2,2)) % 把较大的特征值对应的向量挪到第一行
     buf = V(1,:);
     V(1,:) = V(2,:);
     V(2,:) = buf;
end;
% 4.求解主方向向量
res = inv(V)*[1;0];
Dir = atan(res(2)/res(1))/pi*180;- Step 1 : Load Data
# Load Geo Map
dataf = pd.read_excel('GeoRegion.xlsx')
wordmap = dataf.values
sz = wordmap.shape
geomap = dict()
for i in range(0,sz[0]):
    geomap[wordmap[i][0]] =[wordmap[i][1],wordmap[i][2],wordmap[i][3],wordmap[i][4]]

# Load Data Set
# Load Cluster Info
df = pd.read_excel('CityTagsClusterVer4.xlsx')
words = df.values
# Load Tags labeled by cluster index
df2 = pd.read_excel('CityTagsWithIndex2.xlsx')
points = df2.values
cluster_size = words.shape[0] + 10
cluster_points = [[] for i in range(cluster_size)]

for i in range(0, points.shape[0]):
cluster_points[points[i][2]].append((points[i][0],points[i][1]))- Step 2 : Cluster 由 K_means_Region_Cluster.m 实现
WordCluster 类声明
class WordCluster(object):
    def __init__(self,word,x,y,num,direction,region,min_x,max_x,min_y,max_y,idx):
        self.word = word
        self.x = x
        self.y = y
        self.num = num
        self.direction = direction
        self.region = region
        self.min_x = min_x
        self.max_x = max_x
        self.min_y = min_y
        self.max_y = max_y
        self.idx = idx

    def __lt__(self, other):
        return self

    def __lt__(self, other):
        return self.num > other.num

    def __str__(self):
return '(' + self.word + ', ' + str(self.x) + ', ' + str(self.y) + ', ' + str(self.num) + ', '+str(self.direction)+')'# compute the area of M in pixel : Am
img = cv2.imread("SD.png")
gray = cv2.cvtColor(img, cv2.COLOR_BGRA2GRAY)
h, w = gray.shape[:2]
m = np.reshape(gray, [1, w * h])
mean = m.sum() / (w * h)
ret, binary = cv2.threshold(gray, mean, 255, cv2.THRESH_BINARY)
Am = len(binary[binary == 0]) 求解
font_size = int((cmath.sqrt((freq * Am)/n).real))(2) Choose the Rotation 由 PCA_Rotation.m 实现
- Step 4 : Greedy Placement
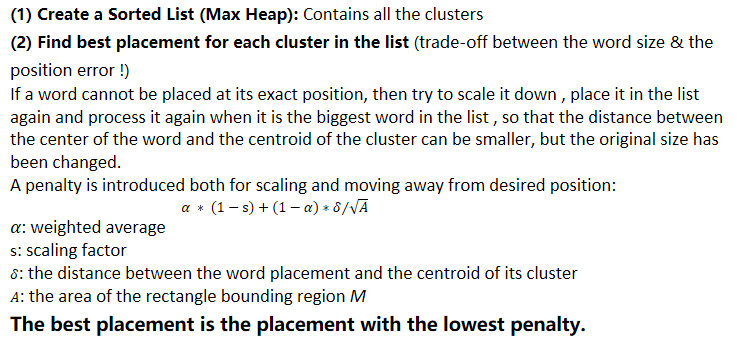
论文中提到,如果某个单词不能被放在它准确的位置,那么就缩小它,重新加入队列,关于放置的方法没有提及(只是说了尽可能覆盖聚类中更多的点) 下面就依照我自己对问题的理解来实现放置算法: 关于放置的具体位置我尝试了质心周围矩形范围内放置、按区域放置、按聚类结果放置,
- 第一种方法,由于重点一直关注在质心,所以为了实现放置可能会出现很多冲突的单词由于被缩放多次直至小于 minimal size 被抛弃,导致很多单词没有被绘制,实验结果也证实了这种猜测,由于存在多次迭代,运行时间较长,且被绘制在词云上的单词数减少了
- 第二种方法,规定范围放置,比如要放置的单词位于青岛,那么就在青岛这个范围内,随便找取一个空闲位置放置,通过实验,这种方法虽然运行速度很快,但由于限定的范围太过宽泛,地理偏差较大
- 第三种方法,在观察上述两种方法的词云与聚类中心点叠加图层后的结果后受到启发,取了二者的折中,将限定范围缩小,缩小为聚类所占据的范围,为了避免一些聚类边缘点的干扰,首先对聚类的坐标点进行排序,然后取 5%到95% 的数据作为聚类的范围,然后在寻找位置时,在所有可行的坐标中取距离聚类中心点距离最短的一组作为放置位置,放置算法实现代码如下:
def sample_position_v2(self, size_x, size_y, b_x, b_y, e_x, e_y, center_x, center_y):
    dis_to_center = 99999999
    ans_x = 0
    ans_y = 0
    for y in range(max(1, b_y), min(e_y - size_y, self.height - size_y)):
        for x in range(max(1,b_x), min(e_x - size_x,self.width - size_x)):
            area = self.integral[y - 1, x - 1] + self.integral[y + size_y - 1, x + size_x - 1]
            area -= self.integral[y - 1, x + size_x - 1] + self.integral[y + size_y - 1, x - 1]
            if not area:
                tmpdis = Euclidean_distance(x + size_x/2 , center_x, y + size_y/2, center_y).real
                if tmpdis < dis_to_center:
                    dis_to_center = tmpdis
                    ans_x = x
                    ans_y = y
    if dis_to_center == 99999999:
        return None
    else:
        return ans_y, ans_x
寻找最佳缩放比例的算法代码实现如下:
weight_aver = 0.5
penalty = 9999999999.9
scaling_factor = 1.0
# find the best placement
b_x = center_x - (box_size[0] + self.margin) // 2
b_y = center_y - (box_size[1] + self.margin) // 2
for s_f in np.arange(0.05,1.00,0.05):
    tmp_penalty = weight_aver * (1 - s_f)
    new_x = (int)(center_x - box_size[0] * s_f / 2)
    new_y = (int)(center_y - box_size[1] * s_f / 2)
    distance_error = cmath.sqrt((b_x - new_x ) * (b_x - new_x ) + (b_y - new_y) * (b_y - new_y))
    tmp_penalty = tmp_penalty + (1 - weight_aver) * distance_error / cmath.sqrt(A)
    if tmp_penalty <= penalty:
        scaling_factor = s_f
        penalty = tmp_penalty
freq = (int)(freq * scaling_factor)
que.put(WordCluster(word, center_x, center_y , freq, curword.direction, CurRegion, min_x, max_x, min_y, max_y, curword.idx))def Color_Distribution(self, i):
Hue_Spectrum = ['rgb(29, 122, 202)', 'rgb(0, 139, 182)', 'rgb(1, 146, 149)', 'rgb(0, 146, 107)',
'rgb(1, 142, 46)', 'rgb(78, 134, 0)', 'rgb(131, 123, 0)', 'rgb(161, 111, 0)',
'rgb(182, 94, 46)', 'rgb(197, 78, 110)', 'rgb(197, 69, 152)', 'rgb(180, 77, 186)',
'rgb(135, 98, 204)']
l = len(Hue_Spectrum)
c = 3
return Hue_Spectrum[(i + c) % l]放置算法的完整代码如下:
def GeoGenerate(self, words, A , Am ,geomap, cluster_points, PointsNum, max_font_size=None):
     '''
     :param words: Preprocessed data sets
     :param A: the area of the rectangle bounding region M
     :param Am: the area of M in pixel
     :param geomap : the region coordinate
     :param cluster_points : the points that labeled with the cluster index
     :param max_font_size: Max Font Size
     :return: Geo Word Cloud

     '''
     # Coverage error
     Measure1 = 0.0
     # Words not represent
     Measure2 = 0.0
     # difference between M and M'
     Measure3 = 0.0
     MM = np.zeros((800,500))
     # the total frequency
     n = 0
     que = Q.PriorityQueue()
     min_freq = 999999999
     for i in range(0, words.shape[0], 1):
         que.put(WordCluster(words[i][0], words[i][1], words[i][2], words[i][3], words[i][4], words[i][5],words[i][6],words[i][7],words[i][8],words[i][9], i+1))
         n = n + words[i][3]
         if min_freq > words[i][3]:
             min_freq = words[i][3]

     # the number of the cluster
     CountWord  = que.qsize()

     '''
     #users can diy the fill word to complete the shape of the map

     if que.qsize() < self.max_words:
         for i in range(0, self.max_words - que.qsize(), 1):
             # users can diy fill words
             que.put(WordCluster('fill', self.width//2, self.height//2, (int)(min_freq * 0.5) , 1))
     '''

     frequencies = list()

     if self.random_state is not None:
         random_state = self.random_state
     else:
         random_state = Random()

     # set the mask
     if self.mask is not None:
         boolean_mask = self._get_bolean_mask(self.mask)
         width = self.mask.shape[1]
         height = self.mask.shape[0]
     else:
         boolean_mask = None
         height, width = self.height, self.width

     occupancy = IntegralOccupancyMap(height, width, boolean_mask)

     # create image
     img_grey = Image.new("L", (width, height))
     draw = ImageDraw.Draw(img_grey)
     img_array = np.asarray(img_grey)
     font_sizes, positions, orientations, colors = [], [], [], []

     last_freq = 1.

     if max_font_size is None:
         # if not provided use default font_size
         max_font_size = self.max_font_size

     curidx = 0

     # start drawing grey image
     while not que.empty():
         curword = que.get()
         freq = curword.num
         word = curword.word
         CurRegion = curword.region
         # the cluster center
         center_x = (int)(curword.x)
         center_y = (int)(curword.y)
         # the cluster range
         min_x = (int)(curword.min_x)
         max_x = (int)(curword.max_x)
         min_y = (int)(curword.min_y)
         max_y = (int)(curword.max_y)

         # select the font size
         rs = self.relative_scaling

         if rs != 0:
             font_size = int((cmath.sqrt((freq * Am)/n).real))

         # select the rotation
         if curword.direction == 1:
             orientation = None
         else:
             orientation = Image.ROTATE_90

         tried_other_orientation = False
         #Origin_orientation = orientation

         while True:
             # try to find a position
             font = ImageFont.truetype(self.font_path, font_size)
             # transpose font optionally
             transposed_font = ImageFont.TransposedFont(
                 font, orientation=orientation)
             # get size of resulting text
             box_size = draw.textsize(word, font=transposed_font)
             # find possible places using integral image:
             '''
             if freq < min_freq:
                 result = occupancy.sample_position_v2(box_size[0] + self.margin, box_size[1] + self.margin,
                                                       1, 1,self.width ,self.height )
             else:
             '''
             '''
             b_x = geomap[CurRegion][0]
             b_y = geomap[CurRegion][2]
             e_x = geomap[CurRegion][1]
             e_y = geomap[CurRegion][3]
             '''

             result = occupancy.sample_position_v2(box_size[0] + self.margin, box_size[1] + self.margin,
                                                  min_x, min_y, max_x, max_y,center_x,center_y)

             if result is not None or font_size < self.min_font_size:
                 # either we found a place or font-size went too small
                 break
             # if we didn't find a place, make font smaller
             # but first try to rotate
             if not tried_other_orientation :
                 orientation = (Image.ROTATE_90 if orientation is None else Image.ROTATE_270)
                 tried_other_orientation = True
                 continue
             # scale the word down
             else:
                 weight_aver = 0.5
                 penalty = 9999999999.9
                 scaling_factor = 1.0
                 # find the best placement
                 b_x = center_x - (box_size[0] + self.margin) // 2
                 b_y = center_y - (box_size[1] + self.margin) // 2
                 for s_f in np.arange(0.05,1.00,0.05):
                     tmp_penalty = weight_aver * (1 - s_f)
                     new_x = (int)(center_x - box_size[0] * s_f / 2)
                     new_y = (int)(center_y - box_size[1] * s_f / 2)
                     distance_error = cmath.sqrt((b_x - new_x ) * (b_x - new_x ) + (b_y - new_y) * (b_y - new_y))
                     tmp_penalty = tmp_penalty + (1 - weight_aver) * distance_error / cmath.sqrt(A)
                     if tmp_penalty <= penalty:
                         scaling_factor = s_f
                         penalty = tmp_penalty
                 freq = (int)(freq * scaling_factor)
                 que.put(WordCluster(word, center_x, center_y , freq, curword.direction, CurRegion, min_x, max_x, min_y, max_y, curword.idx))
                 break

         # can place
         if result is not None:
             x, y = np.array(result) + self.margin // 2
             # actually draw the text
             draw.text((y, x), word, fill="white", font=transposed_font)
             tmpmeasure = Hausdorff_Distance(y,x,box_size[0] + self.margin,box_size[1] + self.margin,curword.idx,cluster_points)
             tmp1, tmp2 = np.array(tmpmeasure)
             Measure1 = Measure1 + tmp1
             Measure2 = Measure2 + tmp2
             Fill_Map(MM, y, x,box_size[0] + self.margin, box_size[1] + self.margin)
             # append attributes
             frequencies.append((word, freq))
             positions.append((x, y))
             orientations.append(orientation)
             font_sizes.append(font_size)
             '''
             colors.append(self.color_func(word, font_size=font_size,
                                           position=(x, y),
                                           orientation=orientation,
                                           random_state=random_state,
                                           font_path=self.font_path))
             '''
             colors.append(self.Color_Distribution(curidx))
             curidx = curidx + 1
             # print(colors)
             # recompute integral image
             if self.mask is None:
                 img_array = np.asarray(img_grey)
             else:
                 img_array = np.asarray(img_grey) + boolean_mask
             # recompute bottom right
             # the order of the cumsum's is important for speed ?!
             occupancy.update(img_array, x, y)
             last_freq = freq

     # layout
     self.layout_ = list(zip(frequencies, font_sizes, positions,
                             orientations, colors))


     # Three Measures
     Measure1 = (Measure1/PointsNum).real
     Measure2 = (PointsNum - Measure2)/PointsNum
     Measure3 = (162384 - len(MM[MM == 1]))/162384
     print ("Measure1:")
     print (Measure1)
     print ("Measure2:")
     print (Measure2)
     print("Measure3:")
     print(Measure3)

return self- Measure 1
论文中有这么一句话,我没有理解好 " the coverage error is measured as the total sum of distances and we divide this error by the diagonal of the map " the diagonal of the map 指的是?直接除以对角线的长度还是? (我在实现时只除以了点的总数)
- Measure 2
- Measure 3
def Euclidean_distance(x1, x2, y1, y2):
    return cmath.sqrt((x2 - x1) * (x2 - x1)  + (y2 - y1) * (y2 - y1))

def Hausdorff_Distance(x, y, w, h, idx, cluster_points):
    sz = len(cluster_points[idx])
    min_x = x
    max_x = x + w
    min_y = y
    max_y = y + h
    dis = 0
    num = 0
    for i in range(0, sz):
        cur_x = cluster_points[idx][i][0]
        cur_y = cluster_points[idx][i][1]
        if cur_x >= min_x and cur_x <= max_x and cur_y >= min_y and cur_y <= max_y:
            num = num + 1
            continue
        mindis = 99999999
        for x2 in range(min_x,max_x + 1):
            tmpdis1 = Euclidean_distance(cur_x, x2, cur_y, min_y).real
            tmpdis2 = Euclidean_distance(cur_x, x2, cur_y, max_y).real
            tmpdis = min(tmpdis1, tmpdis2)
            if mindis > tmpdis:
                mindis = tmpdis
        for y2 in range(min_y, max_y + 1):
            tmpdis1 = Euclidean_distance(cur_x, min_x, cur_y, y2).real
            tmpdis2 = Euclidean_distance(cur_x, max_x, cur_y, y2).real
            tmpdis = min(tmpdis1, tmpdis2)
            if mindis > tmpdis:
                mindis = tmpdis
        dis = dis + mindis
    print((dis,num))
    return dis,num

def Fill_Map(MM, x, y, size_x, size_y):
    for i in range(x - 1, x+size_x):
        for j in range(y - 1, y+size_y):
            MM[i][j] = 1

.
.
.
# After placing one word
tmpmeasure = Hausdorff_Distance(y,x,box_size[0] + self.margin,box_size[1] + self.margin,curword.idx,cluster_points)
tmp1, tmp2 = np.array(tmpmeasure)
Measure1 = Measure1 + tmp1
Measure2 = Measure2 + tmp2
Fill_Map(MM, y, x,box_size[0] + self.margin, box_size[1] + self.margin)
.
.
.
# At the end of the algorithm
Measure1 = (Measure1/PointsNum).real
Measure2 = (PointsNum - Measure2)/PointsNum
Measure3 = (162384 - len(MM[MM == 1]))/162384数据集大小:10000 聚类后单词总数:126 与原论文中的法国数据集大小相似
Measure1: 38.479475028111644 Measure2: 0.8894705053352124 Measure3: 0.13974899004828062 Total Time(包含了加载数据、词云可视化、指标衡量计算): 47.89249 s
Measure1 在这里的意义是所有点地理误差的平均值,约为 38 像素,按比例换算为实际距离,代表的意义是所有点地理位置偏差的平均值约为 30 km(虽然从山东省的面积来看 30km 并不大:除以地图的宽/高得,在地图水平方向的偏差为5.6%,在地图竖直方向上的偏差为8.7%),但我个人认为可能与放置算法的关系不是很大,而对其影响最大的是数据的分布以及聚类的结果。
原因如下:
首先从放置算法来看,它的基础操作对象实际是每个聚类,其 best placement 的计算中放置的误差设置的也是基于聚类的中心点,而指标一的计算是基于聚类中的每一个点,计算聚类中所有点到单词矩形框的豪斯多夫距离然后加和,当数据分布较为集中时,大多数点都在矩形框内,指标一的值很小,而当数据分布距离聚类中心点“比较远”时,那么这个加和后的值是非常大的。在原有算法的基础上,要想使指标一的值减小,可以加大 K-means 的 K 值,但这会使聚类数增多,同时原本高频率的大单词可能会因此被分成几个距离较近的小单词(比如不进行聚类的极端情况),可视化的效果较差。
Measure2 在这里的意义是没有被矩形框覆盖的点所占的比例约为 88%,通过观察程序的运行结果发现,最先被放置,即频率较大的单词,被覆盖的点的比例是比较大的,但后面的单词,由于大多数空间被前面的大单词所占据,它们要缩小字体大小以完成放置,那么它们被矩形框所覆盖的点的比例是很小的,尤其是数据点比较分散,比较多的时候。
比如单词 Edith 的覆盖基本准确,但由于矩形框较小且数据点的分布比较分散,所以没有被覆盖的点依旧很多。
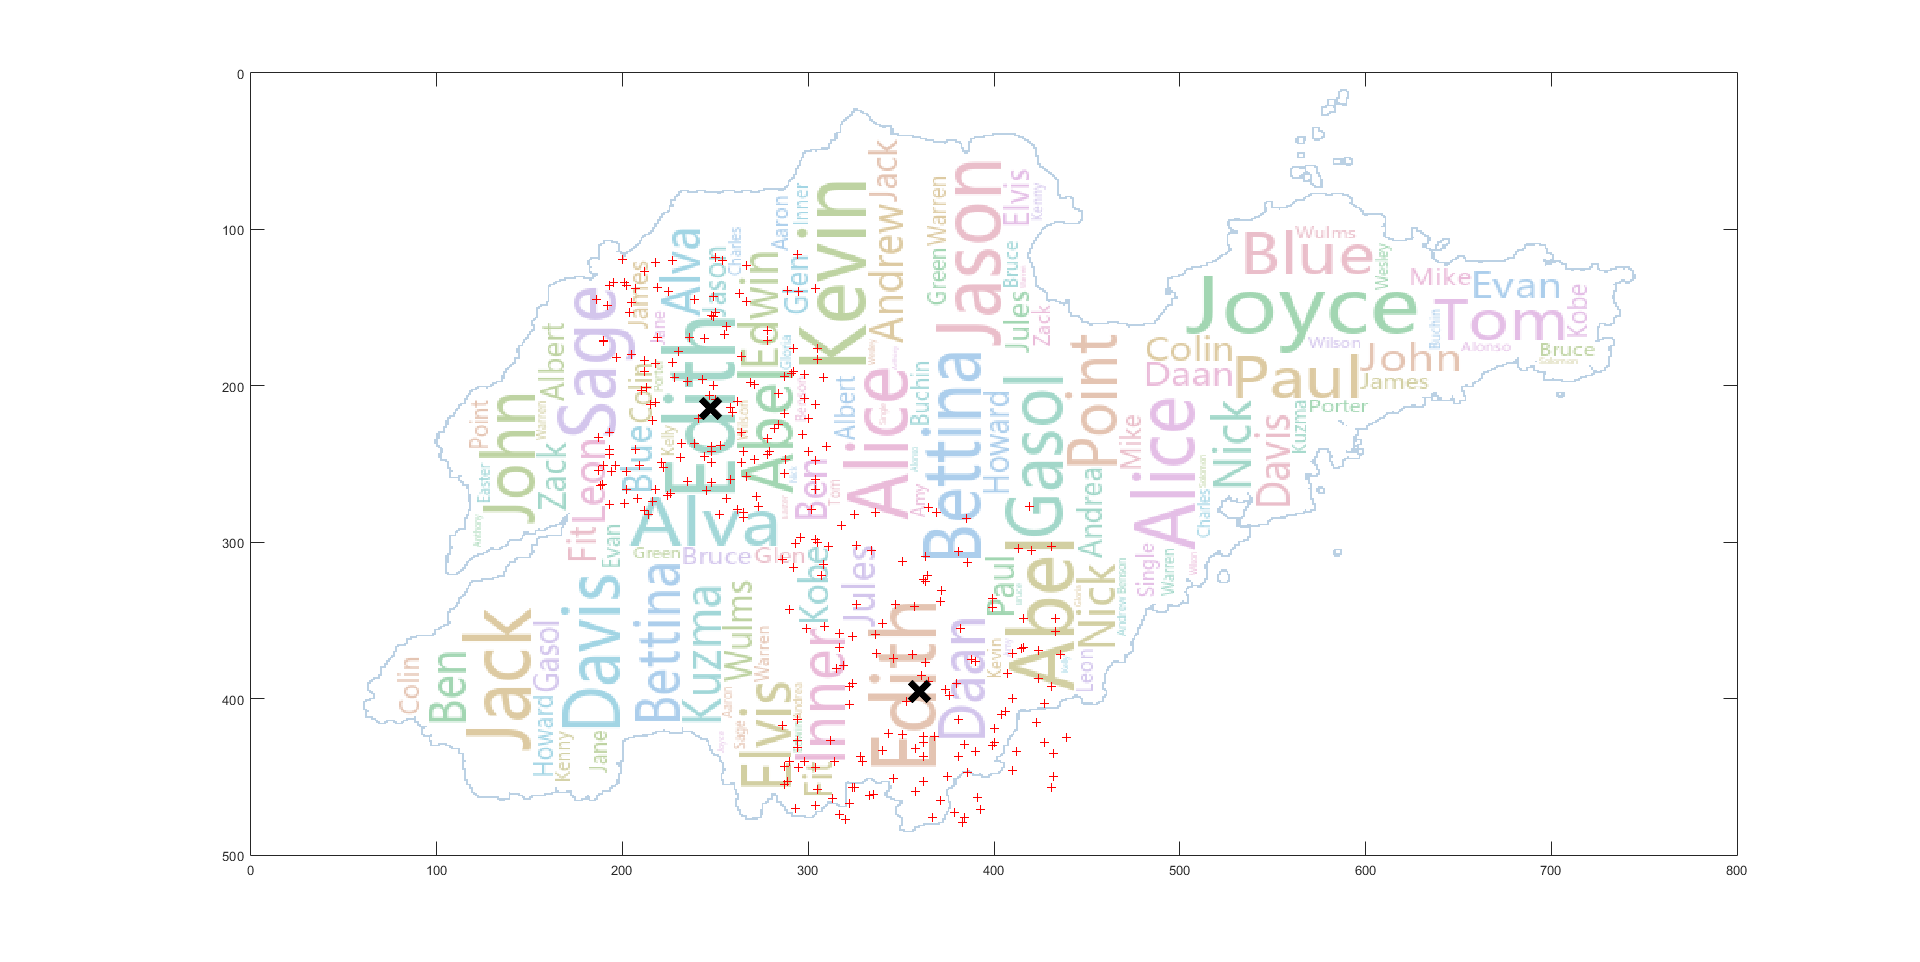
Measure 3: 对称性差异仅为 14%,原文中这一数值的最小值为 22%,从这一指标来看还是比较可观的
Total Time: 50 s 左右,因为按自己的理解修改了放置算法,减少了过多的迭代,所以在时间上会远优于原论文的 30 min。
现阶段,我觉得用以下所修正的指标来衡量当前的实现质量可能会更好一些:
Measure 4 : 聚类中心点到对应单词矩形框的豪斯多夫距离的中位数 设置为中位数的原因是为了避免一些 “outliers” 的影响,比如前面较大的单词,放置时空间比较宽阔,聚类中心点在矩形框内的概率很大,其豪斯多夫距离很小,后面较小的单词由于大多数空间已被占据,其豪斯多夫距离很大。
计算结果为:18.384776310850235
各聚类中心到矩形框的豪斯多夫距离如下:
0
0
0
0
0
0
0
0
0
0
0
0
0
0
0
0
0
0
0
0
1
2
5
5
5
5.38516
5.65685
7
8
8
8
8
10
10.6301
11
11
11.7047
12
12
13
13
13.4164
14.3178
14.4222
15
15
15
15
15
15.6205
15.6525
15.8114
16
16
16.6433
17
17
17.0294
18
18
18
18
18.3576
18.3848
19
19.2354
20
20
20
20.3961
21
21
21.0238
21.587
22.0227
22.1359
22.561
24.4131
24.6982
25.4951
25.5539
27
27
27.0185
27.6586
28
28.4253
29
29.2746
29.5296
29.6142
30
30.4138
32
32.6497
32.6497
33.4215
33.6006
34
34.2053
34.6554
35
36.6742
36.6879
37.7359
38
38.0132
38.0789
38.5876
40.6079
40.8534
41.1096
41.6773
44.5533
44.9444
46
47.0106
48.3011
50
51.0784
52.3259
53.9073
54
55
56.4358
57.9828
由结果可以看出,前面被放置的聚类中心点大多数都在单词矩形框内,确保了重要单词的地理位置精度。
从整个实现的过程来看,编程实现的难度其实不是很大,重要的是对论文的理解,前两个指标的偏差也可能是由理解的偏差引起的,比如指标一里地图的对角线指的是什么,放置算法里单词缩放后位置的确定以及如何确定覆盖尽可能多的点的位置等等。
将这个项目完善为一个 Web 端或移动端的自动可视化的应用,通过与用户的交互来提高可视化的质量,比如绘制词云图前首先向用户展示聚类结果,由用户决定是否进行调整,可视化后提供编辑重制功能,为用户提供各单词的地理位置偏移信息、频率信息,然后可以自行调整位置或修改单词的绘制优先级以优化词云的可视化效果等。
- GeoWordCloud.py 主程序
- wordcloud.py 修改了词云库的源码,要测试程序的话只需覆盖原有的库文件即可
- K_means_Region_Cluster.m 数据预处理
- PCA_Rotation.m 确定聚类主方向
- Vis_Output.m 叠加图层观察词云的覆盖情况
- RandomData.cpp 生成随机数据集
