This program uses PyQt5 library as a GUI framework. It also uses the following libraries:
    - numpy
    - pillow / PIL
    - os
    - sys
    - shutil
    - pathlib
It is designed for scientific purposes and is property of the Paris Observatory.
The UI was generated with Qt Designer and modified manually by the author in the interface_setup.py file. Please make sure to not overwrite the file by generating another one with the same name.
SelectZones is a program made at the Laboratory of Study of Radiation and Matter in Astrophysics of the Paris Observatory. Made for spectroscopy in the vacuum ultraviolet, this program allows the user to select areas of the image he chose to collect its data and output it in a file with its corresponding cropped image.
There are two ways to use this program. You can either get the executable file generated by Pyinstaller and just open it or use the source code from the GitHub repository (you can find the link below), set up a Python environment, and launch it on a command prompt
To use Pyinstaller: https://pyinstaller.org/en/stable/usage.html
I recommand using this line : pyinstaller --onefile selectzones.py
Here is the link to the last executable that I generated : https://github.com/abenfraj/SelectZones/tree/main/dist
This can be done simply by clicking the top left button “Choose Bitmap” which will redirect you to a file dialog. You will then have to choose a .BMP file. At this time, only that file extension works on this program. Using any other file extension will probably lead to the closure of the program. Once the file is selected, it will be displayed on your screen. Note that the image displayed on your screen isn’t the actual real image, it’s a temporary copy named “_resized.bmp”. The last path you chose before quitting the program will be saved in a temporary file called “_path_file.txt” so that you won’t have to browse through your directories.
The “Flip Image” button is found right next to the “Choose Bitmap” button, it is deactivated until you choose a bitmap. This button flips the image from left to right every time it is clicked. Note that this won’t also flip the rectangles that you have drawn before.
You can zoom in and out of the image with your mousewheel. If any rectangles are drawn before zooming in or out, they will be resized according to the scale of the zoom. Note that it doesn’t affect in any way shape or form the data of the rectangles or the pixels of the image.
⚠️ If you are zoomed in and are trying to zoom, you will first need to scroll down to the bottom of the label before doing so because the scrolling event has priority over the zoom event.
Right next to the “Flip Image” button, you will be able to see the position of your mouse (in millimeters) after the chosen image is displayed. This only tracks the mouse inside of the label.
After the image is displayed on your screen, you can draw rectangles in any way you want. Note that every rectangle you will draw will add a sample group box on the bottom left side of your window. Also, every rectangle you draw will be automatically adjusted to be as if you drew it from top left to bottom right : which means you can draw rectangles backwards or from bottom to top. If you try to drag your mouse out of the label, the rectangle will be pushed back inside after you release your mouse. Your rectangles won’t be deleted if you change the image to another one. In fact, if you quit the program, your last drawn rectangles will be registered in a file named ”_previous_rectangles_data.txt” which will be used for the next launch of the program after an image is displayed.
You can only adjust with your mouse the last rectangle you drew, not the ones before. To edit the ones you drew before the last, you will have to modify the sample group boxes. To modify the last drawn rectangle, you have to hover one of its sides then press and drag. You can only adjust one side at a time. If you try to drag it out of the label, the rectangle will automatically be pushed back inside.
Simply select the line edit you want to modify in the sample group box and type your coordinates in millimeters. The rectangle adjusts dynamically when the values are changed. You aren’t able to type any character other than numbers and one single dot.
⚠️ If you make the X0 and Y0 values greater than XF and YF values, the program might bug out and leave the output file empty. The same should happen if you make the XF and YF values lesser than X0 and Y0.
⚠️ If you type coordinates that don’t match the limits of the image, the rectangle will go out of the label and won’t be automatically pushed back inside, which will lead to a crash or the generation of an empty output file.
You can delete a rectangle by clicking on the red cross ❌ of the corresponding sample group box.
For safety, you are advised to click on the pencil icon ✏️ to round the values according to the conversion factor that is input. You are not obligated to do this because the values will be rounded anyway if you save the data successfully.
Right under the label in the middle, you can enter any value you want (positive or negative) then click on “Apply” to see the modifications. Note that the real image isn’t really modified. Actually, the image that will be displayed on your screen is a temporary copy of the real image named “_contrasted.bmp”. The data that will be used at the end with the exportation corresponds to the pixels of the real image.
Unlike the contrast feature, you can type fractions or decimal numbers. You then have to click on the “Apply” button right next to the line edit. This will change the values in the sample group boxes and the mouse track value.
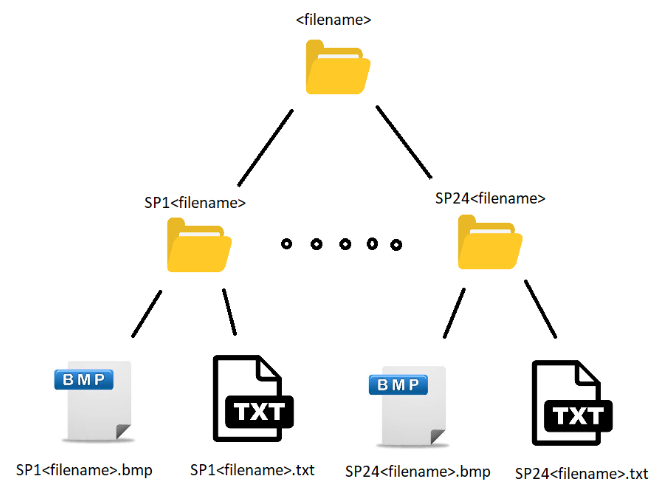
To save the data that you are looking for — after displaying the image, making rectangles and everything else you need — you just have to click on the “Save selected zones” button that is positioned on the bottom middle of your window. It will then open a new file dialog in which you will have to choose a directory where a tree of folders will be created containing the exported files. Here is the structure of that tree :
⚠️ If you try to save data of the same image with the same name in the same directory, the old tree of folders will be destroyed.
⚠️ If you try to save data of the same image you have been working on with the same name in the same directory, make sure the output files are closed before doing so or a warning message will pop up on your screen.
To quit the program, you can either click on the red cross ❌ or click on the “Quit” button.
Author : Ayoub BEN FRAJ
Last Update : 2022-06-15 (YYYY-MM-DD)
Contact : https://www.linkedin.com/in/abenfraj/