gitk is the Git repository browser. You can specify the revision range by date using the --since=<date> or --until=<date> switches, by branch using the --branches[=<pattern>] switch, or you can show everything using the --all switch.
Adding a trailing ampersand directs the shell to run the command in the background, that is, it is forked and run in a separate sub-shell:
$ gitk --all &
Clear the command window:
$ git clear
Show help for a specific command:
$ git <command> --help
Show git version:
$ git --version
Create a file in the home directory named .bashrc.
Add lines of the form:
alias <alias_name> = "<command_name>"
Show the configuration options:
$ git config --list
Configure the user name and email address:
$ git config --global user.name "..."
$ git config --global user.email "..."
Make VS Code the default editor:
$ git config --global core.editor "code --wait"
Create a local repository (repo):
$ git init
Check status:
$ git status
$ git status --short
$ git status -s
File status:
M = modified
A = added
D = deleted
R = renamed
C = copied
U = updated, but unmerged
Move a file or directory:
$ git mv <source> <destination>
Stash allows you to record the current state of a dirty working tree and index before going back to a clean working tree. It saves your local modifications and reverts the working tree to match the HEAD commit:
$ git stash
List the stash entries:
$ git stash list
Show the changes recorded in the stash entry as a diff between the stashed contents and the commit back when the stash entry was first created:
$ git stash show
Remove a single stash entry from the list of stash entries:
$ git stash drop [<stash>]
Remove a single stashed state from the stash list and apply it on top of the current
working tree state, i.e., do the inverse operation of $ git stash push (the working
directory must match the index):
$ git stash pop [<stash>]
Add file(s) in the working tree to the index (i.e., staging area):
$ git add <file_name> [<file_name2> ...]
$ git add *.<ext>
Unstage a file (i.e., restore from the index back to the working tree):
$ git reset HEAD <file_name>
or
$ git restore --staged <file_name>
Allow the addition of ignored files in the working tree to the index:
$ git add --force <file_name>
$ git add -f <file_name>
Add all tracked files in the working tree to the index:
$ git add -u
Add all files in the working tree to the index:
$ git add .
Interactively add specific changes to the named file to the index:
$ git add --patch <file_name>
$ git add -p <file_name>
Remove a file from both the index and the working tree:
$ git rm <file_name>
Perform a dry run:
$ git rm --dry-run <file_name>
$ git rm -n <file_name>
Commit files in the index with a message:
$ git commit -m "Commit message."
Add all tracked files to the index, and commit with a message:
$ git commit -am "Commit message."
Amend the most recent commit:
$ git commit --amend
$ git commit --amend -m "new msg"
$ git commit --amend --reset-author
Display the commit history, newest to oldest:
$ git log
$ git log --oneline
Show the last 3 entries:
$ git log -3
Order from oldest to newest:
$ git log --reverse
Show a specific commit:
$ git show <commit_id>
Show a commit n steps before the last commit:
$ git show HEAD~n
Show commits that touched a specific file:
$ git log <file_name>
Show commits with a specific string in their commit messages:
$ git log --grep="<str>"
Show commits with a specific string in their patches:
$ git log -S "<str>"
Tag the latest commit (note that the tag name must not yet exist, unless the -f option is specified):
$ git tag <tag_name>
Tag a specific commit (note that the tag name must not yet exist, unless the -f option is specified):
$ git tag <tag_name> [<commit_id>]
Delete a tag:
$ git tag -d <tag_name>
List all tags:
$ git tag -l
Push a tag to a remote repo (note that tags are NOT automatically included when using the push command, and so must be explicitly specified):
$ git push origin <tag_name>
Note that you can push all tags at once using the --tags option, but this is not recommended because it's common to have old or "bad" tags in a local repo. These would serve no useful purpose in the remote repo.
Delete a tag from the remote repo:
$ git push origin --delete <tag_name>
Create a new branch:
$ git branch <branch>
Switch to a branch:
$ git checkout <branch>
$ git switch <branch>
Create a new branch, and switch to it:
$ git checkout -b <branch>
$ git switch -C <branch>
Merge changes from the specified branch to the current branch:
$ git merge <branch>
In the event of conflict(s), the operation can be aborted:
$ git merge --abort
For more information about merge conflicts, see:
https://www.atlassian.com/git/tutorials/using-branches/merge-conflicts
Move/rename a branch:
$ git branch -m [<old_branch>] <new_branch>
Delete a branch:
$ git branch -d <branch>
Checkout is used to update the state of the repo to a specific point in the project's history. When passed with a branch name, it lets you switch between branches. This moves HEAD to a different branch and updates the working directory to match. Since this has the potential to overwrite local changes, Git forces you to commit or stash any changes in the working directory that will be lost during the checkout operation. Unlike reset, checkout doesn’t move any branches around.
$ git checkout <branch>
You can also check out arbitrary commits by passing the commit reference instead of a branch. This does the exact same thing as checking out a branch, i.e., it moves the HEAD reference to the specified commit:
$ git checkout <commit_id>
Check out the grandparent of the current commit:
$ git checkout HEAD~2
$ git clean -n
The -n option will perform a dry run which will show you which files are going to be removed without actually removing them.
It is a best practice to always first perform a dry run.
Interactive:
$ git clean -i
Cherry picking allows arbitrary commits to be picked by reference and appended to the current working HEAD. That is, it's the act of picking a commit from one branch and applying it to another. In this regard, it can be useful for undoing changes. For example, if a commit is accidently made to the wrong branch, you can switch to the correct branch and cherry pick the commit to where it belongs.
$ git checkout main
$ git cherry-pick <commit_id>
This feature can also be useful for bug hotfixes. Consider the scenario in which a developer is working on a new feature branch. During development of the new feature, a pre-existing bug is identified. The developer creates a commit for the sole purpose of patching this bug. This new patch commit can be cherry picked directly to the main branch to fix the bug before it effects more users.
Rebase solves the same problem as merge. Both of these commands are designed to integrate changes from one branch into another branch; they just do it in very different ways. Rebase lets you move branches around, which helps you avoid unnecessary merge commits. The resulting linear history is often much easier to understand and explore because rebase re-writes the project history by creating brand new commits for each commit in the original branch.
For example, you can move the commits in a working branch to the head of the main branch:
$ git checkout <working_branch>
$ git rebase main
The golden rule of rebase is to never use it on public branches. If you’re not entirely comfortable with rebase, you can always perform the rebase in a temporary branch. That way, if you accidentally mess up your feature’s history, you can check out the original branch and try again.
To modify older or multiple commits, you can use rebase to combine a sequence of commits into a new base commit. In standard mode, rebase allows you to literally rewrite history — automatically applying commits in your current working branch to the passed branch head. Since your new commits will be replacing the old, it's important to not use rebase on commits that have been pushed public, or it will appear that your project history disappeared.
Rebase to a specific commit:
$ git rebase <commit_id>
Rebase interactively, using the last n commits (lists the oldest commits at the top):
$ git rebase --interactive HEAD~n
or
$ git rebase -i HEAD~n
Note that the first (i.e., root) commit represents a special case, and as such must be treated differently:
$ git rebase -i --root
It's possible that a merge failure will prevent this process from being completely automatic. You will have to resolve any such merge failure and run $ git rebase --continue. Another option is to bypass the commit that caused the merge failure with $ git rebase --skip. You can abort the rebase command currently in progress and reset HEAD to the original branch using the $ git rebase --abort command.
Reset is a simple way to undo changes that haven’t been shared with anyone else.
It has three primary forms of invocation, which correspond to the command line
arguments --soft, --mixed, and --hard.
The three arguments each correspond to Git's three internal state management
mechanisms, The Commit Tree (HEAD), The Staging Index, and The Working Tree.
Undo a commit, leaving the working tree as it was (i.e., the staged snapshot and working tree are not altered in any way, only the the commit history):
$ git reset --soft <commit_id>
Reset the index but not the working tree (i.e., the changed files are preserved but not marked for commit - this is the default action):
$ git reset --mixed <commit_id>
or
$ git reset HEAD^
This performs a mixed reset, which effectively undoes that commit and leaves the modified files unstaged. This is useful for splitting a commit.
Permanently undo changes (i.e., the staged snapshot and the working tree are both updated, so any pending work that was hanging out in the index or working tree will be lost):
$ git reset --hard <commit_id>
Remove a file from the index while keeping your changes:
$ git reset -- <file_name>
Revert can be considered an "undo" type command, however, it is not a traditional undo operation. Instead of removing the commit from the project history, it figures out how to invert the changes introduced by the commit and appends a new commit with the resulting inverse content. This prevents Git from losing history, which is important for the integrity of your revision history and for reliable collaboration.
Revert should be used when you want to apply the inverse of a commit from your project history. This can be useful, for example, if you’re tracking down a bug and find that it was introduced by a single commit. Instead of manually going in, fixing it, and committing a new snapshot, you can use revert to automatically do all of this for you.
$ git revert
The preferred method of undoing shared history is revert. A revert is safer than a reset because it will not remove any commits from a shared history. A revert will retain the commits you want to undo and create a new commit that inverts the undesired commit. This method is safer for shared remote collaboration because a remote developer can then pull the branch and receive the new revert commit that undoes the undesired commit.
If revert is a "safe" way to undo changes, you can think of reset as the
dangerous method. There is a real risk of losing work with reset. Reset
will never delete a commit, however, commits can become "orphaned", which means there
is no direct path from a ref to access them. These orphaned commits can usually be
found and restored using $ git reflog. Git will permanently delete any orphaned
commits after it runs the internal garbage collector.
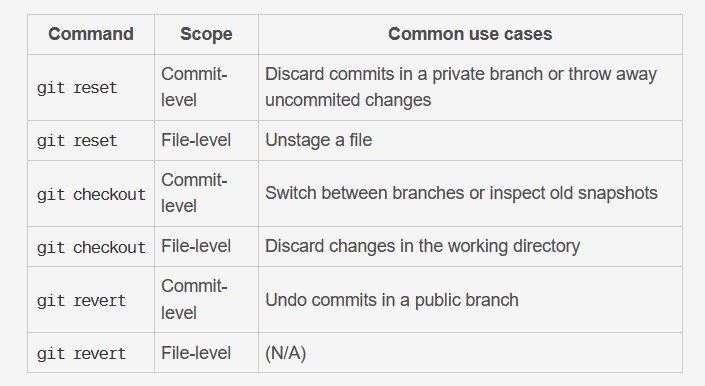
Checkout and reset are generally used for making local or private changes. They modify the history of a repository, which can cause conflicts when pushing to remote shared repositories. Revert is considered a safer operation for public changes, as it creates a new history which can be shared remotely and doesn't overwrite the history the remote team members may be dependent on.
In summary, revert is designed to safely undo a public commit; reset is designed to undo local changes to the index and working tree. Because of their distinct goals, the two commands are implemented differently: resetting completely removes a changeset, whereas reverting maintains the original changeset and uses a new commit to apply the undo.
https://www.atlassian.com/git/tutorials/resetting-checking-out-and-reverting
Like reset and revert, restore is a way to update the working tree’s files from the index or another commit. Unlike the other two commands, it does not modify the history.
Discard changes to a specific file in the working tree:
$ git restore <file_name>
Restore a file from the index back to the working tree:
$ git restore --staged <file_name>
Clone an existing remote repo to a new local repo:
Open Git Bash in the desired parent directory of the new repo to be created and execute the command:
$ git clone <[email protected]:user_name/repo_name.git>
This will create a local copy of the repo in a new subdirectory of the parent directory. The new subdirectory will have the same name as the remote repo. Alternatively, you can explicitly specify the target directory using the command:
$ git clone <[email protected]:user_name/repo_name.git> <target_dir>
Note that if the target directory name contains whitespace, it must be enclosed in quotation marks.
You can limit the Clone operation to a specific branch or tag, or even a specific number of commits. The latter can be useful when working with repos that have an extensive commit history.
https://www.atlassian.com/git/tutorials/setting-up-a-repository/git-clone
Note that if the remote repo contains submodules, cloning does not automatically include the content of the associated submodules. Instead, two additional steps are required:
$ git submodule init
$ git submodule update
Alternatively, you can add the --recurse-submodules switch to the Clone command:
$ git clone --recurse-submodules <[email protected]:user_name/repo_name.git>
Add an existing remote repo (empty) to an existing local repo:
$ git remote add origin <[email protected]:user_name/repo_name.git>
$ git branch -M main
Use -u option to set the upstream branch (upstream branches define the branch tracked on
the remote repository by your local remote branch):
$ git push -u origin main
Use the $ git remote -v or $ git remote --verbose command to show the remote url. For example:
$ git remote -v
origin  [email protected]:bdubs-astro/GitCommandSummary.git (fetch)
origin  [email protected]:bdubs-astro/GitCommandSummary.git (push)
https://devconnected.com/how-to-set-upstream-branch-on-git/
Updating:
Fetch downloads a branch from another repository, along with all of its associated commits and files. Pull is the automated version of fetch. It downloads a branch from a remote repository, then immediately merges it into the current branch.
It is a best practice to use $ git fetch instead of $ git pull because it doesn't try to integrate
anything into your local repository. This provides a chance to inspect changes before merging them with your project. For example,
$ git fetch
followed by
$ git merge remotes/origin/main
gets the changes from the remote repo and merges them into the local repo.
Push lets you move a local branch to another repository, which serves as a convenient way to publish contributions.
The -u option automatically sets that upstream for you, linking your repo to a central one.
That way, in the future, Git "knows" where you want to push to and where you want to pull from,
so you can use $ git push, $ git pull, or $ git fetch without arguments.
$ git push <remote_name> <branch_name>
$ git push
You can limit the scope of a push command by specifiying a particular commit or series of commits. The following command pushes all the commits up to and including the specified commit:
$ git push <remote_name> <commit_hash>:<branch_name>
For example: $ git push origin f9827295:main
Note that when creating a new Github repository with a README.md file, the first attmpt to pull to a local repository results in the error
fatal: refusing to merge unrelated histories. This can be overcome by using the $ git pull --allow-unrelated-histories
command.
Rename/remove a remote repo:
To rename a remote, execute the $ git remote rename <old_name> <new_name> command.
To remove a remote, execute the $ git remote rm <name> command.
This removes all references to the remote repository. It does not remove the repository from the remote server.
A git submodule is a record within a host repo that points to a specific commit in another external repo. Submodules are very static and only track specific commits. Submodules do not track refs or branches, and are not automatically updated when the host repository is updated.
Create a submodule:
$ git submodule add <[email protected]:user_name/repo_name.git> <relative path to submodule's destination folder - must not already exist>
Note that if the target directory name contains whitespace, it must be enclosed in quotation marks.
Update submodule(s):
$ git submodule update
$ git submodule update --remote
$ git submodule foreach git pull origin main
Remove a submodule:
A git submodule appears in four places in the repository. In the example below, the TxtUtilsMatlab submodule was added to the TxtUtilsMatlab submodule folder in the main folder of the repository.
-
A folder is added to the main folder of the repository:

-
The contents of the
.gitmodulesfile in the main folder are modified:
-
A folder is added to the
.git/modulesfolder:


-
The contents of the
.git/configfile are modified:

To fully remove the submodule, follow the three steps below.
- Use the
$ git rm -r "TxtUtilsMatlab submodule"command to delete the folder in the main folder of the repository, and to modify the contents of the.gitmodulesfile. Note that the quotation marks are necessary if the path name contains whitespace. - Use the
$ rm -rf .git/modules/"TxtUtilsMatlab submodule"command to delete the folder in the.git/modulesfolder. - Finally, use the
$ git config -f .git/config --remove-section submodule.$"TxtUtilsMatlab submodule"command to modify the contents of the.git/configfile.
For more information, see:
https://stackoverflow.com/questions/1260748/how-do-i-remove-a-submodule/21211232#21211232
https://git-scm.com/book/en/v2
https://www.atlassian.com/git/tutorials