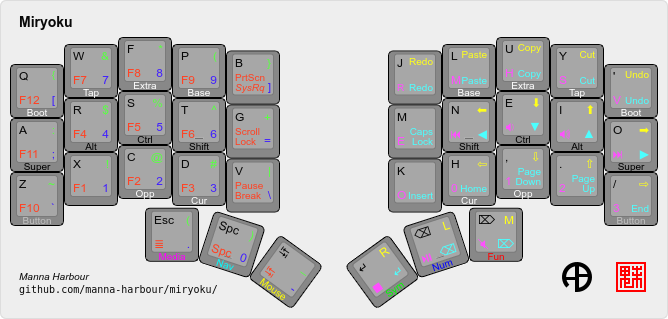
The keyboard layout used on the framedeck is something I sort of take for granted as it's the one I've been using for quite a while in various forms.... but it's something that's, understandably, generated a lot of questions!
These usually boil down to either "How do you type with so few keys?" or "Where is the [specific key] key?". Not only is the keyboard on the framedeck light on keys, the markings on the keys are not very specific.
Every keyboard has sort of two layouts... how the keys are arranged in space, the physical layout, and what each key does when you press it, the logical one. Most keyboards indicate what happens when you press a key with the legend on the keycap, which is pretty handy!
However, these legends don't often tell the full story. The key marked with a 'W' on your keyboard probably generates a 'w', but if you hold the shift key it generates a 'W'. Only one of those is probably marked on the key because this is such a common way to arrange things... but sometimes, in the case of numbers, the shifted value is also indicated. Older computers might have even more indications for other types of key-combinations....
The general idea is that by pressing a specific key, like shift, all the other keys switch to another 'layer' and generate something different. This allows us to generated hundreds of symbols with many fewer keys.
In the extreme, you can geneate many, many symbols with very few keys :-) Most custom keyboards run software which is very flexible and allows a lot of options when it comes to remapping keys.
It's surprisingly easy to endlessly tweak the way a keyboard works once you have that power. There are many discussion about finger placement and letter frequency in various languages, but there is no empirically correct answer, so it's easy to just keep changing things, even if you keep the keys in the same positions. If you also play around with varous physical layouts, there is even more to fiddle with. Each one of these changes means some amount of re-learning... so after a year or so of tweaking my own layouts (physical and logical) and having to partially re-learn each time, I discovered Miryoku. It's a much better logical layout than I ever came up with and has the amazing benefit of being suported on top of many, many (almost any!) physical layout.
This last bit was important to me as I had accumlated an embarassing amount of keyboards and I wanted to be able to use them all without remembering what layout each had been configured with.
The default letter layout for Miryoku is Colmak-DH, but I configure mine with standard QWERTY. One day I really should switch, but for now it's working well for me. The image above shows all functions for all the layers, but the website has a much more digestable set of images with each layer on it's own.
Almost all smaller keyboards use a system for accessing layers which allow these layer select keys (like the shift key on a standard keyboard) to be used for double duty. If you tap these keys they generate a specific symbol, such as space or enter, but if you hold it down and press another key, you get the layer version of the second key. All the thumb buttons are setup this way and are the primary way of getting to the various layers in Miryoku, but they also do the heavy lifting with often used keys like space, tab, enter, esc, delete, and backspace.o
Shift, Ctrl, Alt, and Mod (Windows/Mac) keys are on the home row and are duplicated on each side so you can hold down the 'J' key with the left hand and press any key on the right hand for the shifted version of that key.
The Miryoku Docs do a much better job of explaining this, so give them a read if you are interested!
If you'd like to hear more about my journey with the layout and reducing key counts, check out My Miryoku Journey
Cheers!
