Requirements
To run nivio you need the following software installed:
- nodejs v16 LTS, How to update node?
- Maven
- Java 17
Docker Setup (Linux)
Clone nivio, build and run a Docker image:
git clone https://github.com/dedica-team/nivio.git && cd nivio
mvn clean package
docker build -t nivio:latest .
docker run -e SEED=/tmp/nivio/inout.yml --mount type=bind,source="$(pwd)"/src/test/resources/example,target=/tmp/nivio -p 8080:8080 nivio:latest
then open http://localhost:8080
Docker Setup (Windows)
Clone nivio, build and run a Docker image:
  git clone https://github.com/dedica-team/nivio.git && cd nivio
  mvn clean package
  docker build -t nivio:latest .
  docker run -e SEED=//tmp/nivio/inout.yml --mount type=bind,source="C:\<your>\<path>\<to>\nivio\src\test\resources\example",target=/tmp/nivio -p 8080:8080 nivio:latest
then open http://localhost:8080
(Note: the double slashes at the beginning of the path for the SEED environment variable work as a fix to make MSYS/MinGW consoles
not translate the /tmp path to a local DOS path. This is safe to use with the PowerShell. Further reading: https://stackoverflow.com/a/14189687/10000398)
Development Setup (IntelliJ)
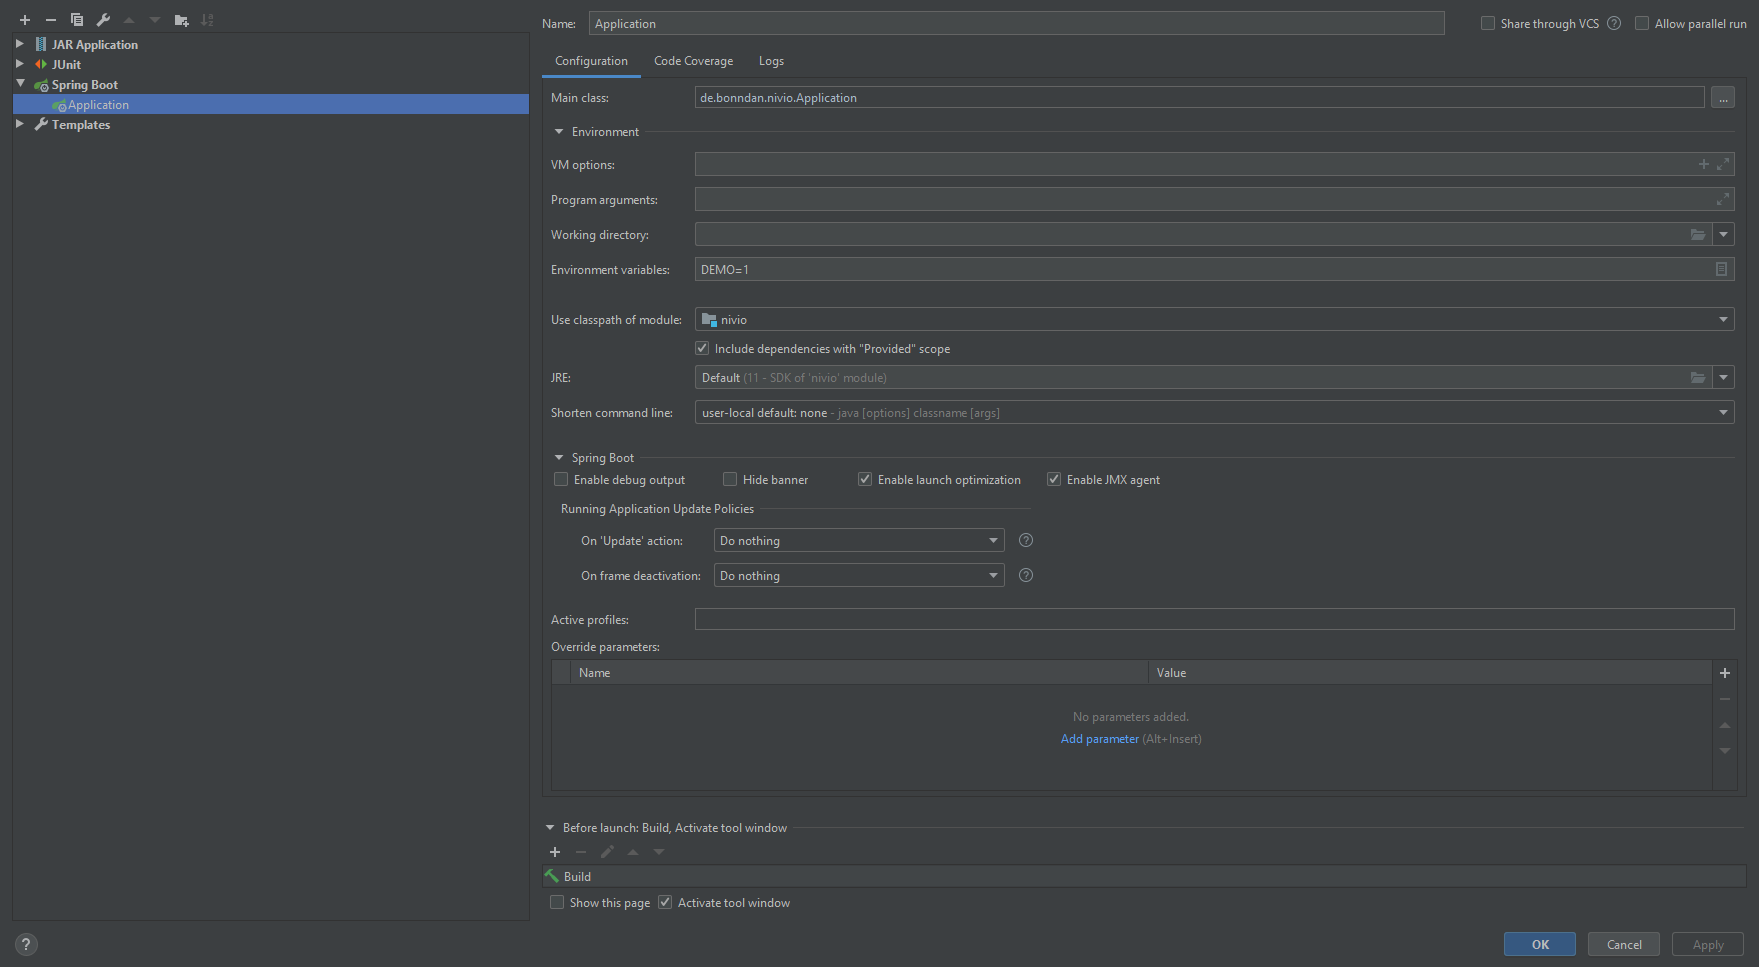
Create a Spring Boot Configuration in IntelliJ that looks like this:
If you need a clean build you can run
mvn clean package
You can use your own configuration files, if you add SEED=/path/to/config as an environment variable.
If you want to contribute to our frontend, read further into our Frontend Readme
Nivio Backend Architecture
If you want to contribute to our backend, maybe the following diagram is of use to you. It shows some of the most important classes and interfaces. It is supposed to give you an idea on how the backend is structured, but note that not all details are displayed:
If you use the ApiController as the entry point to the backend, you can see that it retrieves information and triggers events
to the most important parts of the application.
The LandscapeRespository gives access to the stored landscapes.
The LandscapeDescriptionFactory is used to generate a LandscapeDescription from various sources, such as a String input,
or e.g. from a yaml file.
This LandscapeDescription has to be enriched with the ItemDescription for all items in the landscape. This is
managed by the InputFormatHandler, which are able to read several input formats such as e.g. kubernetes files, or the
nivio description format. Access to these handlers is managed by the InputFormatHandlerFactory.
To actually create a landscape, the Indexer is used. This is able to compute the landscape graph from
a LandscapeDescription. The Indexer uses several Resolver to resolve groups and item relations in landscapes and
e.g. the appearance of the graph.
The Indexer can be triggered either directly through the ApiController to index or reindex a landscape, or it is
triggered by an observer mechanism on files. These are the files located under the path provided through the SEED
environment variable.
Testing
Smoke tests:
In Nivio, smoke tests are executed for new commits to the develop and master branch.
The tests use the Cypress framework and are located in the cypress directory: src/main/app/cypress/integration.
Every test is executed against the Nivio demo and the results will then be sent to our Cypress Dashboard.
The configuration for this workflow is located in nivio/.github/workflows/cypress_test.yml and called in the nivio/.github/workflows/main.yml.

