OpenAssistant focuses on providing a rich set of AI tools for spatial data analysis and GIS tasks. Unlike previous versions, v1.0.0 is framework-agnostic and can be integrated with any AI framework of your choice.
Key Features:
- 🗺️ Spatial Analysis Tools: Comprehensive suite of GeoDA tools for spatial statistics, LISA, Moran's I, spatial regression, and more.
- 🗄️ DuckDB Integration: Powerful in-browser SQL queries with DuckDB WASM for handling large datasets efficiently.
- 🌍 OpenStreetMap Tools: Access OSM data with geocoding, reverse geocoding, routing, and isochrone analysis.
- 📊 Visualization Components: Ready-to-use components for ECharts, Vega-Lite, Kepler.gl, and Leaflet visualizations.
- 📍 Places & H3: Location intelligence with place search, geotagging, and H3 hexagonal spatial indexing.
- 🤖 AI Framework Agnostic: Works with Vercel AI SDK, LangChain, Anthropic, and other popular AI frameworks.
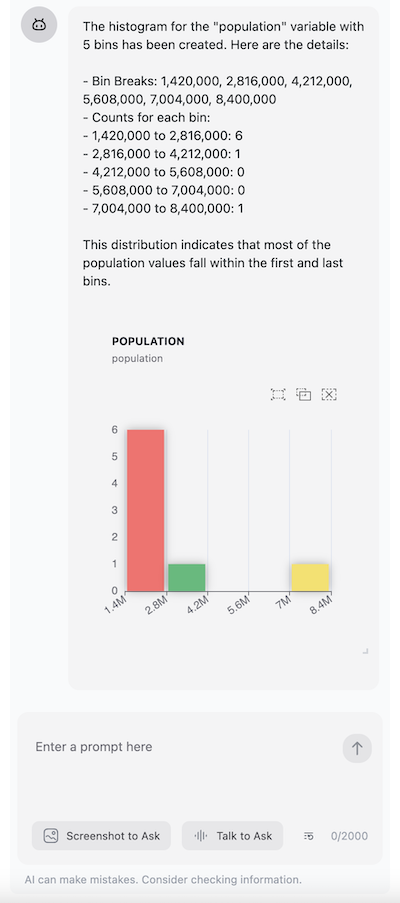
Add histogram tool to your AI application, e.g. Vercel AI SDK:
import { generateText } from 'ai';
import { histogram, HistogramTool } from '@openassistant/plots';
import { convertToVercelAiTool } from '@openassistant/utils';

const histogramTool: HistogramTool = {
  ...histogram,
  context: {
    // get the values of the variable from your dataset, e.g.
    getValues: async (datasetName, variableName) => {
      // you can retrieve the values from your dataset/database, e.g.:
      return [1, 2, 3, 4, 5, 6, 7, 8, 9, 10];
    },
  },
  onToolCompleted: (toolCallId, additionalData) => {
    // the call back function when the tool is completed
    // you can save it or use it to render a histogram component
    console.log('toolCallId: additionalData', toolCallId, additionalData);
  },
};

// use tool with vercel ai sdk
const result = await generateText({
  model: openai('gpt-4o', { apiKey: key }),
  system: 'You are a helpful assistant',
  prompt: 'create a histogram of HR60 in dataset Natregimes',
  tools: { histogram: convertToVercelAiTool(histogramTool) },
});Add map tool to your AI application:
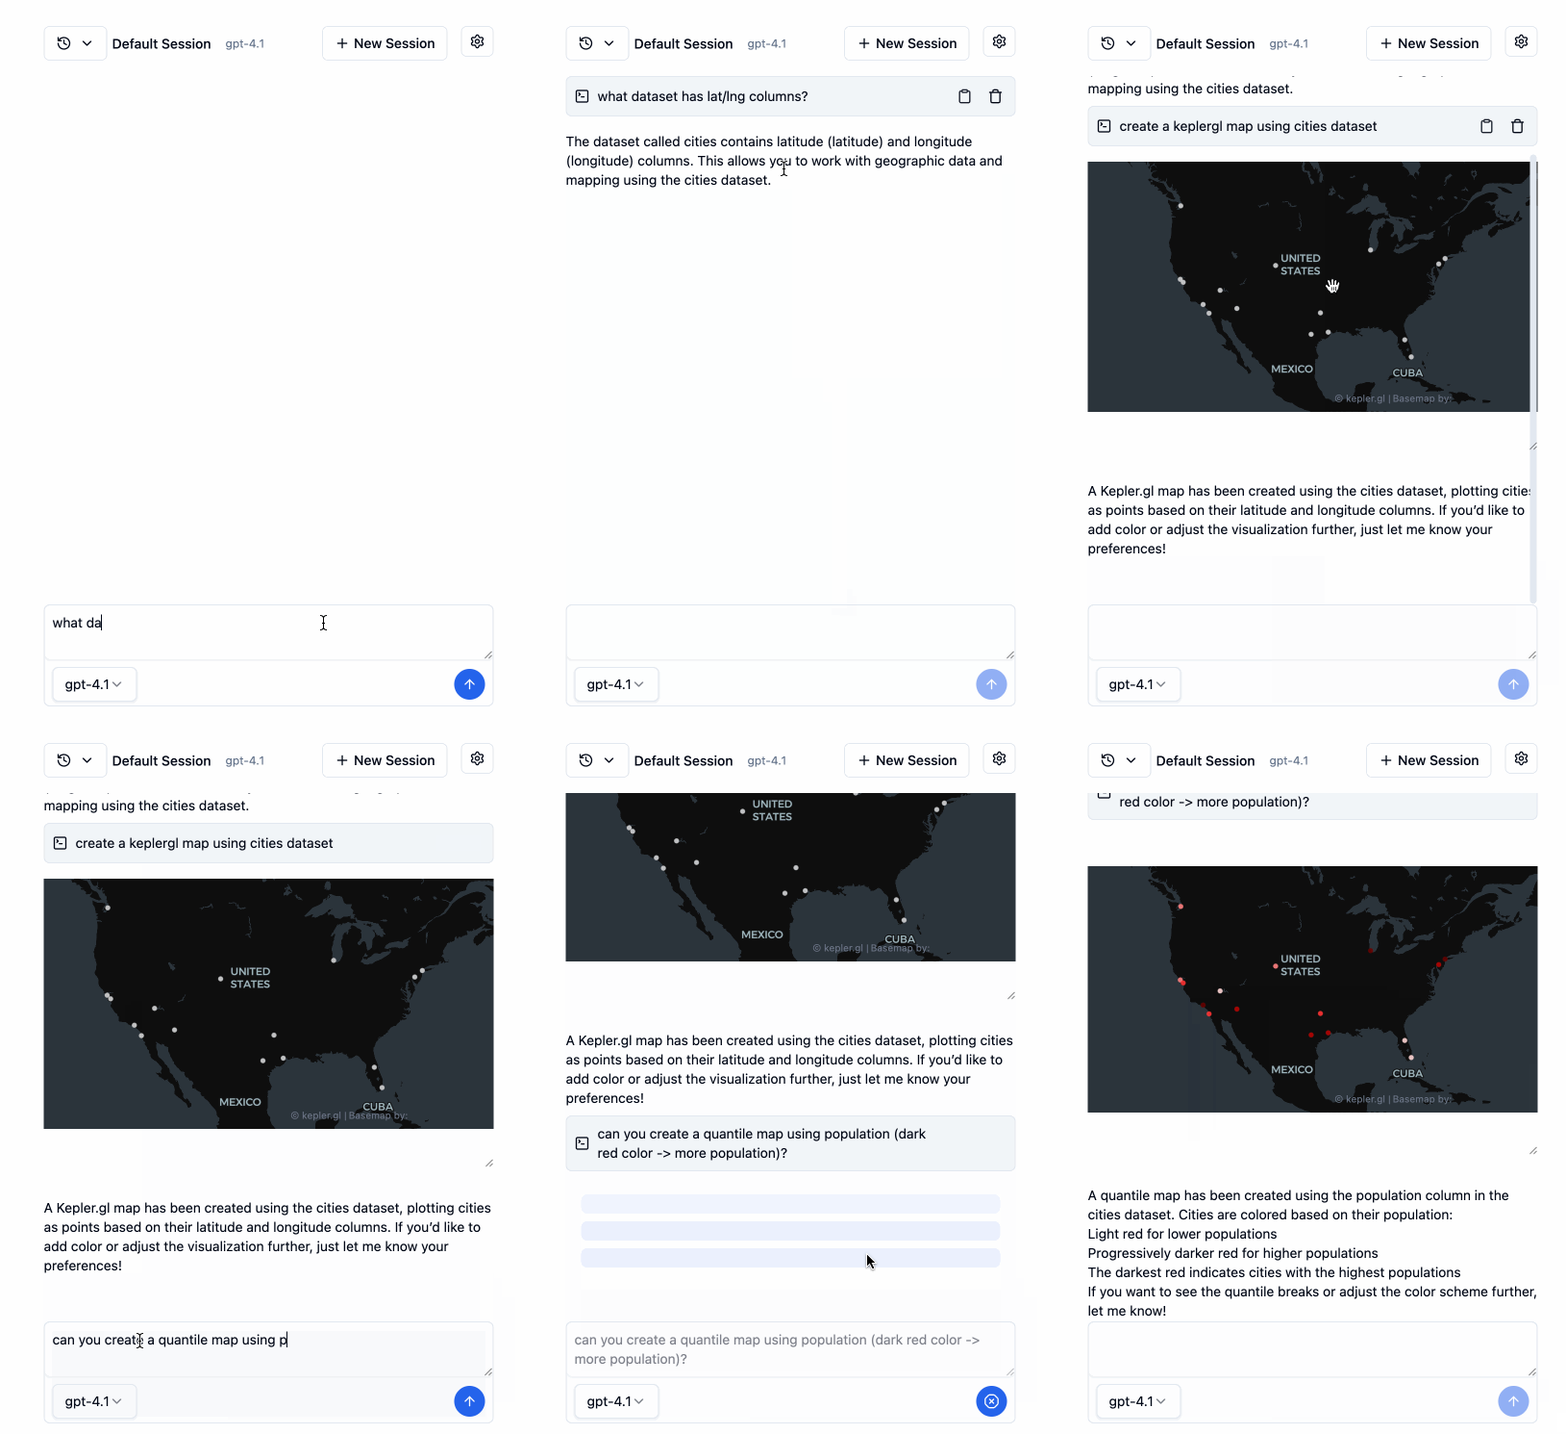
import { Assistant } from '@openassistant/assistant';
import { keplergl } from '@openassistant/maps';
import { KeplerGlComponent } from '@openassistant/keplergl';

// Sample dataset for demonstration
const SAMPLE_DATASETS = {
  cities: [
    { name: 'San Francisco', population: 800000, latitude: 37.774929, longitude: -122.419416 },
    { name: 'New York', population: 8400000, latitude: 40.712776, longitude: -74.005974 },
    { name: 'Los Angeles', population: 3900000, latitude: 34.052235, longitude: -118.243683 },
    ...
  ],
};

// Create a kepler map tool with your context
const keplerMapTool = {
  ...keplergl,
  context: {
    getDataset: async (datasetName: string) => {
      if (datasetName in SAMPLE_DATASETS) {
        return SAMPLE_DATASETS[datasetName as keyof typeof SAMPLE_DATASETS];
      }
      throw new Error(`Dataset ${datasetName} not found`);
    },
  },
  component: KeplerGlComponent,
};

export function App() {
  return (
    <div className="flex h-screen w-screen items-center justify-center p-4">
      <div className="w-full max-w-[900px] h-full">
        <Assistant options={{
          ai: {
            getInstructions: () => `You are a helpful assistant that can answer questions and help with tasks.
Your name is George.
You can use the following datasets to answer the user's question:
- Dataset: venues
 - Fields: name, city, ratin
- Dataset: cities
 - Fields: name, population, latitude, longitude`,
            tools: {
              keplergl: keplerMapTool,
            },
          },
        }} />
      </div>
    </div>
  );
}
You can combine all the tools together to create a more complex application.
Create a weather tool to return the weather from a weather station you installed at different cities.
import { OpenAssistantTool, convertToVercelAiTool } from '@openassistant/utils';
import { generateText } from 'ai';
import { z } from 'zod';

type WeatherToolArgs = { cityName: string };
type WeatherToolResult = { weather: string };
type WeatherToolAdditionalData = { station: string };
type WeatherToolContext = {
  getStation: (cityName: string) => Promise<{ stationId: string; weather: string; timestamp: string }>;
};

const weatherTool: OpenAssistantTool<WeatherToolArgs, WeatherToolResult, WeatherToolAdditionalData, WeatherToolContext> = {
  name: 'getWeather',
  description: 'Get the weather in a city from a weather station',
  parameters: z.object({ cityName: z.string() }),
  context: {
    // provide your own implementation to get the data from your application as a context
    getStation: async (cityName: string) => {
      const stations = {
        'New York': {
          stationId: '123',
          weather: 'sunny',
          timestamp: '2025-06-20 10:00:00',
        },
      };
      return stations[cityName];
    },
  },
  execute: async (args, options) => {
    if (!options || !options.context || !options.context['getStation']) {
      throw new Error('Context is required');
    }
    const getStation = options.context['getStation'];
    const station = await getStation(args.cityName as string);
    return {
      // the result returned to the LLM
      llmResult: {
        success: true,
        result: `The weather in ${args.cityName} is ${station.weather} from weather station ${station.station}.`,
      },
      // the additional data for e.g. rendering a component or saving to your database
      additionalData: {
        station,
      },
    };
  },
});OpenAssistant provides a chat interface component based on @sqlrooms/ai. It is a powerful chat interface component that can be used to build your own AI application.
- Easy provider and model selection and configuration
- Support provider and model settings management
- Support custom models
- Support model usage tracking
import { Assistant, type AssistantOptions } from '@openassistant/assistant';
import { z } from 'zod';

const config: AssistantOptions = {
  ai: {
    getInstructions: () => 'You are a helpful assistant.',
    tools: {
      echo: {
        description: 'Echo the input',
        parameters: z.object({
          input: z.string().describe('The input to echo'),
        }),
        execute: async ({ input }: { input: string }) => {
          return {
            llmResult: {
              success: true,
              output: input,
            },
          };
        },
        context: {},
      },
    },
  },
};

export function App() {
  return (
    <div className="flex h-screen w-screen items-center justify-center p-4">
      <div className="w-full max-w-[900px] h-full">
        <Assistant options={config} />
      </div>
    </div>
  );
}
Add the following configurations to your tailwind.config.js file:
import { sqlroomsTailwindPreset } from '@sqlrooms/ui';

const preset = sqlroomsTailwindPreset();
const config = {
  ...preset,
  content: ['src/**/*.{ts,tsx}', '../../node_modules/@sqlrooms/*/dist/**/*.js'],
  theme: {
    ...preset.theme,
    extend: {
      ...preset.theme?.extend,
    },
  },
};

export default config;
If you want to build your own chat interface, just simply pass your custom component in component.
import { Assistant, type AssistantOptions } from '@openassistant/assistant';
import { z } from 'zod';

const config: AssistantOptions = {
  ai: {
    getInstructions: () => 'You are a helpful assistant.',
    tools: {},
  },
};

export function App() {
  return (
    <div className="flex h-screen w-screen items-center justify-center p-4">
      <div className="w-full max-w-[900px] h-full">
        <Assistant options={config}>
          <CustomComponent />
        </Assistant>
      </div>
    </div>
  );
}
For more details, you can follow the source code of packages/ai, which is a wrapper of @sqlrooms/ai.
You can also use the OpenAssistant core package @openassistant/core, which provides a uniform interface for different AI providers, to build your own AI assistant, along with a design allows you to easily create your own tools by :
- providing your own context (e.g. data, callbacks etc.) for the tool execution
- providing your own UI component for rendering the tool result
- passing the result from the tool execution to the tool UI component or next tool execution.
Then, you can use the OpenAssistant in your application. For example:
import { createAssistant } from '@openassistant/core';

// get the singleton assistant instance
const assistant = await createAssistant({
  name: 'assistant',
  modelProvider: 'openai',
  model: 'gpt-4o',
  apiKey: 'your-api-key',
  version: '0.0.1',
  instructions: 'You are a helpful assistant',
  tools: {},
  // abortController: null
});

// now you can send prompts to the assistant
await assistant.processTextMessage({
  textMessage: 'Hello, how are you?',
  streamMessageCallback: ({ isCompleted, message }) => {
    console.log(isCompleted, message);
  },
});
OpenAssistant supports the following model providers:
| Model Provider | Models | Dependency |
|---|---|---|
| OpenAI | models | @ai-sdk/openai |
| models | @ai-sdk/google | |
| Anthropic | models | @ai-sdk/anthropic |
| DeepSeek | models | @ai-sdk/deepseek |
| xAI | models | @ai-sdk/xai |
| Ollama | models | ollama-ai-provider |
:::
MIT © Xun Li


