-
Notifications
You must be signed in to change notification settings - Fork 82
SNI Tricks
WARNING:
This option is experimental and unstable.
Please, don't enable SNI Tricks if you're not an advanced PC user and don't have administrator rights.
Applies to:
- PowerTunnel v1.12 and higher
- PowerTunnel for Android v1.7 and higher
Summary: Internet Service Provider (ISP) filters your HTTPS traffic by looking on SNI - Server Name Indication. This method of filtering can be bypassed by removing or modifying SNI in your HTTPS requests.
Table of contents:
Server Name Indication is an extension to the TLS protocol.
When you're attempting to connect to a HTTP website, the hostname is passed in the request headers, which are unencrypted.
If you're connecting with HTTPS, the request headers are encrypted, but the hostname can be read from SNI in ClientHello packet. That's how your ISP blocking HTTPS websites.
We have to remove or encrypt SNI to bypass filtering.
In recent years, ESNI - Encrypted SNI - has been developed to encrypt the hostname, but it's still experimental and most websites doesn't support it.
PowerTunnel supports some tricks with SNI, that allow you to remove or modify SNI in your HTTPS requests to blocked websites.
To do that, we need to replace the original SSL certificate, so you need to install it at the first.
This method may not work anywhere, because some DPI rejects HTTPS requests without SNI or when the SNI is encrypted, also this approach doesn't supported by the most of sites, especially the ones, who checking the SSL certificate.
Spoil SNI method is more efficient than Erase SNI.
You do the following actions on your risk.
Make sure that you run a genuine build of PowerTunnel (PC/Android) to keep your traffic safe.
The manual below is for the PC version of PowerTunnel. PowerTunnel for Android automatically suggests you to install the certificate when you have this option enabled.
If you're running PowerTunnel in console mode, just add -sni-trick [trick] key, where [trick] is a number:
1 - SPOIL
2 - ERASE
3 - FAKE (PowerTunnel v1.13 and higher)
$ java -jar PowerTunnel.jar -sni-trick [trick]
You need to provide a fake host if you choosed FAKE trick:
$ java -jar PowerTunnel.jar -sni-trick [trick] -sni-trick-fake-host [host].
The fake host is a host of a government resource or a website that is not blocked in your country.
You can enter the fake host in user interface since version 1.13.
You can enable this option from the user interface:

Tip: disable "chunking" option to more stable work
Global mode is enabled by default, but this method can break the most of unblocked websites, so PowerTunnel uses selective SNI erasing.
Clean government-blocklist.txt and fill it with a list of the blocked domains in your country.
The certificate generates on the first run of the PowerTunnel with this option enabled.
All certificates are unique, neither PowerTunnel developers nor someone else has its password. The password is stored insettings.ini.
PowerTunnel never decrypts your traffic.
PowerTunnel re-crytps your HTTPS session to remove SNI, so you have to install PowerTunnel Root CA.
- Go to the PowerTunnel folder, find
powertunnel-root-ca.cer. If you don't see it, findpowertunnel-root-ca.pem, copy it to another place and rename it topowertunnel-root-ca.cer(you need to enable "Show file extensions" if you're on Windows). If you're on Linux or macOS, you can installpowertunnel-root-ca.pem.
A more complicated way for Windows
1*) Extract the root certificate
- Open a blocked website

- Open connection details

- Select "Certificate"
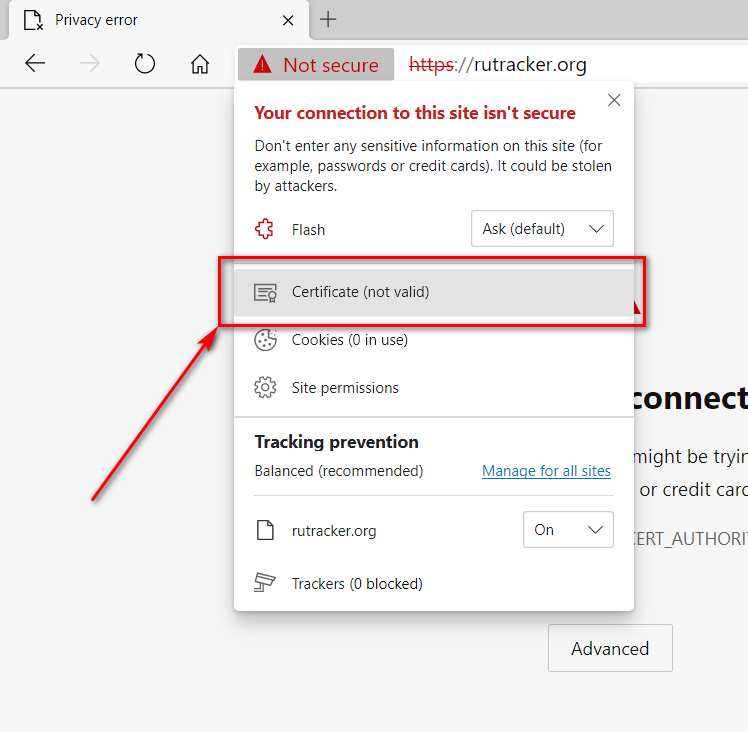
- Go to "Certification Path -> View certificate"
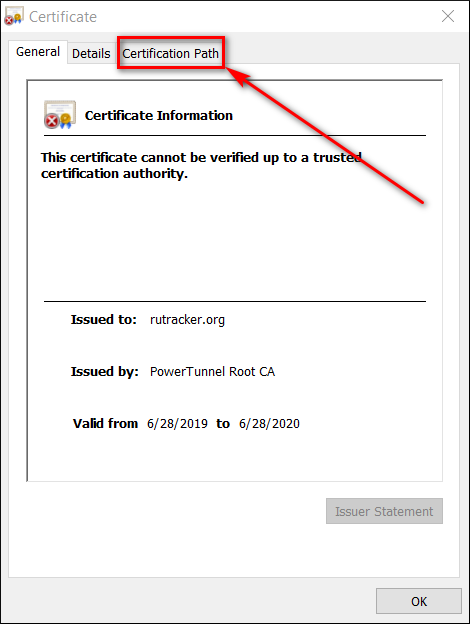
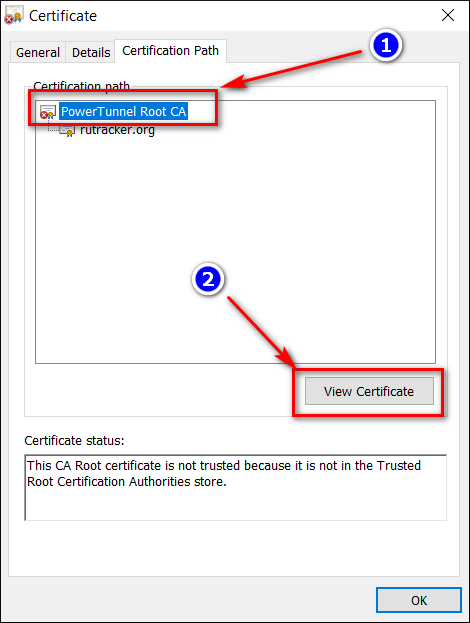
- Go to "Details -> Copy to file"
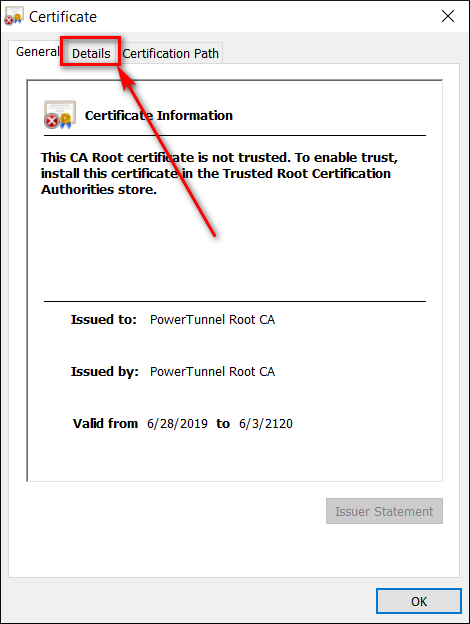
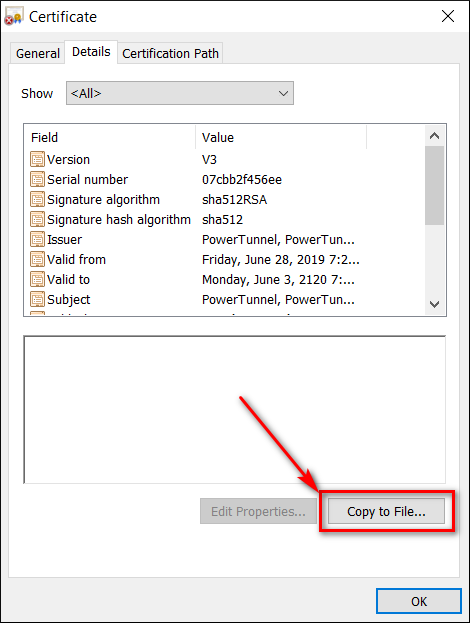
Follow instructions on your screen and extract the certificate to your desktop
- Install the root certificate
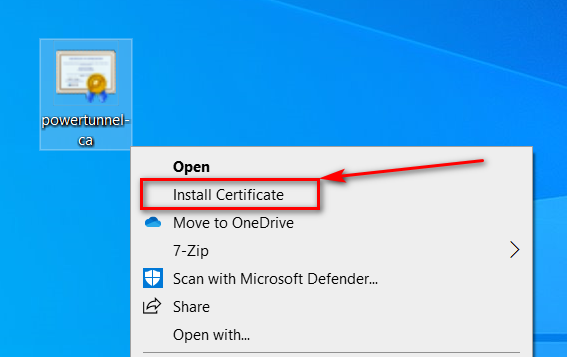
- Open context menu for file
powertunnel-root-ca.cerand select "Install Certificate"
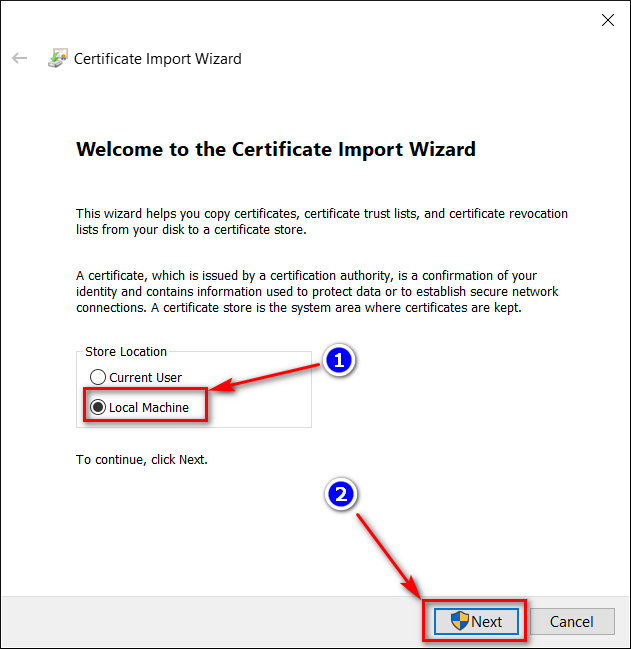
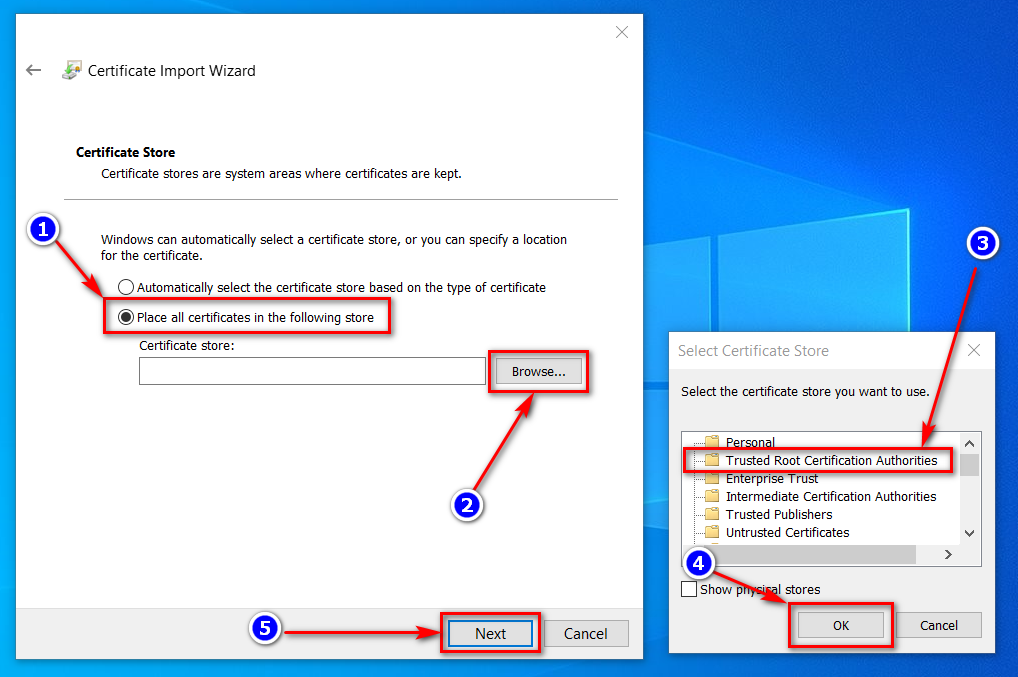
- Install the certificate to "Trusted Root Certification Authorities"
- Clear your browser cache and restart it
Manual for Windows:
- Open the "Run" dialog (Win+R) and execute "certlm.msc"

- Remove the certificate

Manual for Android:
Go to Settings -> Security -> Trusted Credentials -> User, select "PowerTunnel Root CA" and click "Remove"
Seems that this method doesn't work with your ISP's DPI. Keep in mind that some websites want to enforce you using their original certificates, so that method can't be applied to them.
Use "chunking" method or any encrypted connection, such as VPN or Tor.
Manual for PC:
If you can't access a blocked website check government-blacklist.txt.
If you still have problems with the Root CA, do following actions:
- Remove the Root CA from your system as described above
- Remove files
powertunnel-root-ca.p12andpowertunnel-root-ca.pemin PowerTunnel folder - Open
settings.iniin PowerTunnel folder - Remove the line starting with
powertunnel.cert.password= - Run PowerTunnel again
Manual for Android:
Just clear data of the PowerTunnel Android application.
Open your system settings, find PowerTunnel in applications section, choose "Data" and tap on "Clear data".
This also will reset PowerTunnel configuration.
Open an issue in the GitHub repository if you have any questsions.