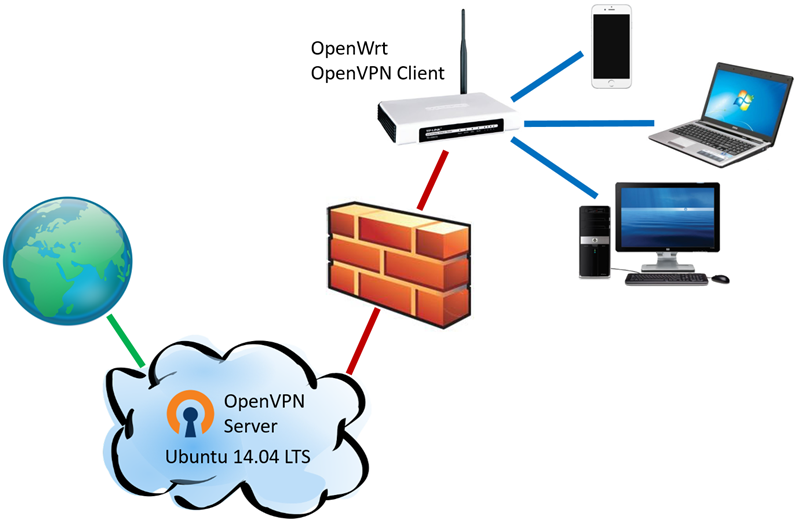
作为一个挨踢人,翻墙是基本技能,因为有太多好的技术资料在墙外了。当然,翻墙有很多方法,你喜欢用那种都可以。我原本一直在 PC 上通过 SSH 打隧道,有兴趣的话请参考我之前写的 双 Azure 虚机翻墙,看 YouTube 的 720P 视频绝对没问题。接下去的问题是,家里的那些手机们和其它移动端呢?难道要在每个端上都做配置吗?何不直接把家里的路由器翻出墙,这样家里所有的端都可以享受福利了。
- 一台墙外的主机。我选择用 Azure 虚机,系统是 Ubuntu 14.04 LTS,选择最小配置的就可以。数据中心选 East Asia,在香港,离我们最近,所以速度会比较好。
- 一台 OpenWrt 支持的**路由器**。需要把路由器的 firmware 刷成 OpenWrt。如果你家现在用的路由器不在这个被支持的列表中,那就得去买个被支持的了。我用的是 TP-Link TL-WR740N v4 硬件版本,从淘宝上买的,连运费一共50元左右。你可以要求淘宝卖家帮你把路由器刷好,超级方便。
在 Azure 上创建虚机后,配置两个 Endpoints: TCP 22,UDP 1194。

SSH 到虚机上,安装 OpenVPN 和 Easy RSA。
sudo apt-get update
sudo apt-get install openvpn easy-rsa
接着配置 Easy RSA,创建证书和密钥。
sudo mkdir easy-rsa
cd easy-rsa
sudo make-cadir my_ca
sudo bash
cd my_ca
vim vars
编辑 vars 里面的内容,确保以下的都不为空。
# These are the default values for fields
# which will be placed in the certificate.
# Don't leave any of these fields blank.
export KEY_COUNTRY="CA"
export KEY_PROVINCE="ON"
export KEY_CITY="Toronto"
export KEY_ORG="MyOrg"
export KEY_EMAIL="[email protected]"
export KEY_OU="MyOrgUnit"

# X509 Subject Field
export KEY_NAME="server"
初始化 Easy RSA 的 Public Key Infrastructure (PKI)。
cd /etc/openvpn/easy-rsa/my_ca
. ./vars
. ./clean-all
. ./build-ca
创建服务器的证书和密钥。可以接受所有缺省值,一路按回车就可以。当被问到 “Sign the certificate?” 和 “1 out of 1 certificate requests certified, commit?” 是,都按 Y 确认。
./build-key-server server创建客户端的证书和密钥。同样,当被问道 Y/N 时,都按 Y 确认。
./build-key client1生成 Diffie Hellman 文件。
./build-dh将 CA 和服务器相关的证书密钥复制到 /etc/openvpn 里面。
cd /etc/openvpn/easy-rsa/my_ca/keys
cp dh2048.pem ca.crt server.crt server.key /etc/openvpn
接下去我们来编辑 OpenVPN 服务器的 server.config 配置文件。
cd /usr/share/doc/openvpn/examples/sample-config-files
sudo cp server.conf.gz /etc/openvpn
cd /etc/openvpn
sudo gunzip server.conf.gz
sudo vim server.conf
服务器的默认配置是用 10.8.0.0/24 subnet。建议不去修改,除非已经被别的服务所占用了。
# Configure server mode and supply a VPN subnet
# for OpenVPN to draw client addresses from.
# The server will take 10.8.0.1 for itself,
# the rest will be made available to clients.
# Each client will be able to reach the server
# on 10.8.0.1. Comment this line out if you are
# ethernet bridging. See the man page for more info.
server 10.8.0.0 255.255.255.0
确保刚才生成的证书和密钥文件名字和配置里的完全一致。
# Any X509 key management system can be used.
# OpenVPN can also use a PKCS #12 formatted key file
# (see "pkcs12" directive in man page).
ca ca.crt
cert server.crt
key server.key  # This file should be kept secret
将 Diffie Hellman 文件名字从 1024 改成 2048。
# Diffie hellman parameters.
# Generate your own with:
#   openssl dhparam -out dh1024.pem 1024
# Substitute 2048 for 1024 if you are using
# 2048 bit keys.
dh dh2048.pem
Un-comment 以下两行。
# You can uncomment this out on
# non-Windows systems.
user nobody
group nogroup
Un-comment 这行,告诉客户端将其所有的网络数据都发送到 OpenVPN 服务器。
# If enabled, this directive will configure
# all clients to redirect their default
# network gateway through the VPN, causing
# all IP traffic such as web browsing and
# and DNS lookups to go through the VPN
# (The OpenVPN server machine may need to NAT
# or bridge the TUN/TAP interface to the internet
# in order for this to work properly).
push "redirect-gateway def1 bypass-dhcp"
将 DNS 服务器 IP 地址也发给客户端。
# Certain Windows-specific network settings
# can be pushed to clients, such as DNS
# or WINS server addresses.  CAVEAT:
# http://openvpn.net/faq.html#dhcpcaveats
# The addresses below refer to the public
# DNS servers provided by opendns.com.
push "dhcp-option DNS 10.8.0.1"
push "dhcp-option DNS 8.8.8.8"
push "dhcp-option DNS 8.8.8.4"
保存 server.conf 配置文件。去掉所有的被注释的内容后,我的是这样的,供大家参考。
port 1194
proto udp
dev tun
ca ca.crt
cert server.crt
key server.key
dh dh2048.pem
server 10.8.0.0 255.255.255.0
ifconfig-pool-persist ipp.txt
push "redirect-gateway def1 bypass-dhcp"
push "dhcp-option DNS 10.8.0.1"
push "dhcp-option DNS 8.8.8.8"
push "dhcp-option DNS 8.8.8.4"
keepalive 10 120
comp-lzo
user nobody
group nogroup
persist-key
persist-tun
status openvpn-status.log
verb 3
OpenVPN 服务器配置基本完成,试一下服务能否起来。
sudo service openvpn start
sudo service openvpn status
 * VPN 'server' is running
运行 ifconfig 除了可以看到 eth0 和 lo 两个网口,应该还应该看到 tun0,这个就是 OpenVPN 用的 tunnel。
tun0      Link encap:UNSPEC  HWaddr 00-00-00-00-00-00-00-00-00-00-00-00-00-00-00-00
          inet addr:10.8.0.1  P-t-P:10.8.0.2  Mask:255.255.255.255
          UP POINTOPOINT RUNNING NOARP MULTICAST  MTU:1500  Metric:1
          RX packets:46429 errors:0 dropped:0 overruns:0 frame:0
          TX packets:63212 errors:0 dropped:0 overruns:0 carrier:0
          collisions:0 txqueuelen:100
          RX bytes:4797451 (4.7 MB)  TX bytes:78158428 (78.1 MB)
我们希望将所有接入 OpenVPN 的客户端的数据流量都引导至服务器本地网卡 eth0。
sudo bash
iptables -t nat -A POSTROUTING -s 10.8.0.0/24 -o eth0 -j MASQUERADE建议在 Windows 上装个 OpenVPN Client 测试一下,也方便调试。
首先,从服务器上把客户端的证书和密钥文件,以及一个客户端配置文件下载下来。
cd ~
mkdir client_config
cd client_config
sudo cp /etc/openvpn/easy-rsa/my_ca/keys/ca.crt .
sudo cp /etc/openvpn/easy-rsa/my_ca/keys/client1.crt .
sudo cp /etc/openvpn/easy-rsa/my_ca/keys/client1.key .
sed 's/$/\r/' /usr/share/doc/openvpn/examples/sample-config-files/client.conf > client1.ovpn
sudo chown azureuser *
在 Windows 上,使用命令行下载文件。
scp [email protected]:/home/azureuser/client_config/* .将这四个文件复制到 C:\Program Files\OpenVPN\config 下面。编辑 client1.ovpn 这个配置文件。
修改服务器名字,要用云服务的全名。
# The hostname/IP and port of the server.
# You can have multiple remote entries
# to load balance between the servers.
remote mycloudservicename.cloudapp.net 1194
;remote my-server-2 1194
确认证书和密钥文件名字和配置里的完全一致。
# SSL/TLS parms.
# See the server config file for more
# description.  It's best to use
# a separate .crt/.key file pair
# for each client.  A single ca
# file can be used for all clients.
ca ca.crt
cert client1.crt
key client1.key
插入以下配置。
# Route all traffic through VPN.
redirect-gateway def1
保存 client1.ovpn 配置文件。去掉所有的被注释的内容后,我的是这样的,供大家参考。
client
dev tun
proto udp
remote mycloudservicename.cloudapp.net 1194
resolv-retry infinite
nobind
persist-key
persist-tun
ca ca.crt
cert client1.crt
key client1.key
ns-cert-type server
comp-lzo
redirect-gateway def1
verb 3
用管理员身份运行 OpenVPN GUI,在菜单里选 Connect。如果连接不成功,它会不断重试。那就得看看日志文件里是怎么说的了。在命令行里运行 ipconfig /all,应该可以看到 OpenVPN 的 TAP-Windows Adapter。
Ethernet adapter OpenVPN:

   Connection-specific DNS Suffix  . :
   Description . . . . . . . . . . . : TAP-Windows Adapter V9
   Physical Address. . . . . . . . . : 00-FF-73-20-4E-72
   DHCP Enabled. . . . . . . . . . . : Yes
   Autoconfiguration Enabled . . . . : Yes
   Link-local IPv6 Address . . . . . : fe80::b5f1:d0bb:6bdf:95a0%13(Preferred)
   IPv4 Address. . . . . . . . . . . : 10.8.0.6(Preferred)
   Subnet Mask . . . . . . . . . . . : 255.255.255.252
   Lease Obtained. . . . . . . . . . : Friday, May 15, 2015 5:17:40 PM
   Lease Expires . . . . . . . . . . : Saturday, May 14, 2016 5:17:40 PM
   Default Gateway . . . . . . . . . :
   DHCP Server . . . . . . . . . . . : 10.8.0.5
   DHCPv6 IAID . . . . . . . . . . . : 234946419
   DHCPv6 Client DUID. . . . . . . . : 00-01-00-01-1A-E7-F3-3D-3C-97-0E-D8-83-9D
   DNS Servers . . . . . . . . . . . : 10.8.0.1
                                       8.8.8.8
                                       8.8.8.4
   NetBIOS over Tcpip. . . . . . . . : Disabled
试试 ping 10.8.0.1 是否成功。
Pinging 10.8.0.1 with 32 bytes of data:
Reply from 10.8.0.1: bytes=32 time=116ms TTL=64
Reply from 10.8.0.1: bytes=32 time=117ms TTL=64
Reply from 10.8.0.1: bytes=32 time=117ms TTL=64
Reply from 10.8.0.1: bytes=32 time=116ms TTL=64

Ping statistics for 10.8.0.1:
    Packets: Sent = 4, Received = 4, Lost = 0 (0% loss),
Approximate round trip times in milli-seconds:
    Minimum = 116ms, Maximum = 117ms, Average = 116ms
打开浏览器,访问类似 https://www.whatismyip.com 的网站,看看你现在的 IP 地址是否已经在墙外了。
恭喜你! OpenVPN 测试成功。
简单介绍一下我的路由器。我用的是中国版的 TP-Link TL-WR740N v4,说是 v4,但实际上用的芯片是和国际版 v3 用的一样 – AR7240。所以刷机是必须选择 OpenWrt 针对 TL-WR740N v3 的系统。更重要的一点是一定要用 JFFS2 文件格式的系统,因为那是可读写的。不要用 SquashFS 文件格式。建议选择路由器时,除了比对被支持的**路由器型号**,还要比对芯片型号。顺便说一下,我试过刷 dd-wrt,它的系统认定了我这个路由器只有 4MB 的 Flash,所以不让我开启 JFFS2 mount 功能,即使路由器已经被改装为 8MB 的 Flash 也没用。
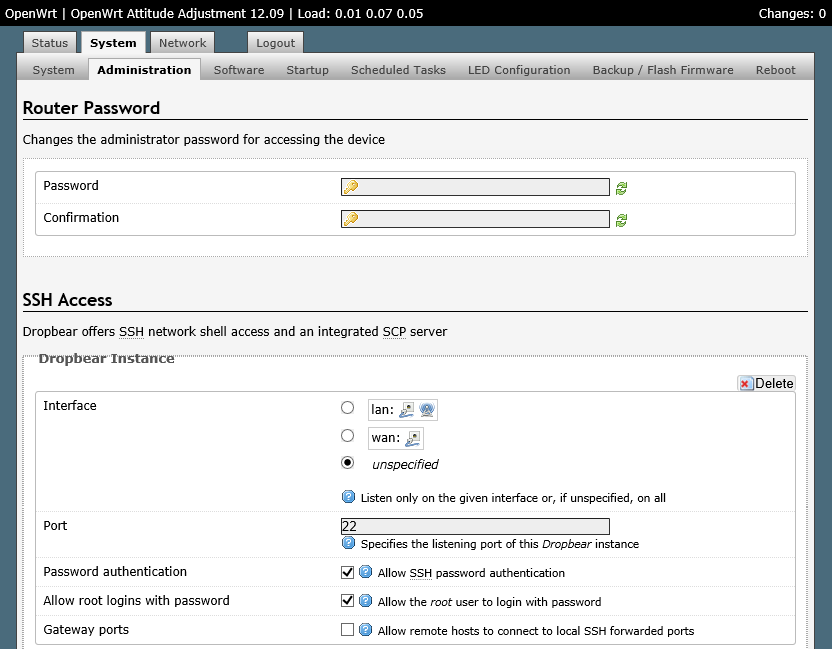
现在,我假设你已经有了一台运行 OpenWrt 系统的路由器,并且打开了 SSH 管理功能。
用 root 账户通过 SSH 连接到路由器,开始安装和配置。
opkg update
opkg install openvpn
mv /etc/config/openvpn /etc/config/openvpn_old
我看网上有建议安装 openvpn-openssl 这个包,可我这个版本的系统貌似没有这个包,用 openvpn 也挺好。
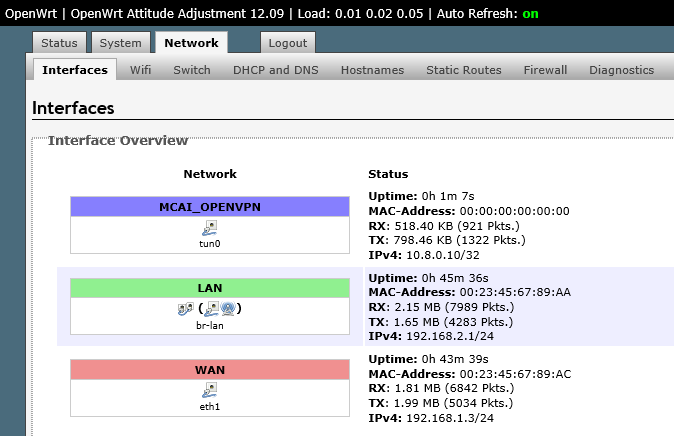
手动为 OpenVPN 创建一个新的端口,给它取个名字。
cat >> /etc/config/network << EOF
config interface 'MY_OPENVPN'
    option proto 'none'
        option ifname 'tun0'
EOF
/etc/init.d/network restart
这时网络会断一下,重新连上后登陆管理界面,可以看到这个新建的端口。
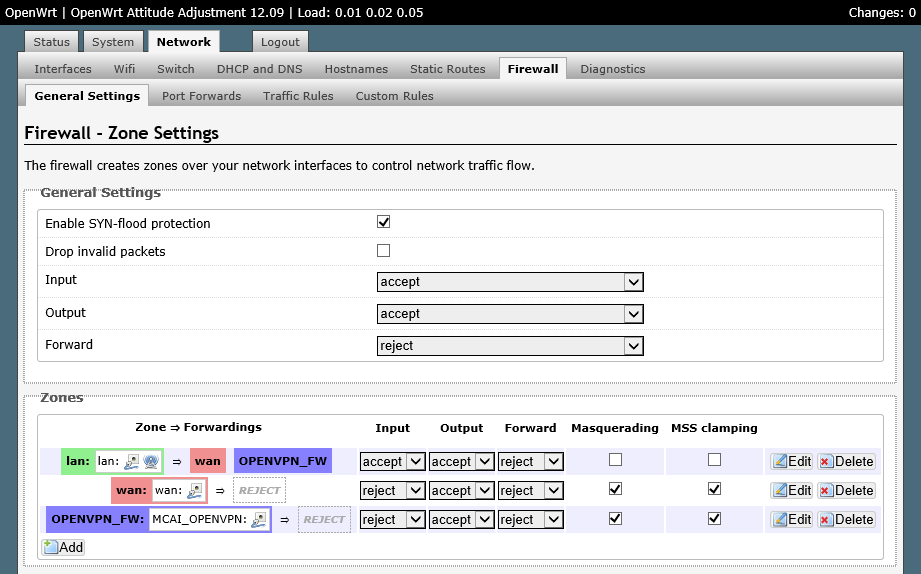
然后,需要为 OpenVPN 新建一个 Firewall Zone。指定让所有连接到路由器的设备都走到 OpenVPN 的端口。
cat >> /etc/config/firewall << EOF
config zone
    option name 'OPENVPN_FW'
    option input 'REJECT'
    option output 'ACCEPT'
    option forward 'REJECT'
    option masq '1'
    option mtu_fix '1'
    option network 'MY_OPENVPN'

config forwarding
        option dest 'OPENVPN_FW'
        option src 'lan'
EOF
/etc/init.d/network restart
/etc/init.d/firewall restart
网络再会断一下,重新连上后登陆管理见面,可以看到这个新建的 Firewall Zone。
现在,将刚才在 Windows 上做测试时创建的 client1.ovpn 文件转成 Unix 格式,然后上传到路由器。假设路由器地址是 192.168.2.1。
dos2unix client1.ovpn
scp client1.ovpn [email protected]:/etc/openvpn/
终于可以在路由器上开启 OpenVPN 了。
openvpn --cd /etc/openvpn --config /etc/openvpn/client1.ovpn &如果一切顺利,你可以看到下面这些日志信息。将你的手机或者电脑练到路由器上试试吧,应该已经在墙外了。恭喜你!
Fri May 15 22:53:59 2015 TUN/TAP device tun0 opened
Fri May 15 22:53:59 2015 TUN/TAP TX queue length set to 100
Fri May 15 22:53:59 2015 /sbin/ifconfig tun0 10.8.0.10 pointopoint 10.8.0.9 mtu 1500
Fri May 15 22:53:59 2015 /sbin/route add -net 168.63.213.180 netmask 255.255.255.255 gw 192.168.1.1
Fri May 15 22:53:59 2015 /sbin/route add -net 0.0.0.0 netmask 128.0.0.0 gw 10.8.0.9
Fri May 15 22:53:59 2015 /sbin/route add -net 128.0.0.0 netmask 128.0.0.0 gw 10.8.0.9
Fri May 15 22:53:59 2015 /sbin/route add -net 10.8.0.0 netmask 255.255.255.0 gw 10.8.0.9
Fri May 15 22:53:59 2015 Initialization Sequence Completed
如果需要设置路由器启动时自动开启 OpenVPN,将命令行添加到 /etc/rc.local 文件里。
# Put your custom commands here that should be executed once
# the system init finished. By default this file does nothing.
openvpn --cd /etc/openvpn --config /etc/openvpn/client1.ovpn &
exit 0
如果感觉网速太慢,可以尝试一下同时在服务器端的 server.conf 文件和客户端的 client1.ovpn 文件里插入下面的配置。
sndbuf 0
rcvbuf 0
GOOD LUCK!!!


