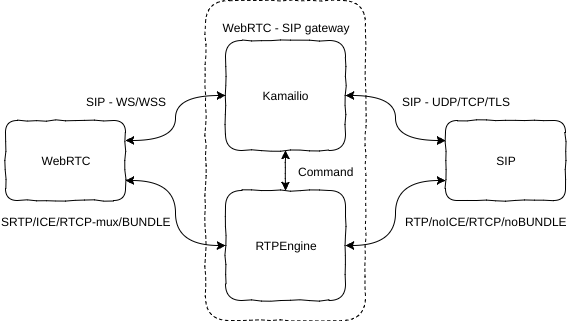
How to setup Kamailio + RTPEngine + TURN server to enable calling between WebRTC client and legacy SIP clients. This config is IPv6 enabled by default. This setup will bridge SRTP --> RTP and ICE --> nonICE to make a WebRTC client (sip.js) be able to call legacy SIP clients. The WebRTC client can be found here.
This setup is for Debian 10 Buster.
This setup is configured to run with the following services:
- Kamailio + RTPEngine + Nginx (proxy + WebRTC client) + coturn
The configuration is setup to always bridge via RTPEngine. To change the behavior, take a look in the NATMANAGE route.
For the certificates you need, a simple solution is Let's Encrypt certificates. They will work for both Kamailio TLS, Nginx TLS and TURN TLS. Run the following (you must stop services running on port 443 during certificate request/renewal):
apt-get install certbot
certbot certonly --standalone -d YOUR-DOMAIN
You will then find the certificates under:
/etc/letsencrypt/live/YOUR-DOMAIN/privkey.pem
/etc/letsencrypt/live/YOUR-DOMAIN/fullchain.pemAll files needed to setup all components on Debian 9 Stretch.
git clone https://github.com/havfo/WEBRTC-to-SIP.git
cd WEBRTC-to-SIP
find . -type f -print0 | xargs -0 sed -i 's/XXXXXX-XXXXXX/PUT-IPV6-OF-YOUR-SIP-SERVER-HERE/g'
find . -type f -print0 | xargs -0 sed -i 's/XXXXX-XXXXX/PUT-IPV4-OF-YOUR-SIP-SERVER-HERE/g'
find . -type f -print0 | xargs -0 sed -i 's/XXXX-XXXX/PUT-DOMAIN-OF-YOUR-SIP-SERVER-HERE/g'This will do the SRTP-RTP bridging needed to make WebRTC clients talk to legacy SIP server/clients. You can find the latest build instructions in their readme.
The easiest way of installing is to get it from Sipwise repository:
echo 'deb https://deb.sipwise.com/spce/mr9.4.1/ buster main' > /etc/apt/sources.list.d/sipwise.list
echo 'deb-src https://deb.sipwise.com/spce/mr9.4.1/ buster main' >> /etc/apt/sources.list.d/sipwise.list
wget -q -O - https://deb.sipwise.com/spce/keyring/sipwise-keyring-bootstrap.gpg | apt-key add -
apt-get update
apt-get install -y ngcp-keyring ngcp-rtpengine
After you have successfully installed RTPEngine, copy the configuration from this repository.
cd WEBRTC-to-SIP
cp etc/default/ngcp-rtpengine-daemon /etc/default/
cp etc/rtpengine/rtpengine.conf /etc/rtpengine/
/etc/init.d/ngcp-rtpengine-daemon restartRTPEngine handles the chain for itself, but make sure to not block the RTP-ports it is using. Take a look in iptables.sh for details, and apply it by doing the following. This will persist after reboot. You can run the iptables.sh script at any time after it is set up.
cd WEBRTC-to-SIP
chmod +x iptables.sh
cp etc/network/if-up.d/iptables /etc/network/if-up.d/
chmod +x /etc/network/if-up.d/iptables
touch /etc/iptables/firewall.conf
touch /etc/iptables/firewall6.conf
./iptables.shapt-get install kamailio kamailio-websocket-modules kamailio-mysql-modules kamailio-tls-modules kamailio-presence-modules mysql-server
cd WEBRTC-to-SIP
cp etc/kamailio/* /etc/kamailio/
kamdbctl createSelect yes (Y) to all options.
kamctl add websip websip
service kamailio restartThis will install the client that can be found here.
To be able to support running HTTP(S) and TURN on the same port (443), we need a newer version of nginx that supports streams the way we need. Get it from official repo:
echo 'deb http://nginx.org/packages/mainline/debian/ buster nginx' > /etc/apt/sources.list.d/nginx.list
curl -fsSL https://nginx.org/keys/nginx_signing.key | apt-key add -
apt-get update
apt-get install nginx
cd WEBRTC-to-SIP
cp etc/nginx/nginx.conf /etc/nginx/
cp etc/nginx/conf.d/default.conf /etc/nginx/conf.d/
cp -r client/* /var/www/html/
service nginx restartapt-get install coturn
cp etc/default/coturn /etc/default/
cp etc/turnserver.conf /etc/
service coturn restartYou should now be able to go to https://XXXX-XXXX/ and call legacy SIP clients. Click the account icon in the top right corner and add the following settings:
- Display name: Whatever
- SIP URI: websip@XXXX-XXXX
- Password: websip
- Outbound Proxy: wss://XXXX-XXXX/ws
To manually configure other TURN servers, change the config in client/config.js.
