A modern customer relationship and analytics platform

| Software | Version |
|---|---|
| Node.JS | >=4.0.0 |
| Redis | >=2.0.0 |
| MySQL or Postgres | "modern" |
Dashboard
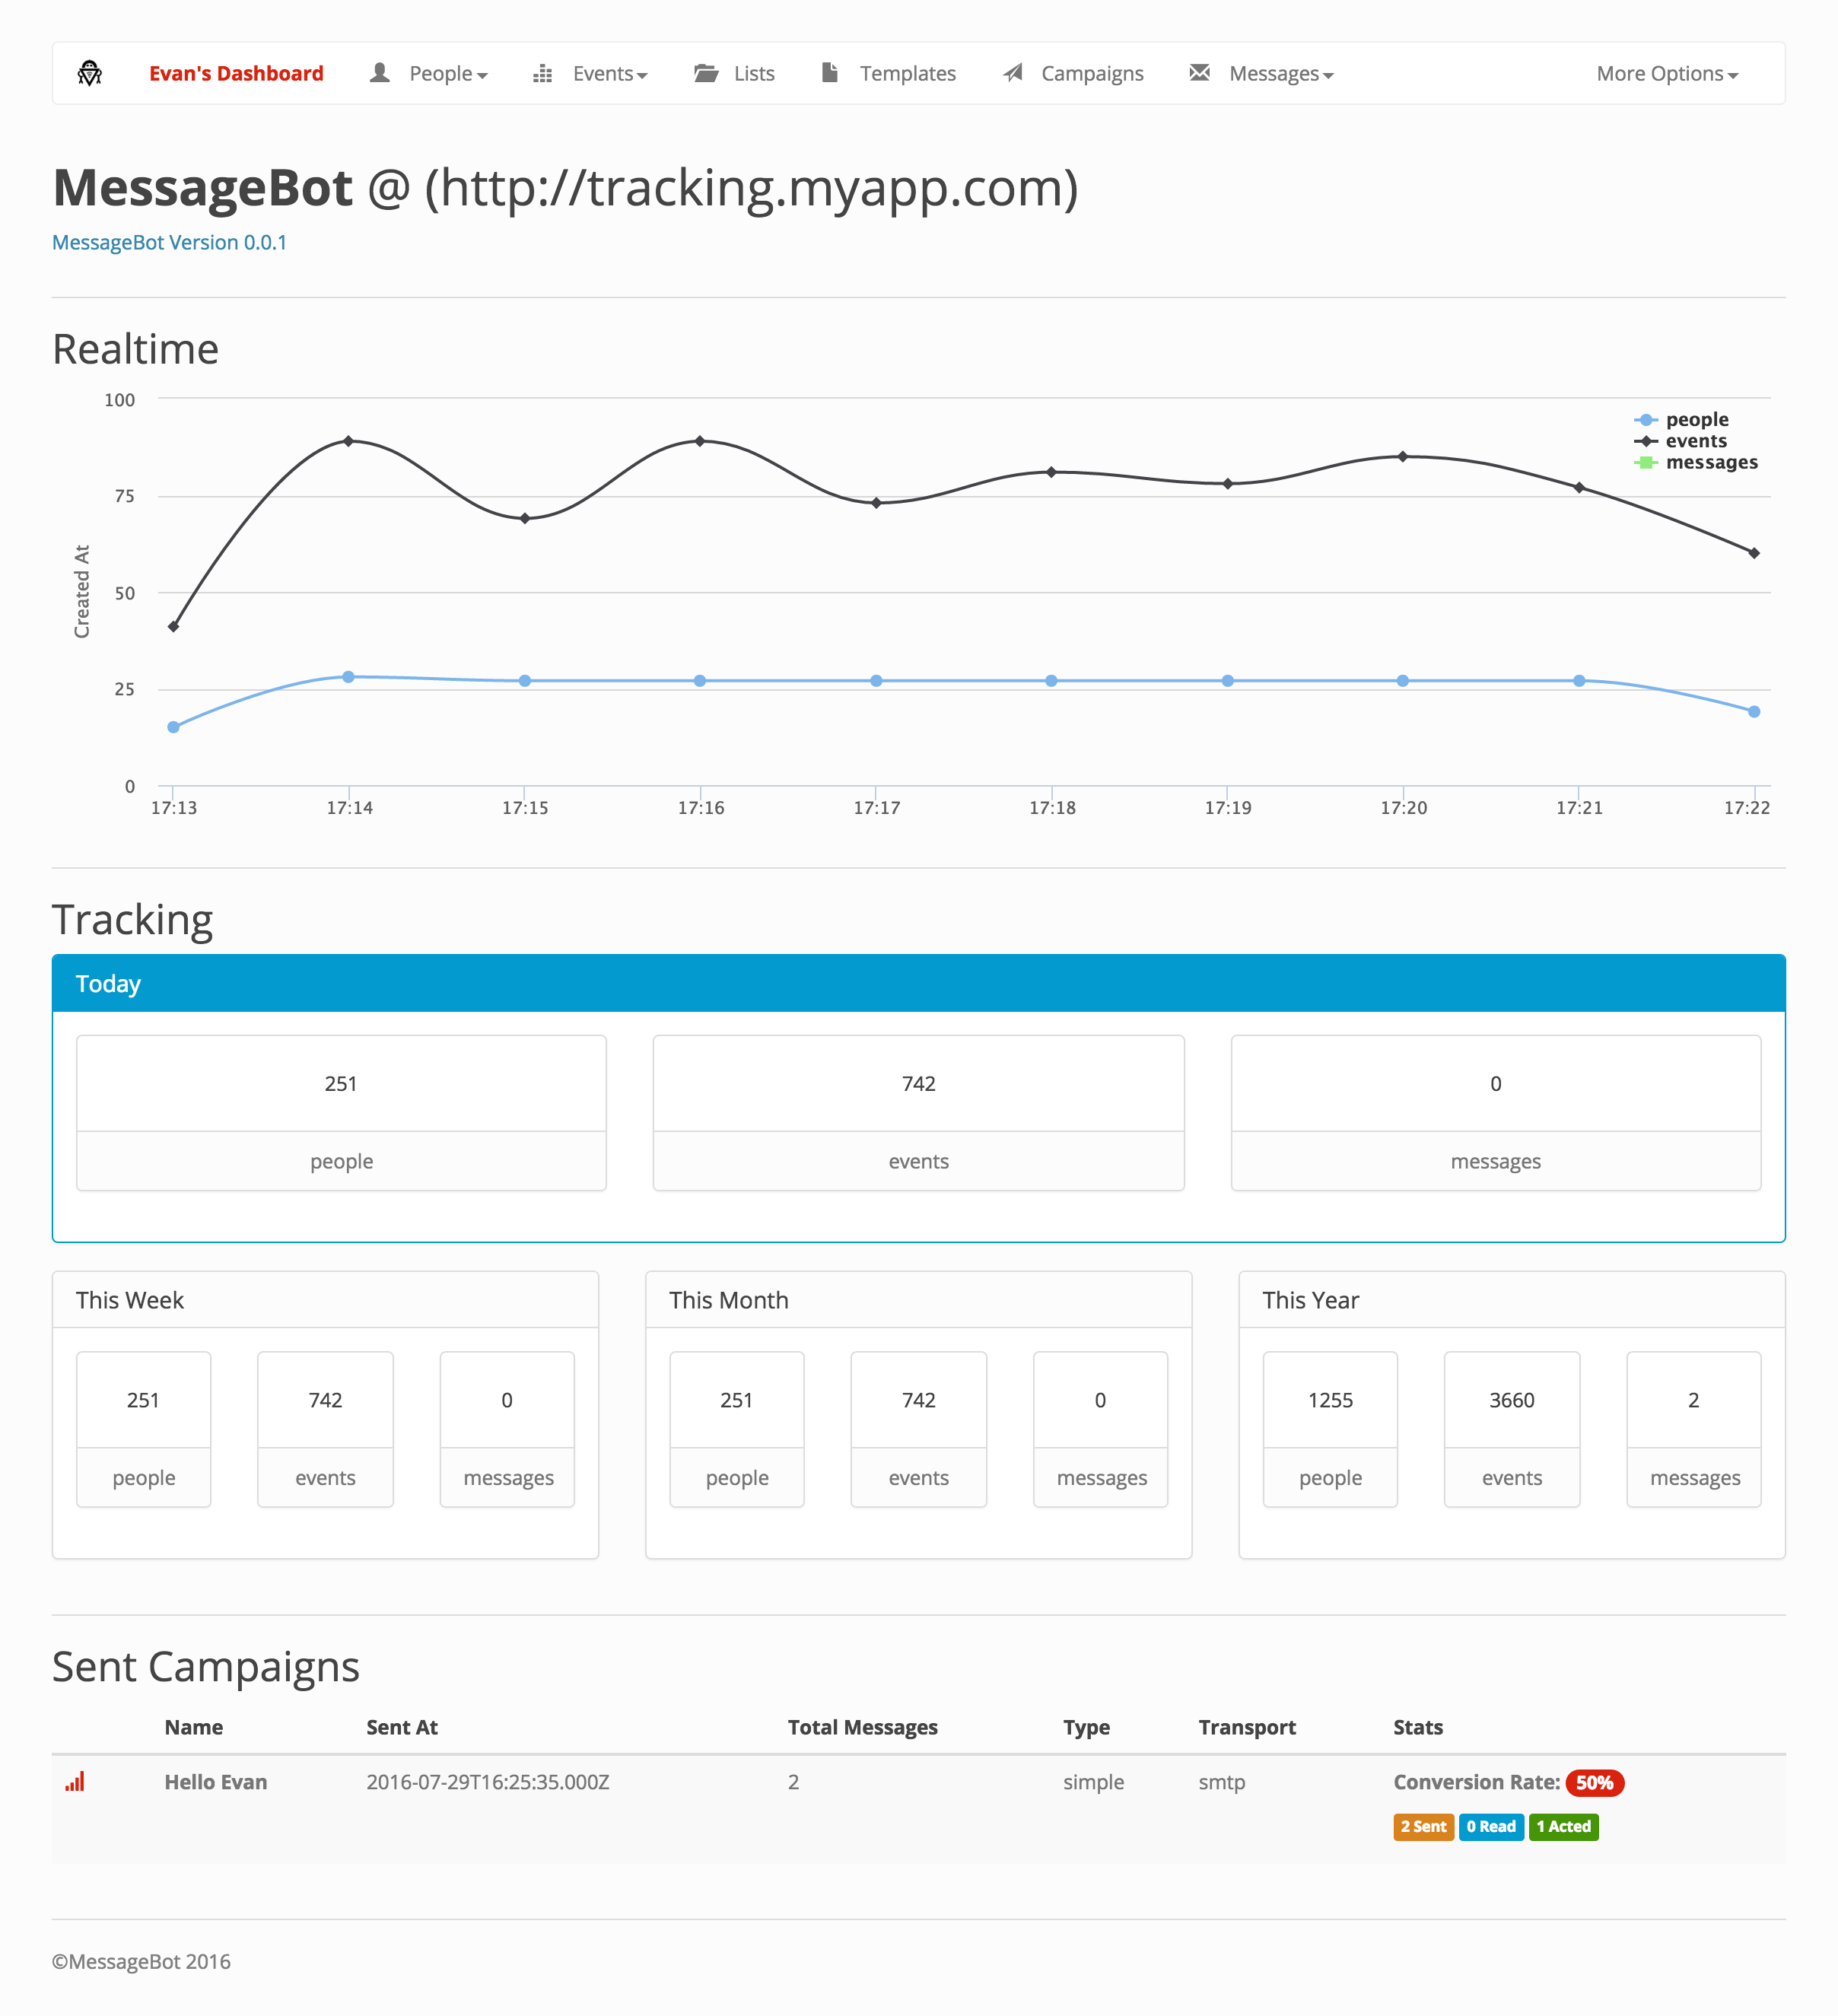
|
Search Results
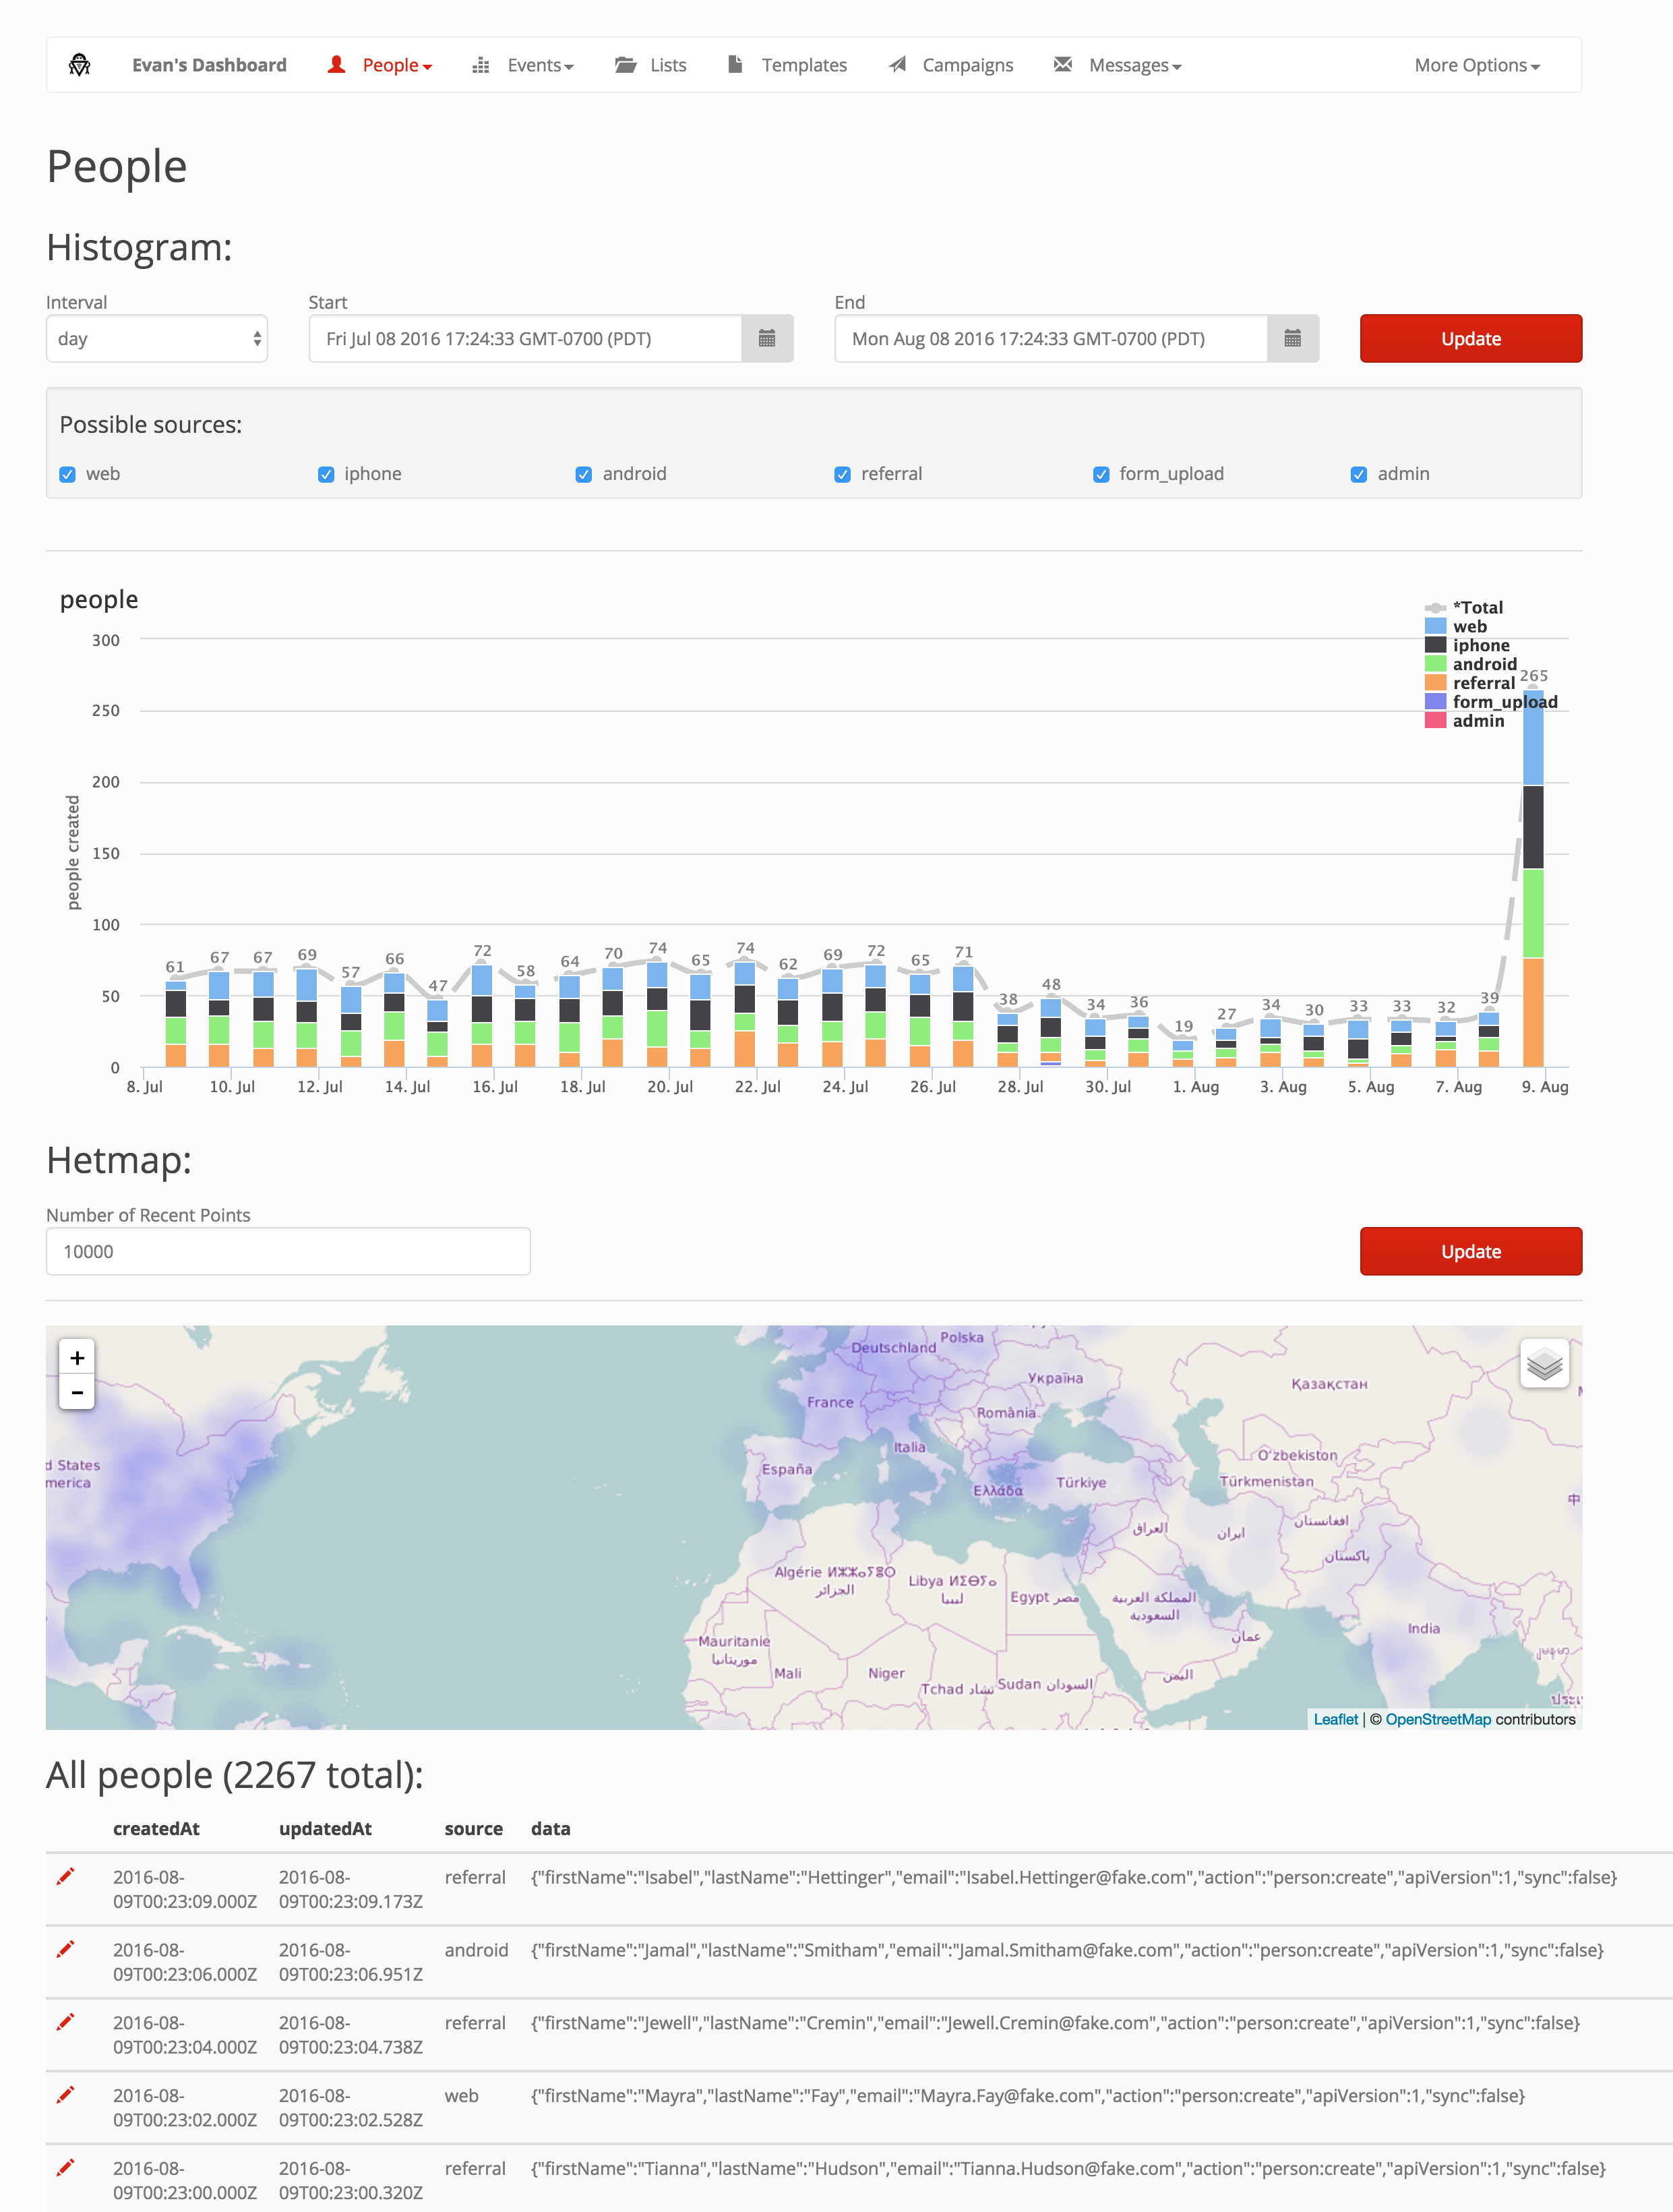
|
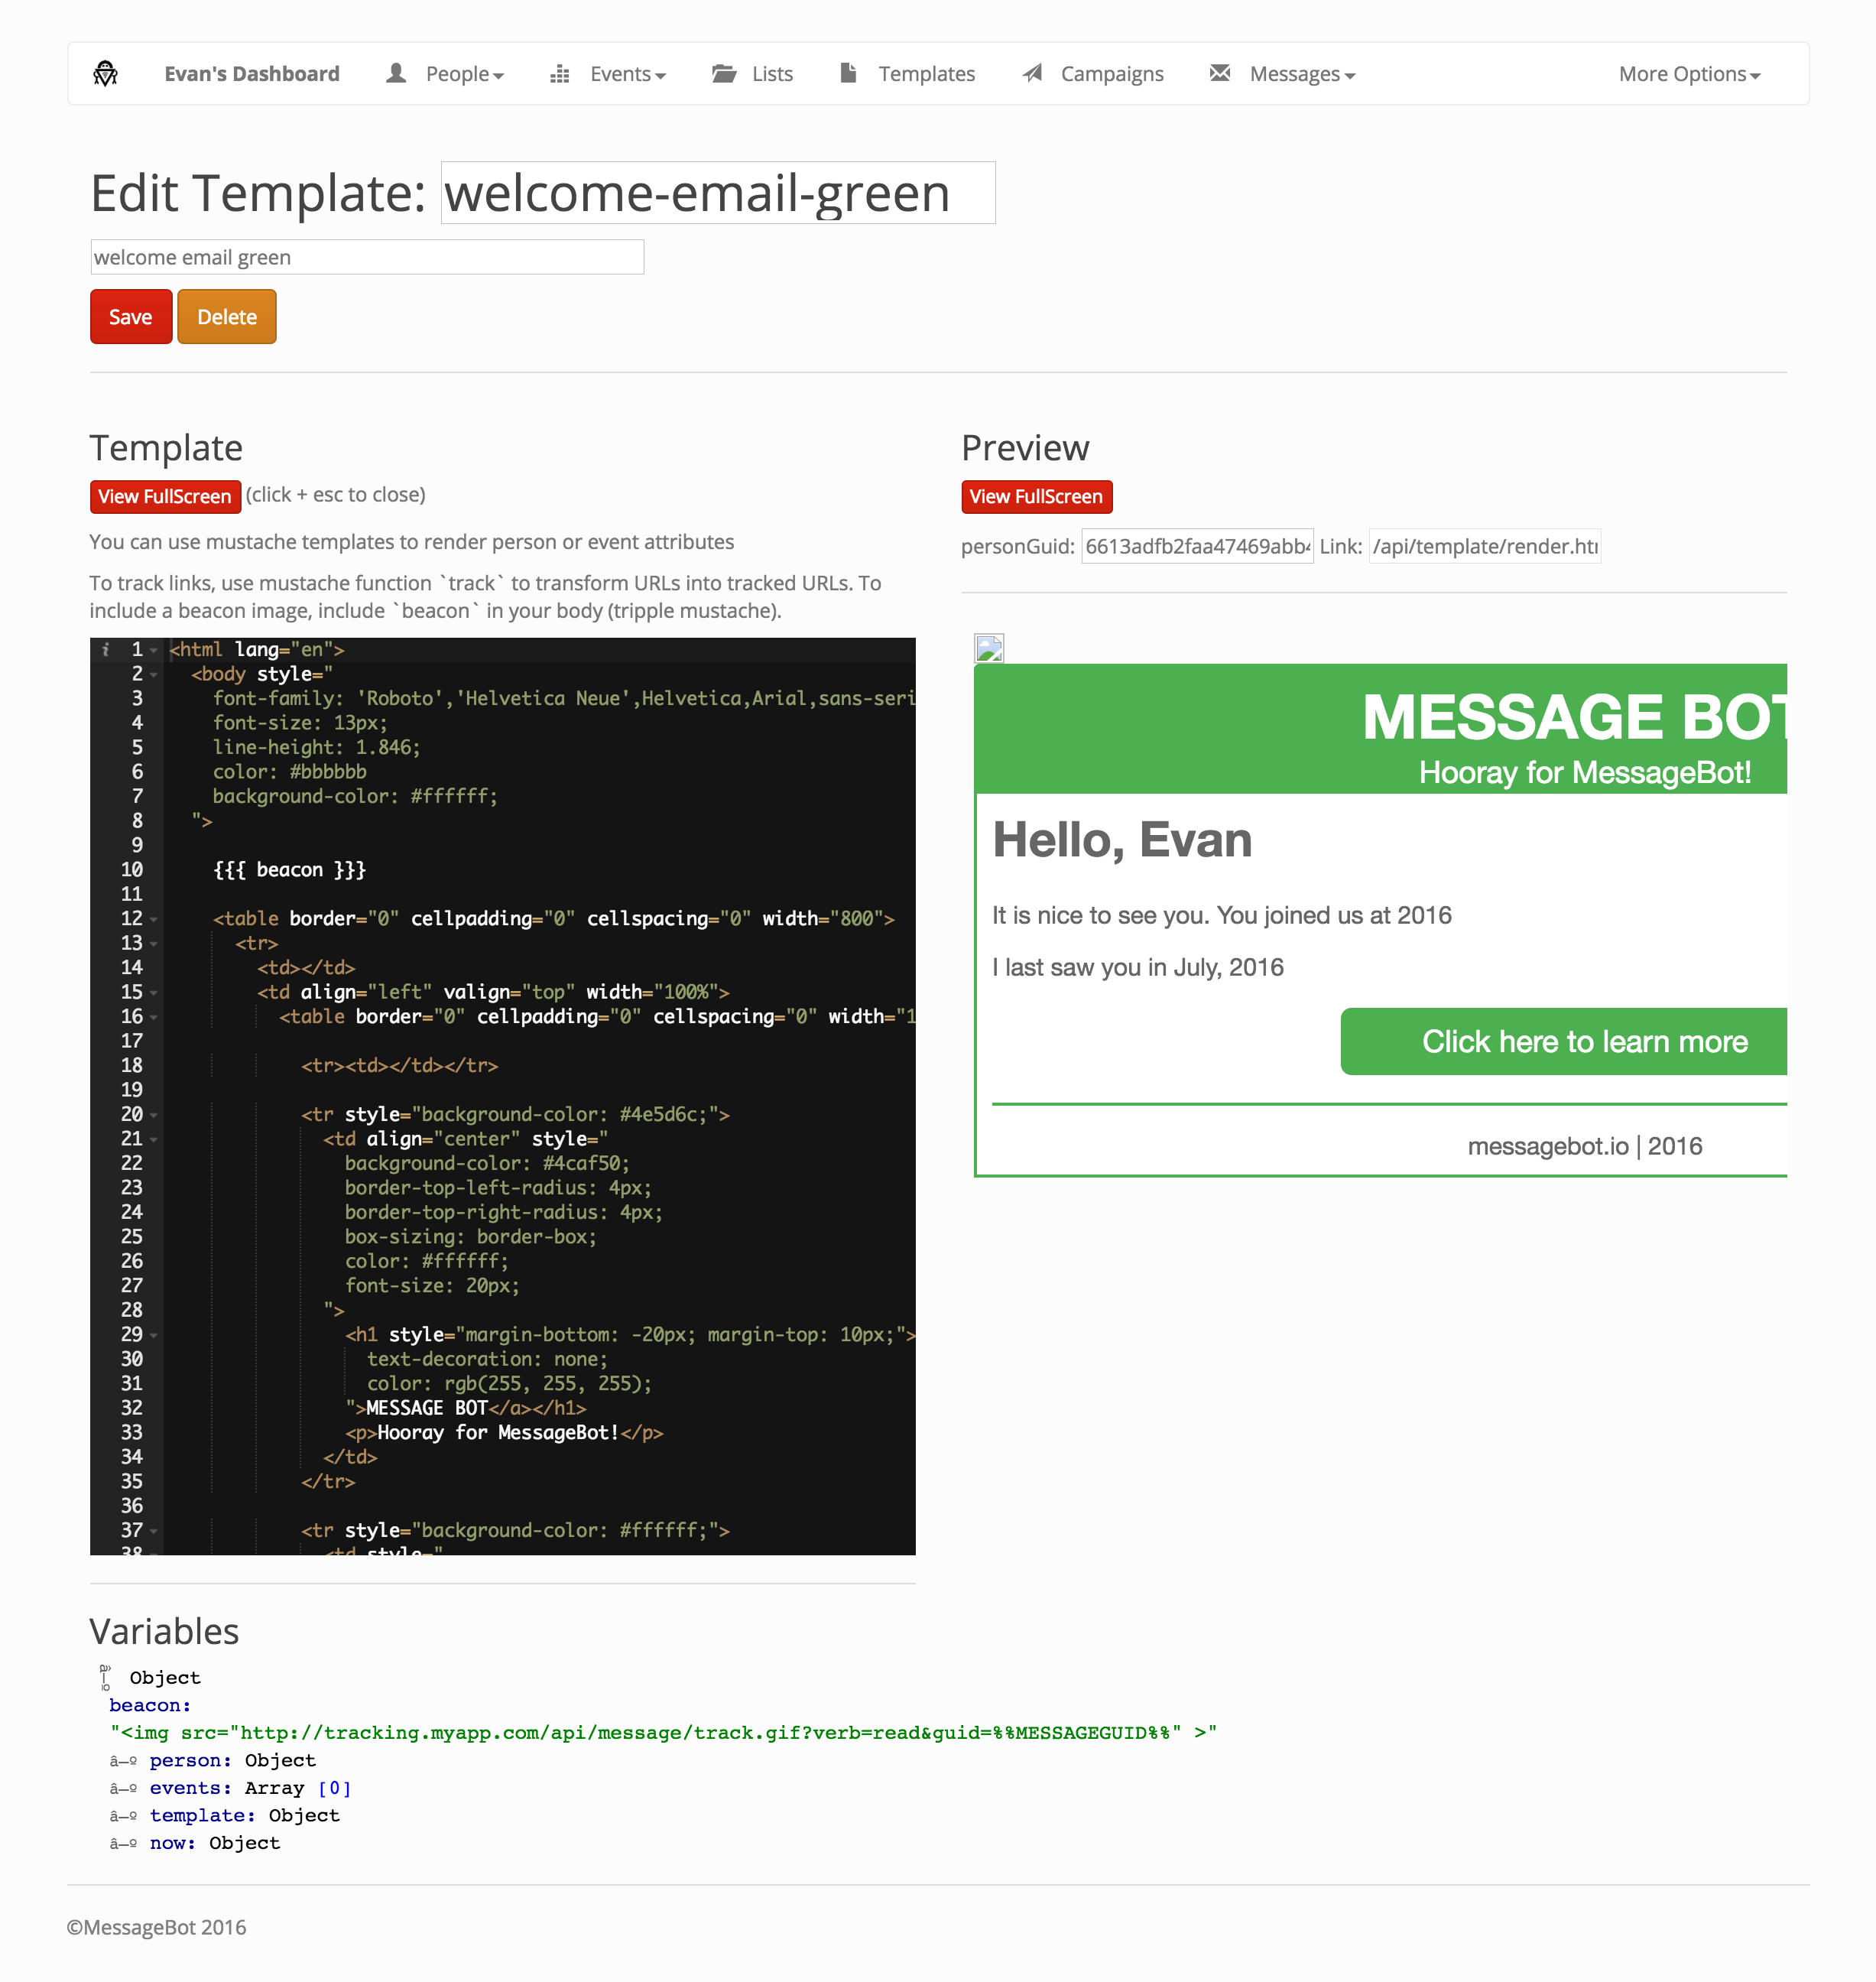
Template Creation
|
System Status

|
npm installcp .env.example .env, and adjust according to your system/needs
- Start
redis - Start your relational database, IE:
mySQL- be sure to create the database you need for development, IE:
- (mysql)
mysql -u root -e "crete database messagebot_development" - (postgres)
createdb messagebot_development
- (mysql)
- Install any additional database drivers needed for your relational database:
npm install --save pg pg-hstorenpm install --save mysql- etc
- be sure to create the database you need for development, IE:
- Configure
.envwith the secrets you need, or ensure that they are already present within the environment- ensure that the databases you listed exist and that the user(s) you have configured can reach & access them
- Source your environment, ie:
source .env - Create the First Team from the CLI:
npx actionhero messagebot team create --name MessageBot --trackingDomainRegexp "^.*$" --trackingDomain "http://tracking.myapp.com" --email="[email protected]" --password="password"- This will also create the first admin user for this team. Take note of this user's email and password.
- Start the App:
npm start
Run npm run migrate to migrate the database.
To generate seed data, you can run 2 faker commands:
npm run faker:seedwill generateprocess.env.USERS_COUNT || 1000users who follow the funnel between now and 30 days ago.npm run faker:runwill start generating fake users and events now, creating a new one everyparseInt(process.env.SLEEP) || (1000 * 2.2)ms
Both faker commands follow a funnel designed to emulate a simple e-commerce applications conversion funnel. Reaching the final thank you page will also genearte a purchase event.
exports.funnel = [
  { pages: ['index.html'],                                                rate: 1.00 },
  { pages: ['about.html', 'learn_more.html'],                             rate: 0.50 },
  { pages: ['signup.html', 'log-in.html'],                                rate: 0.50 },
  { pages: ['cool-hat.html', 'aweseome-shoes.html', 'ugly-sweater.html'], rate: 0.30 },
  { pages: ['cart.html'],                                                 rate: 0.50 },
  { pages: ['checkout.html'],                                             rate: 0.50 },
  { pages: ['thank-you.html'],                                            rate: 0.99 },
];
Users will be assigned one of the following sources at random:
exports.sources = ['web', 'iphone', 'android', 'referral'];The funnel and sources can be modified via db/fakers/common.js
The MessageBot CLI is used to manage system-level data, IE: the creation and removal of teams. You can learn more about the CLI by running ./bin/messsagebot help
npm test should postinstall and run everything you need, including the creation and seeding of your database. Ensure that the environment and various config files are prepared correctly.
Notes
- At this time, the test suite will only run on MySQL or Postgres, and assumes the test databases are local (on the same host) as where you are running the test suite code.
- The test suite will configure a new redis database to be used equal to your normal database ID + 1
This product includes GeoLite2 data created by MaxMind, available from www.maxmind.com.
MessageBot Plugins are normal ActionHero Plugins. They can be installed from NPM, Git, or locally checked into your project. In additional to the normal creation of Actions and Initializers, you can also modify the core of MessageBot:
If your plugin requires that a team configure a setting, you can use the setting API:
api.teams.settings.push({
  key: 'client:tracking:web:cookieExpiry',
  value: (1000 * 60 * 60 * 24 * 365), // 1 year
  description: 'How long to store the personId cookie in the browser for (ms)'
});
Please use verbose key names like the above to avoid collisions. You can add your key in any initializer.
Transports let you send messages by other mediums. Transports have a name, description, requiredDataKeys (properties of events and people which must exists and are used to send the message), campaignVariables (properties which must be sent when creating a campaign using this transport), and finally a deliver() method.
The deliver() method accepts a payload (which contains body and the campaignVariables), a person, and a callback.
The simplest transport, logger (which just logs the message to MessageBot's logs) would be:
// in an initializer
let transport = {
  name: 'logger',
  description: 'for testing messages by sending them to a log file',

  requiredDataKeys: {
    person: ['firstName', 'lasName']
  },

  campaignVariables: [
    'logPrefix',
    'logLevel',
  ],

  deliver: function(payload, person, callback){
    let message = '';
    message += '[' + payload.logPrefix + ' | to ' + person.data.data.firstName + ' ' + person.data.data.firstName + '] ';
    message += payload.body;

    api.log(message, payload.logLevel);
    return callback();
  }
}

api.transports.push(transport);To Modify the navigation elements of the application (the top-nav of the website), use api.navigation.navigation:
api.navigation.navigation.push({
  title: 'Data',
  align: 'left',
  glyphicon: 'glyphicon-equalizer',
  loggedIn: true,
  elements: [
    {route: '/#/people/recent', title: 'People: Recent', glyphicon: 'glyphicon-user', highlights: ['^\/people\/recent.*$']},
    {route: '/#/people/search', title: 'People: Search', glyphicon: 'glyphicon-user', highlights: ['^\/people\/search.*$']},
    {route: '/#/person/new', title: 'Person: New', glyphicon: 'glyphicon-user', highlights: ['^\/person\/new$']},
    {divider: true},
    {route: '/#/events/recent', title: 'Events: Recent', glyphicon: 'glyphicon-equalizer', highlights: ['^\/events\/recent.*$']},
    {route: '/#/events/search', title: 'Events: Search', glyphicon: 'glyphicon-equalizer', highlights: ['^\/events\/search.*$']},
    {route: '/#/event/new', title: 'Event: New', glyphicon: 'glyphicon-equalizer', highlights: ['^\/event\/new$']},
    {divider: true},
    {route: '/#/messages/recent', title: 'Messages: Recent', glyphicon: 'glyphicon-envelope', highlights: ['^\/messages\/recent.*$']},
    {route: '/#/messages/search', title: 'Messages: Search', glyphicon: 'glyphicon-envelope', highlights: ['^\/messages\/search.*$']},
    // {route: '/#/message/new', title: 'Message: New', glyphicon: 'glyphicon-envelope', highlights: ['^\/message\/new$']},
  ]
});When rendering templates to your users, including {{{ beacon }}} will insert a tracking image into the body of your message (for HTML messages/emails). You can also refrence {{{ view.beconLink }}} to obtain just the URL for the tracking image. URLs will take the form of {{ team.trackingDomain }}/api/message/track.gif?verb=read&guid={{ messageGuid }}.
Loading this image denotes the message was "viewed", updating the message and creating an event for having viewed the message.
Any HTML links in your template can be configured to track the click, and therefore mark the message as 'acted'. Use the track function, ie: {{#track}}http://messagebot.io{{/track}}. This will transform your links to something of the form: {{ team.trackingDomain }}/api/message/track.gif?verb=act&guid={{ messageGuid }}&link=http://messagebot.io
You can include template within other templates as well. Use the mustache function include, and pass the name or ID of the template you want to include, ie: {{#include}}footer{{/include}}.
- You'll get a link to the client-side JS from the settings page.
- Include it in your app (
<script src="https://tracking.yoursite.com/api/client"></script>)
// Init the person we are tracking
// This will automatically capture relevant browser data
// If you don't have a PersonID, we will generate one at random.
// We will set a cookie with this personID, so on subsequent pages you don't need to set it
//   nor will you need to call init again manually
MESSAGEBOT.init('<your PersonID>');
// If you pass your PersonID via the URL, you can get it
MESSAGEBOT.init( MESSAGEBOT.getURLParameter('personID') );

// You can modify/add extra properties to the person
MESSAGEBOT.person.edit({firstName: 'tester'});

// You can also display what MessageBot knows about the person
// We'll also update `MESSAGEBOT.data.person` to inspect later
MESSAGEBOT.person.hydrate(function(error, data){ console.log(data); });

// And you can delete the person
MESSAGEBOT.person.delete();

// People can opt in/out of your communications as well
// Opt Out of one list:
MESSAGEBOT.person.opt({direction: 'out', listGuid: 123});
// Opt back in:
MESSAGEBOT.person.opt({direction: 'in', listGuid: 123});
// Opt out of all communications all together:
MESSAGEBOT.person.opt({direction: 'out', global: true});Tracking events is as simple as:
// simple
MESSAGEBOT.track({type: 'pageview'});

// complex
MESSAGEBOT.track({
  type: 'purchase',
  data: {
    value: 12.50, tax: 0.50, products: [
      {name: 'car', make: 'Toyota', model: 'Prius', price: 12.00}
    ]
  }
});
Tracking an event will automatically append many relevant variables about the page, like referrer, href, browser type, etc. You can track events at any time, even before the person is initialized. We'll wait until the person is loaded up until actually sending events to the server.
TODO
TODO