👨🏻🍳 Let's cook a DeFi staking program together! We will use a top-down approach to build this. This is not a simple copy and paste article. Instead, this is more a pair programming style challenge where we will peel the onion by layer and ask ourselves the questions required to complete this project. We will uncover the ingredients necessary to construct a staker program in Solana in the process.
If you are an Etherean, ex etherean, or cyborg etherean-solanian 😁, please jump to the EVM Comparison.
🍭 TL;DR - Github
The code in this article is not exhaustive. Instead, it will illustrate the important pieces so that you develop the mental model to build a DeFi program yourself in the future.
Please don't try to copy-paste any of the code here. It probably won't compile. I have reduced the noise on purpose. However, the complete code is available here. Feel free to look at it along with the article or clone it locally and try it.
This is not an intro to Solana and blockchains. If you are not familiar with the Account Model, I highly recommend that you familiarize yourself with my introduction first. Also, knowing what PDAs are could be helpful, but you can also dig into it afterward here.
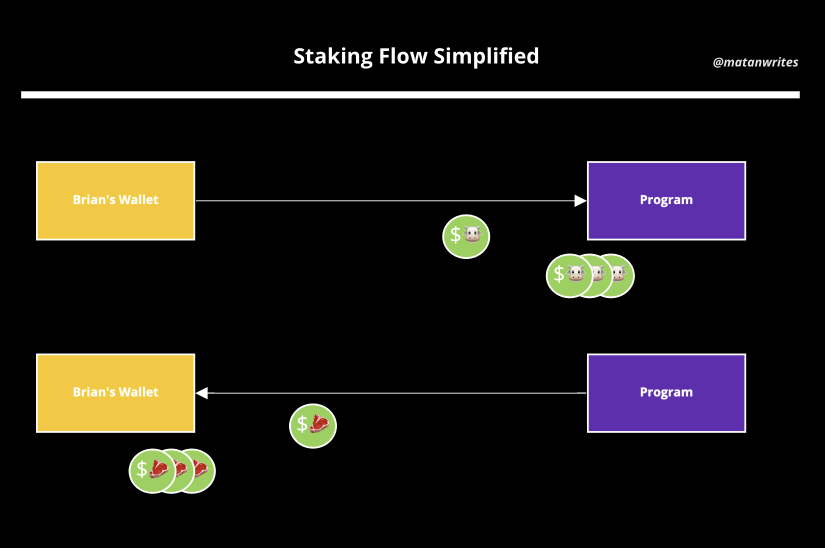
What is Staking? Staking is lending your tokens into a vault in exchange for a reward token. For example, some vaults might lock your tokens for some duration, while some do not. Some vaults even give you additional rewards based on the number of tokens staked.
Our mission, if you accept it, is to build a Solana program that:
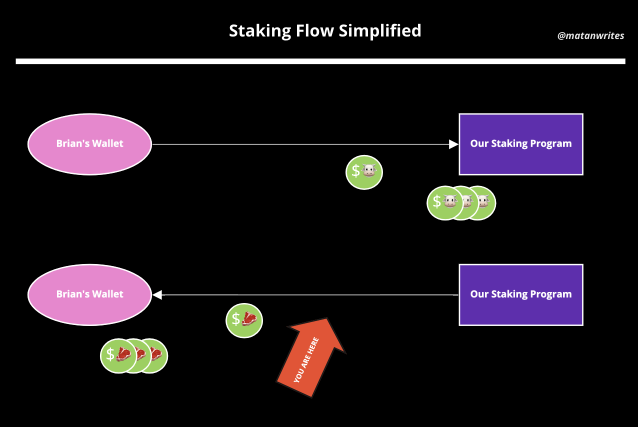
- Let users stake (lend)
$🐮 to our program in exchange for $ 🥩. - Let users unstake (or redeem) their
$🥩 for the original $ 🐮 and make a profit (or loss!) on it.
You might know that there are several ways to stake. In some dapps, your stakes are locked. In others, you don't even get a reward token. This article will focus on staking a $token in exchange for a $sToken where the value of $sToken increases over time by just holding it.
Humans have two faces, and Solanians have three.
As usual with Solana, we need to prepare accounts ahead of time before feeding them to our programs. We will need to wear different hats, roles, and faces to understand how to build a staker app on Solana.
We will need to work with Solana before touching any rust to create accounts. We will also need to look at the client-side to see how the flow should work. Finally, we will implement the Solana program on the rust side.
In this episode of Hell's Kitchen
In this article, we will make an attempt to the staking feature of our program, staking consist of:
- Minting 🥩tokens to users.
- Transfering 🐮 from users to the program.
We will make an attempt to the minting part which will lead us to discover several ingredients:
- Creating a SPL-Token.
- Signing with a PDA.
- Associated Token Accounts.
- Cross-Program Invocations.
The preparation of these ingredients will be 80% of the work, as these are the core skills needed to make other recipes. So most of our effort will be to understand and prepare these ingredients to complete the minting part. The transfer will be cover in part 2.
Contributor to this joke: Austin Griffith
I assume this is not your first Solana experience, and you already had all the tools installed. If not, please install all the toolchains, and I highly recommend familiarizing yourself with the account model first.
The code in this article is not exhaustive. Instead, it will illustrate the crucial pieces so that you develop the mental model to build a DeFi program yourself in the future. I will be using simplified rust and js code.
The repo, however, contains the complete code that you can build and test. Please clone the project:
git clone [email protected]:mwrites/solana-staker.gitFYI, I have added the dependencies for the SPL Token Program in Cargo.toml:
anchor-spl = "0.29.0"
And in package.json:
{
	"dependencies": {
		"@coral-xyz/anchor": "^0.29.0",
        "@solana/spl-token": "^0.4.0"
	},
	"devDependencies": {
		"chai": "^4.3.4",
        "mocha": "^9.0.3",
        "ts-mocha": "^10.0.0",
        "@types/bn.js": "^5.1.0",
        "@types/chai": "^4.3.0",
        "@types/mocha": "^9.0.0",
        "typescript": "^4.3.5",
        "prettier": "^2.6.2"
	},
}
Install dependencies:
yarn installThe main feature we want to build is staking. We need to exchange the user's
Let's start with this, how can our program mint 🥩 to the user?
So the function signature for staking should look something like this:
pub fn stake(ctx: Context<Stake>, amount: u64) -> Result<()>Instead of diving into implementation details, let's see what we expect the stake instruction to do from the client's or test's perspective:
    it('It swaps $🐮 for $🥩', async () => {
        // 1. Get user current stake amount
        const userStakes = await user.stakeBalance();

        // 2. Execute our stuff
        await program.rpc.stake(
	        ...,
	        new anchor.BN(5)}
	    );

        // 3. After:
        // We expect the user to have received 5 $🥩
        expect(await user.stakeBalance()).to.be.eql((await user.stakeBalance()) + 5);

    });
Let's try to implement stake on the rust side:
use anchor_spl::token::{self, Mint, Token};


#[program]
pub mod staking {
	fn stake(ctx: Context<Stake>, beef_amount: u64) -> Result<()> {

		// don't worry about the math for now
		let stakeAmount = beef_amount;

		let cpi_ctx = CpiContext::new_with_signer(
			// SPL Token Program's public address, to reference it
			ctx.accounts.token_program.to_account_info(),

			// The Arguments for the MintTo Instruction.
			token::MintTo {
				mint: // ?,
				authority: // ?,
				to: // ?,
			},
			&signer,
		);
		token::mint_to(cpi_ctx, stakeAmount);

		Ok(())
	}
}


pub struct Stake<'info> {
    // SPL Token Program.
	pub token_program: Program<'info, Token>,
}
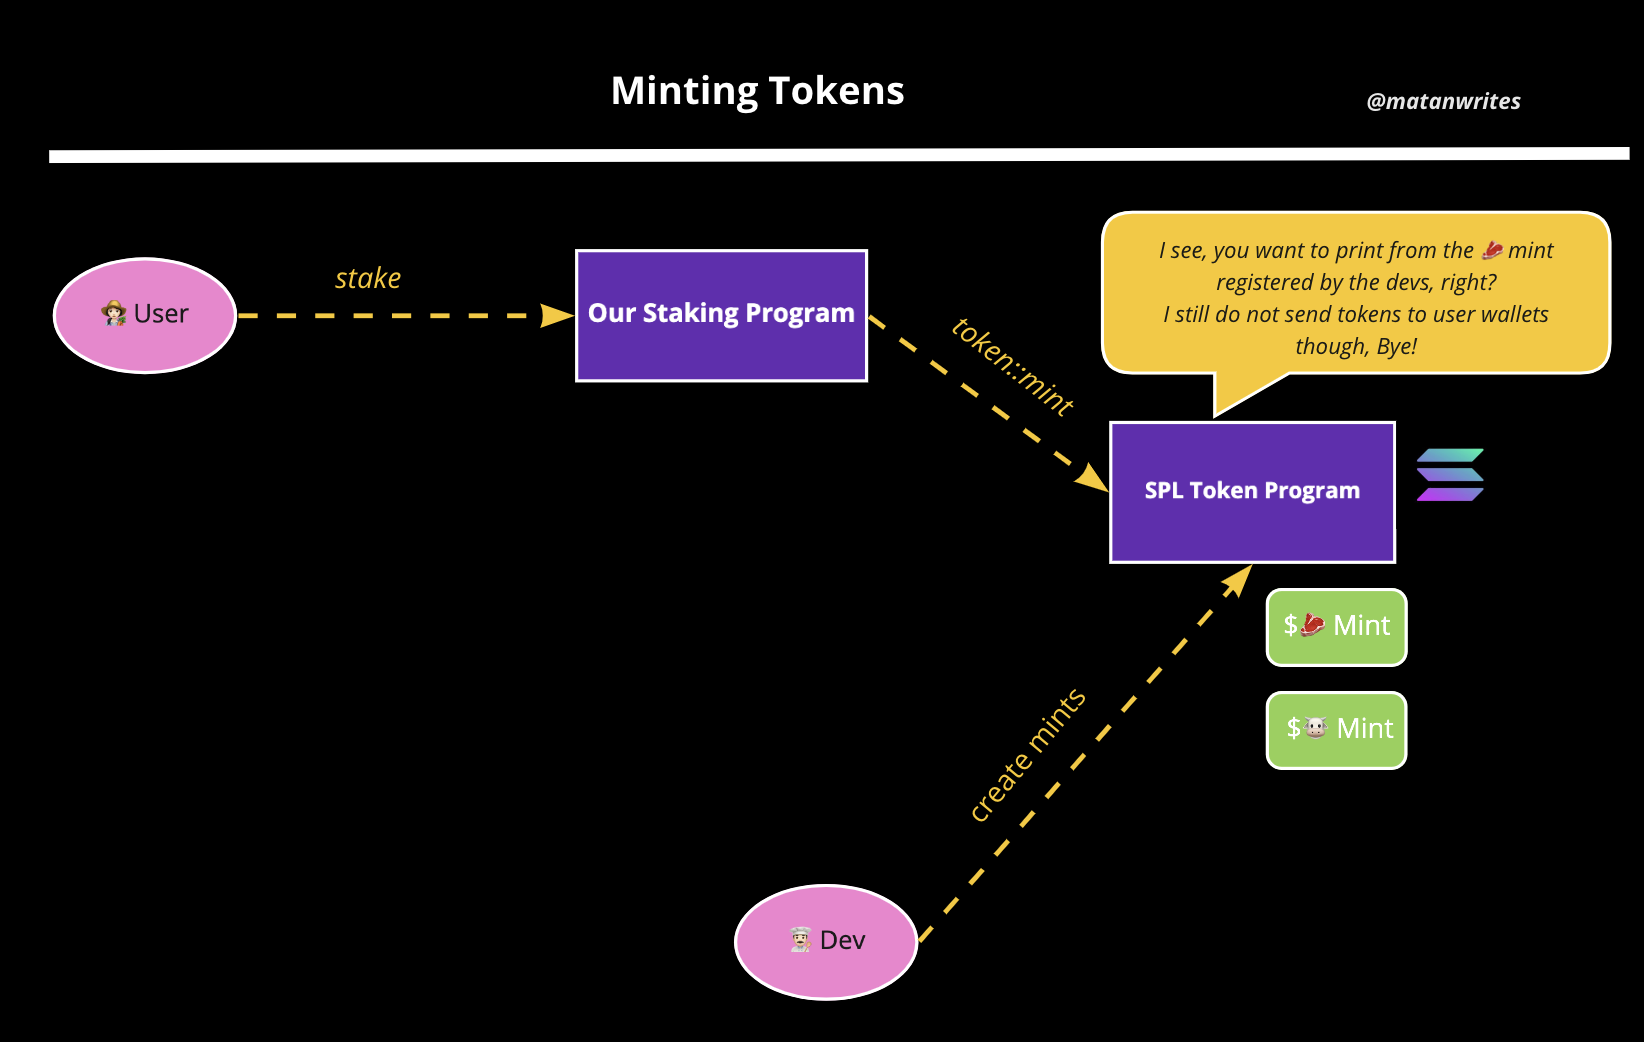
anchor_spl::token::is the SPL Token Program. We will see very soon what it is.- Minting Tokens is done using Cross-Program Invocation. This cult-like word just means calling another program. In that case, we are asking the SPL Token Program to do the minting.
- In the same way, our own program's instructions take context arguments, calling another program also takes context arguments. The
mint_toinstruction is defined by anchor here.
This is what our discussion (CPI) with the SPL Token Program looks like:

- It's telling us that it needs a mint. It needs to know where to find out about 🥩 . Our token doesn't exist yet. Let's cook that token ingredient!
- It also says that it doesn't send to wallets directly. We will discover later what ingredient we will need to make the token program happy.
🏆 Achievement: Minting Flow
If you have arrived here, then you are done. Congratulations! I am half-joking, but what I have shown you above is essentially how minting works. Now it's about completing these CPIs arguments by feeding them with the correct accounts ingredients.
From now on, our mission will be to prepare the arguments for this:
token::MintTo {
	mint: // ?
	authority: // ?
	to: // ?
}, Check list - MintTo.mint:
Our goal is to provide the necessary ingredients for the Token Program to do the mint:
token::MintTo {
	mint: // NOW
	authority: // later
	to: // later
}, -
mint: we need to inform the Token Program what kind of token we want to print. -
authority: later. -
tolater.
We need to prepare accounts to complete the minting of 🥩 for our staking instruction. As we saw earlier, we haven't created our token yet. So, let's chop a token mint.
🧙♀️ Switching hat to the Solana magician:
The tokens need to exist before even letting users stake 🐮 or receive 🥩. The tokens need to exist first! So, before implementing our staker program, we need to work with the Solana blockchain.
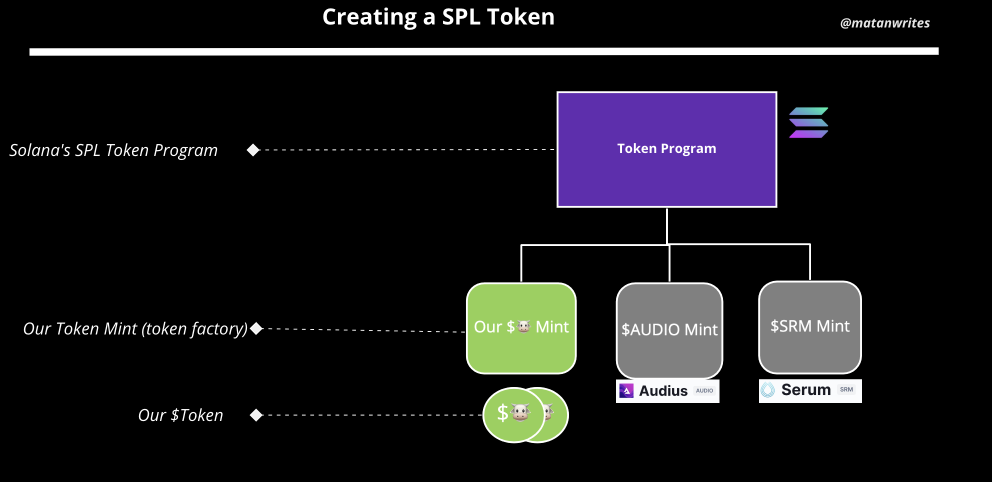
The way to create a Solana Token Program (commonly called SPL Token) is to nicely ask the SPL Token Program to register our $beef and $stake token mint definition.
What does SPL mean? It stands for Solana Program Library -> "read Solana Helper Programs."
Traditionally, a mint is an industrial facility that manufactures coins that can be used as currency
Oh, Grand Token Program, could you please register my new token mint?
We need to ask the SPL Token Program to register our new 🐮 and 🥩 mints. We can do so using the spl-token-cli tool or the @solana/SPL-token javascript library. Again, this needs to happen independently from our program. To make our life easier with the management of keys and addresses, let's use the js library.
A Reminder on Accounts
In Solana, everything is ... so token mint is ... -> In Solana, everything is an account, so a token mint is also an account!
We will see how to create the stake mint in the next section. Even though the stake mint account doesn't exist yet, you must create an address for it beforehand.
Remember to not confuse yourself between an account and an address. An account is the data structure in Solana, while the address is how you reference it. An account is a buffer, and an address is how you reference that buffer. It is just a keypair.
Creating an SPL Token Mint with the JS Library
🧙♀️ Remember, we are switching to the Solana magician hat here because the mint needs to be created even before our stake program exists.
I have already prepared two keys for the mints in the keys_for_test folder, make sure to use your own for prod!
- We prepare two keys for the mints so that we can identify them by their public address.
- We also need another key to set the owner of these mints.
With these keypairs, we can ask the SPL Token Program to materialize accounts for them. I have created a helper script to do so in scripts/create_mints.ts:
import { createMint } from "@solana/spl-token";
import {
	beefMintKeypair,
	stakeMintKeypair,
	connection,
	randomPayer,
	getStakeMintAuthority,
} from "./config";


const createMints = async () => {
    const beefMintAddress = await createMintAcct(
		beefMintKeypair,  // keys_for_test/beef_mint.json
		beefMintKeypair.publicKey
	 )

    const [stakePDA, _] =  await getStakeMintAuthority();
	// Same as:
	// const [stakePDA, stakePDABump] = await PublicKey.findProgramAddress(
	//     [stakeMintAddress.toBuffer()],
	//     program.programId
	// );
	const stakeMintAddress = await createMintAcct(
	    stakeMintKeypair,  // keys_for_test/stake_mint.json
		stakePDA // see diagram below to understand why we are doing this
	)

    console.log(`🐮 beef Mint Address: ${beefMintAddress}`);
	console.log(`🥩️ stake Mint Address: ${stakeMintAddress}`);
}


const createMintAcct = async (
	keypairToAssign: Keypair,
	authorityToAssign: PublicKey): Promise<PublicKey> => {
    return await createMint(
	    ...
		authorityToAssign, // mint authority
		keypairToAssign // address of the mint
		...
	 );
}

export {
    createMints
}- Creating a SPL Token is done using the
createMintinstruction keypairToAssign: we are using the keypair we generated for the addresses of the soon-to-be-created mint account address.
PDA as Mint Authority
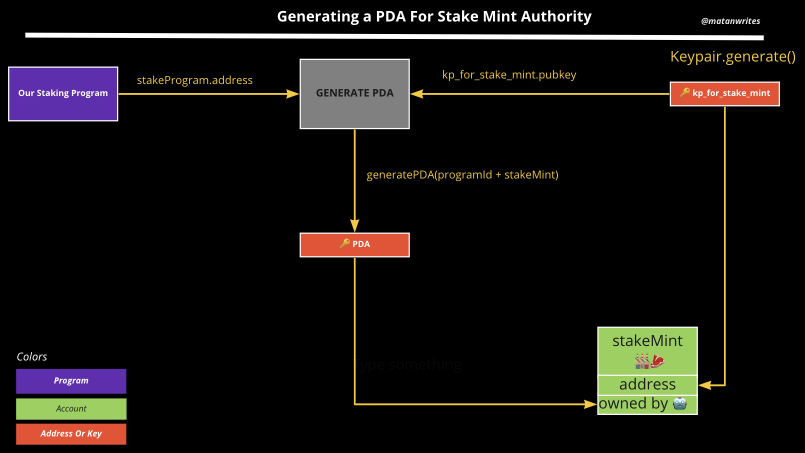
authorityToAssign: Mints have authority -> "read who owns that mint, who can print from that mint, who can destroy this currency."
- For the 🐮 beef mint, we need to ask ourselves, who should be able to print $beef tokens? It is not the staker program, nor is it the user. So for the authority, we can leave it as
beefMintKeypair.publicKey, or you could use anotherkeypaircontrolled by dev. - For the 🥩 stake mint, who should be able to print $stake tokens? The answer is the program. It should mint $stake to the users upon calling the
stakefunction. For that reason, theauthorityof the stake mint should be the program.
How do we achieve this? Accounts owned by programs need program-derived addresses. For this program derived address, we want to make sure it is related to the address of the 🥩 mint:
🏆 Achievement:
Yes! We now have our 🐮 and 🥩 tokens. I know what you are thinking. We haven't named them yet. Solana does not care about the name of your token. It just cares about how to identify them and own them; that's why we created the keypairs previously. Naming will come later.
Now the question is, when do we need to call this script? For testnet or the mainnet, you would need to call this script once before deploying your program. To be clear, when I say you, it means the dev.
However, we will deploy the token mint during the tests to make our life easier. Otherwise, you would need to yarn create-mints every time before running the tests. Open scripts/staker.ts and let's add this create mints step:
...
import { createMints } from "../scripts/create-mints";


describe("staking", () => {

    before(async () => {  =
		await createMints();
	});

	...
}
🐮 beef Mint Address:: AXyTBL1C48WEdpzpY4bcDNsG4B2N918zy2cYsiQFKGBf
🥩️ stake Mint Address: 9FgzyMYYiQew42BdVjsKNHUeXDpP4CaK1rFLMQndf1xE
Now that the mint account is created and living in Solana, we can complete the MintTo.mint:
token::MintTo {
	mint: ctx.accounts.stake_mint.to_account_info(),
	authority: // later
	to: // later
},
programs/staking/src/lib.rs:
...
// REPLACE ADDRESS of stake mint by running solana address -k keys_for_test/stake_mint.json
pub const STAKE_MINT_ADDRESS: &str = "9FgzyMYYiQew42B...";

fn stake(ctx: Context<Stake>, beef_amount: u64) -> Result<()> {
	...

	let cpi_ctx = CpiContext::new_with_signer(
		// SPL Token Program's public address, to reference it
		ctx.accounts.token_program.to_account_info(),

		// The Arguments for the MintTo Instruction.
		token::MintTo {
			mint: ctx.accounts.stake_mint.to_account_info(),
			authority:
			to: // ? user.something.to_account_info,
		},
		// ?,
	);

	...
}


pub struct Stake<'info> {
    // Address of the token program
	pub token_program: Program<'info, Token>,


	// Address of the stake mint 🏭🥩
	#[account(
		mut,
		address = STAKE_MINT_ADDRESS.parse::<Pubkey>().unwrap(),
	)]
	pub stake_mint: Account<'info, Mint>,
}- We define the
stake_mintasmutsince we will alter the supply when we mint.
Make sure to replace STAKE_MINT_ADDRESS. You can find that address by running:
solana address -k keys_for_test/stake_mint.jstests/staker.ts:
...
import { TOKEN_PROGRAM_ID } from "@solana/spl-token";
import { program, stakeMintAddress } from "../scripts/config"
import { createMints } from "../scripts/create-mints";


describe("staking", () => {

    before(async () => {  =
		await createMints();
	});


	it('Swap $🐮 for $🥩', async () => {

		await program.rpc.stake(
			new anchor.BN(5_000),
			{
				accounts: {
					tokenProgram: TOKEN_PROGRAM_ID,
					stakeMint: stakeMintAddress
				}
			}
		);

	});
}tokenProgramSolana is lost: "where is my spl program friend?"stakeMint: Token Program asks: "what type of token am I supposed to print?"
🙋 Quiz Time:
- Why do we need to explicitly specify the address of the
stake_mint?
👀 Answer:
It is to assert that the stake_mint is not a random mint address. On the client-side, if someone gave the mint of another token, your staker program would not be minting 🥩 anymore but some random coin!
In Ethereum, during deployment of the contract, you would inject the address of your ERC20 token and store it as a variable. Solana programs do not maintain state. So they cannot hold such reference to your token contract. This introduces two changes:
- Instead, the token "contract" reference must be passed on for every instruction/transaction.
- We need to use PDA to ensure the mint authority is set to the program (more on this below).
Check list: MintTo::authority
token::MintTo {
	mint: ctx.accounts.stake_mint.to_account_info(),
	authority: // NOW
	to: // later
}, -
mint: we need to inform the Token Program what kind of token we want to print. -
authority: The Token Program wants the 🔑 to be able to print from that mint.
We need to prove to the Token Program that when we ask to mint some stake, we have the authority to do so. Proving that we own something in the blockchain world is done using signing.
Let's rewind a bit, "FX: people walking back à-la tenet": 🚶🏻♂️🚶🏽🚶♀️
- That is how we set the authority of the stake mint.
- The authority of the stake mint is a PDA.
- That PDA with
stakingProgramId+stakeMint.address.
The above diagram described in pseudo code:
stakeMintPDA = programId + stakeMint.address
stakeMint.authority = stakeMintPDA
The same again in js (we already did this when we created the stakeMint account):
   const [stakePDA, _] =  await getStakeMintAuthority();
	// Same as:
	// const [stakePDA, stakePDABump] = await PublicKey.findProgramAddress(
	//     [stakeMintAddress.toBuffer()],
	//     program.programId
	// );
	const stakeMintAddress = await createMintAcct(
	    stakeMintKeypair,  // keys_for_test/stake_mint.json
		stakePDA // see diagram above to understand why we are doing this
	)
Hopefully, this makes sense, don't worry if you can't wrap your head around it at the first shot. Just remember that the authority of the stakeMint is not a traditional private key but a PDA. And PDAs, by nature, do not have private keys.
When we created the stake mint, I already had a helper to create that PDA. Let's use it:
...
import { TOKEN_PROGRAM_ID } from "@solana/spl-token";
import {
	program,
	stakeMintAddress,
	findStakeMintAuthorityPDA
} from "../scripts/config"
import { createMints } from "../scripts/create-mints";


describe("staking", () => {

	...

	it('Swap $🐮 for $🥩', async () => {

		const [stakePDA, stakePDAbump] = await findStakeMintAuthorityPDA(); // NEW

		await program.rpc.stake(
			stakePDAbump, // NEW
			new anchor.BN(5_000),
			{
				accounts: {
					tokenProgram: TOKEN_PROGRAM_ID,
					stakeMint: stakeMintAddress,
					stakeMintAuthority: stakePDA // NEW
				},
			}
		);

	});
}findStakeMintAuthorityPDAwe use this helper to get the PDA we designed before.- We feed the first part of the PDA to our program via the
stakeMintAuthority.WithstakePDAbump,a PDA comes in two parts, the PDA + bump (or nonce).
Let's start by the Context<Stake>:
#[derive(Accounts)]
#[instruction(stake_mint_authority_bump: u8)]  // NEW
pub struct Stake<'info> {
	// SPL Token Program
	pub token_program: Program<'info, Token>,

	// Address of the stake mint 🏭🥩
	#[account(
		mut,
		address = STAKE_MINT_ADDRESS.parse::<Pubkey>().unwrap(),
	)]
	pub stake_mint: Account<'info, Mint>,


	// The authority allowed to mutate the above ⬆️
	// And Print Stake Tokens
	/// CHECK: only used as a signing PDA
	#[account(
		seeds = [ stake_mint.key().as_ref() ],
		bump = stake_mint_authority_bump,
	)]
	pub stake_mint_authority: UncheckedAccount<'info>
}seedsandbumptell anchor this is a PDA.seeds: is set to the stakeMintAddress.bumpis provided via the newly added#[instruction(stake_mint_authority_bump: u8)].
Now, the stake implementation:
pub fn stake(
	ctx: Context<Stake>,
	stake_mint_authority_bump: u8,
	beef_amount: u64
	) -> Result<()> {


	 let stake_amount = beef_amount; // For now 1 $beef = 1 $stake


	 let cpi_ctx = CpiContext::new_with_signer(
		ctx.accounts.token_program.to_account_info(),
		token::MintTo {
			mint: ctx.accounts.stake_mint.to_account_info(),
			authority: ctx.accounts.stake_mint_authority.to_account_info(), // NEW
			to: // later
		},
	);

	token::mint_to(cpi_ctx, stake_amount)?;

	Ok(())
}Are we done? No. Why is that?
🧐 Don't you find it strange that we are proving the authority of the stakeMint with a public address? Public means everyone can use it. We even gave that public address from the client side! If that were enough to mint tokens, that would be a disaster because it would mean anyone with a public address would be able to print tokens freely 🤑.
As we said earlier, in blockchains, ownership or control is proven via signing ✍️. So, for example, we prove ownership of it via the matching private key given a public address.
PDA Signing
- Token Program.
- The
token::MintTostruct. - Lastly, a signer.
The Anchor Book explains how to solve our problem:
PDAs are not public keys, so they can't sign anything. However, PDAs can still pseudo-sign CPIs. To sign with a PDA, you must change
CpiContext::new(cpi_program, cpi_accounts)toCpiContext::new_with_signer(cpi_program, cpi_accounts, seeds)where theseedsargument is the seeds and the bump the PDA was created with.
When the token::mint_to wil be invoked with its context. It will check if authority: ctx.accounts.stake_mint_authority can be pseudo-signed.
Pseudo sign meaning it will try to find back the PDA we generated. For example, look at this pseudo algebra magic:
// We know that:
// PDA         , BUMP             = findPDA(programId + seed)
// stakeMintPDA, stakeMintPDABump = findPDA(programId + stakeMint.address)

// -> So signer can be found using:
// findPDA(programId + seed)              = X + bump
// findPDA(programId + stakeMintAddress)  = X + bump
So, we just need to provide the variables we know about the equation, which are the bump, the seed of the PDA, and the programId (programId doesn't need to be provided):
The brutal rust code:
let stake_mint_address= ctx.accounts.stake_mint.key();
let seeds = &[stake_mint_address.as_ref(), &[stake_mint_authority_bump]];
let signer = [&seeds[..]];

let cpi_ctx = CpiContext::new_with_signer(
	...
	token::MintTo {
		mint: ...
		authority: ...
		to: ...
	},
	&signer // NEW
);
🤯 I agree. The syntax and the logic are pretty obscure. The Solana Doc and the Anchor Book explains it like this:
When the CPI is invoked, for each account in
cpi_accounts,the Solana runtime will check whetherhash(seeds, current_program_id) == account addressis valid. If yes, that account'sis_signerflag will be turned to true.
pub fn stake(
		ctx: Context<Stake>,
		stake_mint_authority_bump: u8,
		beef_amount: u64
	) -> Result<()> {

		let stake_amount = beef_amount; // For now 1 $beef = 1 $stake

		let seeds = &[stake_mint_address.as_ref(), &[stake_mint_authority_bump]];
		let signer = [&seeds[..]];

		let cpi_ctx = CpiContext::new_with_signer(
			ctx.accounts.token_program.to_account_info(),
			token::MintTo {
				mint: ctx.accounts.stake_mint.to_account_info(),
				authority: ctx.accounts.stake_mint_authority.to_account_info(),
				to: ... // not yet :(
			},
			&signer
		);
		token::mint_to(cpi_ctx, stake_amount)?;

		Ok(())
	}
}
🏆 Achievement:
💪 Pat yourself on the back for me! I know this last part was brutal. That was the most challenging part of the article, actually. But if you have followed so far, be proud of yourself because it's not just some tedious code you are learning. The code is not the point. You are learning why things happen.
You now master:
- Program Address Derivation to prove the ownership of another address.
- Cross Program Invocation with Pseudo Signing.
Check list: MintTo::authority
token::MintTo {
	mint: ctx.accounts.stake_mint.to_account_info(),
	authority: ctx.accounts.stake_mint_authority.to_account_info(),
	to: // NOW
}, -
mint: we need to inform the Token Program what kind of token we want to print. -
authority: The Token Program wants the 🔑 to be able to print from that mint. -
to: Token Program says it doesn't send tokens to wallets! After completing this part, we will finally be able to mint 🥩 to our users!
The Token Program still does not want to do the mint! So we need to discuss something. Although we can simply send $sol to wallets in Solana, we cannot send SPL tokens (custom tokens) directly to a wallet address.
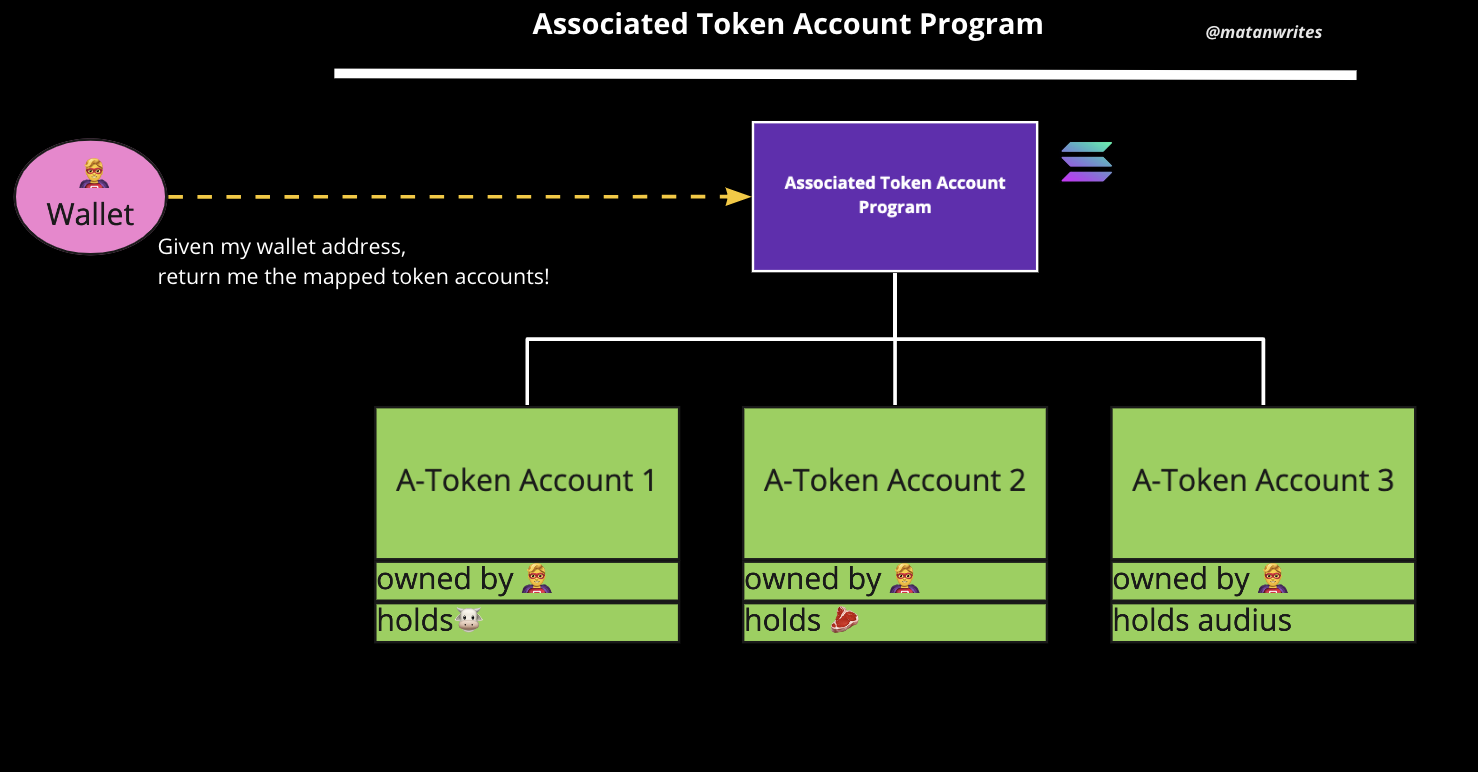
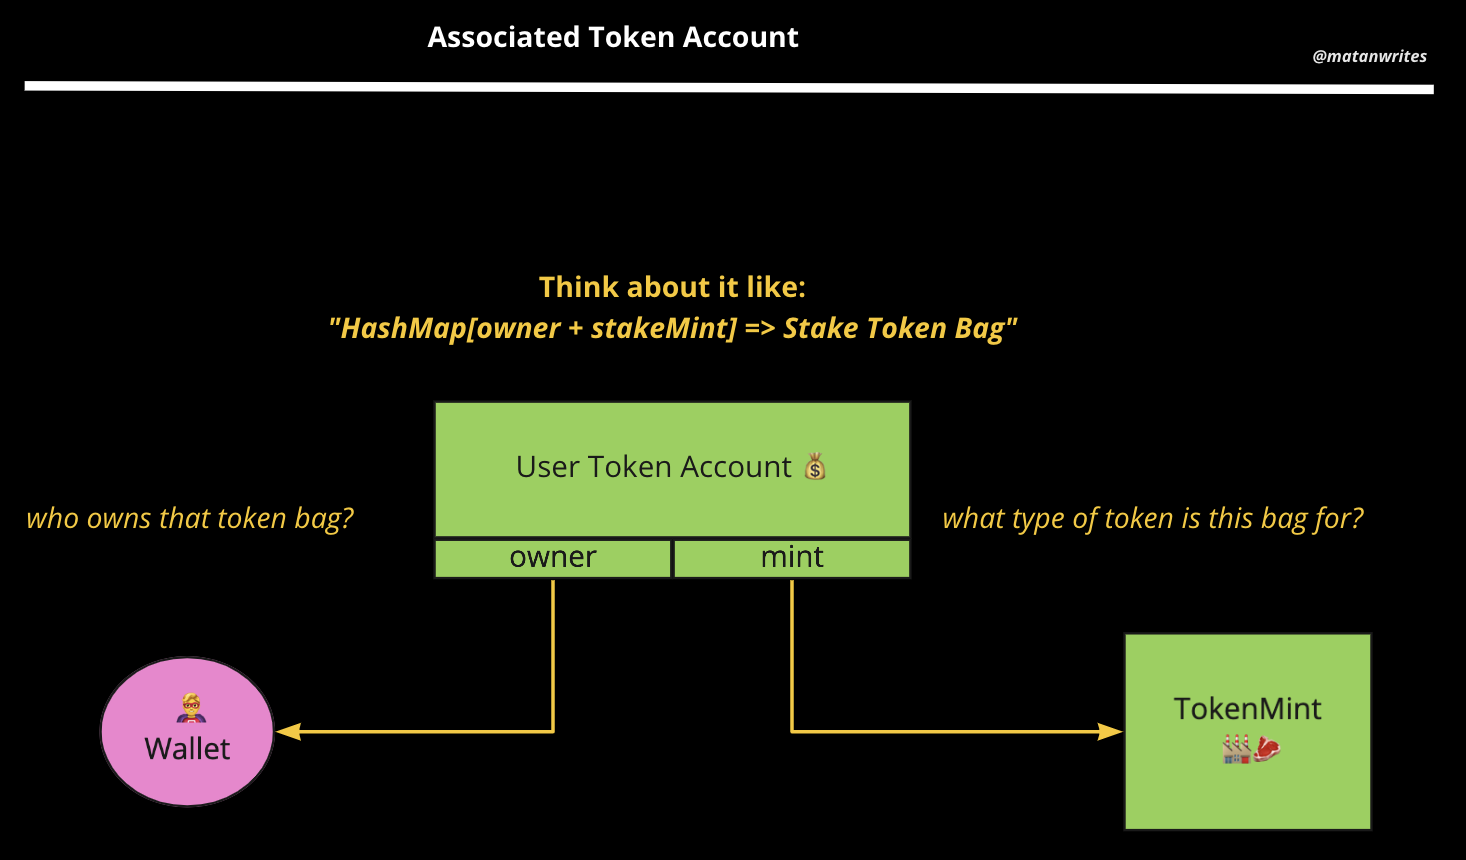
A wallet needs to have an Associated Token Account setup to receive a custom token. I will refer to Associated Token Account as token bags 💰 from now on. You can read more about the ATAP here: https://spl.solana.com/associated-token-account. What's important is that a Token Bag belongs to a user and holds a specific type of token.
Why is it called Associated Token Account? Then, we can derive the mapped token accounts addresses given a wallet address. That's why!
Before I lose you, let's clarify the difference between token bags (token accounts) and token mints:
- Previously, we registered token mints 🏭 which are factories to produce SPL tokens. We know that token bags 💰 are used to hold SPL Tokens.
Why do we care?
This is great and pretty, but why do we need this? Because if we want to send 🐮 or 🥩 to the users, we need to first create the corresponding 🐮 bags or 🥩 bags for users.
To create a token bag we need: owner + mint and call getOrCreateAssociatedTokenAccount from the @solana/spl-token :
import { getOrCreateAssociatedTokenAccount } from "@solana/spl-token";


const getOrCreateStakeTokenBag = async (): Promise<Account> => {
	return await getOrCreateAssociatedTokenAccount(
		some_connection,
		payer_for_the_account_rent,
		address_of_mint_this_token_bag_is_for,
		address_of_user_wallet
	);
}
But don't copy the above code. I have already prepared helpers to glue all the addresses together. Just jump back to scripts/staker.ts, and let's create the token bags and add a new step: // 0. Prepare Token Bags:
...
import { User } from "./user";


describe("staking", () => {
	...

    it('Swap $🐮 for $🥩', async () => {
	    // 0. stakeMintAuthority = PDA with stakeMint as seed
		const [stakePda, stakeBump] = await findStakeMintAuthorityPDA();

		// 1. Prepare Token Bags
		const user =  new User();
		await user.getOrCreateStakeTokenBag();

		// 2. Get current stake amount
		const userStakes = await user.stakeBalance();

		// 3. STAKE!
		await program.rpc.stake(
			stakeBump,
			new anchor.BN(5_000),
			{
				accounts: {
					// Solana is lost: where are my spl program friends?
					tokenProgram: TOKEN_PROGRAM_ID,

					// Token Program asks: 🏭 what type of token am I supposed to print?
					stakeMint: stakeMintAddress,

					// Token Program asks:
					// ✍️ who is allowed to print tokens from stakeMint?
					stakeMintAuthority: stakePda,

					// 💰🥩 Token Program wonders: "where should I mint this to?"
					userStakeTokenBag: user.stakeTokenBag,
				}
			}
		);
	});
}
Finally we can complete the to:, let's make use of that token bag in program programs/staking/lib.rs:
#[program]
pub mod staking {
	pub fn stake(
		ctx: Context<Stake>,
		stake_mint_authority_bump: u8,
		beef_amount: u64
	) -> Result<()> {

		...

		token::MintTo {
			...
			to: ctx.user_stake_token_bag.to_account_info(),
		}

		...
	}
}

#[derive(Accounts)]
#[instruction(stake_mint_authority_bump: u8)]
pub struct Stake<'info> {
	...
	// Associated Token Account 💰 for User to receive 🥩
	#[account(mut)]
	pub user_stake_token_bag: Account<'info, TokenAccount>,
}- Don't forget to add the
#[account(mut)]to specify that we should be able to mutate that account.
Run the test👏 anchor test:
🐮 beef Mint Address: AXyTBL1C48WEdpzpY4...
🥩️ stake Mint Address: 9FgzyMYYiQew42BdVjs...
    ✔ Swap $🐮 for $🥩 (1600ms)


  1 passing (3s)
Checkpoint code in this branch: https://github.com/mwrites/solana-staker/tree/feature/stake-mint
🚀 Let's go! You just finished the minting part of stake!!! You had to learn a few ingredients to make it happen:
- 🥒 First ingredient: how to create a token mint.
- 🥒 Second ingredient: how to do PDA signing.
- 🥒 Third ingredient: how to send SPL tokens to associated token accounts.
Learning how to mint is helpful, but more than that, you learned a few key Solana ingredients that can help you make new dishes later!
The Consequence Of Accounts
Comparing with the solidity version. You might notice that the Solana version is much more involved. If we can resume it in one word, that word is Accounts. You might have seen the phrase " Solana programs are stateless". It took me a while to really, I mean, really understand what this involves. Basically, it means programs are dumb!
So, programs don't know anything. They are just machine processing data. So when you want to talk to programs, you want them to process something. But they have no idea what data you are talking about, so because of that, you need to always provide everything to these processors:
- The first consequence of this is that data (accounts) need to be provided with each instruction, which makes the code longer to write.
- The second consequence is that because accounts are independent of programs, they need to be signed for access control, which again makes the code longer to write.
It's not just program->accounts, it's program->accounts->signer
Because of these two reasons, accounts introduce a new depth. For example, when you want to talk to a program, you want to give an account and not only the account but also the account's signer. So whenever you want to do something, you first need to get the accounts and make sure you have the appropriate signing in place. Then, finally, you can do something with the account.
ERC20 Contracts
The equivalent to ERC20 contracts in Solana is SPL Tokens. However, SPL Tokens are not smart contracts but accounts. So instead of creating a new smart contract (program), we register a new account that defines our token with the SPL Token Program, the centralized authority for managing tokens.
This is part 2 of the staking program. We are still trying to achieve the core staking feature. By trying to implement the minting part, we learned how to chop and slice token mints, token bags, CPI signing, etc... Thanks to that, we will be able to move much faster now!
Remember, if you are an Etherean, ex etherean, or cyborg etherean-solanian 😁, please jump to the EVM Comparison and copy-paste the section somewhere, and keep it along with you as you follow the article. That section was separated on purpose as I am not sure how many of you have the double skills.
Let's do the second part of the staking. We now need to transfer $beef tokens from the user.
Please, please CMD + +, or view -> zoom in at least two or three times in your browser. Unfortunately, hashnode keeps the reading area ridiculously small, even on huge screens, making the screenshots unreadable.
Or, right-click on the screenshots and open in the new tab.
I had previously added the full code in text directly in the article, but it was just impossible to follow given the length of the code! So I decided to go for side-by-side screenshots instead. Also because of accounts, it's way better to see side by side, what your program API expects and what accounts you need to prepare on the client side.
Maybe in the future, I will consider using another platform. I am thinking about a two-view or three-view side by side to look at rust, js, and diagram at the same time.
Humans have two faces, and Solanians have three.
Remember, to fully understand how a Solana program works. We better try to look at it from different glasses 👓:
- The deployment part.
- The client-side.
- The program itself.
1 Pair-Progra-Cooking The Minting Feature:
This was done in part 1.
2 Completing the staking with the $beef transfer:
In this episode, we will make users pay $beef!
3. Unstake:
Finally, we will learn how to do the inverse operation of staking.
🍭 TL;DR - Github
We are still looking at the same repo, the code in this article is not exhaustive. Instead, it will illustrate the important pieces so that you develop the mental model to build a DeFi program yourself in the future.
Please don't try to copy-paste any of the code here. It probably won't compile. I have reduced the noise on purpose. However, the complete code is available here. Feel free to look at it along with the article or clone it locally and try it.
Got some beef?
Previously we have already created the🐮 token mint. Our tokens now exist in the blockchain (at least in our local ledger). It is not time to work on our program yet. Why? Our staker program takes $beef tokens and rewards our users with stake tokens. But how do users get $beef in the first place?
Have you ever noticed that almost all DeFi apps have a swap feature on the home page? So if we were to build a complete DeFi app, users would start by swapping their $sol for 🐮 tokens. Then they would be able to stake their 🐮 tokens.
Airdrop
Since we are in Solana, users usually start with $sol, so when they go to our Staking or DEX application, users would first need to swap their $sol for another crypto token. To simplify this article and make testing easier, we will just airdrop the 🐮 tokens directly to users.
For our tests, we are using ourselves as guinea pig users. So you or I will be the one receiving the 🐮 tokens.
This part is not crucial to the article. However, if you want, look at
scripts/airdrop-beef.tsto understand how to do it.
So, we usually would airdrop $beef to users before they arrive in our application. So, let's do that in the tests:
import { airdropBeef } from "../scripts/airdrop-beef";


describe("staker program", () => {

    before(async () => {
        await createMints();
        await airdropBeef();
	 });


	it('Swap $🐮 for $🥩', async () => {
		...
	}
}
🏆 Achievement: Airdroping 🐮
- Users now have 🐮 in their wallets.
- All the preparation to finish the stake function is now done!
💪 From now on, we don't need to do additional deployment stuff. We can solely focus on our staker program.
One more thing before we let users send 🐮 to us, we need a beef token bag for our program. As users need token bags to hold tokens, programs also need token bags. So let's create one for our program. Since the program will own the token bag account, we will be using a Program Derived Address mapped to the address of the beef mint.
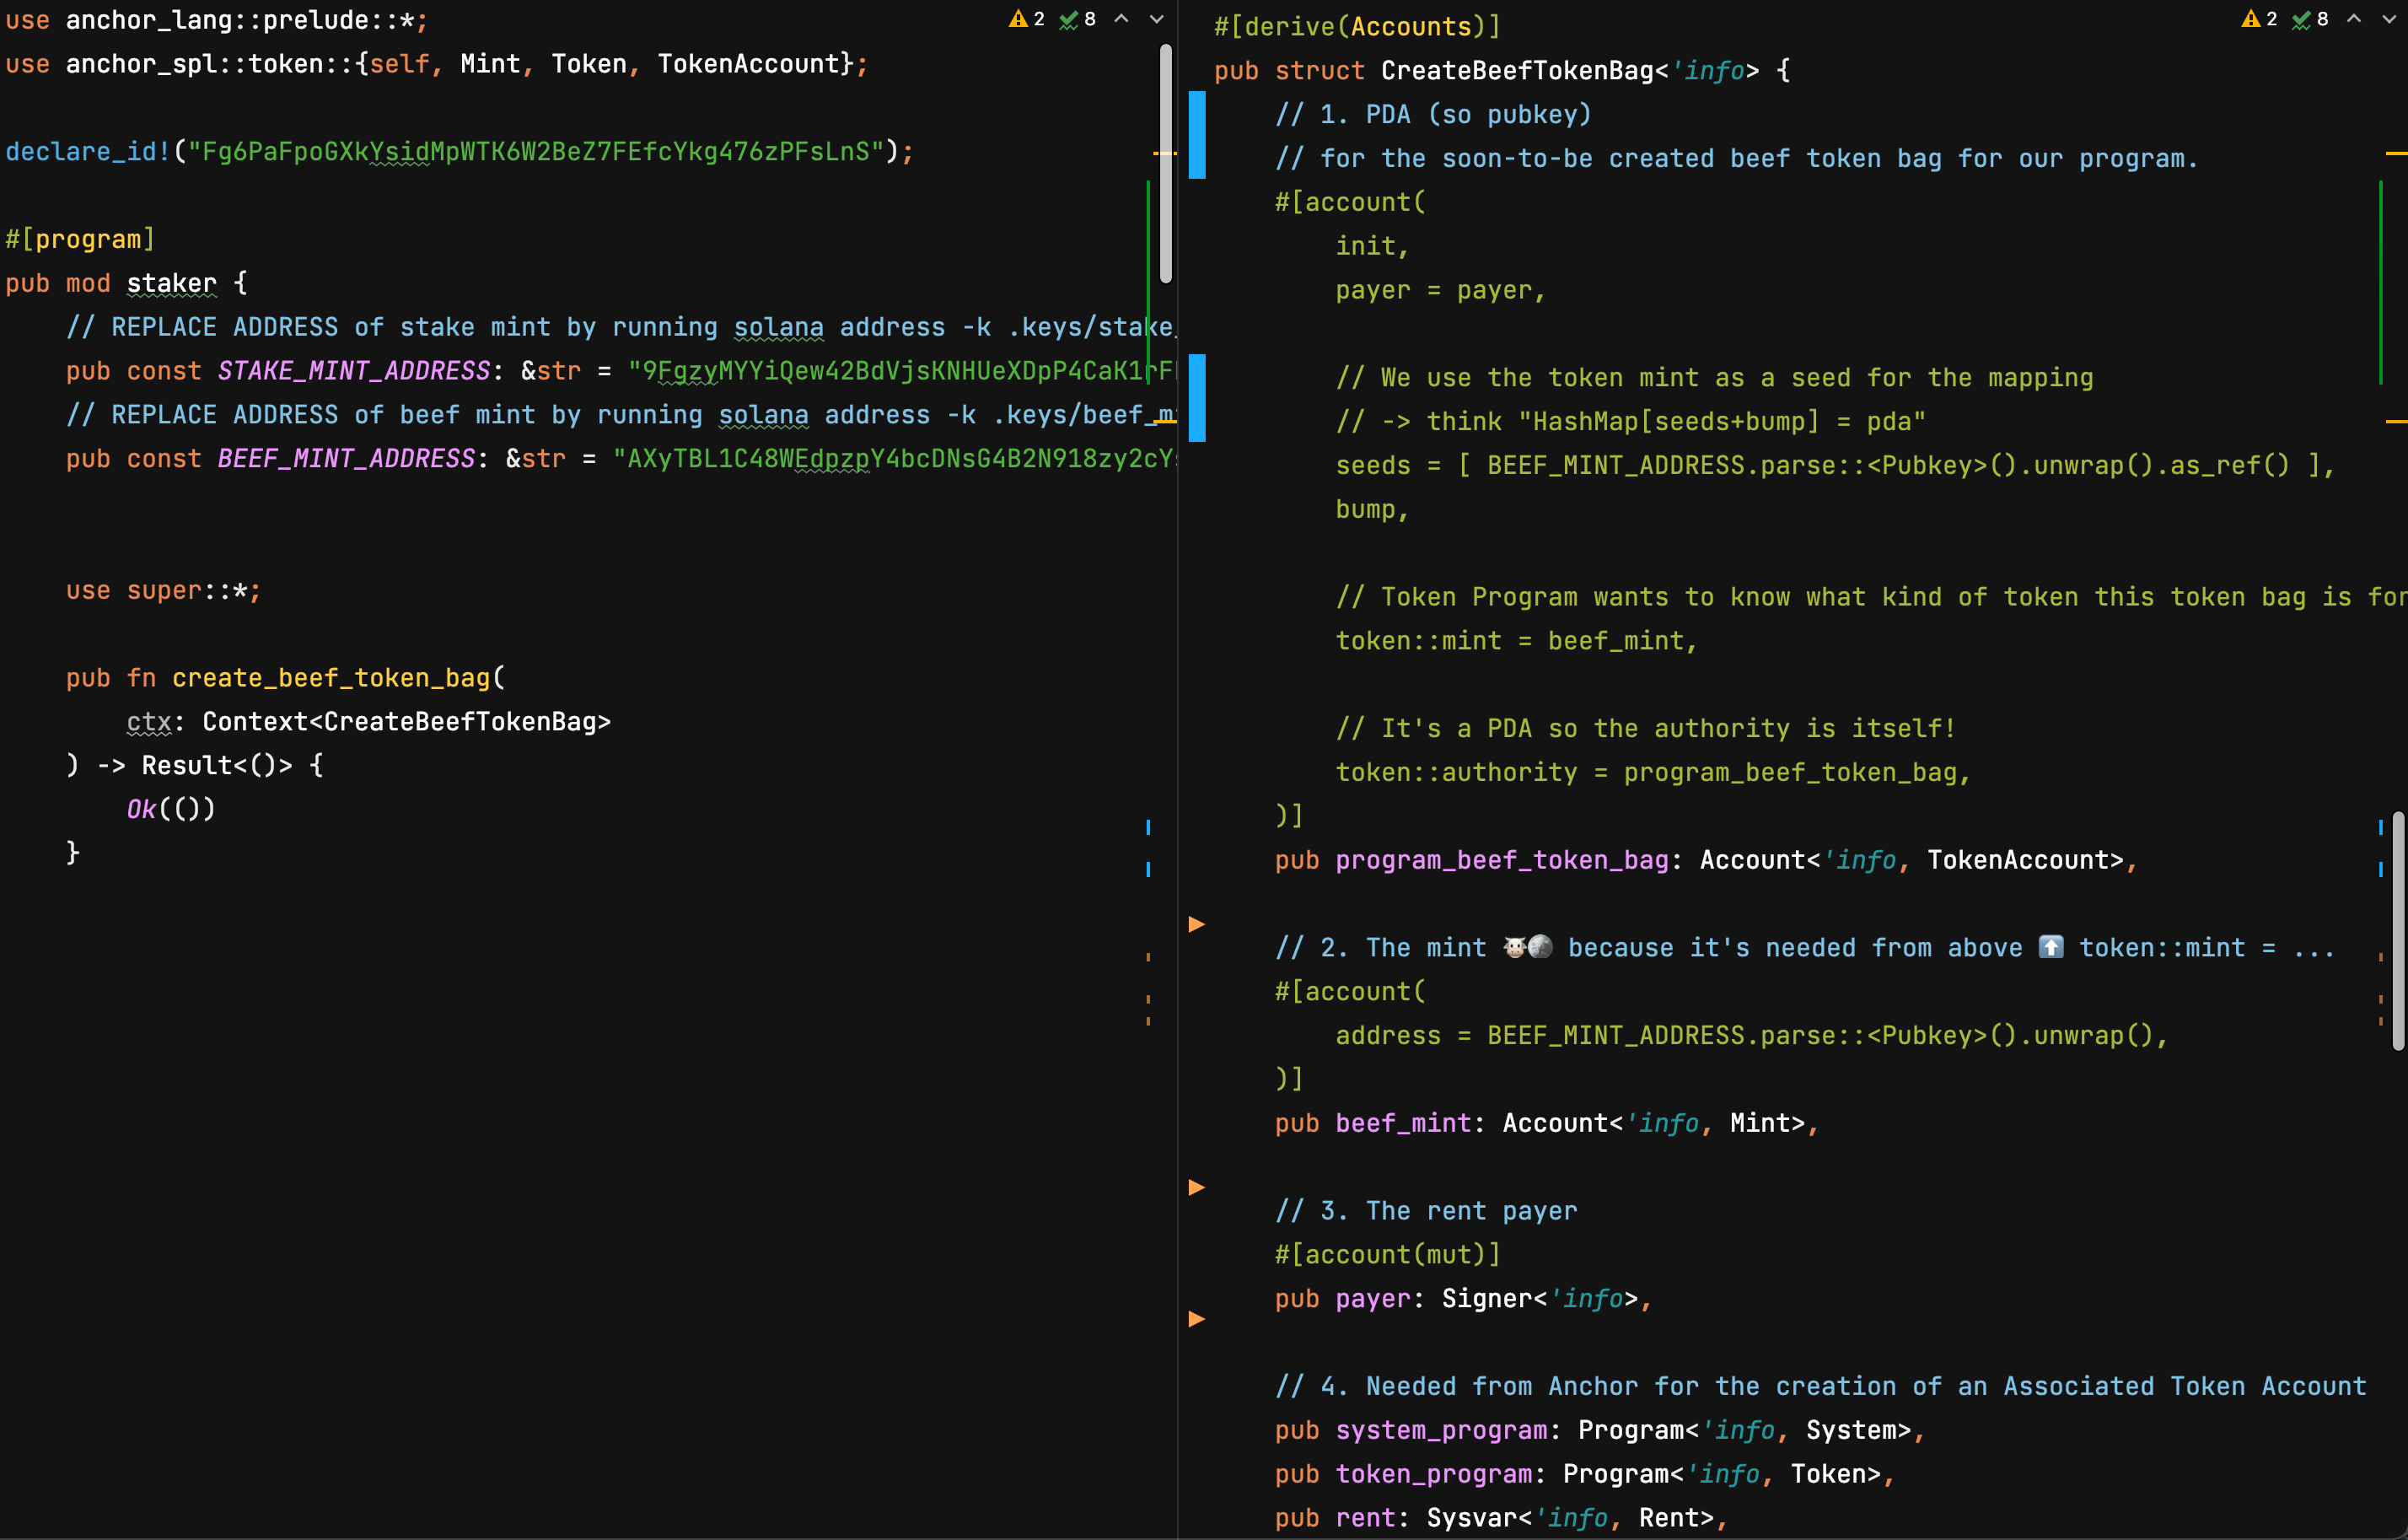
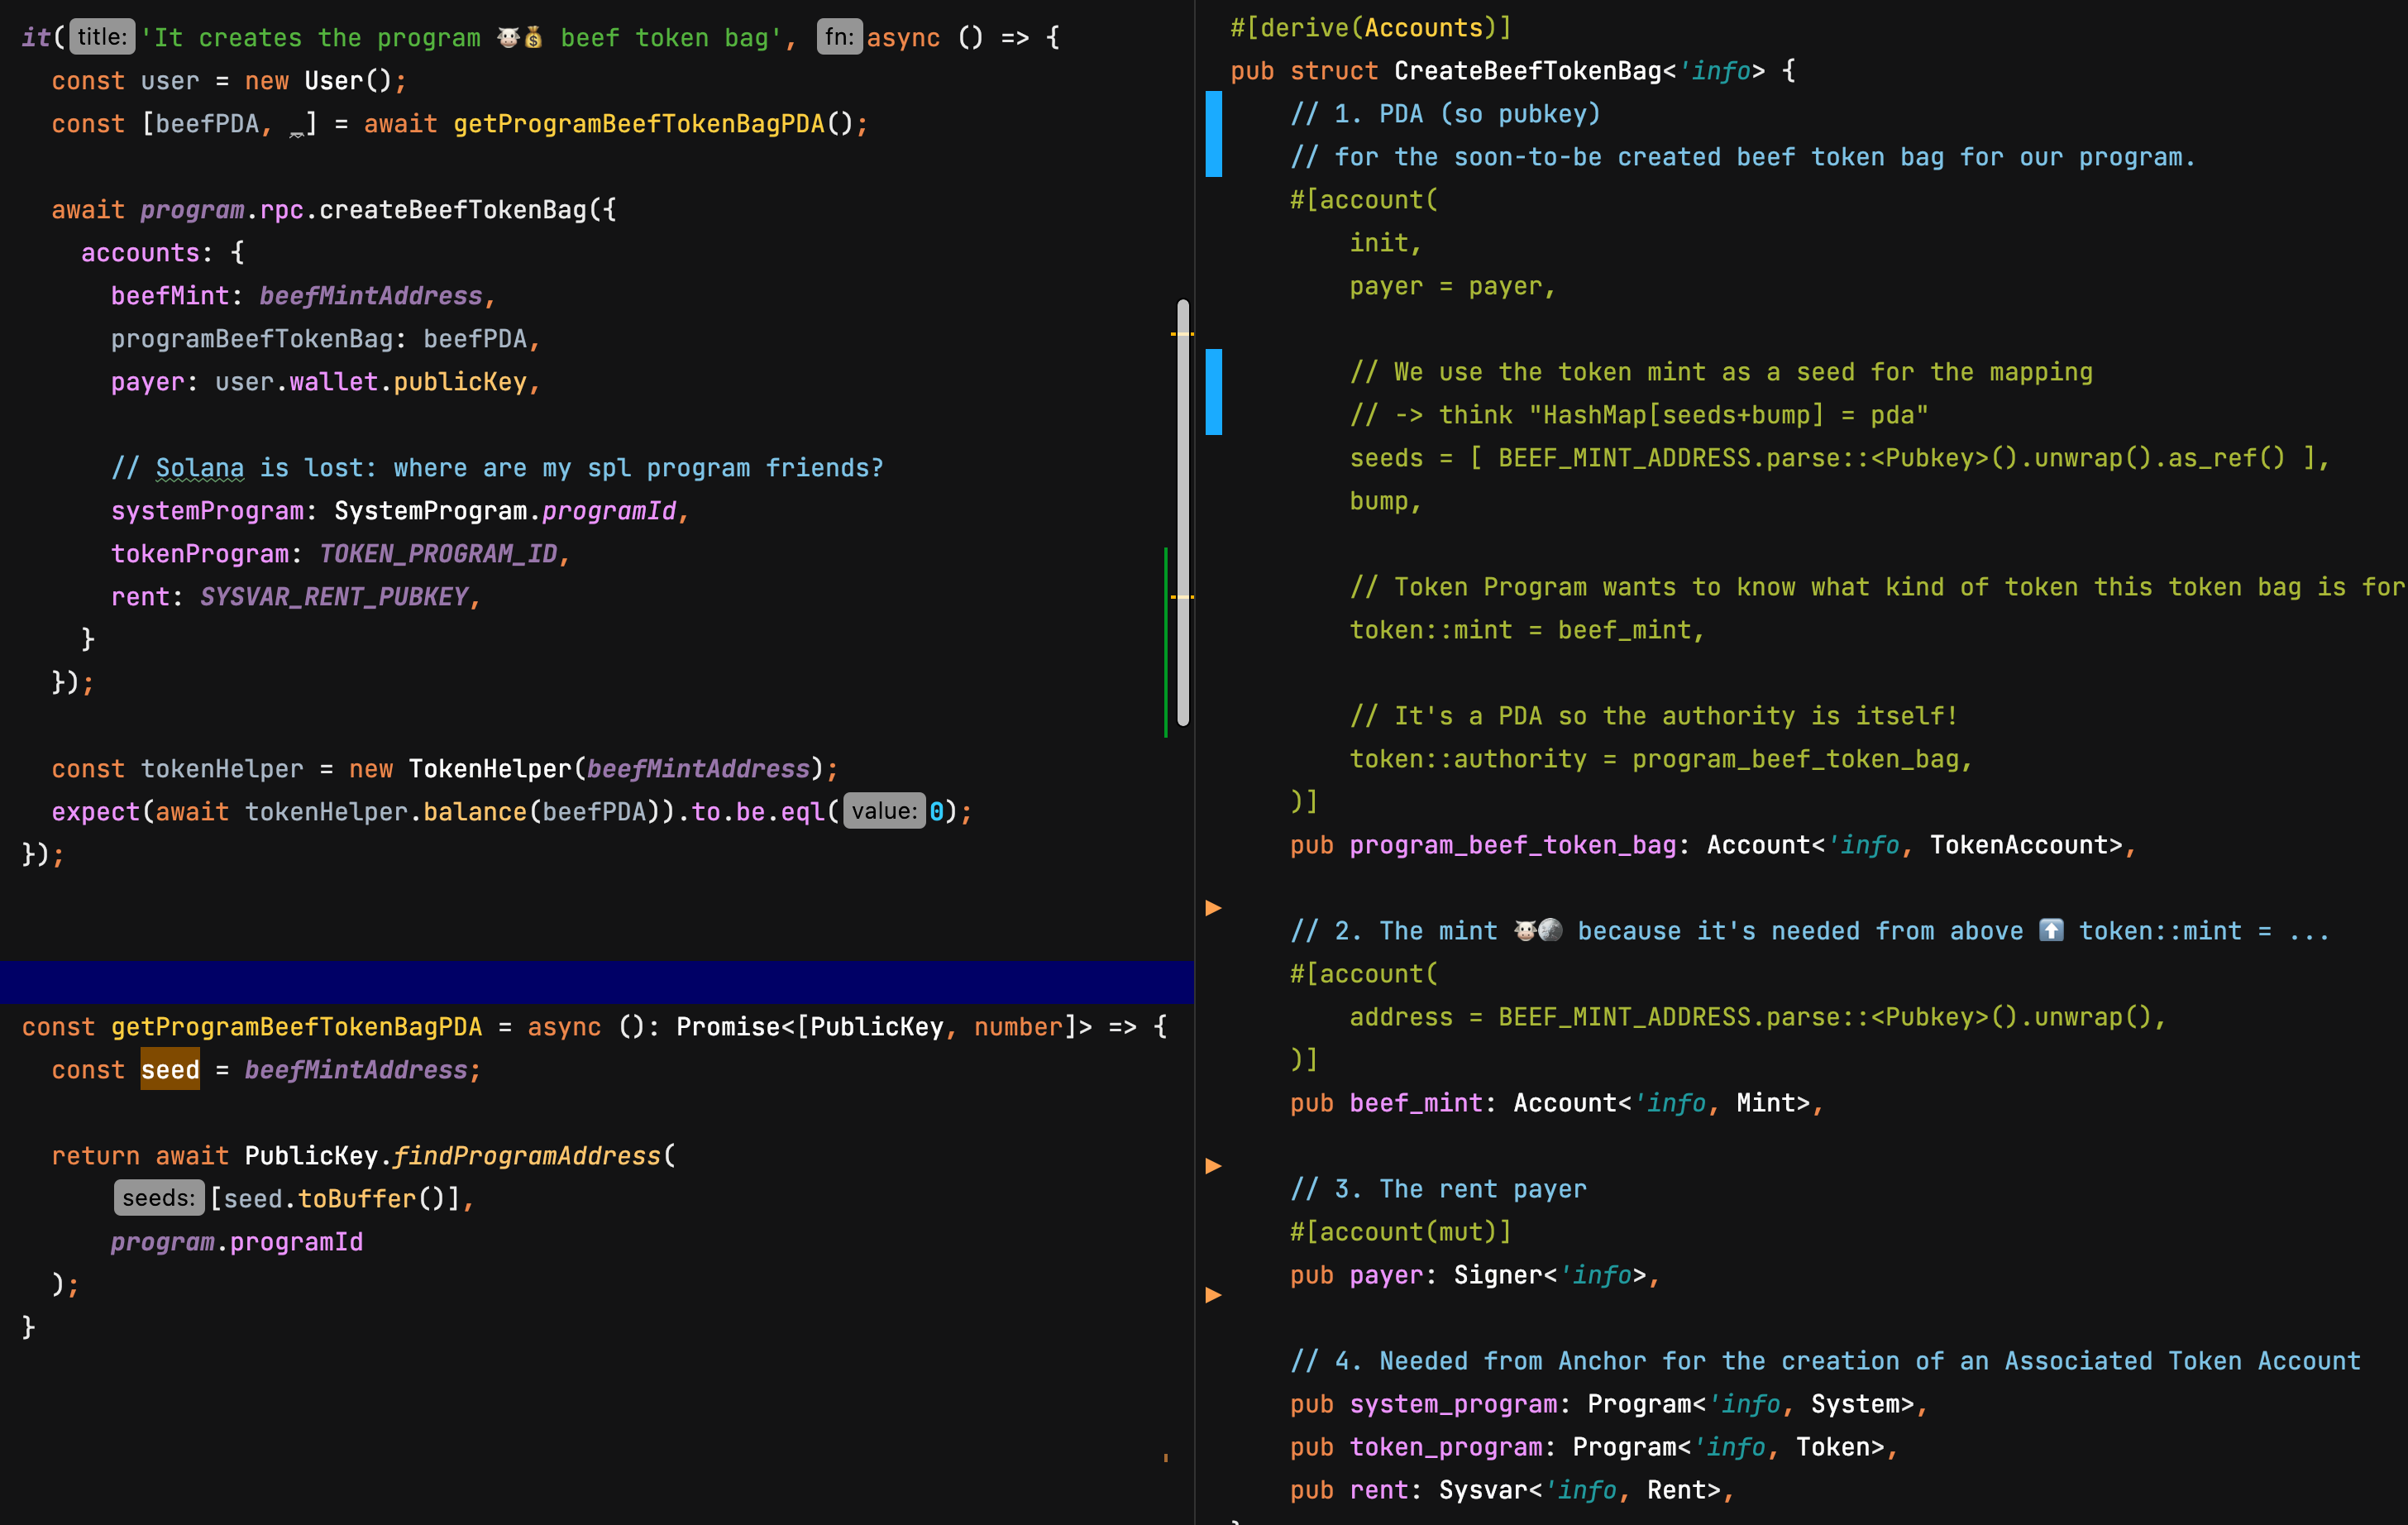
On the left side, the implementation is virtually empty, because thanks to Anchor we can do all the work with the macros when defining Context<CreateBeefTokenBag.
The program token bag will be created with the CreateBeefTokenBag instruction:
- We are creating an account from a PDA, you know this already!
- This time, the
bumpis not necessary.
- Left side: remember, with Solana, we need to prepare the addresses of the accounts ahead of time and feed them to our program. PDAs are "found" instead of created, so let's find that address.
- Right side: we create an account with that program-derived address, all the other accounts are just dependencies of that
program_beef_token_bag.
- This time, the
bumpis not necessary. payer: Solana wonders: " and who is gonna pay for that token bag account space?"
- The rest are required by Token Program, as we saw when we defined the
Context<CreateBeefTokenBag>.
In real life (what is real life?), you would actually do this in an Anchor deployment script.
Run the test👏 anchor test:
    ✔ It creates the program 🐮💰 beef token bag (615ms)
    ✔ Swap $🐮 for $🥩 (1701ms)


  2 passing (7s)
🏆 Achievement:
- We created a token bag for our program to receive 🐮 from the user.
- Our program can now receive and store 🐮 beef tokens.
Similarly to what we did for the mint instruction with the token program, let's see what the transfer looks like:
let cpi_ctx = CpiContext::new(
	ctx.accounts.token_program.to_account_info(),
	token::Transfer {
		from: // from which token bag?
		authority: // do you have the authority to withdraw from ⬆️ ?
		to: // to which token bag?
	}
);
token::transfer(cpi_ctx, beef_amount)?;from: is the token bag to withdraw from, meaning the user 🐮 token bag.authority: is the authority forfrom.Solana wants to make sure we are not stealing from the users without their consent!to: is the program token bag we will need to create below.
😌 No need for a checklist this time. We already have all the ingredients necessary. We will complete all these arguments at once!
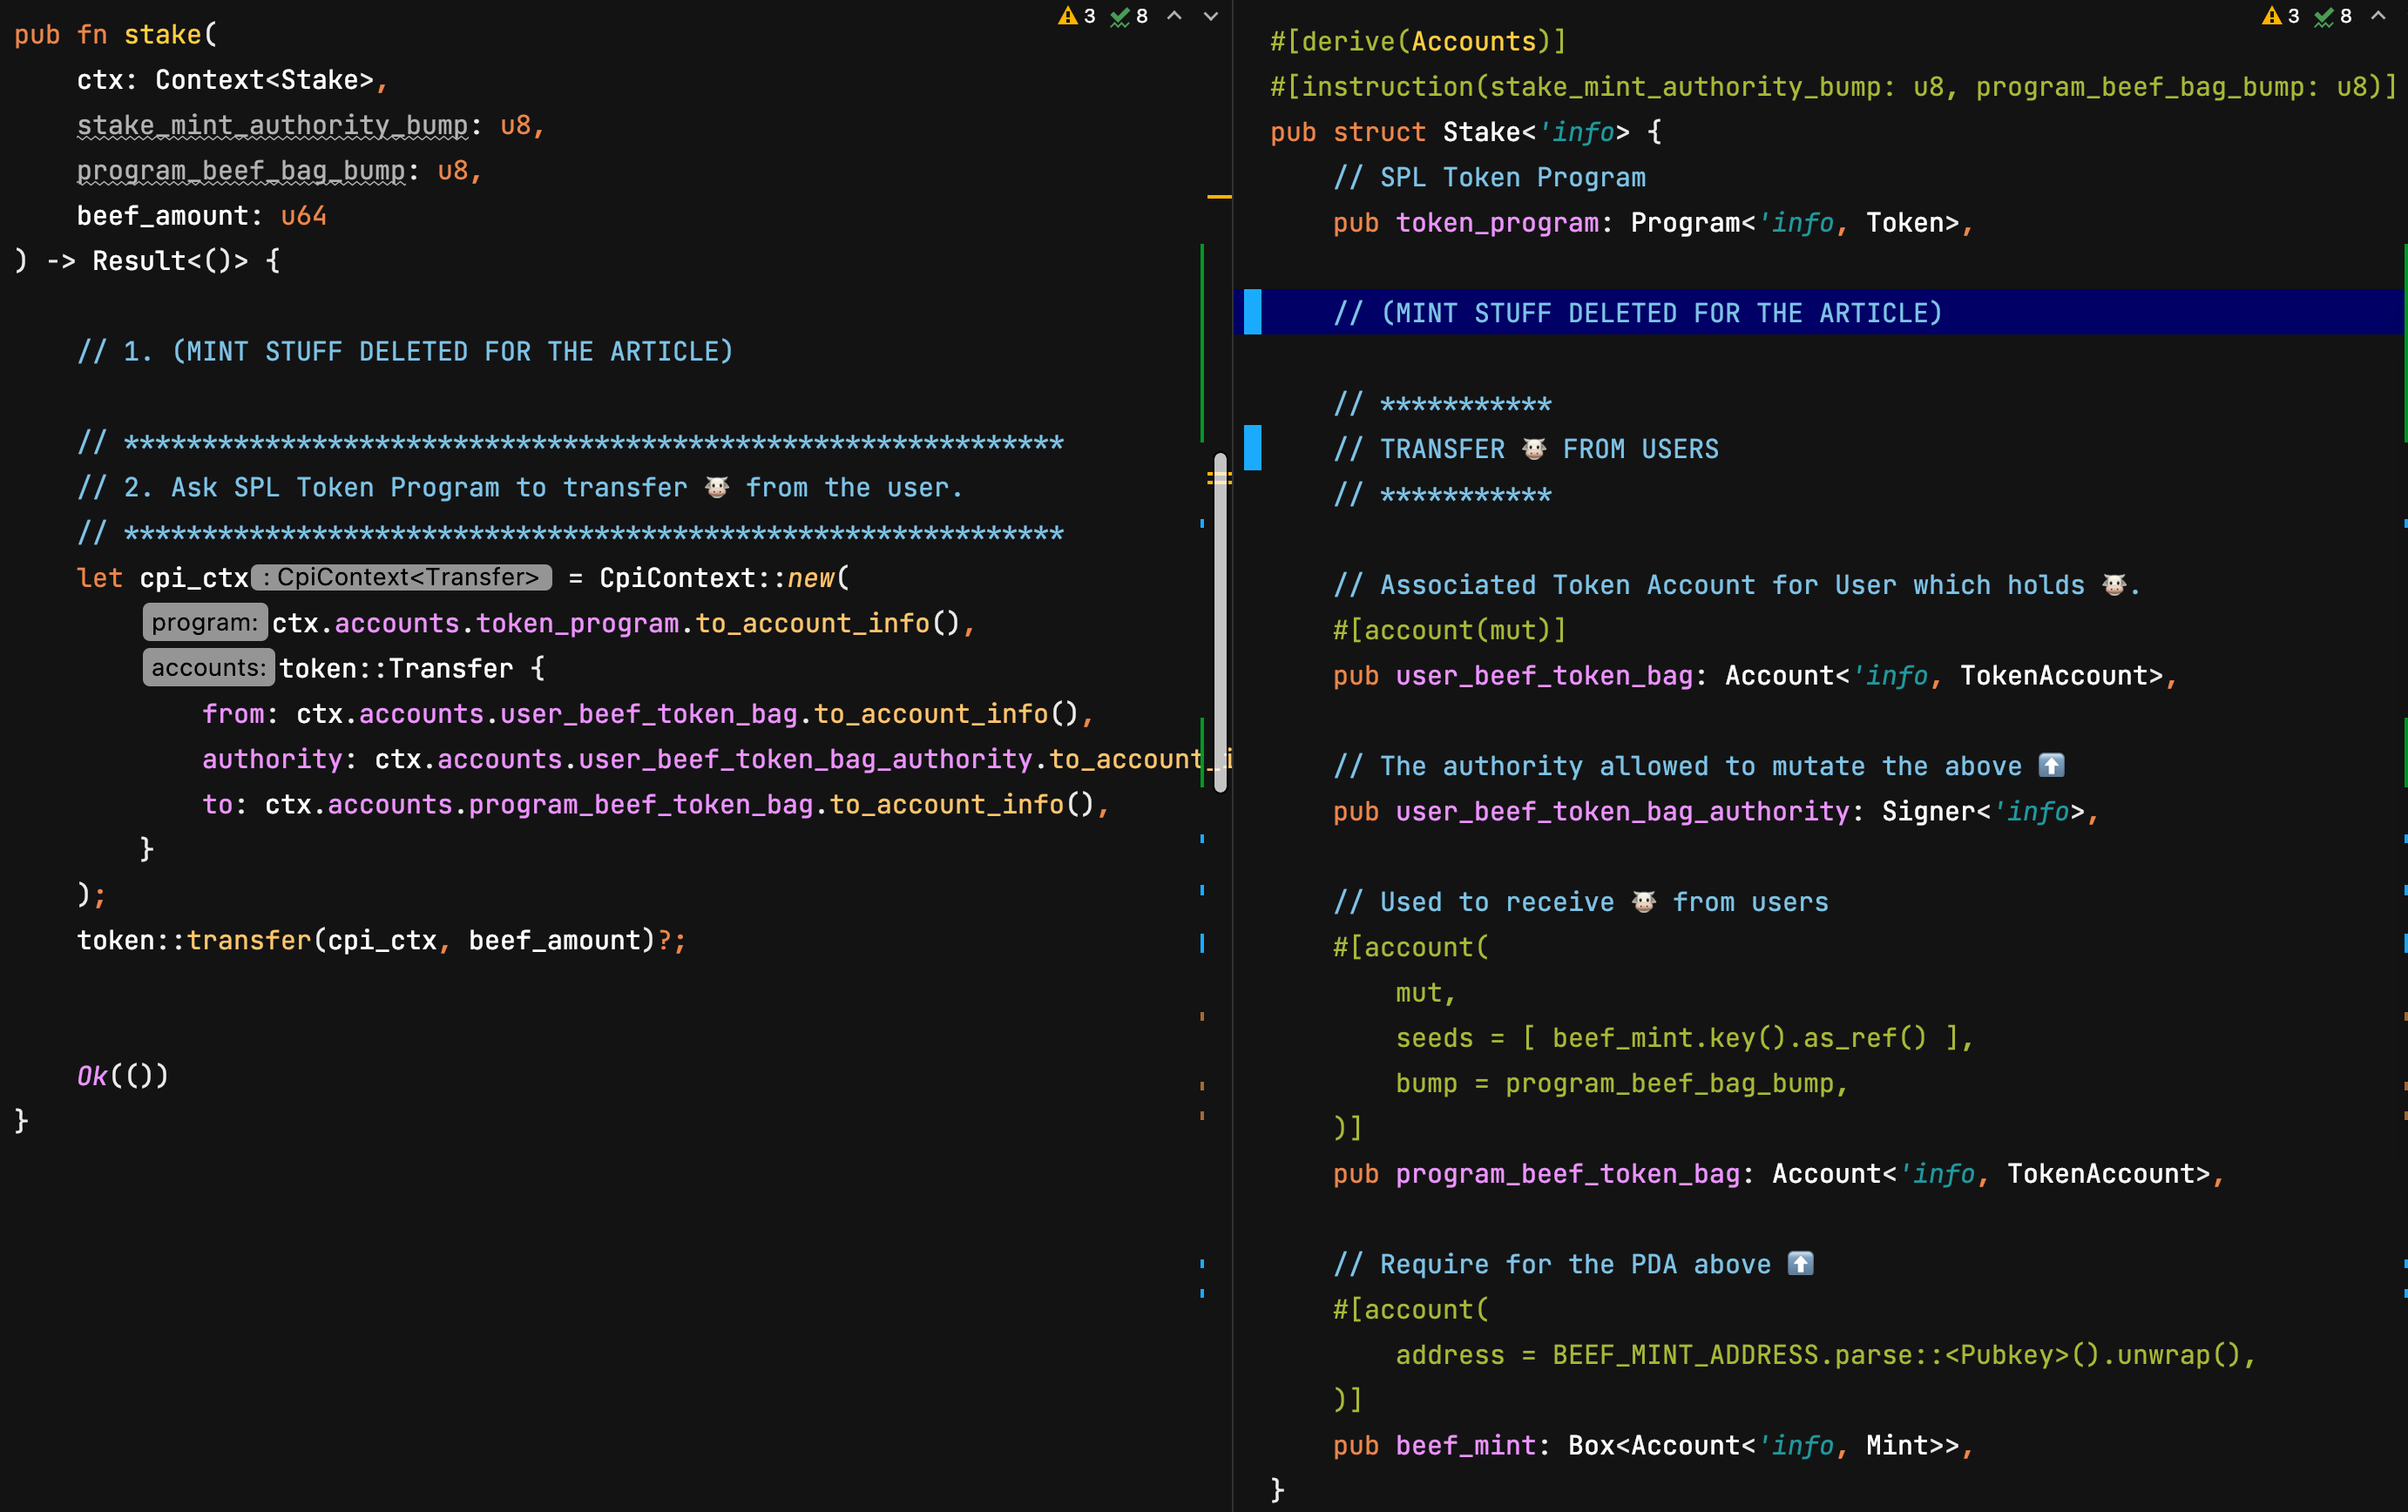
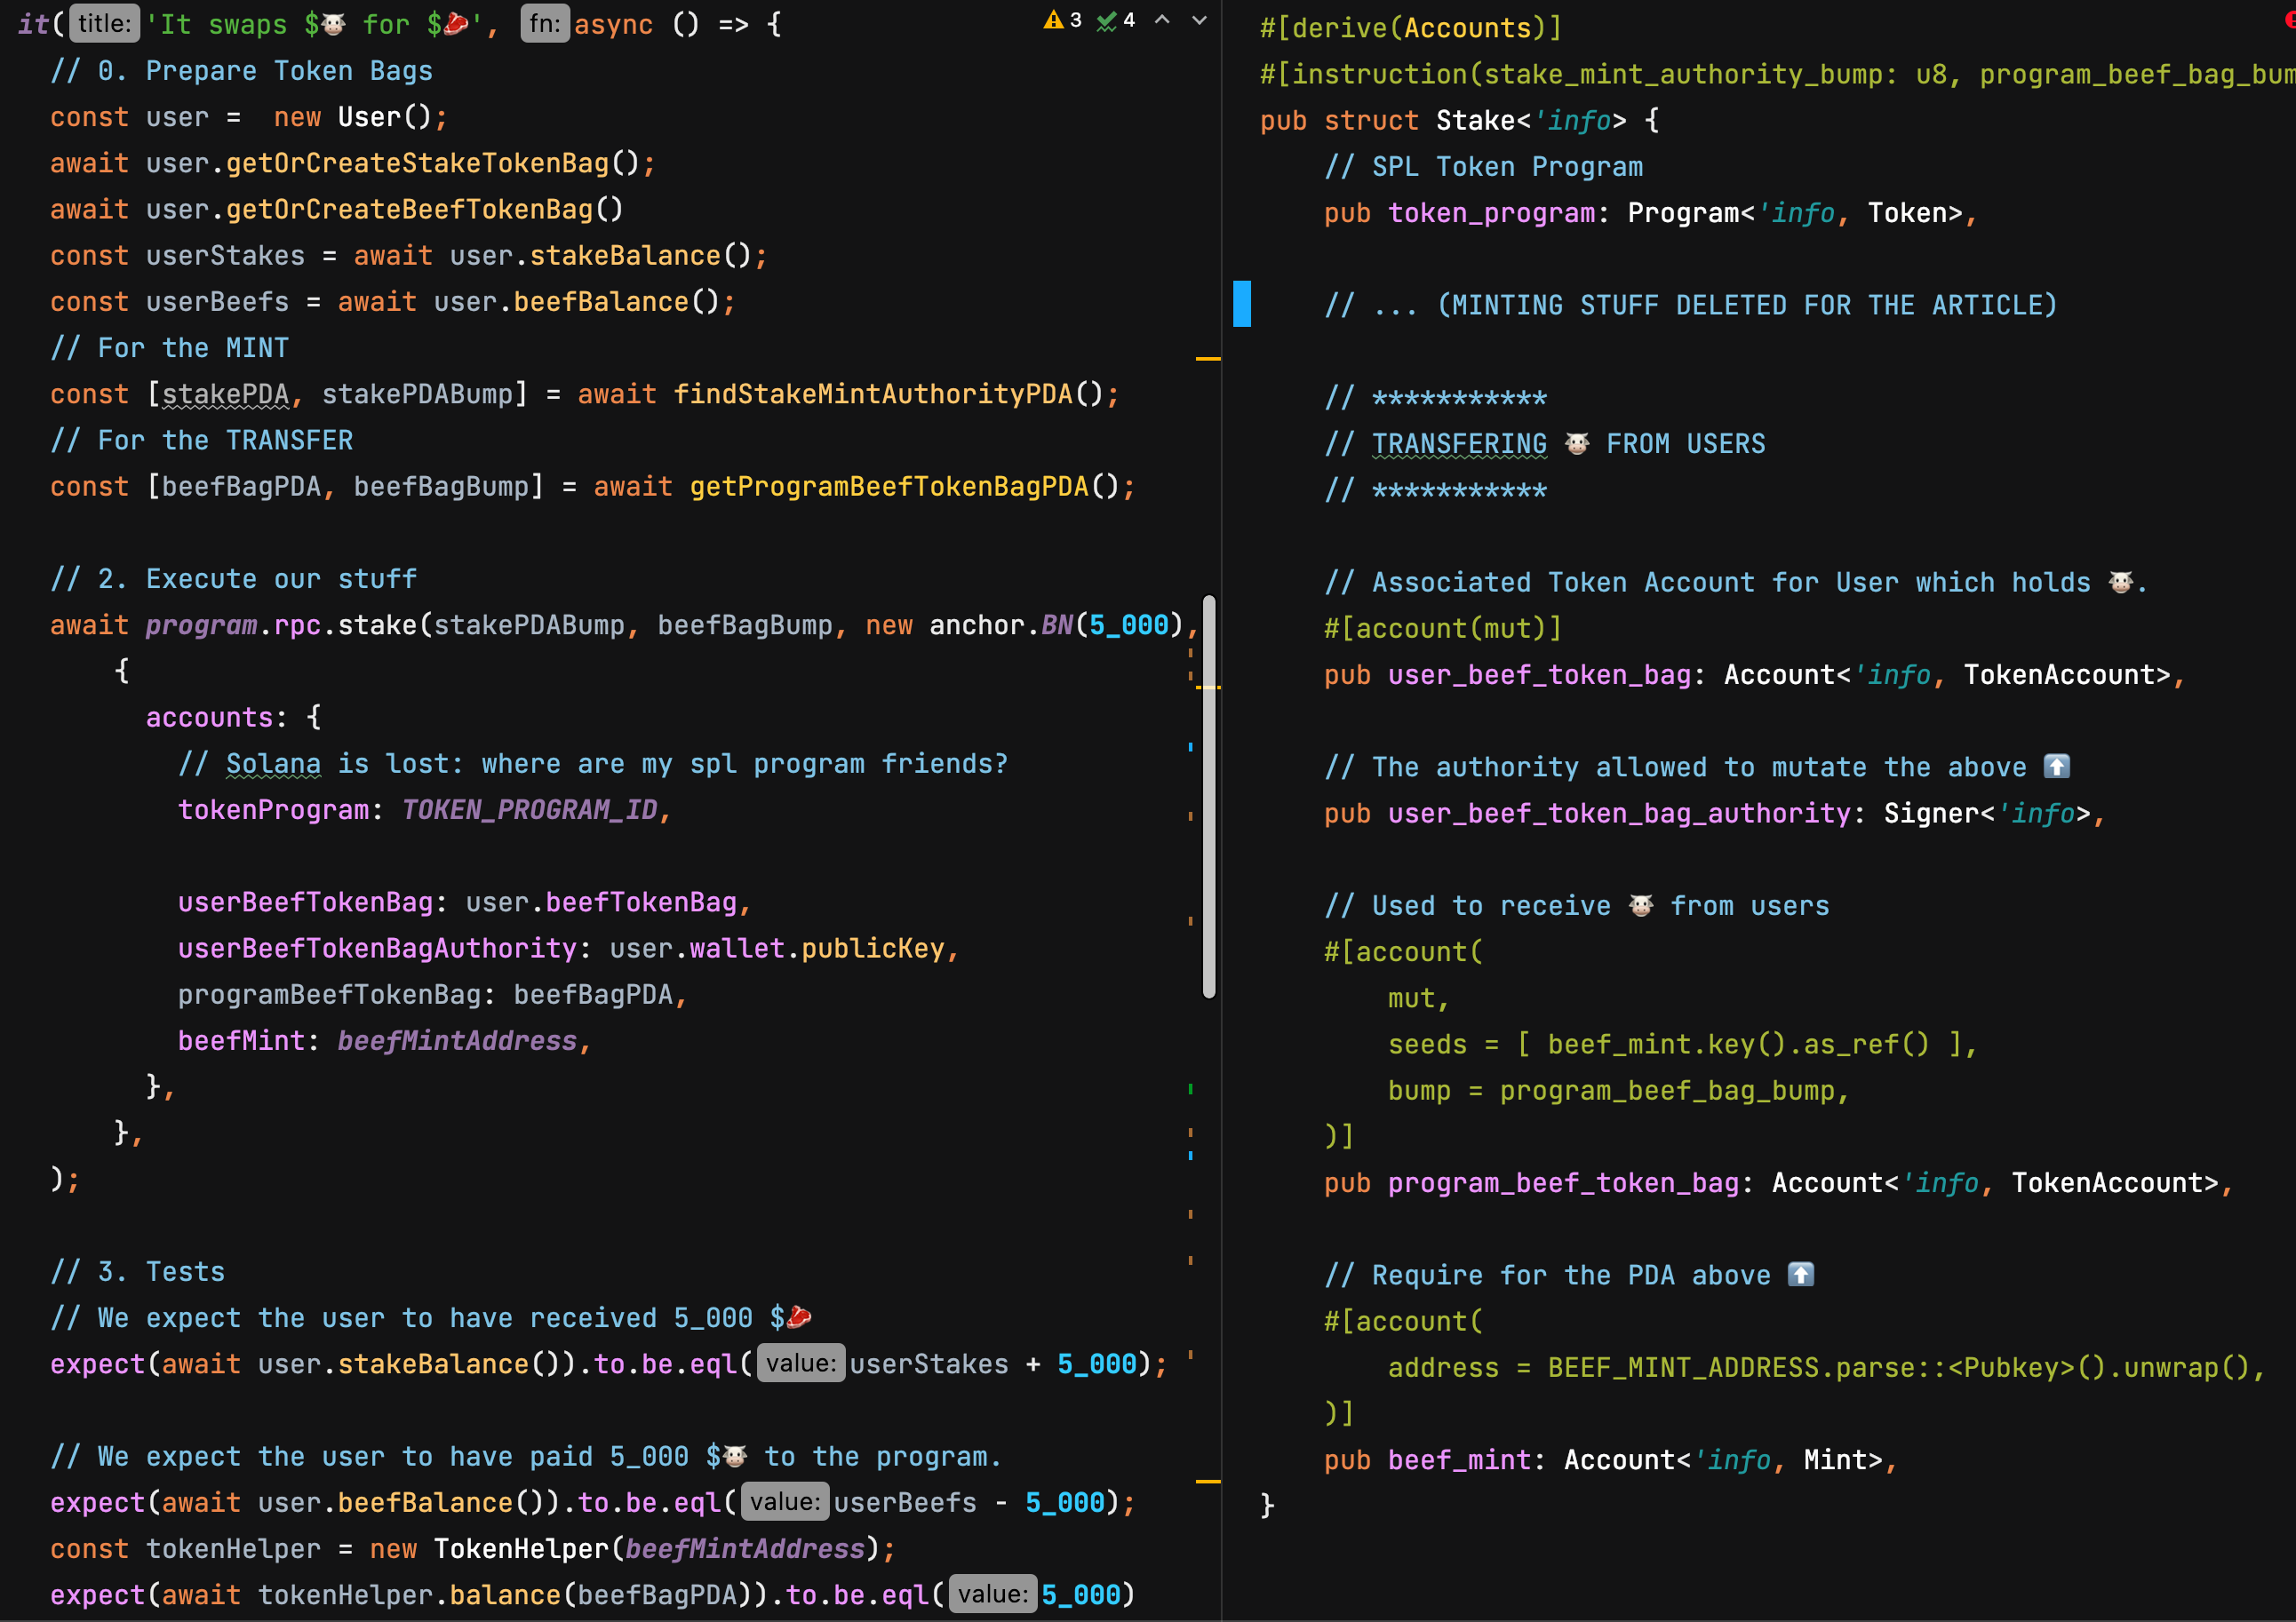
The left side is our implementation and the right side is the Context<Stake> accounts we need to define:
program_beef_token_bag: you know the dance now, it's a PDA seeded with a mint address.- (right), note the additional
#[instruction(stake_mint_authority_bump: u8, program_beef_bag_bump: u8)]. - (left), and also in the function:
stake(ctx: Context<Stake>, stake_mint_authority_bump: u8, program_beef_bag_bump: u8)
*Later, if you are curious about the helpers, look at the
scriptsfolder.
Run the anchor test:
🐮 beef Mint Address: AXyTBL1C48WEdpzpY4bc...
🥩️ stake Mint Address: 9FgzyMYYiQew42BdVjs...
🐮 Token Account 💰'8rn1qnW1QivKinta8rmDHsyV...' balance: 1000000000
    ✔ It creates the program 🐮💰 beef token bag (552ms)
    ✔ Swap $🐮 for $🥩 (2280ms)


  2 passing (8s)
Checkpoint code in this branch: https://github.com/mwrites/solana-staker/tree/feature/stake-transfer-program-beef-token-bag.
😌😌😌 Phew... We finally put all the pieces together, the staking feature finally works!!!
- We had to get a little help from the airdrop function to get users some 🐮.
- Once users had 🐮, we noticed that the program also needed a 🐮 token bag to store SPL tokens.
- After that, we were already familiar with all the 🥒 previous ingredients, mint, PDA, and token bags, so we could finish it in one straight line.
🚀🌈👏 Huge job on getting to this checkpoint!!! We are basically done. There are no more ingredients or detours to learn about. The rest is just finishing the job.
Now, we need to do all of this but in reverse. So what does the Unstake / Redeem of 🥩 actually do?
-
It should not mint but burn the received 🥩.
-
It should transfer back 🐮 to users.
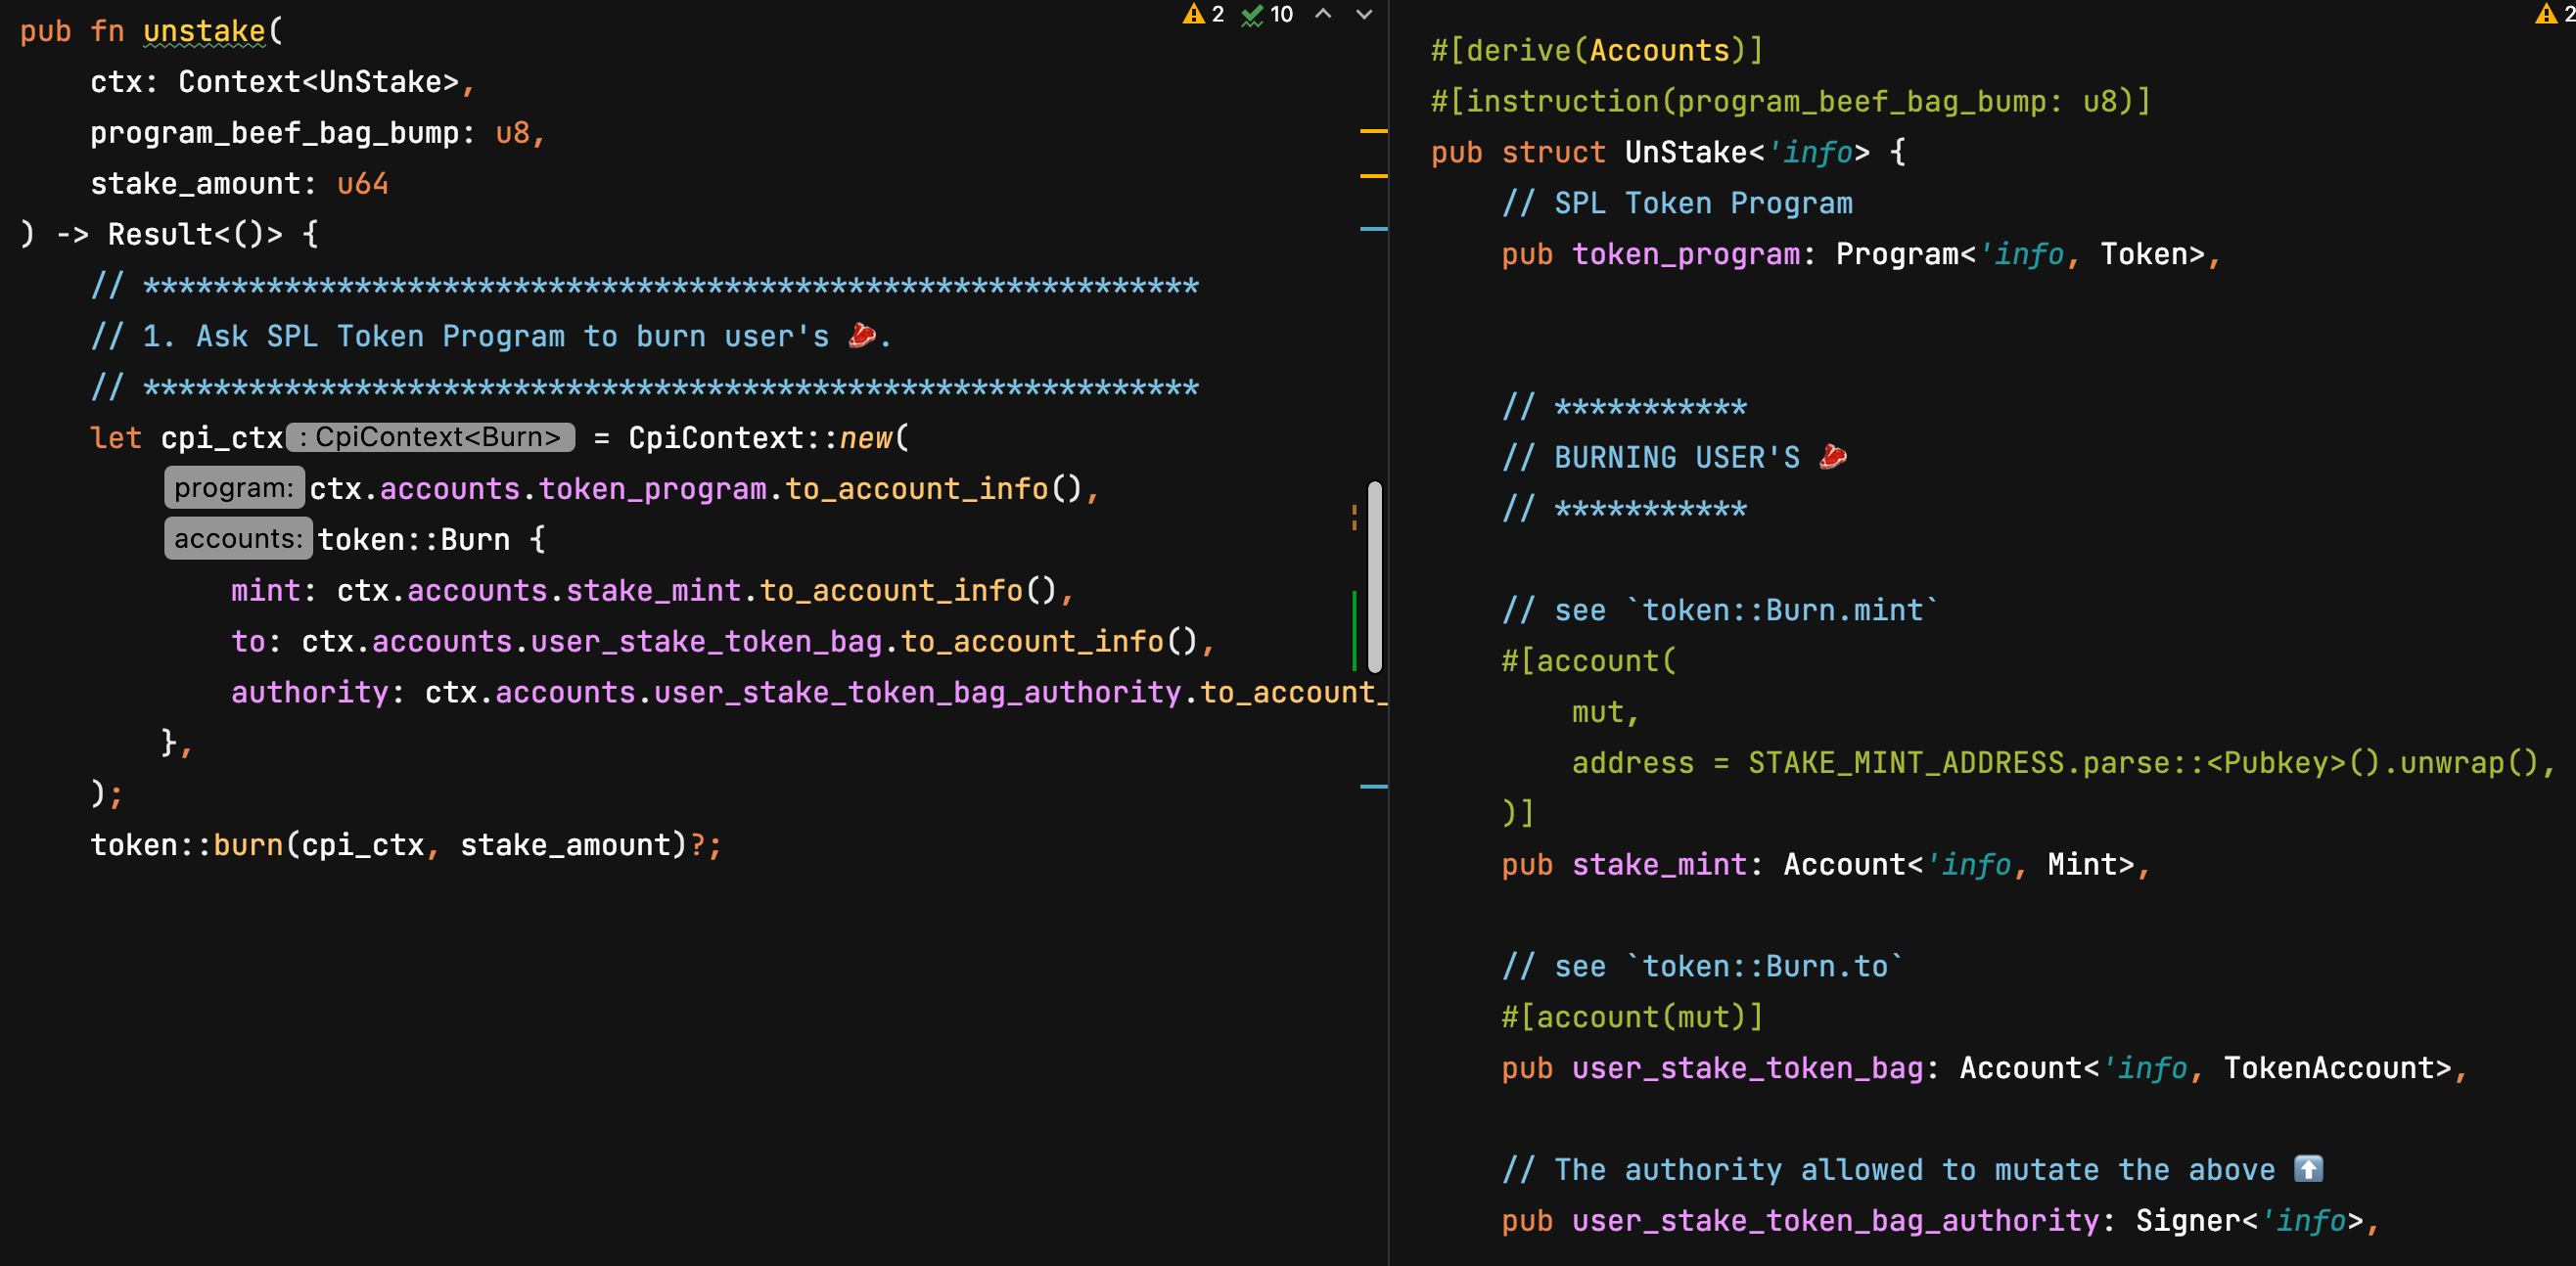
Here's what the token::Burn instruction for the Token Program looks like:
token::Burn {
	mint: // what type of token is this?
	to: // who is burning token?
	authority: // who get the right to burn these?
},- Left side: implementation.
- Right side: what kind of accounts the API expects.
Let's discuss token::Burn (left side):
-
to: I would have called it afromas in "token bag to burn from" instead, but basically, that's the token bag we want to burn. -
authority: Solana wants to make sure the person who is unstaking also controls that token bag.
Rust-Side
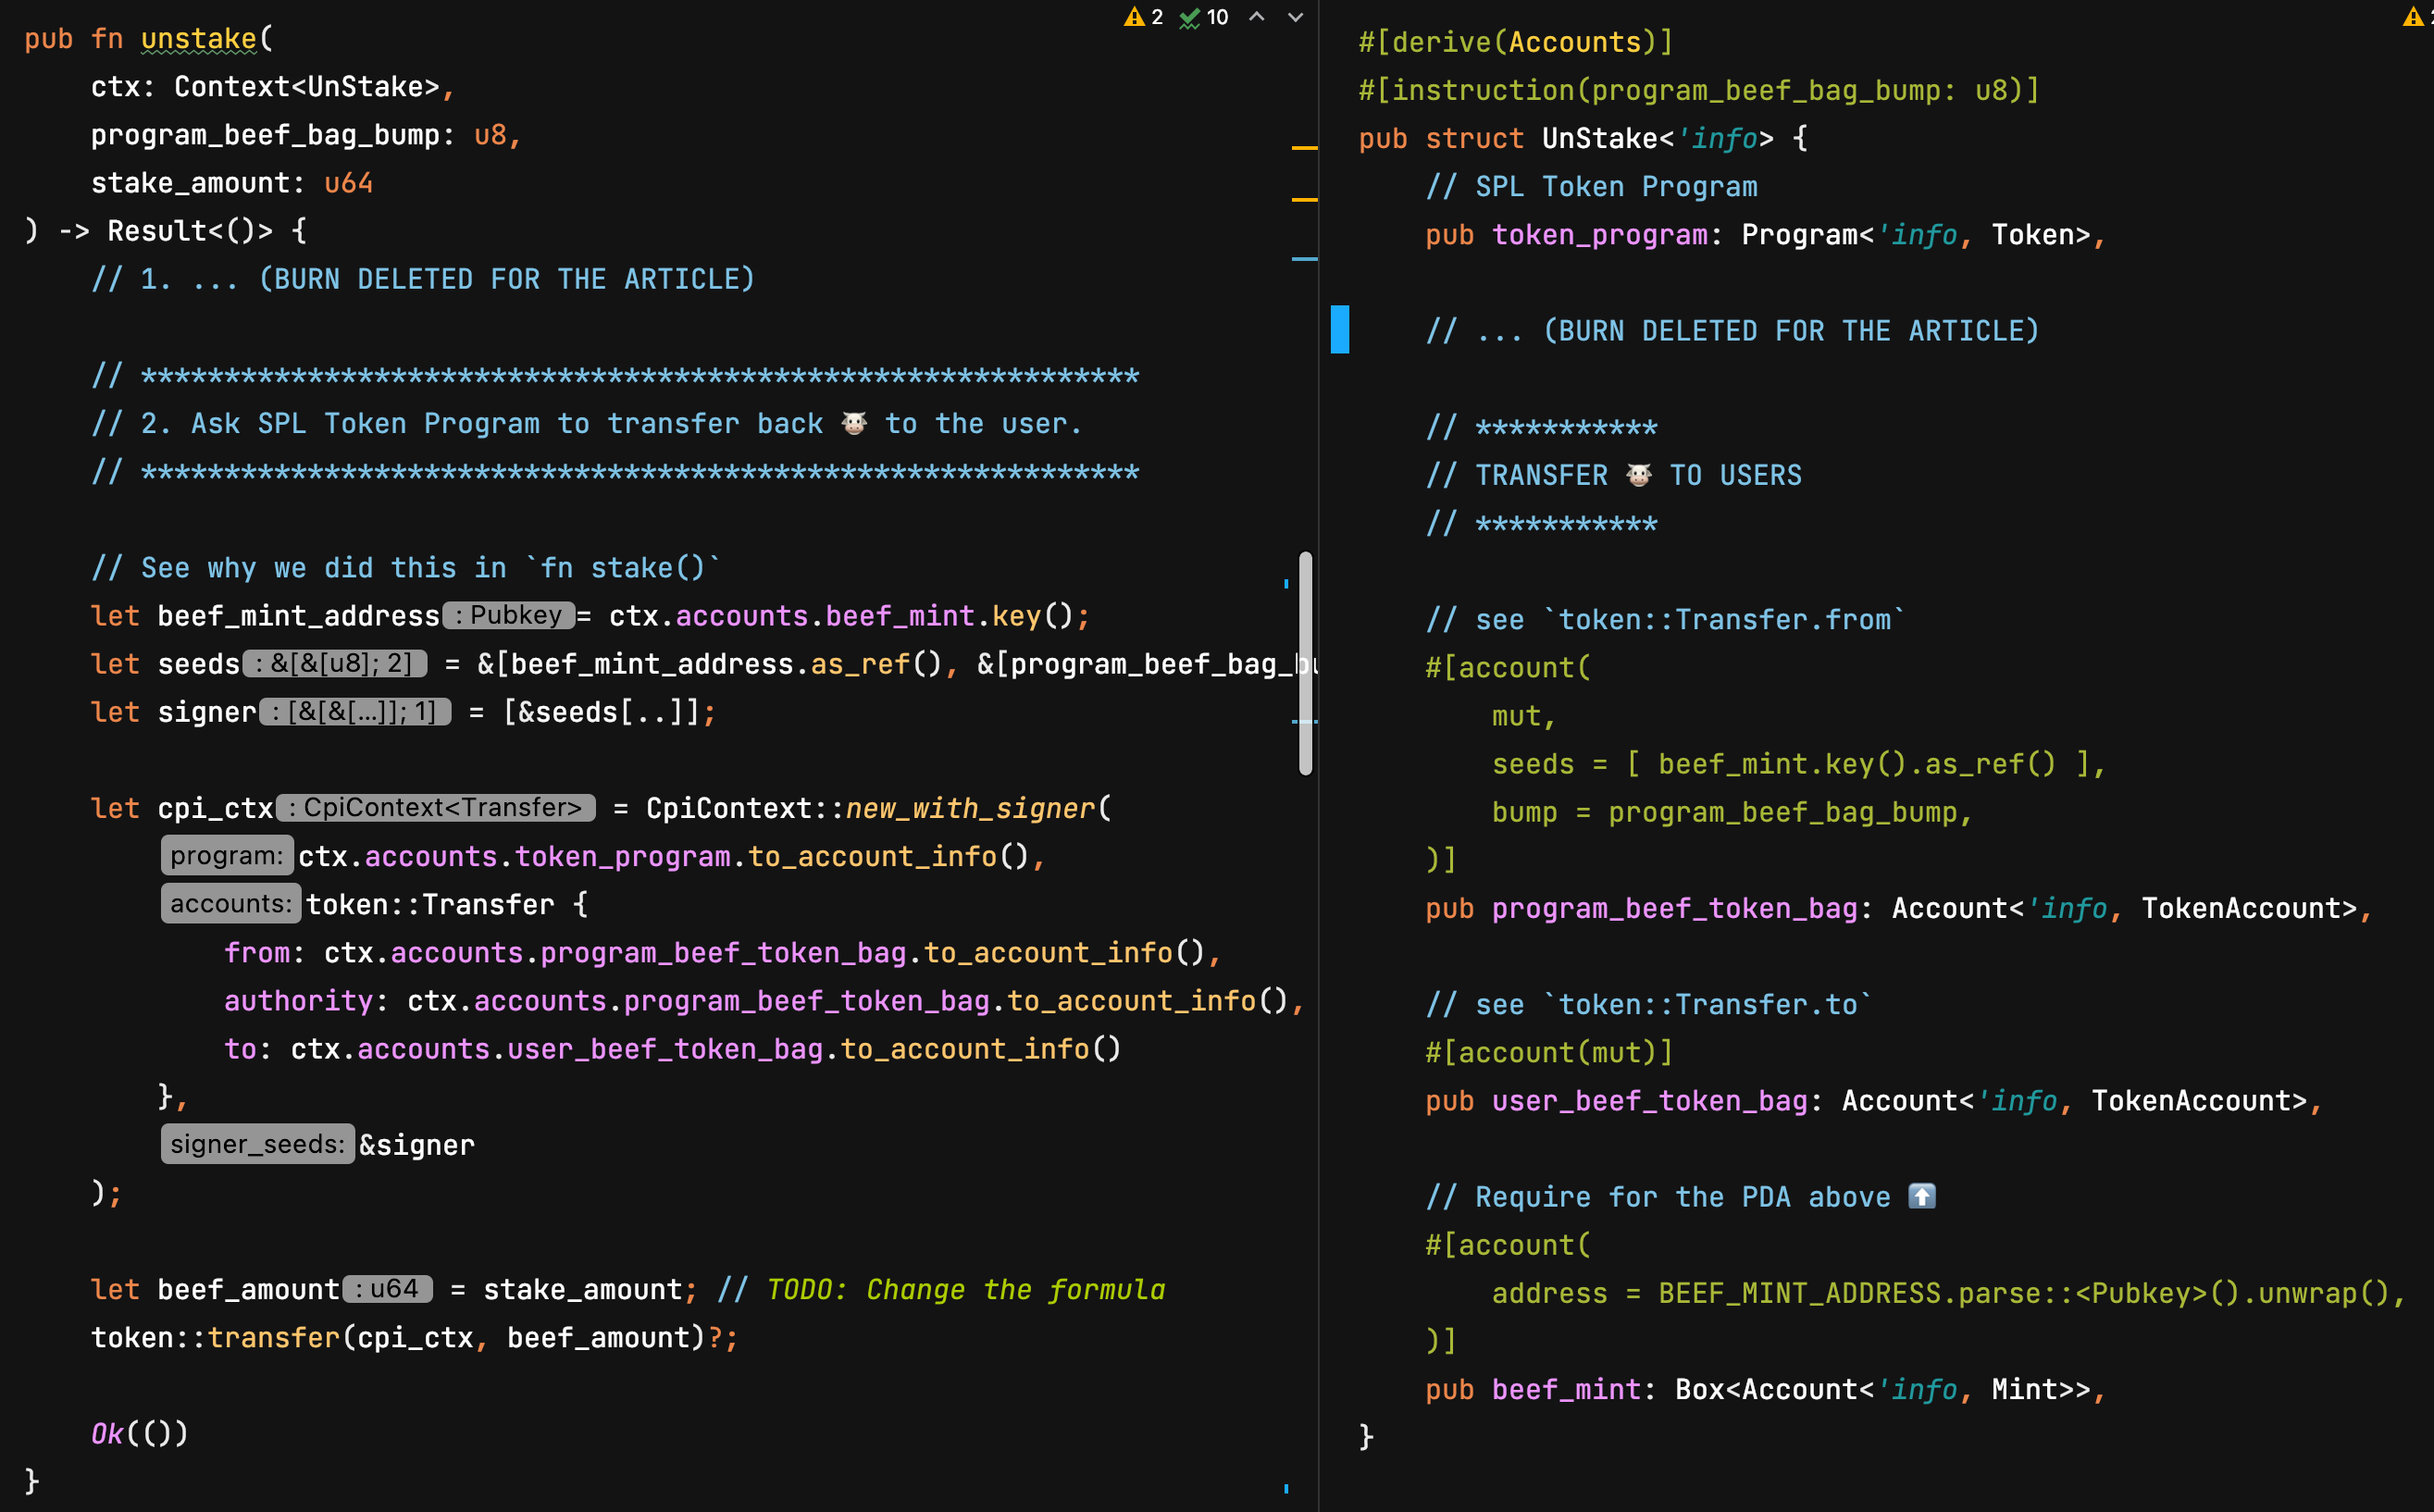
For the transfer, it's pretty much the same thing we did for the stake but inversing the recipient and the destination. On the left side, we do the implementation and on the right side we define the Context<UnStake>:
- The
Context<UnStake>, is a little similar to the Stake's one but we are mostly interested about beef mint and beef bags this time.
Let's zoom in, on the signing, it's quite similar to what we did in fn stake() just using beef_mint and beef_token_bag instead:
  // PDA Signing: same as how we did  in `fn stake()`
let stake_mint_address= ctx.accounts.beef_mint.key();
let seeds = &[beef_mint_address.as_ref(), &[program_beef_bag_bump]];
let signer = [&seeds[..]];

let cpi_ctx = CpiContext::new_with_signer(  // NEW
	 ctx.accounts.token_program.to_account_info(),
	 token::Transfer {
		 from: ctx.accounts.program_beef_token_bag.to_account_info(),
		 authority: ctx.accounts.program_beef_token_bag.to_account_info(),
		 to: ctx.accounts.user_beef_token_bag.to_account_info()
	 },
	 &signer
);CpiContext::new_with_signer: when we did the transfer call instake,we needed the user's signature. Since the token comes from the vault, we need the program to sign this time.
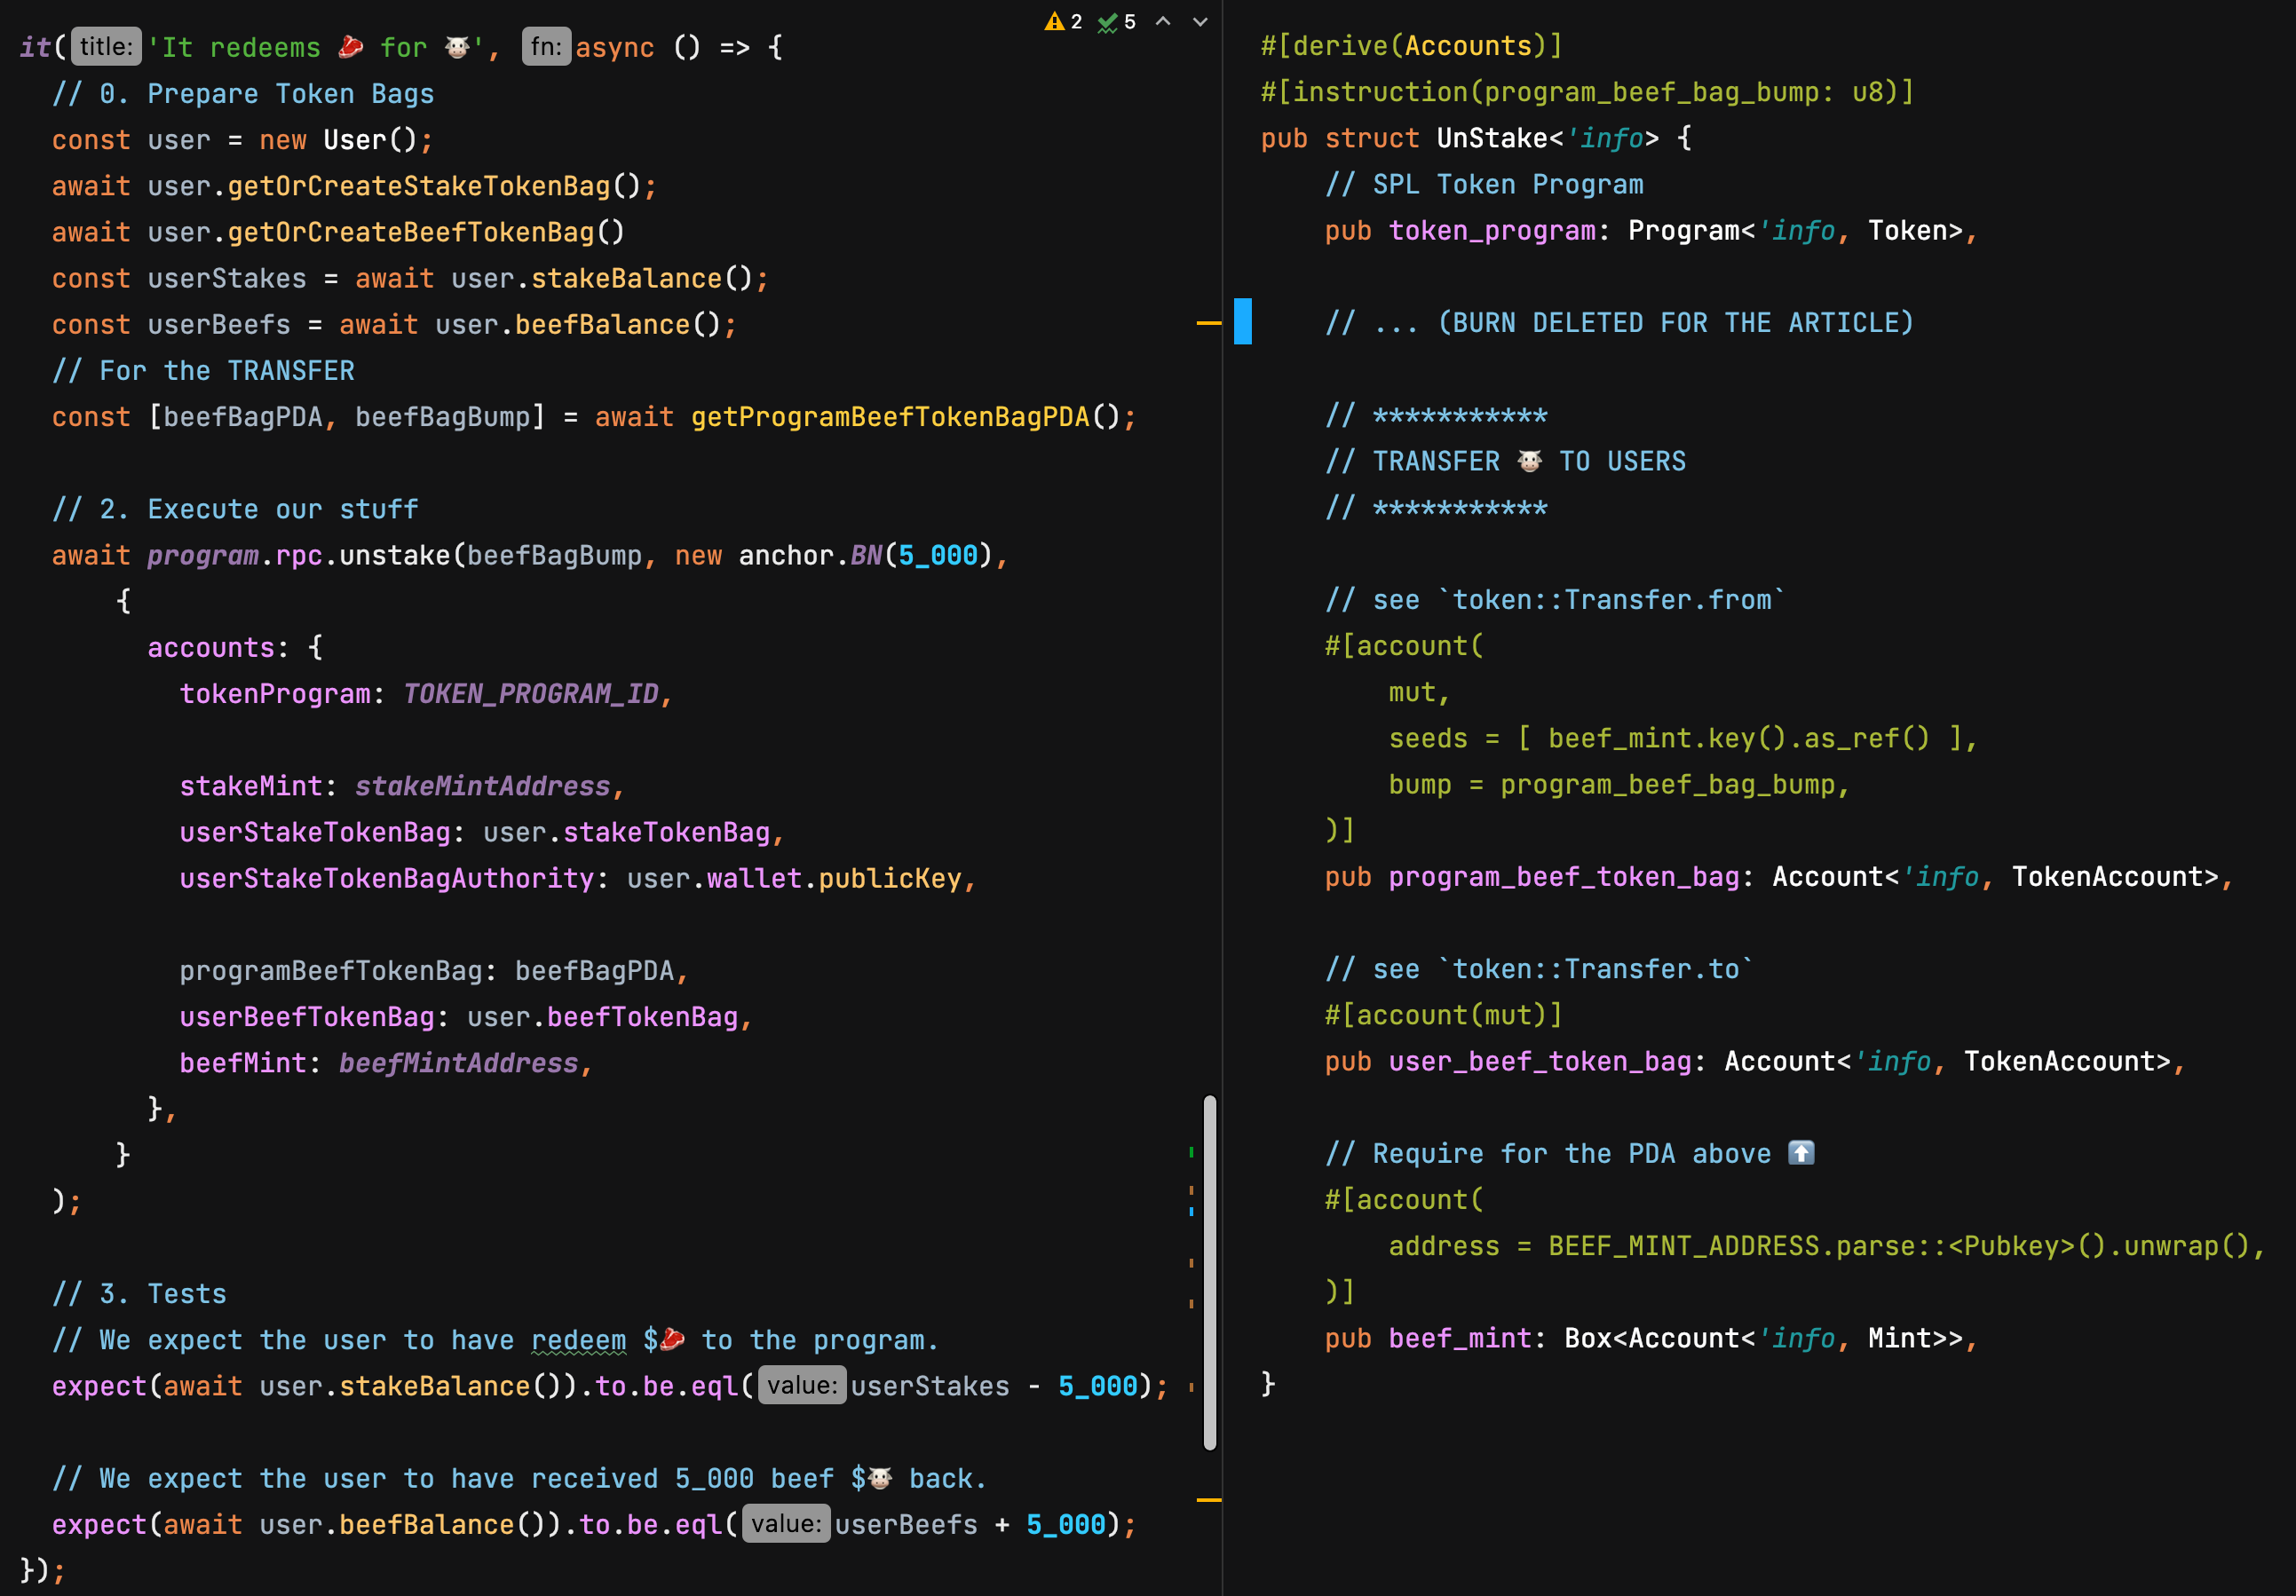
Client-Side
We can look at the right side, to see what are the expected accounts. So that, on the left side, we prepare the addresses of the accounts and feed them to the program:
anchor tests:
🐮 beef Mint Address: AXyTBL1C48WEdpzpY...
🥩️ stake Mint Address: 9FgzyMYYiQew42BdVjsK...
🐮 Token Account 💰'8rn1qnW1QivKinta8rmDH...' balance: 1000000000
   ✔ It creates the program 🐮💰 beef token bag (531ms)
   ✔ Swaps $🐮 for $🥩 (2090ms)
   ✔ It redeems 🥩 for 🐮 (1557ms)


 3 passing (8s)
Checkpoint code is in this branch: https://github.com/mwrites/solana-staker/tree/feature/unstake.
Tremendous job on making it! 💪
Users can now stake and unstake tokens. The only remaining part is the math on how to distribute tokens. One easy solution is to just divide by the total supply, but other ways exist. I will let you figure out this part.
We started from a draft of the minting which led us to learn about several ingredients that we needed:
- Creating a Mint.
- Signing with a PDA.
- Associated Token Accounts.
These 🥒 ingredients will be the foundation of your core skills which you can use to make new recipes apps!
Learning how to prepare and chop these ingredients was the most challenging part, but after mastering these, we were able to quickly unroll the rest, the transfer, and the redeeming feature.
🌈 Going further, the front-end is basically done. You just have to take the js code from the tests and let users connect their wallets with a wallet-adapter. Not sure how to do it?
- Take a look at this front-end walkthrough. You also might want to add the swap feature and avoid the awkward $beef airdrop we did.
- Or you can try to let users stake $sol instead of 🐮, try to implement it, and see what's different about staking $sol.
- Also, you might want to name your token by adding token, Jacob Creech explains how to use the metaplex token metadata standard
Grab a coffee, a beer, water, look at the sunshine take a breath, pat yourself, look at how handsome or pretty you are in the mirror 🤩. Then, come back for the next sections below!
The Consequence Of Accounts
Comparing with the solidity version. You might notice that the Solana version is much more involved. If we can resume it in one word, that word is Accounts. You might have seen the phrase " Solana programs are stateless". It took me a while to really, I mean, really understand what this involves. Basically, it means programs are dumb!
So, programs don't know anything. They are just machine processing data. So when you want to talk to programs, you want them to process something. But they have no idea what data you are talking about, so because of that, you need to always provide everything to these processors:
- The first consequence of this is that data (accounts) need to be provided with each instruction, which makes the code longer to write.
- The second consequence is that because accounts are independent of programs, they need to be signed for access control, which again makes the code longer to write.
It's not a program->accounts, it's program->accounts->signer
Because of these two reasons, accounts introduce a new depth. For example, when you want to talk to a program, you want to give an account and not only the account but also the account's signer. So whenever you want to do something, you first need to get the accounts and make sure you have the appropriate signing in place. Then, finally, you can do something with the account.
ERC20 Contracts
The equivalent to ERC20 contracts in Solana is SPL Tokens. However, SPL Tokens are not smart contracts but accounts. So instead of creating a new smart contract (program), we register a new account that defines our token with the SPL Token Program, the centralized authority for managing tokens.
Associated Token Accounts or Token Bags
While in EVM, token balance is handled by the ERC20 smart contract, it is not managed by a program in Solana. Indeed, the token balance lives in something like a token bag, and that token bag is owned by the user, not the system or your smart contract!
PDA Signing
Since accounts live outside programs, signing is used to determine who has control of an account. Sometimes though. You want only your program to own such an account. This is achieved by PDA Signing, it is pretty finicky, but you will get used to it with time.
Rent
Finally, we need to pay rent for the space accounts occupied in Solana. The rent is usually paid by the signer of the transaction. Because space needs to be paid, we are incentivized as developers to make accounts are small and granular as possible.
By looking at the transaction scan, we can understand what is happening without even looking at the code. Here's an example of how ORCA does it:
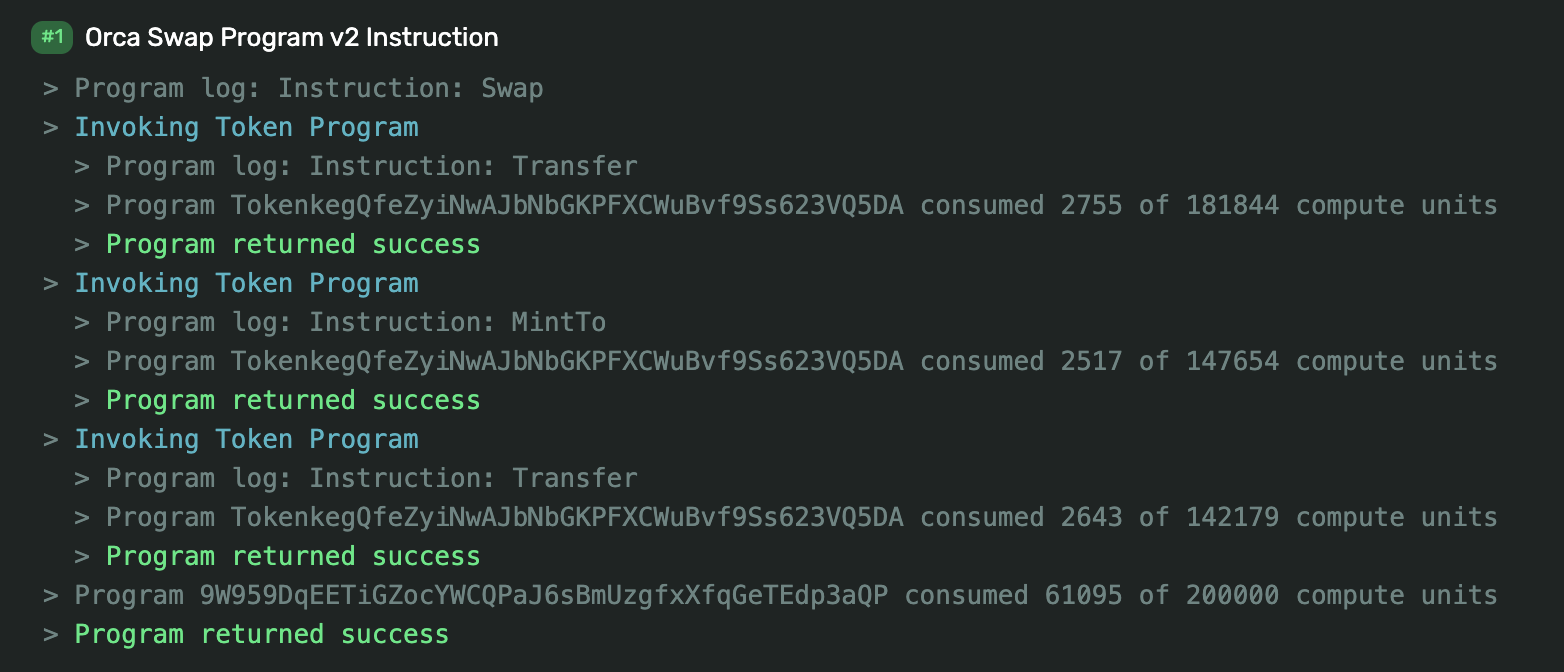
We see that for a swap, we also need to interact with the Token Program:
- Token Program
- Transfer
- Mint
- Transfer
As you now know, to receive tokens, you need to have the corresponding token bags first. In some cases, you will see that before the swap, there is the token bag creation:
- Associated Token Account Program - Create Associated Account
- SOL Transfer
- Allocate
- Assign
- Initialize account
- Token Program
- Transfer
- Mint
- Transfer
The swap code for orca is public and can be found here: https://github.com/orca-so/solana-program-library/blob/master/token-swap/program/src/instruction.rs.
Depending on the project, the staking mode might differ in how they structure the tokens.
- Input: step
- Output: xstep
- Reward = none
- Input: CRP
- Output: sCRP
- Reward: CRP
- Input: Ray
- Output: none
- Reward: Ray
This article would have never seen the light without these beautiful projects:
- The Solana Cookbook
- The Anchor Book
- Step Finance - Single Token Staking Github
- Project Serum Stake Example
- Intro to blockchains programming with Solana
- What is a Program Derived Address
- Solana Doc - Token Program
- Solana Doc - Associated Token Account Program
- Anchor Book - CPI
- Anchor Book - PDA Signing
- How to use the Metaplex Token Metadata Standard
Associated Token Accounts or Token Bags
While in EVM, token balance is handled by the ERC20 smart contract, it is not managed by a program in Solana. Indeed, the token balance lives in something like a token bag, and that token bag is owned by the user, not the system or your smart contract!
PDA Signing
Since accounts live outside programs, signing is used to determine who has control of an account. Sometimes though. You want only your program to own such an account. This is achieved by PDA Signing, it is pretty finicky, but you will get used to it with time.
Rent
Finally, we need to pay rent for the space accounts occupied in Solana. The rent is usually paid by the signer of the transaction. Because space needs to be paid, we are incentivized as developers to make accounts are small and granular as possible.
This is part 2 of the staking program. We are still trying to achieve the core staking feature. By trying to implement the minting part, we learned how to chop and slice token mints, token bags, CPI signing, etc... Thanks to that, we will be able to move much faster now!
Remember, if you are an Etherean, ex etherean, or cyborg etherean-solanian 😁, please jump to the EVM Comparison and copy-paste the section somewhere, and keep it along with you as you follow the article. That section was separated on purpose as I am not sure how many of you have the double skills.
Let's do the second part of the staking. We now need to transfer $beef tokens from the user.
Please, please CMD + +, or view -> zoom in at least two or three times in your browser. Unfortunately, hashnode keeps the reading area ridiculously small, even on huge screens, making the screenshots unreadable.
Or, right-click on the screenshots and open in the new tab.
I had previously added the full code in text directly in the article, but it was just impossible to follow given the length of the code! So I decided to go for side-by-side screenshots instead. Also because of accounts, it's way better to see side by side, what your program API expects and what accounts you need to prepare on the client side.
Maybe in the future, I will consider using another platform. I am thinking about a two-view or three-view side by side to look at rust, js, and diagram at the same time.
Humans have two faces, and Solanians have three.
Remember, to fully understand how a Solana program works. We better try to look at it from different glasses 👓:
- The deployment part.
- The client-side.
- The program itself.
1 Pair-Progra-Cooking The Minting Feature:
This was done in part 1.
2 Completing the staking with the $beef transfer:
In this episode, we will make users pay $beef!
3. Unstake:
Finally, we will learn how to do the inverse operation of staking.
🍭 TL;DR - Github
We are still looking at the same repo, the code in this article is not exhaustive. Instead, it will illustrate the important pieces so that you develop the mental model to build a DeFi program yourself in the future.
Please don't try to copy-paste any of the code here. It probably won't compile. I have reduced the noise on purpose. However, the complete code is available here. Feel free to look at it along with the article or clone it locally and try it.
Got some beef?
Previously we have already created the🐮 token mint. Our tokens now exist in the blockchain (at least in our local ledger). It is not time to work on our program yet. Why? Our staker program takes $beef tokens and rewards our users with stake tokens. But how do users get $beef in the first place?
Have you ever noticed that almost all DeFi apps have a swap feature on the home page? So if we were to build a complete DeFi app, users would start by swapping their $sol for 🐮 tokens. Then they would be able to stake their 🐮 tokens.
Airdrop
Since we are in Solana, users usually start with $sol, so when they go to our Staking or DEX application, users would first need to swap their $sol for another crypto token. To simplify this article and make testing easier, we will just airdrop the 🐮 tokens directly to users.
For our tests, we are using ourselves as guinea pig users. So you or I will be the one receiving the 🐮 tokens.
This part is not crucial to the article. However, if you want, look at
scripts/airdrop-beef.tsto understand how to do it.
So, we usually would airdrop $beef to users before they arrive in our application. So, let's do that in the tests:
import { airdropBeef } from "../scripts/airdrop-beef";


describe("staker program", () => {

    before(async () => {
        await createMints();
        await airdropBeef();
	 });


	it('Swap $🐮 for $🥩', async () => {
		...
	}
}
🏆 Achievement: Airdroping 🐮
- Users now have 🐮 in their wallets.
- All the preparation to finish the stake function is now done!
💪 From now on, we don't need to do additional deployment stuff. We can solely focus on our staker program.
One more thing before we let users send 🐮 to us, we need a beef token bag for our program. As users need token bags to hold tokens, programs also need token bags. So let's create one for our program. Since the program will own the token bag account, we will be using a Program Derived Address mapped to the address of the beef mint.
On the left side, the implementation is virtually empty, because thanks to Anchor we can do all the work with the macros when defining Context<CreateBeefTokenBag.
The program token bag will be created with the CreateBeefTokenBag instruction:
- We are creating an account from a PDA, you know this already!
- This time, the
bumpis not necessary.
- Left side: remember, with Solana, we need to prepare the addresses of the accounts ahead of time and feed them to our program. PDAs are "found" instead of created, so let's find that address.
- Right side: we create an account with that program-derived address, all the other accounts are just dependencies of that
program_beef_token_bag.
- This time, the
bumpis not necessary. payer: Solana wonders: " and who is gonna pay for that token bag account space?"
- The rest are required by Token Program, as we saw when we defined the
Context<CreateBeefTokenBag>.
In real life (what is real life?), you would actually do this in an Anchor deployment script.
Run the test👏 anchor test:
    ✔ It creates the program 🐮💰 beef token bag (615ms)
    ✔ Swap $🐮 for $🥩 (1701ms)


  2 passing (7s)
🏆 Achievement:
- We created a token bag for our program to receive 🐮 from the user.
- Our program can now receive and store 🐮 beef tokens.
Similarly to what we did for the mint instruction with the token program, let's see what the transfer looks like:
let cpi_ctx = CpiContext::new(
	ctx.accounts.token_program.to_account_info(),
	token::Transfer {
		from: // from which token bag?
		authority: // do you have the authority to withdraw from ⬆️ ?
		to: // to which token bag?
	}
);
token::transfer(cpi_ctx, beef_amount)?;from: is the token bag to withdraw from, meaning the user 🐮 token bag.authority: is the authority forfrom.Solana wants to make sure we are not stealing from the users without their consent!to: is the program token bag we will need to create below.
😌 No need for a checklist this time. We already have all the ingredients necessary. We will complete all these arguments at once!
The left side is our implementation and the right side is the Context<Stake> accounts we need to define:
program_beef_token_bag: you know the dance now, it's a PDA seeded with a mint address.- (right), note the additional
#[instruction(stake_mint_authority_bump: u8, program_beef_bag_bump: u8)]. - (left), and also in the function:
stake(ctx: Context<Stake>, stake_mint_authority_bump: u8, program_beef_bag_bump: u8)
*Later, if you are curious about the helpers, look at the
scriptsfolder.
Run the anchor test:
🐮 beef Mint Address: AXyTBL1C48WEdpzpY4bc...
🥩️ stake Mint Address: 9FgzyMYYiQew42BdVjs...
🐮 Token Account 💰'8rn1qnW1QivKinta8rmDHsyV...' balance: 1000000000
    ✔ It creates the program 🐮💰 beef token bag (552ms)
    ✔ Swap $🐮 for $🥩 (2280ms)


  2 passing (8s)
Checkpoint code in this branch: https://github.com/mwrites/solana-staker/tree/feature/stake-transfer-program-beef-token-bag.
😌😌😌 Phew... We finally put all the pieces together, the staking feature finally works!!!
- We had to get a little help from the airdrop function to get users some 🐮.
- Once users had 🐮, we noticed that the program also needed a 🐮 token bag to store SPL tokens.
- After that, we were already familiar with all the 🥒 previous ingredients, mint, PDA, and token bags, so we could finish it in one straight line.
🚀🌈👏 Huge job on getting to this checkpoint!!! We are basically done. There are no more ingredients or detours to learn about. The rest is just finishing the job.
Now, we need to do all of this but in reverse. So what does the Unstake / Redeem of 🥩 actually do?
-
It should not mint but burn the received 🥩.
-
It should transfer back 🐮 to users.
Here's what the token::Burn instruction for the Token Program looks like:
token::Burn {
	mint: // what type of token is this?
	to: // who is burning token?
	authority: // who get the right to burn these?
},- Left side: implementation.
- Right side: what kind of accounts the API expects.
Let's discuss token::Burn (left side):
-
to: I would have called it afromas in "token bag to burn from" instead, but basically, that's the token bag we want to burn. -
authority: Solana wants to make sure the person who is unstaking also controls that token bag.
Rust-Side
For the transfer, it's pretty much the same thing we did for the stake but inversing the recipient and the destination. On the left side, we do the implementation and on the right side we define the Context<UnStake>:
- The
Context<UnStake>, is a little similar to the Stake's one but we are mostly interested about beef mint and beef bags this time.
Let's zoom in, on the signing, it's quite similar to what we did in fn stake() just using beef_mint and beef_token_bag instead:
  // PDA Signing: same as how we did  in `fn stake()`
let stake_mint_address= ctx.accounts.beef_mint.key();
let seeds = &[beef_mint_address.as_ref(), &[program_beef_bag_bump]];
let signer = [&seeds[..]];

let cpi_ctx = CpiContext::new_with_signer(  // NEW
	 ctx.accounts.token_program.to_account_info(),
	 token::Transfer {
		 from: ctx.accounts.program_beef_token_bag.to_account_info(),
		 authority: ctx.accounts.program_beef_token_bag.to_account_info(),
		 to: ctx.accounts.user_beef_token_bag.to_account_info()
	 },
	 &signer
);CpiContext::new_with_signer: when we did the transfer call instake,we needed the user's signature. Since the token comes from the vault, we need the program to sign this time.
Client-Side
We can look at the right side, to see what are the expected accounts. So that, on the left side, we prepare the addresses of the accounts and feed them to the program:
anchor tests:
🐮 beef Mint Address: AXyTBL1C48WEdpzpY...
🥩️ stake Mint Address: 9FgzyMYYiQew42BdVjsK...
🐮 Token Account 💰'8rn1qnW1QivKinta8rmDH...' balance: 1000000000
   ✔ It creates the program 🐮💰 beef token bag (531ms)
   ✔ Swaps $🐮 for $🥩 (2090ms)
   ✔ It redeems 🥩 for 🐮 (1557ms)


 3 passing (8s)
Checkpoint code is in this branch: https://github.com/mwrites/solana-staker/tree/feature/unstake.
Tremendous job on making it! 💪
Users can now stake and unstake tokens. The only remaining part is the math on how to distribute tokens. One easy solution is to just divide by the total supply, but other ways exist. I will let you figure out this part.
We started from a draft of the minting which led us to learn about several ingredients that we needed:
- Creating a Mint.
- Signing with a PDA.
- Associated Token Accounts.
These 🥒 ingredients will be the foundation of your core skills which you can use to make new recipes apps!
Learning how to prepare and chop these ingredients was the most challenging part, but after mastering these, we were able to quickly unroll the rest, the transfer, and the redeeming feature.
🌈 Going further, the front-end is basically done. You just have to take the js code from the tests and let users connect their wallets with a wallet-adapter. Not sure how to do it?
- Take a look at this front-end walkthrough. You also might want to add the swap feature and avoid the awkward $beef airdrop we did.
- Or you can try to let users stake $sol instead of 🐮, try to implement it, and see what's different about staking $sol.
- Also, you might want to name your token by adding token, Jacob Creech explains how to use the metaplex token metadata standard
Grab a coffee, a beer, water, look at the sunshine take a breath, pat yourself, look at how handsome or pretty you are in the mirror 🤩. Then, come back for the next sections below!
The Consequence Of Accounts
Comparing with the solidity version. You might notice that the Solana version is much more involved. If we can resume it in one word, that word is Accounts. You might have seen the phrase " Solana programs are stateless". It took me a while to really, I mean, really understand what this involves. Basically, it means programs are dumb!
So, programs don't know anything. They are just machine processing data. So when you want to talk to programs, you want them to process something. But they have no idea what data you are talking about, so because of that, you need to always provide everything to these processors:
- The first consequence of this is that data (accounts) need to be provided with each instruction, which makes the code longer to write.
- The second consequence is that because accounts are independent of programs, they need to be signed for access control, which again makes the code longer to write.
It's not a program->accounts, it's program->accounts->signer
Because of these two reasons, accounts introduce a new depth. For example, when you want to talk to a program, you want to give an account and not only the account but also the account's signer. So whenever you want to do something, you first need to get the accounts and make sure you have the appropriate signing in place. Then, finally, you can do something with the account.
ERC20 Contracts
The equivalent to ERC20 contracts in Solana is SPL Tokens. However, SPL Tokens are not smart contracts but accounts. So instead of creating a new smart contract (program), we register a new account that defines our token with the SPL Token Program, the centralized authority for managing tokens.
Associated Token Accounts or Token Bags
While in EVM, token balance is handled by the ERC20 smart contract, it is not managed by a program in Solana. Indeed, the token balance lives in something like a token bag, and that token bag is owned by the user, not the system or your smart contract!
PDA Signing
Since accounts live outside programs, signing is used to determine who has control of an account. Sometimes though. You want only your program to own such an account. This is achieved by PDA Signing, it is pretty finicky, but you will get used to it with time.
Rent
Finally, we need to pay rent for the space accounts occupied in Solana. The rent is usually paid by the signer of the transaction. Because space needs to be paid, we are incentivized as developers to make accounts are small and granular as possible.
By looking at the transaction scan, we can understand what is happening without even looking at the code. Here's an example of how ORCA does it:

We see that for a swap, we also need to interact with the Token Program:
- Token Program
- Transfer
- Mint
- Transfer
As you now know, to receive tokens, you need to have the corresponding token bags first. In some cases, you will see that before the swap, there is the token bag creation:
- Associated Token Account Program - Create Associated Account
- SOL Transfer
- Allocate
- Assign
- Initialize account
- Token Program
- Transfer
- Mint
- Transfer
The swap code for orca is public and can be found here: https://github.com/orca-so/solana-program-library/blob/master/token-swap/program/src/instruction.rs

