The body tag contains global flags for the entire page. It can take a few attributes:
cw-optionsThis attribute contains a comma separated list of options for the UI.noresizePrevent the zoom option making sure your UI fit to your screen with no scrollbars. Hence, the zoom will stay at 100% and the body html tag will have scrollbars.
cw-grabbersThis attribute represents a comma separated list of grabbers instance names. See the configuration guide for more info.
Some HTML tags can be used through their id. ConkW will then override their content (through innerText or innerHTML) every time it runs. Here is their list:
cw-delayThis element will be updated with 4 integers in the form1/2/3|4, where1is the time elapsed since the last API call in ms,2is the number of millisecond of the current second on the server when the last call was performed (The UI tries to make it 50 to get fresh data),3is the number of millisecond elapsed for the API call and4the number of millisecond taken by the rendering engine to render the page.cw-statusThe global status of ConkW.okwhen everything is allright andn errorswhen there arenerrors to report, displayed in red. A simple click on the element shows a dialog with the errors.cw-zoomThe global zoom level of the UI.
To display the date, ConkW look into cw-date elements. Their ID will determine what to display in them, quite explicitely:
dayoftheweekex:Saturdaydayofmonthex:12monthex:Juneyearex:2021
The analog clock is displayed inside a tag that reads cw-clock. All is needed is something like:
<cw-clock style="width:240px;height:240px;overflow: hidden;padding-top:3px;margin:auto" onclick="ConkW.dates.rotateClockFace(event, this)"></cw-clock>Where the style is your own choice and the onclick is here to rotate the clockface when the user clicks on it. From there, ConkW will handle everything to have your clock displayed.
Any html element can be used to display data with conkw. For an element to be used by ConkW, it must have a cw-ns attribute, which stands for ConkW namespace. It is the name of a grabber instance, that must be declared in the cw-grabbers part of the body tag.
For example:
<a href="" cw-ns="spotify">Some text</a>
This instruct ConkW to look for other cw- attributes in the tag, and execute them in the context of the spotify data returned by the API.
Those attributes will assign behaviors to the html element. They are heavily based on the ConkW expressions. Let's have a look at them.
Expressions is the way the page author will tell ConkW which value should be used. Values can be used as content, title, color, sioze, etc. Basically any HTML attribute can be used.
Let's take a simple example:
m:num:time:uptime
All basic expressions are built on four values, separated by colons :.
- Class. This is the type of expression. It can be:
mmeans a simple metric name, specified from the grabber specified incw-ns.lliteral expression, such as "foo" or "2".eextended expression. An ES6 template literal expression. Note that these are also supported on browsers that do not support ES6.
- The data type. It can be of two types and is mostly used for metrics expressions:
strA string expressionnumA number expression
- The directive. This will decide what to do with the value you're referring to. It depends on the context the expression is used for. For basic values expressions, it is the format of the number represented. Some examples:
timeIt takes a timestamp in seconds and output the time span it represents. For example161will result in2m 41s.sizeWill format the input as a data size. For example16101will result in15.7KB.tstohhmmssWill format the timestamp in an hour-minute-second string. For example1624091231836(the time of this writing) will result in10:27:11.- Note that some directives can contain the
:character. The:needs to be written as\:, and conversely if you want the\character you will write it\\. - An empty directive will output whatever value untouched.
- Hom in to the concepts page for an exhaustive list.
- The value. The last parameter can contain any character, it ends at the end of the string. Its value will be interpreted according to the class of the expression:
l. The value will be a literal. For numbers2or3e8for example. For strings, it can literaly be anything.m. The value is the name of a metric in the proper datatype of the grabber whose namespace has been specified. SeeNamespacesabove. More details below.e. The value is an ES6 template literal expression. It can tap on the data provided by the grabber specified. More details below.
Those are expressions starting with m:.
Let's take the example of the net.pieroxy.conkw.webapp.grabbers.procgrabber.ProcGrabber grabber, configured with an instance called proc. First, let's have a look at the data extracted by this grabber:
{
  "timestamp": 1624092027928,
  "extracted": [
    "hostname",
    "battery",
    "mdstat"
  ],
  "extractor": "ProcGrabber",
  "name": "proc",
  "num": {
    "bat_exists": 0,
    "loadavg3": 1.8,
    "max$write_bytes_sdc": 162325547.09418836,
    "loadavg2": 1.56,
    "max$write_bytes_sdd": 25477120,
    "loadavg1": 2.47,
    "swapTotal": 68719472640
    ...
  },
  "timestamps": {},
  "elapsedToGrab": 23,
  "str": {
    "allbd": "sda,sdb,sdc,sdd,nvme0n1",
    "hostname": "pieroxy-dev",
    ...
  }
}
The interesting thing here is the num and str nodes. Depending on the data type of the expression, one or the other will be used.
- The expression
m:str::hostnamewill be evaluated aspieroxy-dev - The expression
m:num::loadavg3will be evaluated as1.8 - The expression
m:num:size:max$write_bytes_sdcwill be evaluated as155.MB, as it uses thetimeformatting.
Those are expressions starting with e:. We will use the same data as the section above, with the proc sample data.
The value of these expressions is basically an ES6 template literal expression. The accessible model is the entire model of the grabber extraction as shown above.
Examples with the model above:
e:num::${num.swapTotal*0.5}will output34359736320, result of the computation of68719472640*0.5.e:str::${num.bat_exists==1?'none':'block'}will outputblock, as the value ofbat_existsin thenumdatatype is0.
As you can see, this unlocks logic that you can apply to the metrics collected by ConkW for the purpose of the UI. All standard JS libraries are available here (such as Math for example), but the totality of the global scope is accessible, so any function or object you might add in the window object will be available here. The world is your oyster.
For example, if somewhere in my code I define window.myValue = 35, then I can use myValue as a global variable and the expression e:num::${myValue} will be evaluated as 35.
As an illustration, here is one expression I use to compute the "amount of rain" that will happen:
e:str::${Math.min(100, 10*num.daily_pop_1 * Math.max(num.daily_rain_1, num.daily_snow_1))}%
Identified by the attribute cw-value. It will replace the content of the node through the innerHTML or innerText property, meaning:
- This will effectively wipe whatever was in the
divoriginally - If the attribute
cw-escapeHtml="yes"is present,innerTextis used instead ofinnerHTML. This will avoid special characters (Such as<or&) in the grabber response to be mangled by the browser. - If not, any HTML in the string will be rendered accordingly by the browser.
Note that if the value resolves as undefined, (for a metric expression, if the metric is actually not there,) the element will be added the css class cw-stale. The text will be rendered as dark gray to indicate the value is not present. The last value will be kept to show what it was before it vanished.
Let's look at an example:
<div cw-ns="spotify" cw-value="m:str::album_artist"></div>This empty DIV will be filled with the album_artist value of the strings extracted by the spotify grabber. After interpolation from the UI, it will look like:
<div cw-ns="spotify" cw-value="m:str::album_artist">AC/DC</div>Any html tag with the cw-value attribute can have a cw-value-warn attribute.
Its directive will be a condition upon which the html tag will be added the class cw-error, which renders in a red background in the default CSS. This is used to alert whoever is watching the dashboard of an abnormal condition.
Here are the exhaustive list of directives one can use in a cw-value-warn expression:
isnotwill be red if the value is not equal to the expression resolution.iswill be red if the value is equal to the expression resolution.valuecontainswill be red if the value contains the expression resolution.valueabovewill be red if the value is above the expression resolution.valuebelowwill be red if the value is below the expression resolution.
Let's look at some examples in the default UIs provided:
<cw-label cw-value-warn="l:num:valuebelow:20" cw-ns="proc" cw-value="m:num:prc:bat_prc"></cw-label>This html tag will display the percentage of battery remaining in your laptop. It will be displayed on a red background if below 20%.
Note that the expression for the cw-value-warn is a literal, and uses the directive valuebelow.
<cw-label cw-ns="proc" cw-value-warn="l:str:valuecontains:<" cw-value="m:str::mdstatSummary"></cw-label>This html tag will display the summary string of the mdadm arrays in the system. It will be displayed on a red background if it contains the character <. Per the documentation, this happens when the mdadm array is being reconstructed. As the performance of the array is greatly reduced during that time, it's best the user is aware of it.
Identified by the attribute cw-warn. Any html tag with the cw-warn must have a cw-warn-value attribute.
It will act like the couple cw-value and cw-value-warn seen above.
Let's look at some examples in the default UIs provided:
<div cw-ns="proc" cw-style-display="e:str::${num.mdstatNbDevices==0?'none':''}" cw-warn="l:num:isnot:0" cw-warn-value="m:num::mdstatFailed">
  blah blah blah some UI elements here
</div>
First of all, this div will only be displayed if the number of mdstat devices is not zero.
Then, it will have the CSS class cw-error if the metric num.mdstatFailed is not zero, presumably there are drives failures in the mdstat array.
Identified by the attribute cw-prop-anything. It will replace the html property anything with the value of the expression.
Note cw-prop-innerHTML is similar to cw-value seen above.
Apart from innerHTML, any html property can be set by ConkW. The two most useful that come to mind are title to define a tooltip, and src for images tags to define which image to go fetch. But any property is available. For style property, see the section right below.
Here is an example in the default UI for OpenWeatherMap:
<IMG cw-ns="owm" cw-prop-src="m:str::hourly_icon_1" cw-prop-title="m:str::hourly_desc_1"/>ConkW will set both the title and src property with whatever the owm grabber returns.
Identified by the attribute cw-style-anything. It will replace the style property anything with the value of the expression.
Most used style properties are:
displaythat allows to hide or show stuff depending on the expression provided.widththat allows to set an element width, such as a gauge.heightthat allows to set an element height, such as a gauge.
Example with the ProcGrabber default UI:
<div cw-ns="proc" cw-style-display="e:str::${num.bat_exists==1?'none':''}">
  No battery detected
</div>
<div cw-ns="proc" cw-style-display="e:str::${num.bat_exists!=1?'none':''}">
  Some stuff here irrelevant to the example.
</div>
So, depending on the value of num.bat_exists in the ProcGrabber output, two different things will be displayed. Note that this could have been handled by a cw-value with a ternary expression. Except that the content of the second div is a bunch of HTML hard to stuff in a cw-value expression.
Identified by the attribute cw-stale. Will add the cw-stale css class to the element when the referenced metric is older than the specified delay. Only works with metrics expressions.
Let's have a look at the example from the BingNewsGrabber default UI:
<div cw-stale="m:str:olderThan.1h:news_name_0" cw-ns="bingnews">This instructs conkw to add the cw-stale css class when the metric str.news_name_0 is older than one hour. As the default refresh rate for this grabber is once every hour, the user will be informed if the grabber failed to grab the latest news.
See the concepts page for the duration format.
Identified by the attribute cw-gauge0. It allows to have a simple gauge such as the examples below:
Attributes:
cw-gauge<n>: These are multiple attributes where n starts at0and can end up where you see fit. These are the values you will see in the gauge. The format iscolor:expressionwhere:coloris a CSS color (#abcor#f3f3f3orrgb(10,20,30)) or the worddefaultto use the default gauge color.expressionis the expression defining the value.
cw-min: The expression defining the level zero of the gauge. Any value below that will be discarded. The expression must be numeric and any directive will be ignored.cw-max: The expression defining the maximum value. Any value above that will be rendered as the gauge full. The expression must be numeric and any directive will be ignored.cw-value-warn: The expression defining the threshold above which the value is considered in error (and the gauge changes color to red). The expression must be numeric. A directive equal tovaluebelowdefines it as a minimum instead of a maximum.
Let's have a look at some examples from ProcGrabber default UI:
- The CPU gauge
<heading>CPU /proc</heading>
<label>      used: </label>
<cw-label cw-value-warn="l:num:valueabove:80" cw-ns="proc" cw-value="m:num:cpu:cpu_usg_used"></cw-label>
<gauge cw-ns="proc" cw-min="l:num::0" cw-max="l:num::100" cw-gauge0="#5b5:m:num::cpu_usg_sys" cw-gauge1="#474:m:num::cpu_usg_user" cw-gauge2="#252:m:num::cpu_usg_nice" cw-gauge3="#252:m:num::cpu_usg_wait"></gauge>
The gauge goes from 0 to 100, that's easy. It overlaps the sys, user, nice and wait time with four different colors. As I don't want to discard the different colors even when above 80%, I decided to make the label turn red.
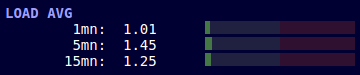
- The load average gauges - only showing the first one.
<cw-label cw-value-warn="m:num:valueabove:nbcpu_threads" cw-ns="proc" cw-value="m:num::loadavg1"></cw-label>
<gauge cw-ns="proc" cw-gauge0="default:m:num::loadavg1" cw-min="l:num::0" cw-max="e:num::${num.nbcpu_threads*2}" cw-value-warn="m:num::nbcpu_threads"></gauge>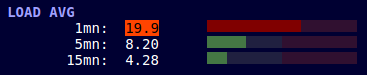
Both the label and the gauge have a maximum set. As I have 8 cores hyperthreaded on my computer, the limit is set at 16 for the warning.
Note as the red value limit shows in the background of the gauges that did not reach it yet.
- A last example with my personal setup
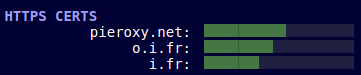
<label cw-ns="httpscert" cw-prop-title="m:num:time_ms:ts_pieroxy.net" style="width:160px; text-align: right; overflow: hidden; text-overflow: ellipsis;">pieroxy.net: </label><gauge cw-prop-title="m:num:tstodatetime:date_pieroxy.net" cw-ns="httpscert" cw-min="l:num::0" cw-max="l:num::90" cw-value-warn="l:num:valuebelow:20" cw-gauge0="default:m:num::days_pieroxy.net"></gauge><br>Here the limit for the warning is expressed by a tiny black vertical bar in the green gauge element, since it is a minimum and not a maximum. Below that value the gauge element will be red.
Identified by the attribute cw-hgauge0. It allows to have gauges with history such as the examples below:


Attributes:
cw-hgauge<n>These are multiple attributes where n starts atr0and end at the number of metrics you see fit. These are the values of the different metrics in the hgauge. Same as for the gauge elements, the format iscolor:expressionwhere:coloris a CSS color (#abcor#f3f3f3orrgb(10,20,30)) or the worddefaultto use the default gauge color.expressionis the expression defining the value.
cw-min: The expression defining the level zero of the gauge. Any value below that will be discarded. The expression must be numeric and any directive will be ignored.cw-max: The expression defining the maximum value. Any value above that will be rendered as the gauge full. The expression must be numeric and any directive will be ignored.cw-log: if set to the stringtrue, will draw the values on a log10 scale. This is particularly useful for network of hdd bandwidth gauges where the "normal activity" is 1000 times below the peak value. If you do not set the log scale, most of the activity will be squashed down to zero. In the first screenshot above, the NET IN graph would be empty and the HDD REA values would be squashed down to one pixel if not set withcw-log="true".cw-bgcolor: Set to a valid CSS color (#abcor#f3f3f3orrgb(10,20,30)) defines the background color. Javascript needs this value as the gauge is drawn on a canvas and the stroke needs to be set to the bg color. If not set, the background color will be set to the default value of#202040.
Note that hgauges can display a red vertical bar, as you can see below:
This means the gathering of data stopped for a while and started again, so there is a time gap from the left side of the bar to the right side of the bar greater than 5 seconds.
Also note that the heartbeat of conkw is once every second. This means there will be a new datapoint every second. So a 60px wide hgauge will display 1 minute of data, and a 120px gauge two minutes.
Let's have a look as some examples.
- The CPU gauge from
ProcGrabber:
<hgauge cw-bgcolor="#202040" style="height:4em;" cw-ns="proc"
        cw-hgauge0="#5b5:m:num::cpu_usg_sys"
        cw-hgauge1="#474:m:num::cpu_usg_user"
        cw-hgauge2="#252:m:num::cpu_usg_nice"
        cw-hgauge3="#252:m:num::cpu_usg_wait"
        cw-min="l:num::0" cw-max="l:num::100"></hgauge>
There are four values being displayed, as you can see with the four cw-hgauge<n> elements. It goes from 0 to 100 and the cw-bgcolor is set to the default value, so it could be removed.
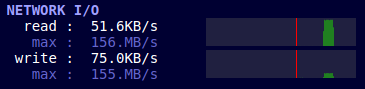
- The Network activity gauge from
ProcGrabber:
<hgauge cw-bgcolor="#202040" cw-ns="proc" style="height:2em" cw-log="true"
        cw-hgauge0="#208020:m:num::netp_in"
        cw-min="l:num::0" cw-max="m:num::max$netp_in"></hgauge>
<hgauge cw-bgcolor="#202040" cw-ns="proc" style="height:2em" cw-log="true"
        cw-hgauge0="#208020:m:num::netp_out"
        cw-min="l:num::0" cw-max="m:num::max$netp_out"></hgauge>
There is a gauge for inbound traffic and one for outbound traffic. The gauges are set to a logarithmic scale otherwise you would see an empty gauge most of the time. Note that the maximum is set to the auto computed value so that conkw automatically determines the maximum throughput of your network interface to what it observes.
Identified by the attribute cw-multinode-pattern. It allows generation of multiple nodes like a for loop in a template. The example below would take 576 lines, but with a multivalue tag, it only takes 12.

Attributes:
cw-multinode-inThere are two ways to define the repetition. Eithercw-multinode-inwhich specifies a comma separated list of values conkw should iterate over, of the two below.cw-multinode-fromThe first numeric value Conkw should iterate from.cw-multinode-toThe end of the numeric sequence Conkw should iterate over.cw-multinode-patternThe pattern that should be replaced by the variable.
<img cw-ns="owm" cw-prop-src="m:str::hourly_icon_0" cw-prop-title="m:str::hourly_desc_0">The line above will display an image that will display the icon for the first forecasted hour. If you want the forecast for the next 48 hours, you will have to define 48 lines like this, only changing the 0 with the hour you want:
<img cw-ns="owm" cw-prop-src="m:str::hourly_icon_0" cw-prop-title="m:str::hourly_desc_0">
<img cw-ns="owm" cw-prop-src="m:str::hourly_icon_1" cw-prop-title="m:str::hourly_desc_1">
<img cw-ns="owm" cw-prop-src="m:str::hourly_icon_2" cw-prop-title="m:str::hourly_desc_2">
...
<img cw-ns="owm" cw-prop-src="m:str::hourly_icon_47" cw-prop-title="m:str::hourly_desc_47">
This is not optimal, because whenever you will have an update you want, such as adding a style attribute or changing the tooltip, you will have to propagate the update to all of the 48 lines.
Instead, you can use a multivalue tag, like this:
<div cw-ns="owm" cw-multinode-from="l:num::0" cw-multinode-to="l:num::47" cw-multinode-pattern="$">
  <img cw-ns="owm" cw-prop-src="m:str::hourly_icon_$" cw-prop-title="m:str::hourly_desc_$">
</div>
When seeing this, ConkW will duplicate the content of the div 48 times, replacing the $ with the actual value from 0 to 47.
Note that both from and to use an expression that is here a literal but may be computed.
We want to display the read throughput of every block devices that are attached. And there are a few.
<heading>DISK IOs</heading>
<span cw-ns="oshi" cw-multinode-in="m:str::diskios_disks" cw-multinode-pattern="#">
  <label>R </label><cw-label cw-ns="oshi" cw-value="m:num:size:diskios_read_bytes_#"></cw-label>/s
  <label class="softlabel"><cw-label cw-ns="oshi" cw-value="m:num:size:max$diskios_read_bytes_#"></cw-label>/s</label>
  <label style="font-weight:bold"><cw-label>#</cw-label></label>
  <br/>
</span>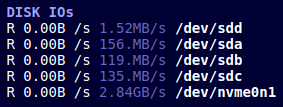
As you can see here, the multinode is defined with cw-multinode-in="m:str::diskios_disks". If you inspect closely the output of the API, diskios_disks has the value /dev/sdd,/dev/sda,/dev/sdb,/dev/sdc,/dev/nvme0n1 on my system, a comma separated list of the names of the block devices.
Hence, ConkW will duplicate thecontent of the divs for each one ot those block devices, replacing all instances of the pattern # with the name of the block device.