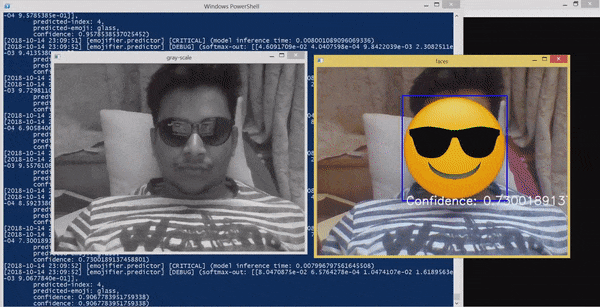
Recognizes the facial emotion and overlays emoji, equivalent to the emotion, on the persons face.
-
- Using SSH:
git clone [email protected]:sp-502/facial_emotion_recognition__EMOJIFIER.git
OR - Using HTTP:
git clone https://github.com/sp-502/facial_emotion_recognition__EMOJIFIER.git
- Using SSH:
-
- Create the virtual environment
python3 -m venv --system-site-packages /path/to/venv
- Activate your virtual-environment
- Linux:
source /path/to/venv/bin/activate - Windows:
cd /path/to/venvthen.\Scripts\activate
- Linux:
- Install the requirements
cd root-dir-of-project- `pip install -I -r requirements.txt
- Create the virtual environment
There are 4 steps from nothing (not even a single image) to getting the result as shown above.
-
STEP 1 - generating the facial images
cd /to/repo/root/dir- run
python3 src/face_capture.py emotion-name num-of-images-to-capture
-- example:python3 src/face_capture.py cry 200
This will open the cam and all you need to do is give the cry emotion from your face.
- Do this step for all the different emotions in different lighting conditions.
- I used 300 images for each emotions captured in 3 different light condition (100 each).
- You can see your images inside the 'images' folder which will contain different folder for different emotion images.
-
STEP 2 - creating the dataset out of it
- run
python3 src/dataset_creator.py
- This will create the ready-to-use dataset as a python pickled file and save it in the dataset folder.
Edit the emoji-dict inside the code if your 'emotion-list' is not the same as defined there.
- run
-
STEP 3 - training the model on the dataset and saving it
- run
python3 src/model.py
- This will start the model-training and upon the training it will save the tensorflow model in the 'model-checkpoints' folder.
- It has the parameters that worked well for me, feel free to change it and explore.
- run
-
STEP 4 - using the trained model to make prediction
- run
python3 src/predictor.py
- this will open the cam, and start taking the video feed -- NOW YOU HAVE DONE IT ALL. 👏
- run
Its time to show your emotions ❤️
