Doc reviewed by localization #2318
Open
Conversation
This file contains hidden or bidirectional Unicode text that may be interpreted or compiled differently than what appears below. To review, open the file in an editor that reveals hidden Unicode characters.
Learn more about bidirectional Unicode characters
… (English, United States)
Contributor
Navigation Preview LinkNo changes detected in the navigation.json file |
Contributor
Preview LinksOpen this URL to set up the portal with this branch changes. You can now access the edited pages with the following URLs:
|
Contributor
Documentation feedback for docs/localization/vtex-installing-activity-flow-for-headless-stores.mdGeneral FeedbackThe Guide is well-structured and provides clear instructions on how to install Activity Flow for headless stores. However, there are some areas where the content deviates from the specified rules, particularly in the use of imperative verbs at the beginning of steps and the overall tone. The frontmatter is correctly formatted. Actionable Feedback
Suggested Revision---
title: "Installing Activity Flow on Headless Stores"
slug: "vtex-installing-activity-flow-for-headless-stores"
excerpt: "Learn how to install Activity Flow in your Headless store."
hidden: false
createdAt: "2025-10-23T13:37:06.246Z"
---
This guide explains how to install and configure the [Activity Flow](LINK) script in your headless store.
This setup enables Activity Flow to capture real user interactions and send them to VTEX for analysis, providing insights into performance, engagement, and shopper behavior.
## Instructions
### Step 1 - Add the Activity Flow script asynchronously
To prevent delays in page rendering, load the Activity Flow script asynchronously.
1. Open your headless storefront project.
2. Insert the following snippet into the `<head>` tag of each page you want to monitor:
```js
<script>
(function(v,t,e,x,a,f,s){
f=v.vtexaf=v.vtexaf||function(){(f.q=f.q||[]).push(arguments)};
f.l=+new Date;s=t.createElement(e);s.async=!0;
s.src=x;a=t.getElementsByTagName(e)[0];
a.parentNode.insertBefore(s,a)
})(window,document,'script','https://activity-flow.vtex.com/af/af.js');
</script>
```
### Step 2 - Define default parameters
Configure the identification parameters for your store to allow Activity Flow to recognize the account, environment, and workspace the events belong to.
1. Add a new script in the `<head>` tag, immediately after the Activity Flow script, using the following structure:
```js
<script>
window.vtexafenv = {
account: '<ACCOUNT NAME>',
env: '<ENVIRONMENT TYPE>',
workspace: '<WORKSPACE TYPE>'
};
</script>
```
* `account` (required): Name of your VTEX account.
* `env` (optional): Environment type. For example, `prod` or `test`.
* `workspace` (optional): The workspace name, useful for A/B testing or distinguishing between environments.
> ℹ️ Replace the values between the curly brackets with your account, environment, and workspace names.
Optionally, combine the script loader and the parameter definition into a single script block.
### Step 3 - Validate the installation
To confirm the script is installed correctly in your store:
1. Open the page where you added the script.
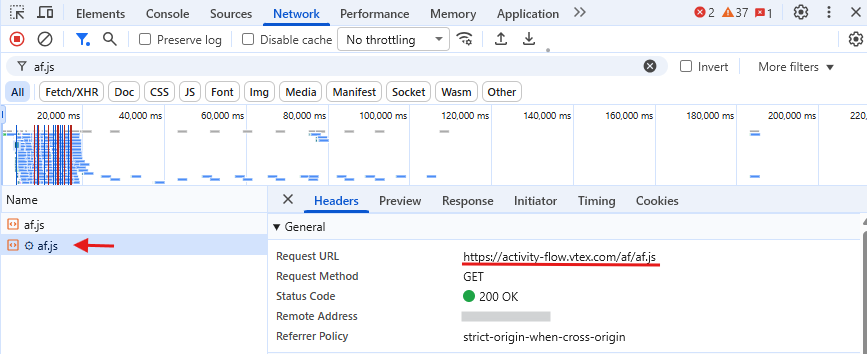
2. Open **DevTools** and navigate to the **Network** tab.
3. Search for `af.js` and select it.
4. In the **Header** tab, verify that the **Request URL** is `https://activity-flow.vtex.com/af/af.js`.
5. Check the console for any errors. Trigger a monitorable action to see events.
If the `af.js` file does not appear in the Network tab, ensure the snippet is in the `<head>` of the page and that no script blockers are active. If the setup is correct and the issue persists, create a ticket with [VTEX Support](https://help.vtex.com/en/support).Was this feedback useful?
|
Sign up for free
to join this conversation on GitHub.
Already have an account?
Sign in to comment
Add this suggestion to a batch that can be applied as a single commit.
This suggestion is invalid because no changes were made to the code.
Suggestions cannot be applied while the pull request is closed.
Suggestions cannot be applied while viewing a subset of changes.
Only one suggestion per line can be applied in a batch.
Add this suggestion to a batch that can be applied as a single commit.
Applying suggestions on deleted lines is not supported.
You must change the existing code in this line in order to create a valid suggestion.
Outdated suggestions cannot be applied.
This suggestion has been applied or marked resolved.
Suggestions cannot be applied from pending reviews.
Suggestions cannot be applied on multi-line comments.
Suggestions cannot be applied while the pull request is queued to merge.
Suggestion cannot be applied right now. Please check back later.
Relates to the task LOC-22580