- Summary
- Description
- Pi Set-up Steps (draft outline)
- Remote Server Setup Steps
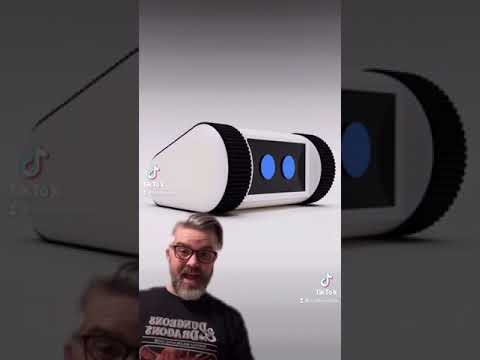
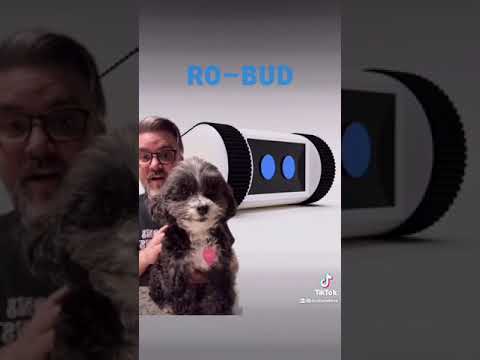
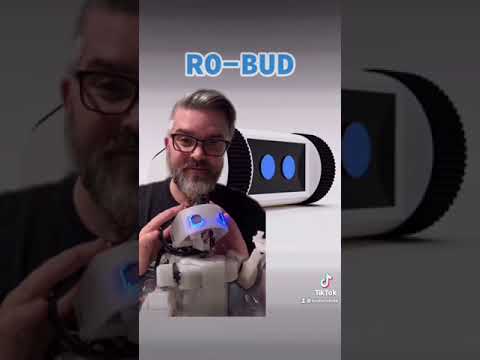
- Original Project Announcement Videos
The RoBud project seeks to create a companion bot that is lovable, accessible to all, and autonomous.
Challenge: Despite decades of fictional depiction through popular culture, as of 2021, robotic companion bots that even come close to those of popular imagination are not available at scale.
While there have been impressive private for-profit attempts at releasing relatively advanced consumer companion bots, specifically Jibo and Anki Vector, these endeavors ultimately proved commercially unviable, forcing the companies to fold, and effectively removing these wonderfully engineered robots from either availability or full operability (as they were dependent on proprietary services provided by their now-defunct companies).
The RoBud project is an attempt to pick up where Jibo and Ankni left off, and fulfil the dream of providing a consumer robot that is:
- LOVEABLE - Feels just like a family pet
- ACCESSIBLE - Can be built by anyone following project instructions with readily available parts with a cost at or under $500
- AUTONOMOUS - Has it's own goals.
- Install 64bit RaspberryPi OS (for tensorflow)
- hostname: robud.local
- username: robud
- password: your choice
- Clone repo - git clone https://github.com/ScottMonaghan/robud-pi.git
- Rename folder - mv robud-pi robud
- PYTHONPATH to robud source
- Add line to /home/robud/.bashrc - export PYTHONPATH="${PYTHONPATH}:/home/robud"
- log out and log back in
- [] Update pip3 install update pip
- Install VSCODE - sudo apt install code
- Install Mosquitto - sudo apt install mosquitto mosquitto-clients
- Configure mosquitto
- sudo nano /etc/mosquitto/mosquitto.conf
- Add these lines and save
- allow_anonymous true
- listener 1883 0.0.0.0
- sudo systemctl restart moquitto.service
- Install paho.mqtt pip install paho-mqtt
- Install OpenCV - sudo apt install python3-opencv -y
- Install TensorFlow 2.10 - https://github.com/PINTO0309/Tensorflow-bin
- Follow Example of Python 3.x + Tensorflow v2 series
- use PYVER=39 (Python 3.9)
- Install eSpeak-ng - sudo apt-get install espeak-ng
- Install Librosa - pip install librosa
- Install Vosk
- pip3 install vosk
- navigate to ~/robud/robud/ai/stt/models (create folder if not created)
- If not already in repo, download Small English Model
- wget https://alphacephei.com/vosk/models/vosk-model-small-en-us-0.15.zip
- unzip vosk-model-small-en-us-0.15.zip
- rm vosk-model-small-en-us-0.15.zip
- If not already in repo, download Speaker Identification Model
- wget https://alphacephei.com/vosk/models/vosk-model-spk-0.4.zip
- unzip vosk-model-spk-0.4.zip
- rm vosk-model-spk-0.4.zip
- Install Blinka - pip3 install Adafruit-Blinka
- Install adafruit_motorkit - pip3 install adafruit-circuitpython-motorkit
- Install adafruit_servokit - pip3 install adafruit-circuitpython-servokit
- Install portaudio19-dev library sudo apt install portaudio19-dev
- Install pyaudio - pip3 install pyaudio
- Install pytweening - pip install pytweening
- Install bno055 - pip3 install adafruit-circuitpython-bno055
- Update /boot/config.txt with following for bno0##: dtparam=i2c_arm_baudrate=400000
- bno055 will crash i2c without this (https://learn.adafruit.com/raspberry-pi-i2c-clock-stretching-fixes)
- Install adafruit-circuitpython-vl53l0x (time-of-flight) - pip3 install adafruit-circuitpython-vl53l0x
[x] Install HC S404 Ultrasonic driver - pip3 install adafruit-circuitpython-hcsr04(ultrasonic sensors not integrated yet)- Install VNC Server - sudo apt-get install realvnc-vnc-server
- Configure VNC Server
- sudo raspi-config
- enable VNC
- set VNC resolution
- Blink Test 1 - hook up to a monitor and see you get robud blinking if you run robud_face.py
- python3 /home/robud/robud/robud_face/robud_face.py
- ctrl-F to exit fullscreen
- Install Adafruit Platform Detect - pip3 install Adafruit-PlatformDetect
- Disable Hardware Accelleration on VSCODE - https://ratticon.com/how-to-fix-slow-visual-studio-code-on-raspberry-pi-4/
- Set up UDEV rules so python can access respeaker through USB
- sudo nano /etc/udev/rules.d/60-respeaker.rules
- add line
- SUBSYSTEM=="usb", ATTR{idProduct}=="0018", ATTR{idVendor}=="2886", MODE:="0666"
- sudo systemctl restart udev
- reconnect respeaker
- Set up Services
- sudo cp /home/robud/robud/services/robud.motors.motors.service /etc/systemd/system
sudo cp /home/robud/robud/services/robud.robud_audio.robud_audio.service /etc/systemd/system- sudo cp /home/robud/robud/services/robud.robud_face.robud_face_animator.service /etc/systemd/system
- sudo cp /home/robud/robud/services/robud.robud_head.robud_head_animator.service /etc/systemd/system
- sudo cp /home/robud/robud/services/robud.robud_logging.robud_logger.service /etc/systemd/system
- sudo cp /home/robud/robud/services/robud.robud_questions.service /etc/systemd/system
- sudo cp /home/robud/robud/services/robud.robud_voice_text_input.service /etc/systemd/system
- sudo cp /home/robud/robud/services/robud.sensors.orientation.service /etc/systemd/system
- sudo cp /home/robud/robud/services/robud.sensors.tof.service /etc/systemd/system
- sudo cp /home/robud/robud/services/robud.robud_state.robud_state_manager.service /etc/systemd/system
- sudo cp /home/robud/robud/services/robud.sensors.camera.service /etc/systemd/system
- sudo systemctl daemon-reload
- sudo systemctl enable [each service unit file]
- The following services need changes still to work RPi 12-Jan-2023
- pulseaudio.service
- robud.ai.object_detection.service
- robud.ai.stt.service
- robud.ai.wakeword_detection.service
- robud.sensors.light_level.service
- robud.sensors.odometry.service
- robud.sensors.ultrasonics.service
- set up graphical autostart
- mkdir /home/robud/.config/autostart
cp /home/robud/robud/robud_startup.sh /home/robud/.config/autostart-
[Desktop Entry]
Name=robud
Exec=/home/robud/robud/robud_startup.sh
Terminal=false
Type=Application
- Blink Test 2 (start up test)
- Hook up pi to monitor, keyboard & mouse, and restart. After a few min, RoBud's eyes should be looking around. CTRL-F to exit full scren.
- Blink Test 3 (VNC test)
- Disconnect all HDMI cables from pi
- Restart Pi and VNC to robud.local (or direct pi IP) RoBud's eyes should be looking around.
- Resolution should be your configured CTRL-F to exit full scren.
- Setup VirtualBox Clean Ubuntu Install
- Download and install virtualbox for your appropriate host system: https://www.virtualbox.org/wiki/Downloads
- Download Ubunto 20.04 desktop iso: https://releases.ubuntu.com/focal/ubuntu-20.04.5-desktop-amd64.iso
- Create a new vm with the following settings:
- Name: ROBUD-REMOTE
- Folder: Your choice
- ISO: iso downloaded above
- Username: Robud
- Password: your choice
- Guest Additions: checked
- Base Memory: 4096
- Processors: 4 (if you can spare)
- Disk Size: 40gb (if you can spare)
- Complete Ubuntu Installation
- Enable bidirectional clipboard under Devices/Shared Clipboard (makes this much easier)
- Upgrade python3 to 3.9:
- sudo apt update
- if robud users doesn't have sudo priveledges (weird): https://www.tecmint.com/fix-user-is-not-in-the-sudoers-file-the-incident-will-be-reported-ubuntu/
- sudo apt install python3.9
- sudo apt update
- Install Git - sudo apt install git
- Clone repo - git clone https://github.com/ScottMonaghan/robud-pi.git
- Rename folder - mv robud-pi robud
- PYTHONPATH to robud source
- Add line to /home/robud/.bashrc - export PYTHONPATH="${PYTHONPATH}:/home/robud"
- log out and log back in
- install pip - sudo apt install python3-pip
- install VS code - sudo snap install --classic code
- Minium for running utils/KeyboardController
- python3.9 -m pip install numpy
- python3.9 -m pip install paho-mqtt
- python3.9 -m pip install pygame
- python3.9 -m pip install pytweening
- Try out keyboard controller:
- Start up robud
- Ensure robud.local returns a ping
- cd ~/robud/utils
- python3.9 keyboard_controller.py
- use arrow keys to control locomotion
- use WASD to move head up & down and turn (same as left/right arrows)
These videos are the original annoucement and project plan for Ro-Bud uploaded to TikTok on 17-April 2021.