PingCastle Notify is a tool that will monitor your PingCastle reports ! You will be notified every time a change between a scan and a previous scan is made.
How it works ? PingCastle-Notify is a PS1 script that will run a PingCastle scan, compare the difference between a previous scan, highlight the diff and send the result into a Slack / Teams channel or a log file !
The slack/teams/log message will notify you regarding the different states: correction, recession etc

⚠️ If you don't want to use Slack or Teams setSLACK_ENABLED=0andTEAMS_ENABLED=0in the.envfile. Skip the step "Create a BOT" and check the log file inside the Reports folder.
▶️ First scan
| Slack | Teams |
|---|---|
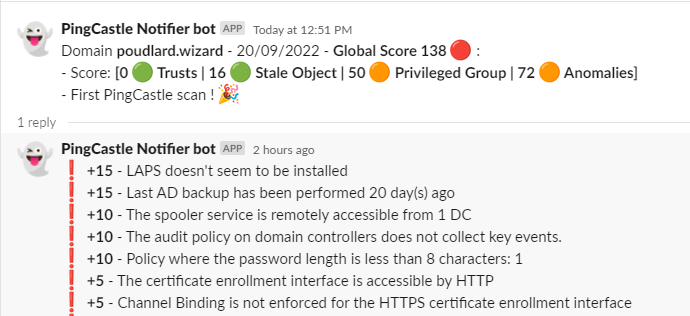 |
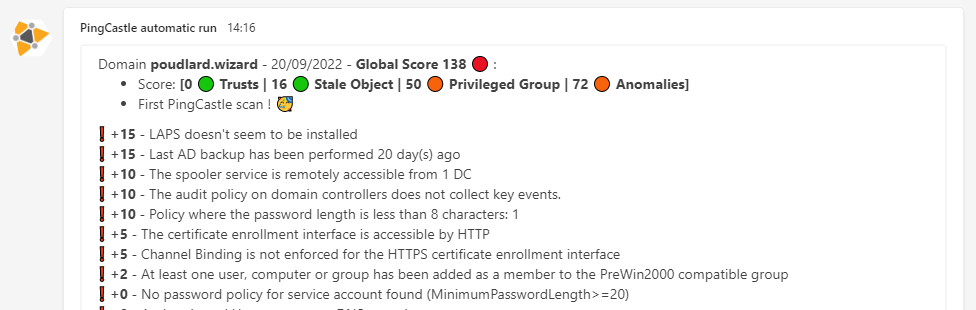 |
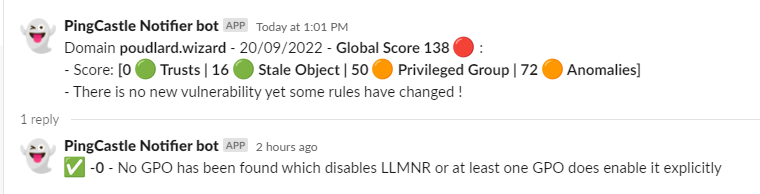
▶️ No new vulnerability but some rules have been updated
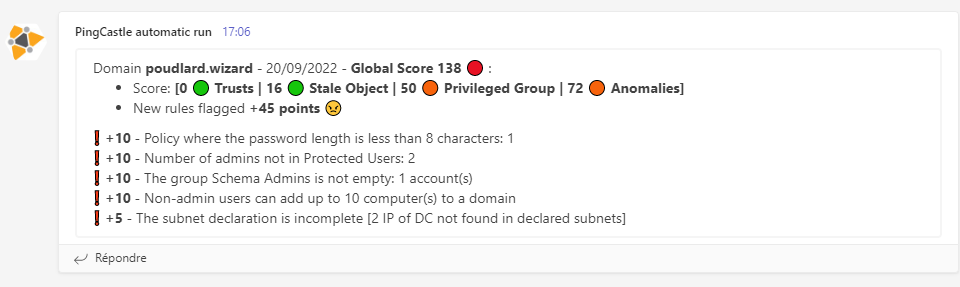
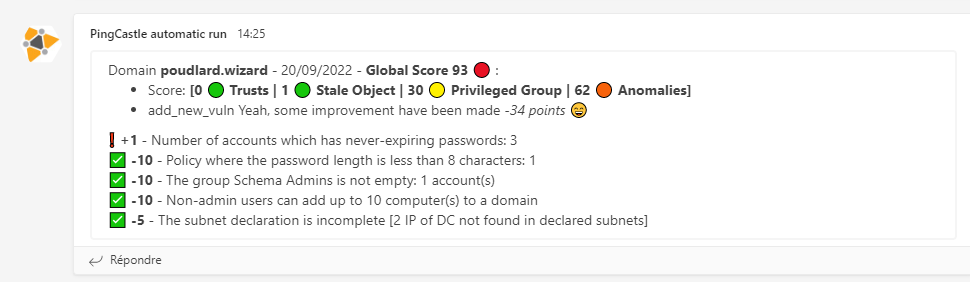
▶️ New vulnerabilty
| Slack | Teams |
|---|---|
 |
 |
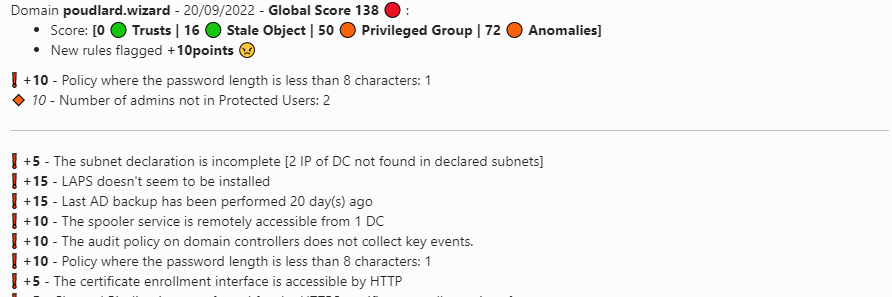
▶️ Some vulnerability have been removed
| Slack | Teams |
|---|---|
 |
 |
▶️ No new vulnerability
No result in slack since reports are the same
🔰 Adding the result of the current scan
Set the variable $print_current_result to 1 in the script, the rules flagged on the current scan will be added as a thread into Slack or after the rule diff on Teams.
| Slack | Teams |
|---|---|
 |
 |
The easiest way to get started is using the automated initial deployment script:
# Download or clone the repository
git clone https://github.com/mpgn/PingCastle-Notify.git
cd PingCastle-Notify

# Run the initial deployment script
.\initial-deploy.ps1
After running the script, you'll need to:
- Edit the
.envfile to add your specific tokens/webhooks - Configure your chosen notification platform (see sections below)
- Run
.\PingCastle-Notify.ps1to start monitoring
SECU-TOOL-SCAN/
    - PingCastle-Notify.ps1
    - .env                  <-- Configuration file
    - modules/
        - Slack.psm1
        - Teams.psm1
    - PingCastle/
        - Reports/
            - domain.local.xml
            - domain.local.html
            - scan.logs <-- contains the logs of the scan (diff scan)
        - Pingcastle.exe
        - ...
- Download PingCastle
- Unzip the archive
- Create a "Reports" folder inside the PingCastle folder
- Download the PingCastle-Notify repository
- Copy
.env.exampleto.envand configure your settings
The .env file contains all configuration options. If you used the initial deployment script, this file is already created with your selected connectors enabled.
# Domain Configuration
DOMAIN=your-domain.local

# Slack Configuration
SLACK_ENABLED=1
SLACK_CHANNEL=#pingcastle-scan
SLACK_TOKEN=xoxb-your-slack-bot-token-here

# Teams Configuration
TEAMS_ENABLED=0
TEAMS_WEBHOOK_URL=https://your-org.webhook.office.com/webhookb2/your-webhook-url

# Teams Workflow Configuration
TEAMS_WORKFLOW_ENABLED=0
TEAMS_WORKFLOW_URL=https://prod-xx.westus.logic.azure.com:443/workflows/xxx

# Discord Configuration
DISCORD_ENABLED=0
DISCORD_WEBHOOK_URL=https://discord.com/api/webhooks/your-webhook-url

# Report Configuration
PRINT_CURRENT_RESULT=1
ANSSI_LVL=1
Configuration Options:
DOMAIN: Your Active Directory domain (auto-configured by initial deploy script)SLACK_ENABLED: Set to1to enable Slack notifications,0to disableSLACK_CHANNEL: The Slack channel to send notifications to (include the #)SLACK_TOKEN: Your Slack bot token (starts withxoxb-)TEAMS_ENABLED: Set to1to enable Teams webhook notificationsTEAMS_WORKFLOW_ENABLED: Set to1to enable Teams Power Automate workflowDISCORD_ENABLED: Set to1to enable Discord notificationsPRINT_CURRENT_RESULT: Set to1to include current scan results in notificationsANSSI_LVL: Set to1to enable ANSSI compliance level reporting
▶️ Slack BOT
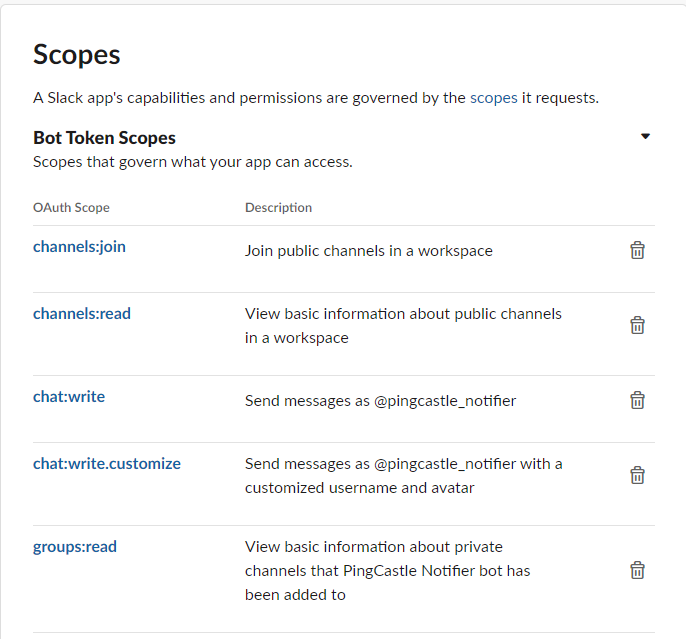
- In Slack create an application https://api.slack.com/apps
- Add the following rights
- Click on "Add features and functionality" -> Bots (configure the name)
- Click on "Add features and functionality" -> Permissions (add the following permissions)
- Generate a "Bot User OAuth Token" on the Permissions tab
- Get your token and add it to the
.envfile asSLACK_TOKEN - Create a slack channel and add your bot user to the channel
- You can test your bot using https://api.slack.com/methods/chat.postMessage/test
- Add the channel to the
.envfile asSLACK_CHANNEL - Set
SLACK_ENABLED=1in your.envfile - Run the script to test using this command:
powershell.exe -exec bypass C:\YOUR_PATH\SECU-TOOL-SCAN\PingCastle-Notify.ps1
▶️ Teams BOT
- Create a channel pingcastle-scan
- Click on the "..." dots and select "Connectors"
- Search for Webhook
- Add the webhook
- Re-click on the connectors button and on the webhook click "configure"
- Add a title and a logo and click Create, copy the webhook URL
- Update the
.envfile:- Set
TEAMS_ENABLED=1 - Set
TEAMS_URIto your webhook URL
- Set
▶️ Teams WorkFlow (prefered for Teams)
- Start a new workflow: In Microsoft Teams, navigate to your desired channel, click the three dots (
...), and select Workflows. Then, click Create a workflow. - Set the trigger: Search for and select the trigger "When a Teams webhook request is received." This action provides a unique URL that will listen for incoming POST requests.
- Add a new action: Click on New step.
- Configure the action: Search for and select the action "Post message in a chat or channel."
- For Post as, choose
Flow botto ensure the message comes from the workflow itself. - Select the Team and Channel where the message should be posted.
- For Post as, choose
- Define the message content: In the
Messagefield, click on the Expression tab. Enter the following expression:triggerBody()?['pingcastle']This expression tells the workflow to look for a key namedpingcastlewithin the JSON payload of the incoming webhook request and use its value as the message content. - Save and get the URL: Save the workflow. Once saved, expand the trigger step "When a Teams webhook request is received." The unique HTTP POST URL will be displayed there.
You can now use this URL to send a message to the Teams channel. Any POST request to this URL with a JSON body containing a key named
pingcastlewill have the corresponding value posted as a message. - Update the
.envfile
Run the script to perform a PingCastle scan and send notifications:
.\PingCastle-Notify.ps1Skip the PingCastle scan and only process existing reports:
.\PingCastle-Notify.ps1 -noscanThis mode is useful for generating the diff without running PingCastle.exe in case you already send all the report into a custom share.
Note: The -noscan mode requires existing PingCastle reports to be present in the expected location.
Enable detailed information output for debugging:
.\PingCastle-Notify.ps1 -InformationAction ContinueOr combine with noscan mode:
.\PingCastle-Notify.ps1 -noscan -InformationAction Continue▶️ Make sure the scan is automatic and run every day
On your Windows Server go to
- Create a service account that will run the PS1 script every night (no need to set the service account as domain admin)
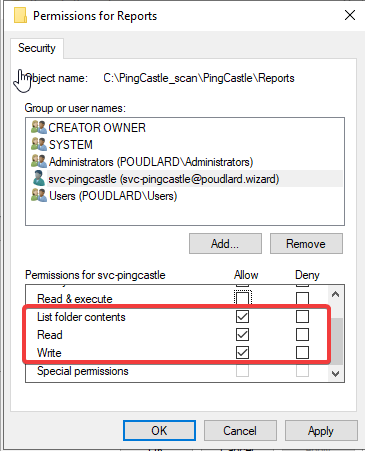
- Give privileges to the service account on the folder "Reports"
- Run taskschd.msc to open the Scheduler Task
- Create a Task and use the service account you just created
- In Actions tab set "Start a program" -> "Script":
C:\Windows\System32\WindowsPowerShell\v1.0\powershell.exe-> "Arguments" ->-exec bypass -f C:\PINGCASTLE\Pingcastle-Notify.ps1 - Give the permission "Log on as Batch Job" to service account https://danblee.com/log-on-as-batch-job-rights-for-task-scheduler/
- Run the scheduled task to test the result
- Enjoy :)


The PingCastle-Notify system is designed to be easily extensible. You can add new notification connectors (Discord, Email, SMS, etc.) by creating a new module file.
Create a new PowerShell module file in the modules folder:
modules/YourConnector.psm1
- Place your module file in the
modulesfolder - Add configuration to
.env - Run the script - your connector will be automatically discovered and loaded
- Check the console output for "Loading module: YourConnector"
- No changes needed to the main script when adding new connectors
- The system automatically discovers all
.psm1files in themodulesfolder - Function names must follow the pattern:
FunctionName-YourConnectorName - Your connector will only be used if enabled in the
.envfile - Both hashtable and string body types are supported
- Vincent Le Toux - https://twitter.com/mysmartlogon
- Romain Tiennot - https://github.com/aikiox
- Lilian Arago - https://github.com/NahisWayard
- Romain Bourgue - https://github.com/raomin
MIT License