WalkPi Player is my attempt at turning a Raspberry Pi Zero W into a portable hi-fi audio solution, taking inspiration from the Sony Walkman TPS-L2.
- Make a buildroot version so this doesn't take 2mins to boot up
- This is a live build log, written as I develop parts. As such it may not be suitable for a step by step guide. I've done my best to make things readable and clear but I may have missed stuff or there may be typos. Submit an issue if there are places I can clarify information.
- Repos and hardware get updated all the time. I have tried to link to official documentation and have copied relevant instructions for convenience but this is by no means the only way to do things. ANYTHING IN HERE ALWAYS DEFERS TO OFFICIAL DOCUMENTATION.
- I am not a Debian expert; I am familiar with the command line and working with headless Linux systems, but I may not know the best ways to do stuff, especially in an Raspberry Pi Enivronment
- I have never worked with Raspberry Pis before, though I have spent time working with embedded hardware before. I've done my best to find the generally accepted practices but for a lot of this project I've had to freestyle and cobble together information that may or may not be the best. I welcome pull requests for updated information.
- Most of this guide assumes you are comfortable with the commandline, including navigating around a headless operating system. It also assumes you're comfortable with soldering, 3d printing, and troubleshooting. I've trimmed many hours of bashing my head against a problem into what worked for my problems, but ultimately if you run into problems following this proccess you may have to do your own troubleshooting/searching. Many forums are friendly and welcoming for problems.
Useful resources
- Pinout.xyz is amazing for understanding the GPIO of the Raspberry Pi and some common boards.
- Mopidy Docs are incredibly thorough and gave me a clear understanding of how Mopidy Works.
- When I couldn't get info out of the docs, someone in the Mopidy Discourse probably had helpful info.
Download the latest version of Raspbian Lite and flash it to your SD card. I used Balena Etcher which is recommended by the Raspberry Pi foundation.
Once that's finished, open the mounted "Boot" drive on your computer and create a new empty file called ssh. This will tell Raspbian to enable an SSH server.
Add a file called wpa_supplicant.conf to the same location. Fill it with your network information:
country=CA
ctrl_interface=DIR=/var/run/wpa_supplicant GROUP=netdev
update_config=1

network={
        scan_ssid=1
        ssid="YOUR WIFI NAME HERE"
        psk="YOUR PASSWORD HERE"
        proto=WPA
        key_mgmt=WPA-PSK
}
Find your Raspberry Pi's address using your router. The device name should be raspberrypi. You should now be able to ssh into your pi using ssh pi@[ipaddress].
Inside of the Pi, we can do a few more configurations by running the configure helper sudo raspi-config. Most of the options are self explanatory.
I changed the hostname in System options, the Timezone and installed other localizations in Localizations. It's worth noting if you can connect your Pi to a keyboard and monitor, it may be easier to setup ssh and networking this way if you're having trouble.
Lastly, it may be worth to run sudo apt update && sudo apt upgrade to make sure everything is up to date. Python is used for a lot of scripts so you should also run sudo apt install python3 && sudo apt install python3-pip.
Now we want to test the DAC. Power down the Pi and attach the DAC hat to the Pi. Power it on and ssh in again.
Follow the DAC install instructions, in my case open /boot/config.txt and add the following two lines:
dtoverlay=allo-boss-dac-pcm512x-audio
dtparam=audio=off
Restart the Pi and then confirm the soundcard is connected with aplay -l

If you'd like, you can now connect an amplifier if you have one with headphones to it right now and run speaker-test -t wav -c 2. You should be able to hear a human voice saying "Front Left, Front Right" repeatedly.
SPI has rather low bandwidth afforded to it, which limits the rate at which the screen updates. There's a display driver designed for our display that uses adapted display stream updates but it lacks touchscreen support. The touch support fork unfortunately is not working in this state for our HX8357D Chip sadly. We'll use the Adafruit drivers instead, and overclock the display.
Power down the Pi and remove the DAC. Mount the touch screen, be careful as it's a bit bigger than the zero.
Power it on and follow Adafruit's guide to run the install script:
    sudo pip3 install --upgrade adafruit-python-shell click==7.0
    sudo apt-get install -y git
    git clone https://github.com/adafruit/Raspberry-Pi-Installer-Scripts.git
    cd Raspberry-Pi-Installer-Scripts
Then either run their single command line options or run sudo python3 adafruit-pitft.py
Enable PiTFT as HDMI Mirror so that we'll be able to touch a desktop interface with it.
Wait for it to install and restart and you should see the console screen on your touchscreen.
It should be fine by default but to test you can run sudo TSLIB_FBDEVICE=/dev/fb1 TSLIB_TSDEVICE=/dev/input/touchscreen ts_test to see if it works as desired.
If not, run sudo TSLIB_FBDEVICE=/dev/fb1 TSLIB_TSDEVICE=/dev/input/touchscreen ts_calibrate to calibrate it.
Now that we know it's working as desired, we'll try to increase the refresh rate of the display at the cost of some battery usage.
Edit your /boot/config.txt and change the dtoverlay to your desired fps and some SPI freunecy multiple of 250MHz:
BUT, here's the thing, the Pi only supports a fixed number of SPI frequencies. So tweaking the number a little won't do anything. The kernel will round the number to the closest value. You will always get frequencies that are 250MHz divided by an even number. Here's the only SPI frequencies this kernel supports
- 15,625,000 (a.k.a 16000000 = 16 MHz)
- 17,857,142 (a.k.a. 18000000 = 18 MHz)
- 20,833,333 (a.k.a 21000000 = 21 MHz)
- 25,000,000 (= 25 MHz)
- 31,250,000 (a.k.a 32000000 = 32MHz)
- 41,666,666 (a.k.a 42000000 = 42MHz)
- 62,500,000 (a.k.a 62000000 = 62MHz)
I went with dtoverlay=pitft35-resistive,rotate=90,speed=31250000,fps=50.
After changing the frequency you should restart your pi to make sure the settings take effect. You can then retry the test commands above to see if it performs as desired.
You should already know the pins used by each of the boards, and they hopefully shouldn't overlap if you used an i2c DAC. Go to https://pinout.xyz/ to see the pins on the Pi.
The HAT spec requires every Hat have EEPROM for passing manufacture info etc but you don't need these for the boards to function so you can safely ignore pins 27/28.
Line up the GPIO pins and connect the used ones with jumpers. Test both boards one at a time to make sure they work still.
Following the instructions for installing mopidy we run
wget -q -O - https://apt.mopidy.com/mopidy.gpg | sudo apt-key add -
sudo wget -q -O /etc/apt/sources.list.d/mopidy.list https://apt.mopidy.com/buster.list
sudo apt update
sudo apt install mopidy
Make sure the latest version was installed.
We can now add it to the system as a service so that it'll run on startup.
Run
sudo dpkg-reconfigure mopidy
sudo service mopidy start
sudo service mopidy status
and you should be able to see it running.
You can the working config with passwords hidden by using sudo mopidyctl config. You should be able to see the config directory there, /etc/mopidy/mopidy.conf by default.
Mopidy by default restricts webservers to localhost only for security reasons, though you can enable all ipv4 connections by adding this to your config:
[http]
hostname = 0.0.0.0
Mopidy will overlay these changes over the defaults.
We can now get some plugins to extend the functionality of Mopidy.
- Mopidy-Local Lets you play files stored locally
- Mopidy-Iris Popular web frontend for mopidy, we'll use it for testing the electronics
- Mopidy-Raspberry-GPIO Support for reading GPIO pins for say, play/pause/skip feedback.
- Mopidy-MPD Adds compatibility for MPD Clients.
- Mopidy-Spotify If you have Spotify Premium you can use this to stream from it. Not covered in this doc.
Mopidy-Local requires you to set a directory. Again go into your config and add
[local]
media_dir = [YOUR_DIR_HERE]
Remember that Mopidy runs as a seperate user, so if you want to have music in /home/pi/Music you must be specific.
Add music files over SFTP and run sudo mopidyctl local scan. This will update the database when new music is added. Now restart Mopidy using sudo service mopidy restart.
We can now connect to our pi by checking it's ip using ip a and typing that into our browser, including the port (default is 6680). You'll be able to see a list of web clients installed, I used Iris.
From Iris, we can then select a song to play and connect speakers to the DAC and play the song
To setup Mopidy MPD, use the following config:
[mpd]
enabled = true
hostname = 127.0.0.1
port = 6600
We are only looking to listen on local connections since this is a portable player. Most MPD clients assume port 6600 by default, so we'll enforce that here.
You should be able to now install a client of your choice. You can test whether it is working by starting a song then using a command like echo currentsong | nc localhost 6600.
You can also install mpc and use that to get a quick status command.
After installing Mopidy-Local, make sure to give the Mopidy user access to the gpio pins:
sudo usermod -a -G gpio mopidy
Also, make sure that you have the python libraries for GPIO.
sudo pip3 install RPi.GPIO
We can now go into our mopidy config and add the following lines:
[raspberry-gpio]
bcm17 = next,active_low,250
bcm22 = prev,active_low,250
bcm27 = play_pause,active_low,250
This sets BCM GPIO pins 17, 22 & 27 to do play/pause, next, and previous song operations. It also configures these pins as pull-up resistors which is safer for the board.
IMPORTANT: The GPIO pins are only built to take 3.3V of voltage. DO NOT CONNECT THE 5V INPUT TO THE GPIO PINS

Once wired up to the board, you can restart Mopidy and test it out in Iris.
Rotary encoders are now supported. You may have to update your version manually. If you check /usr/local/lib/python3.7/dist-packages/mopidy_raspberry_gpio and you don't see a rotencoder.py, you'll have to uninstall your current version by running python3 -m pip uninstall Mopidy-Raspberry-GPIO. Then run python3 -m pip install https://github.com/pimoroni/mopidy-raspberry-gpio/archive/master.zip. It's a slow install so be patient.
To enable rotary encoders, add the following lines to your mopidy config:
bcm23 = volume_down,active_low,10,rotenc_id=vol,step=1
bcm24 = volume_up,active_low,10,rotenc_id=vol,step=1
Using rotenc_id allows you to link two commands to the same physical encoder.
Shutting down the pi without properly initiating a software shutdown is bad because it could cause corruption to our sd card. A simple workaround would be to make the card read only, but then every time we add music we'd have to undo it.
Instead, we'll use LiPoPi and an Adafruit Powerboost 1000c with a standard 2200mAh lipo battery to implement a power button.
Check out the Power up and down version circuit. I used the diodes to step down the power but kept the RC circuit for no hold power up/down. The improved circuit at the bottom does not seem to work.
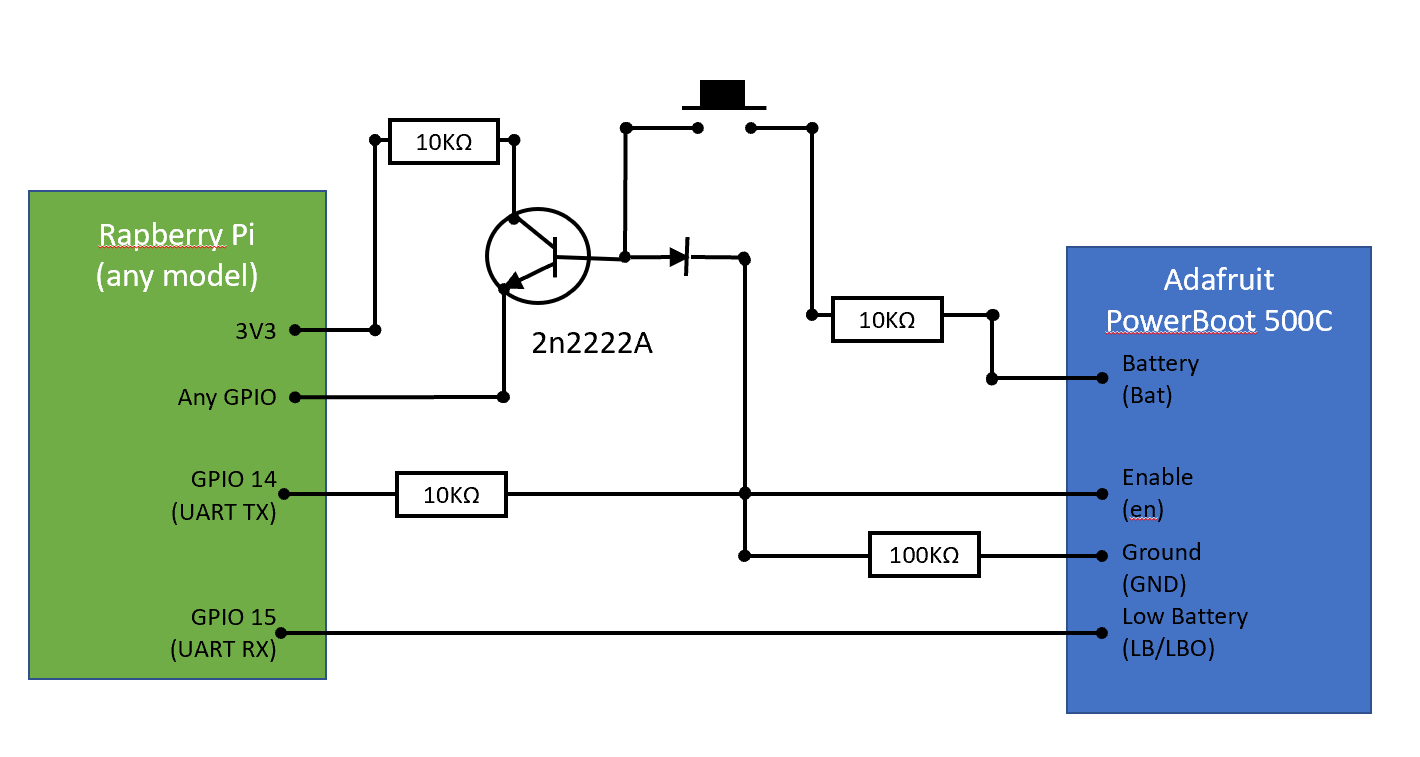
We can build this on a breadboard then install lipopi:
First run sudo raspi-config and make sure to disable the Serial console but not the serial hardware. This prevents the pi from using gpio14 for the console which would intitiate a shutdown.
You may have to edit /boot/config.txt and change enable_uart=0 to 1.
Install the Rpi.GPIO library if you don't have it
sudo apt-get update
sudo apt-get dist-upgrade

sudo apt-get install python-dev

sudo apt-get install python-setuptools
sudo easy_install rpi.gpio
Clone the repository to a folder. I recommend ~/lipopi as this is the default location in the service. Edit lipopi.py if you plan to have a different gpio control the system.
BEFORE YOU SETUP THIS AS A SERVICE RUN THE SCRIPT MANUALLY FIRST
IF YOU DON'T DO THIS YOU CAN BRICK YOUR PI AND WILL HAVE TO START OVER FROM SCRATCH
Run the script by
Edit lipopy.service to target the location of your lipopy.py file. Copy your service with the following:
sudo cp lipopi.service /etc/systemd/system
Now start the service:
sudo systemctl enable lipopi.service
sudo systemctl start  lipopi.service
You should now be able to press the button and restart the pi.
One issue I ran into was lipopi would only work if the pi was charging on powerup. Otherwise, it would shut down during the power on phase. Enabling the script manually on full power would cause it to work just fine as well. My solution was to update the lipopi.py file to add a sleep just before it creates the trigger to shutdown:
import os
import RPi.GPIO as GPIO
import time

# Configure the GPIO pins

def lipopi_setup():
    ...

    # setup the pin to check the shutdown switch - use the internal pull down resistor
    GPIO.setup(lipopi['shutdown_pin'], GPIO.IN, pull_up_down=GPIO.PUD_DOWN)

    # setup the low battery check pin
    GPIO.setup(lipopi['low_battery_pin'], GPIO.IN)

    # Add a minute long sleep so that the pi can actually power on
    time.sleep(60)
    # ^^^^^^^^^^^^^^ THIS IS THE LINE I ADDED ^^^^^^^^^^^^^^

    # create a trigger for the shutdown switch and low battery pins

    GPIO.add_event_detect(lipopi['shutdown_pin'], GPIO.RISING, callback=lipopi_user_shutdown, bouncetime=300)

    GPIO.add_event_detect(lipopi['low_battery_pin'], GPIO.FALLING, callback=lipopi_low_battery_shutdown, bouncetime=300)

    ...