- Forking Git Source
- Setting Up Service Accounts
- Setting Up Hardware
- Installing Neon
- Using Neon
- Making Changes
- Getting New Neon AI Releases
- Removing and re-installing Neon
Neon AI is an open source voice assistant. Follow these instructions to start using Neon on your computer.
Before installing Neon, you will need to fork your own branch of the Neon
core and [skills] repositories on github. You will also need to get
neonSetup.sh from your forked core git.
-
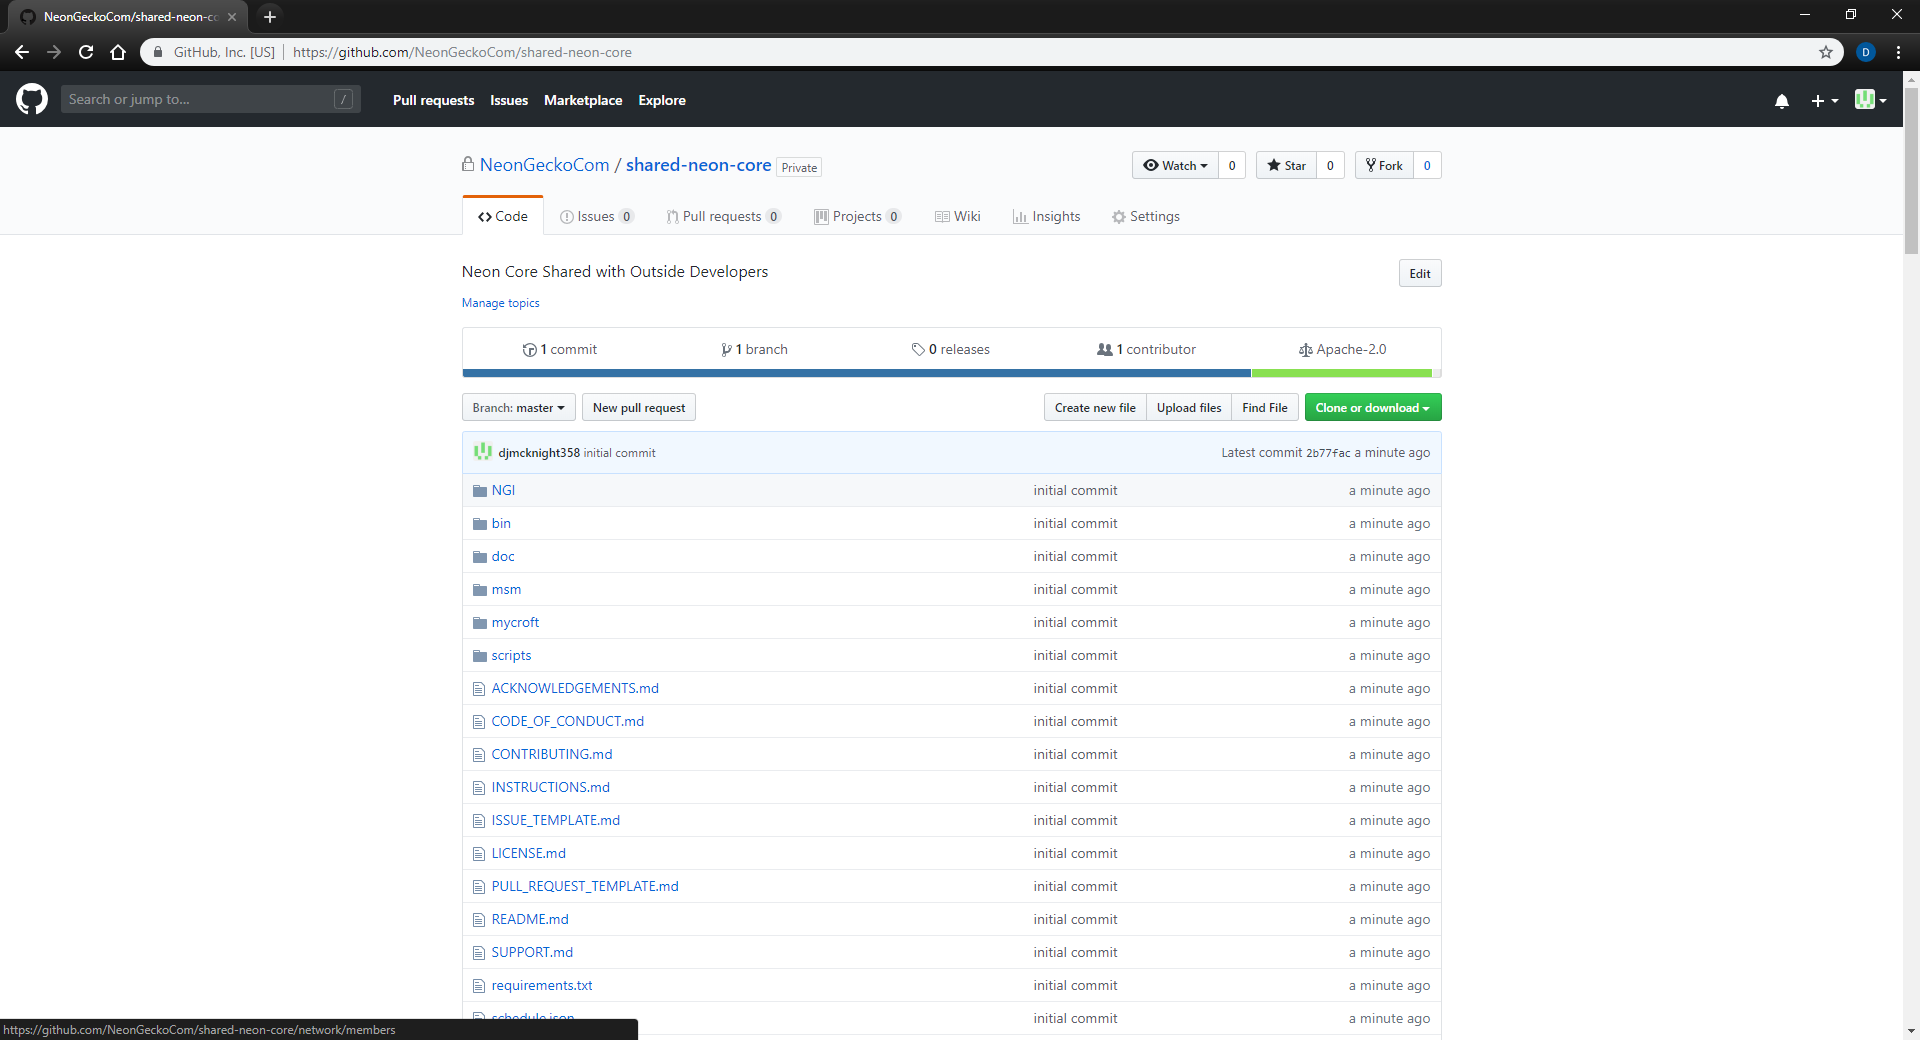
Go to the core repository and click "Fork" in the upper right hand corner.
-
Select the account you wish to fork to (generally you only have one listed)
-
Do the same for the skills repository
Note: You may also wish to fork individual skills and update the submodule references in your forked repository. You can find more information about submodules here.
-
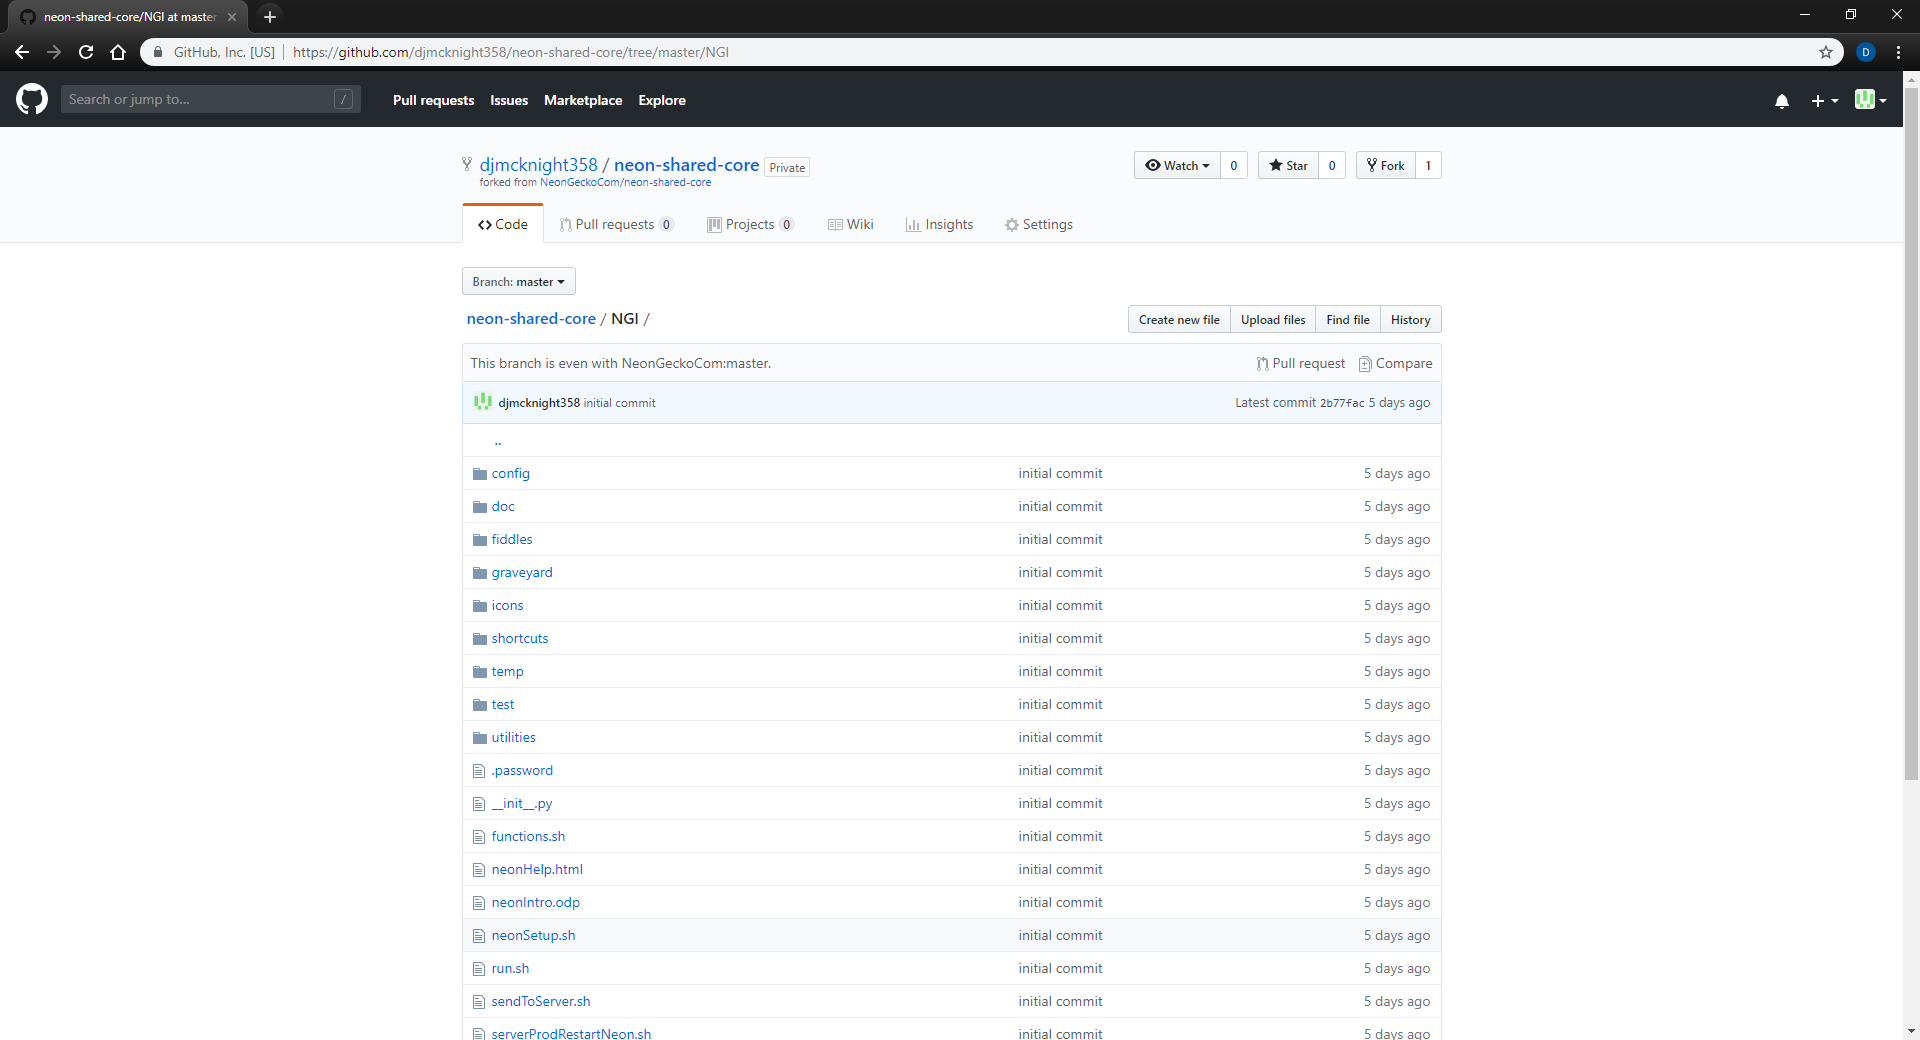
Locate
NGI\neonSetup.shin yourcorerepository -
Right Click on
Rawand selectSave link as... -
Rename the file to neonSetup.sh and save to your
HomedirectoryNote: If you completed this step on a Windows PC, save the file to a flash drive to transfer to the computer you will install Neon on. Move
neonSetup.shto a directory on the machine you will be installing on. Recommended~/(resolves to /home/$USER).

Please follow these steps to create the three credential files required to install Neon. During setup, all credentials
will be imported and validated with any errors logged in status.log.
Note: If you complete this setup on a Windows PC, make sure to edit any files using a text editor such as Notepad++ to ensure compatibility in Linux. Also check for correct file extensions after copying your files to your Linux PC, as Windows will hide known file extensions by default.
-
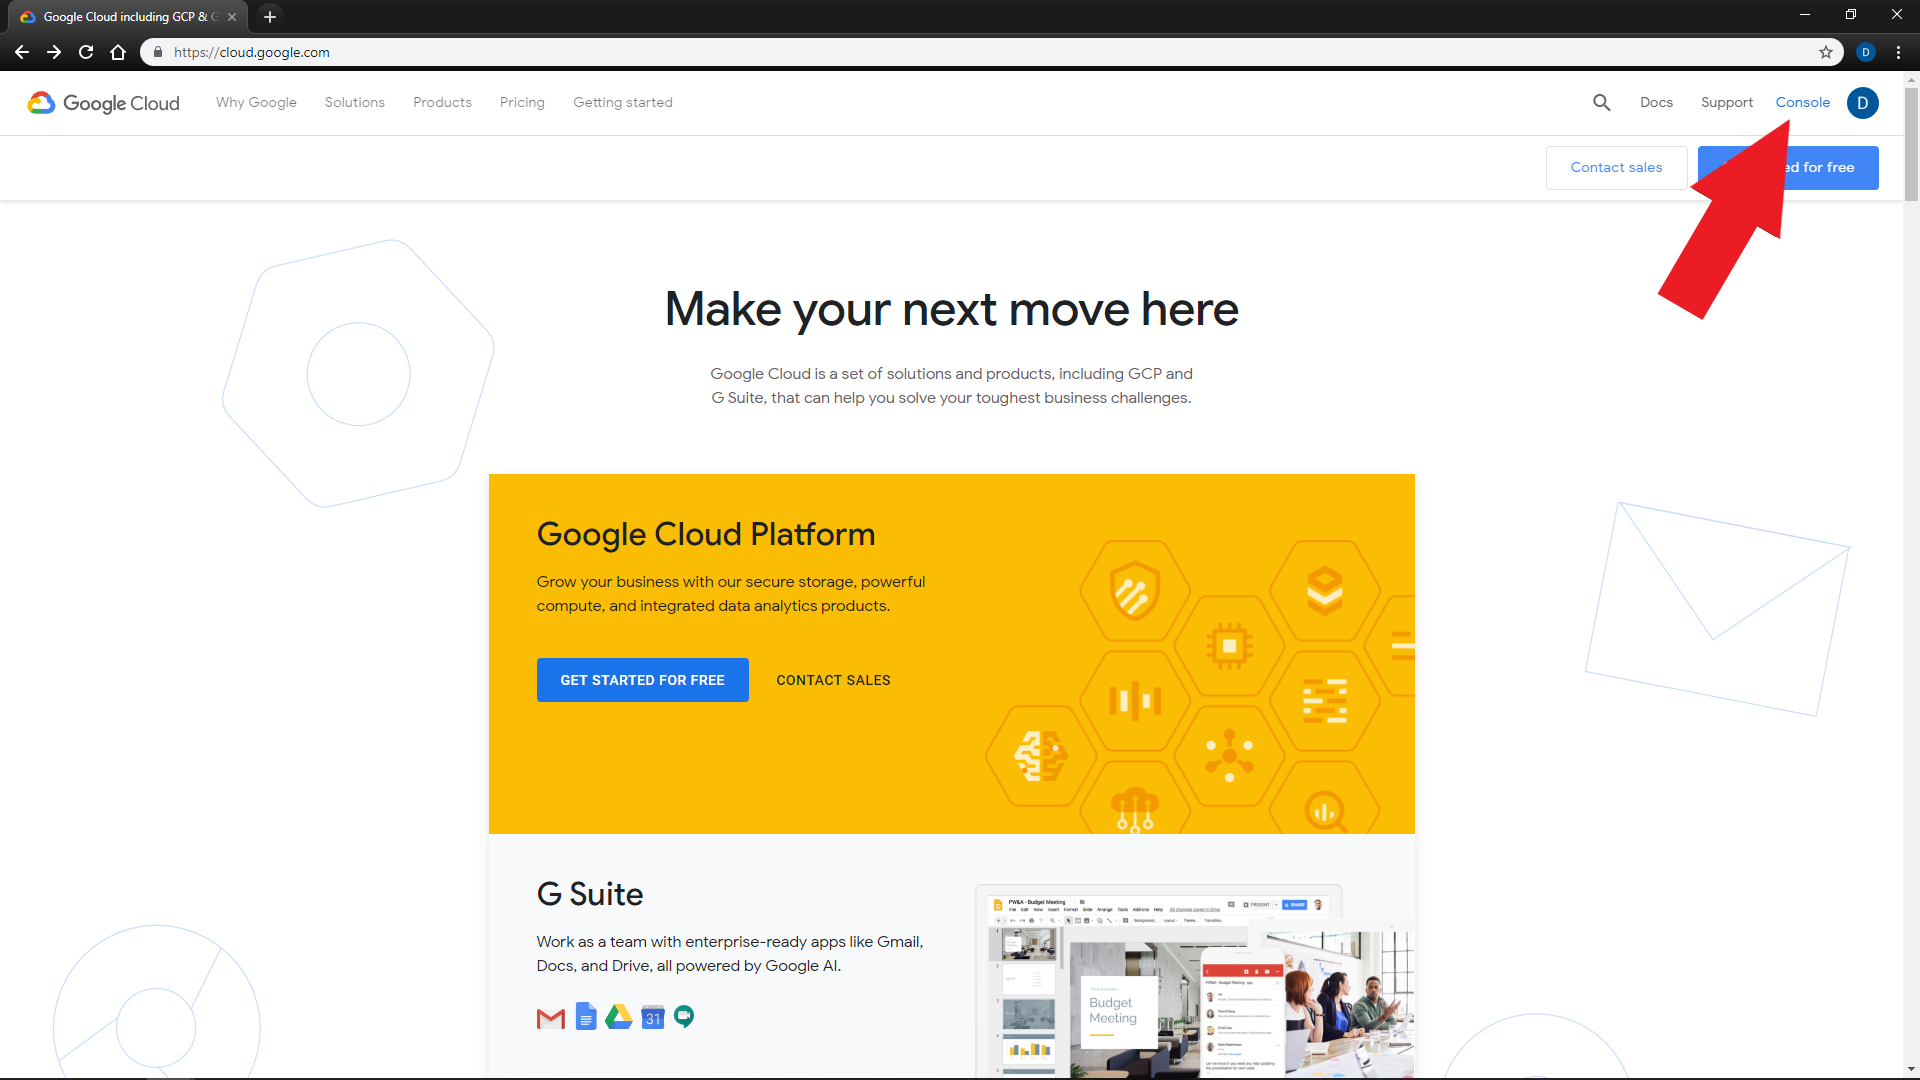
Go to:
-
Sign in or create a
Google account -
Go to your
Console -
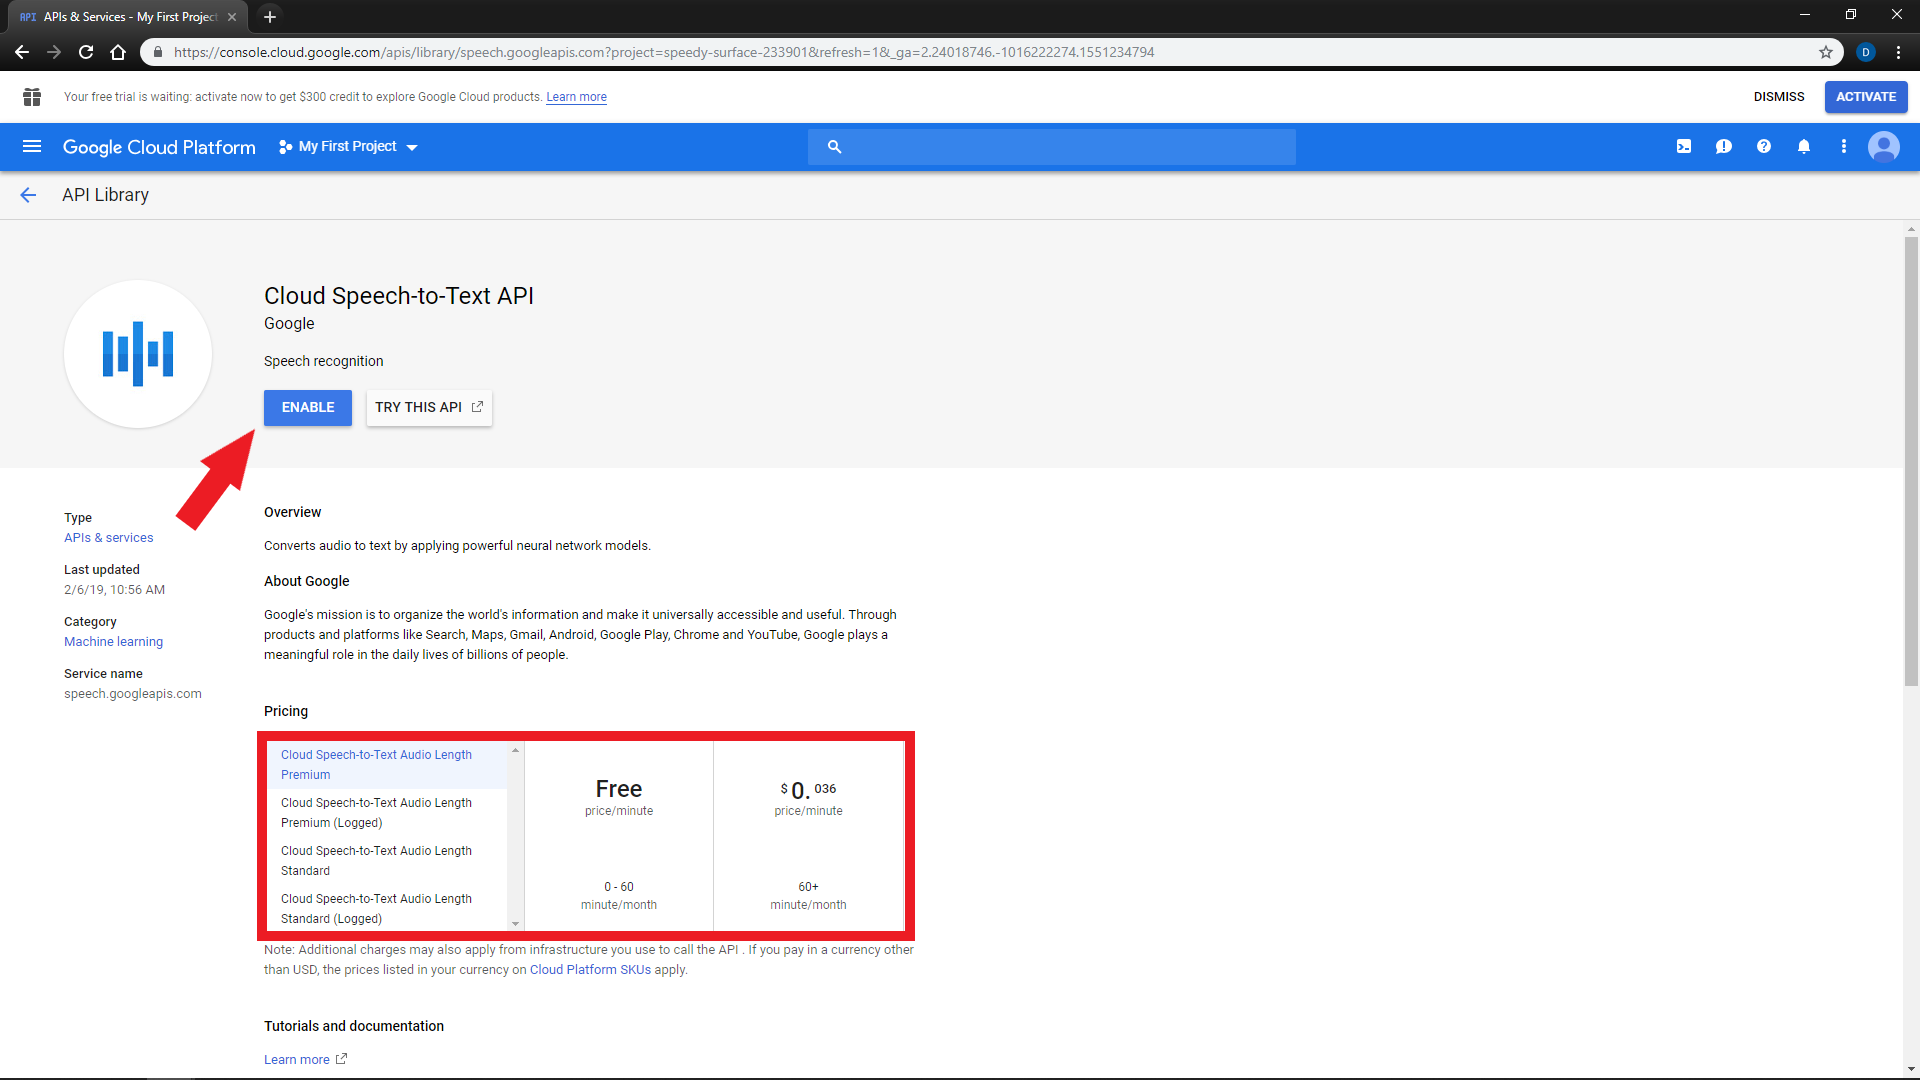
Search for and select
"Cloud Speech-to-Text"(Not to be confused with Text-to-Speech) -
Select the option you would like to use
-
You will be prompted to enable billing on your account at this point because this service is paid after a free monthly quota
Google will not automatically charge your card unless you give permission to do so.
-
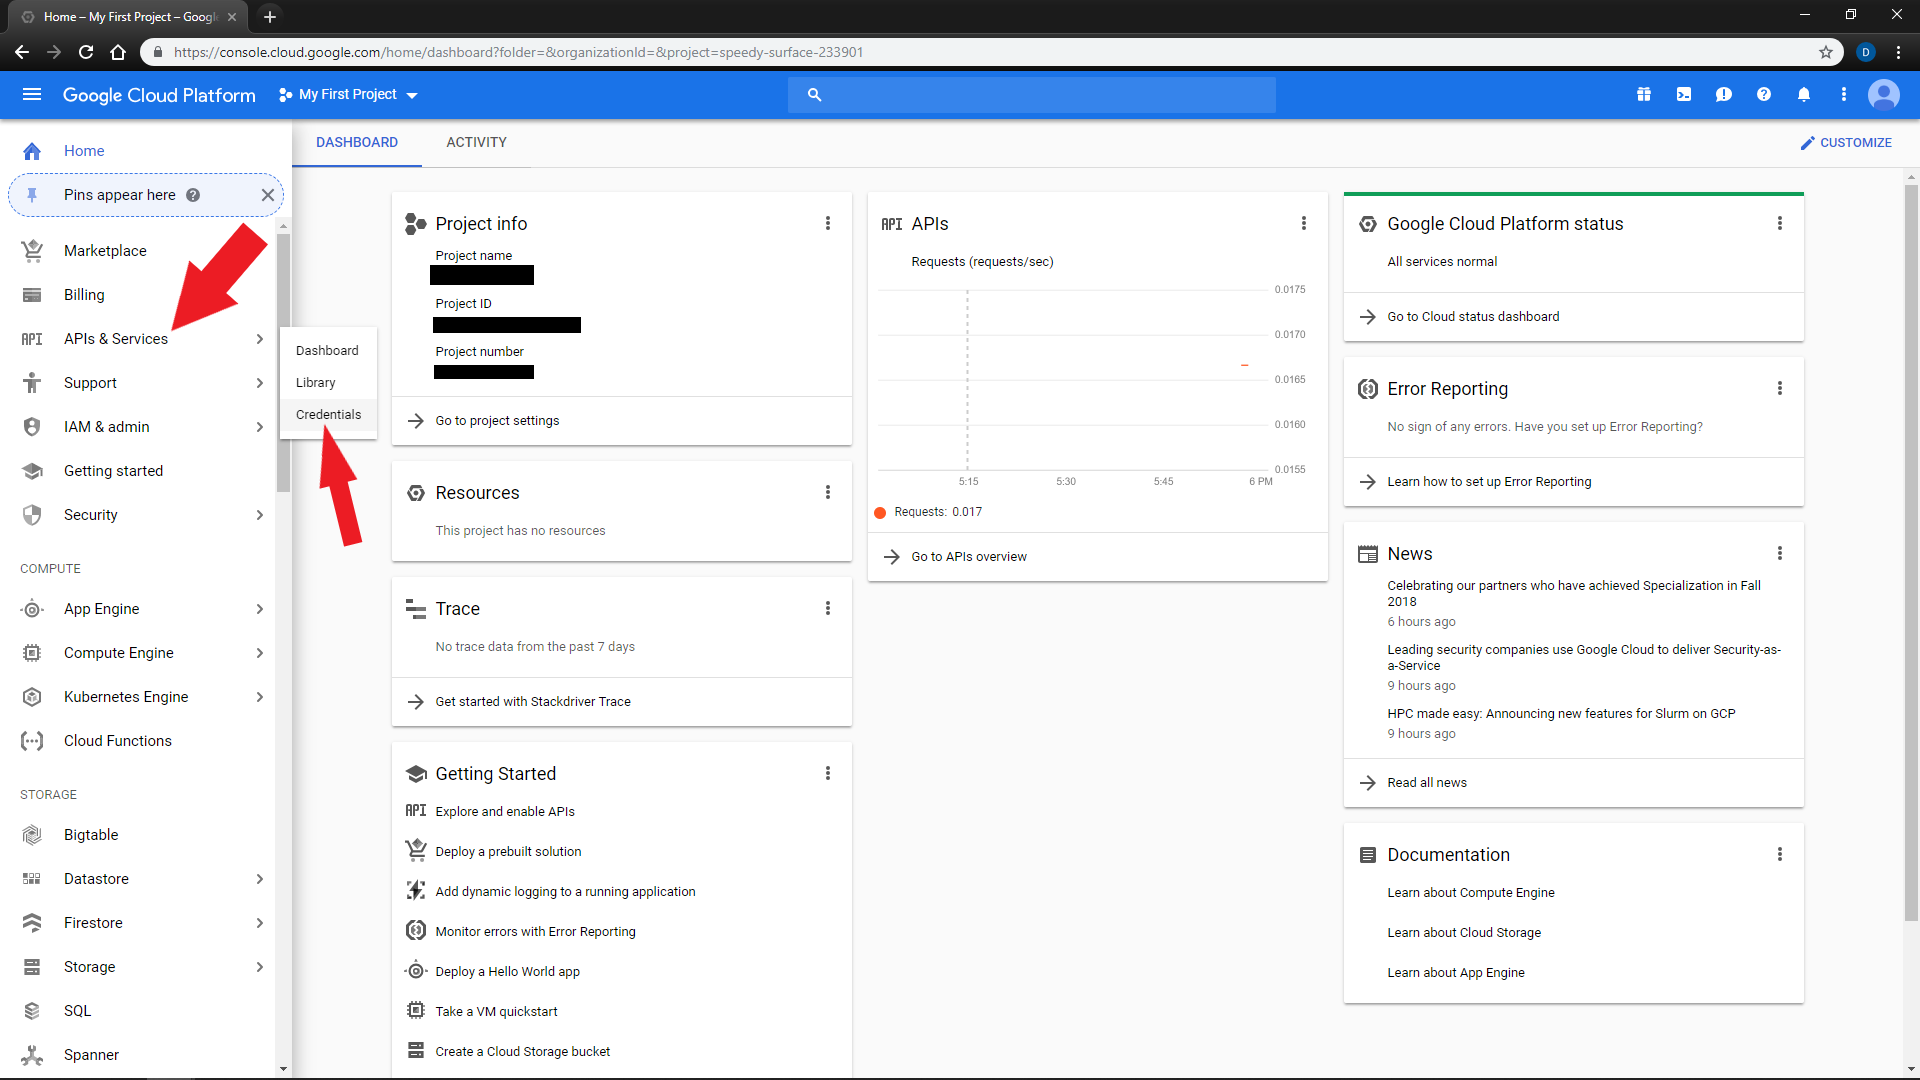
In the left
Navigation Menu, selectAPIs & Services,Credentials -
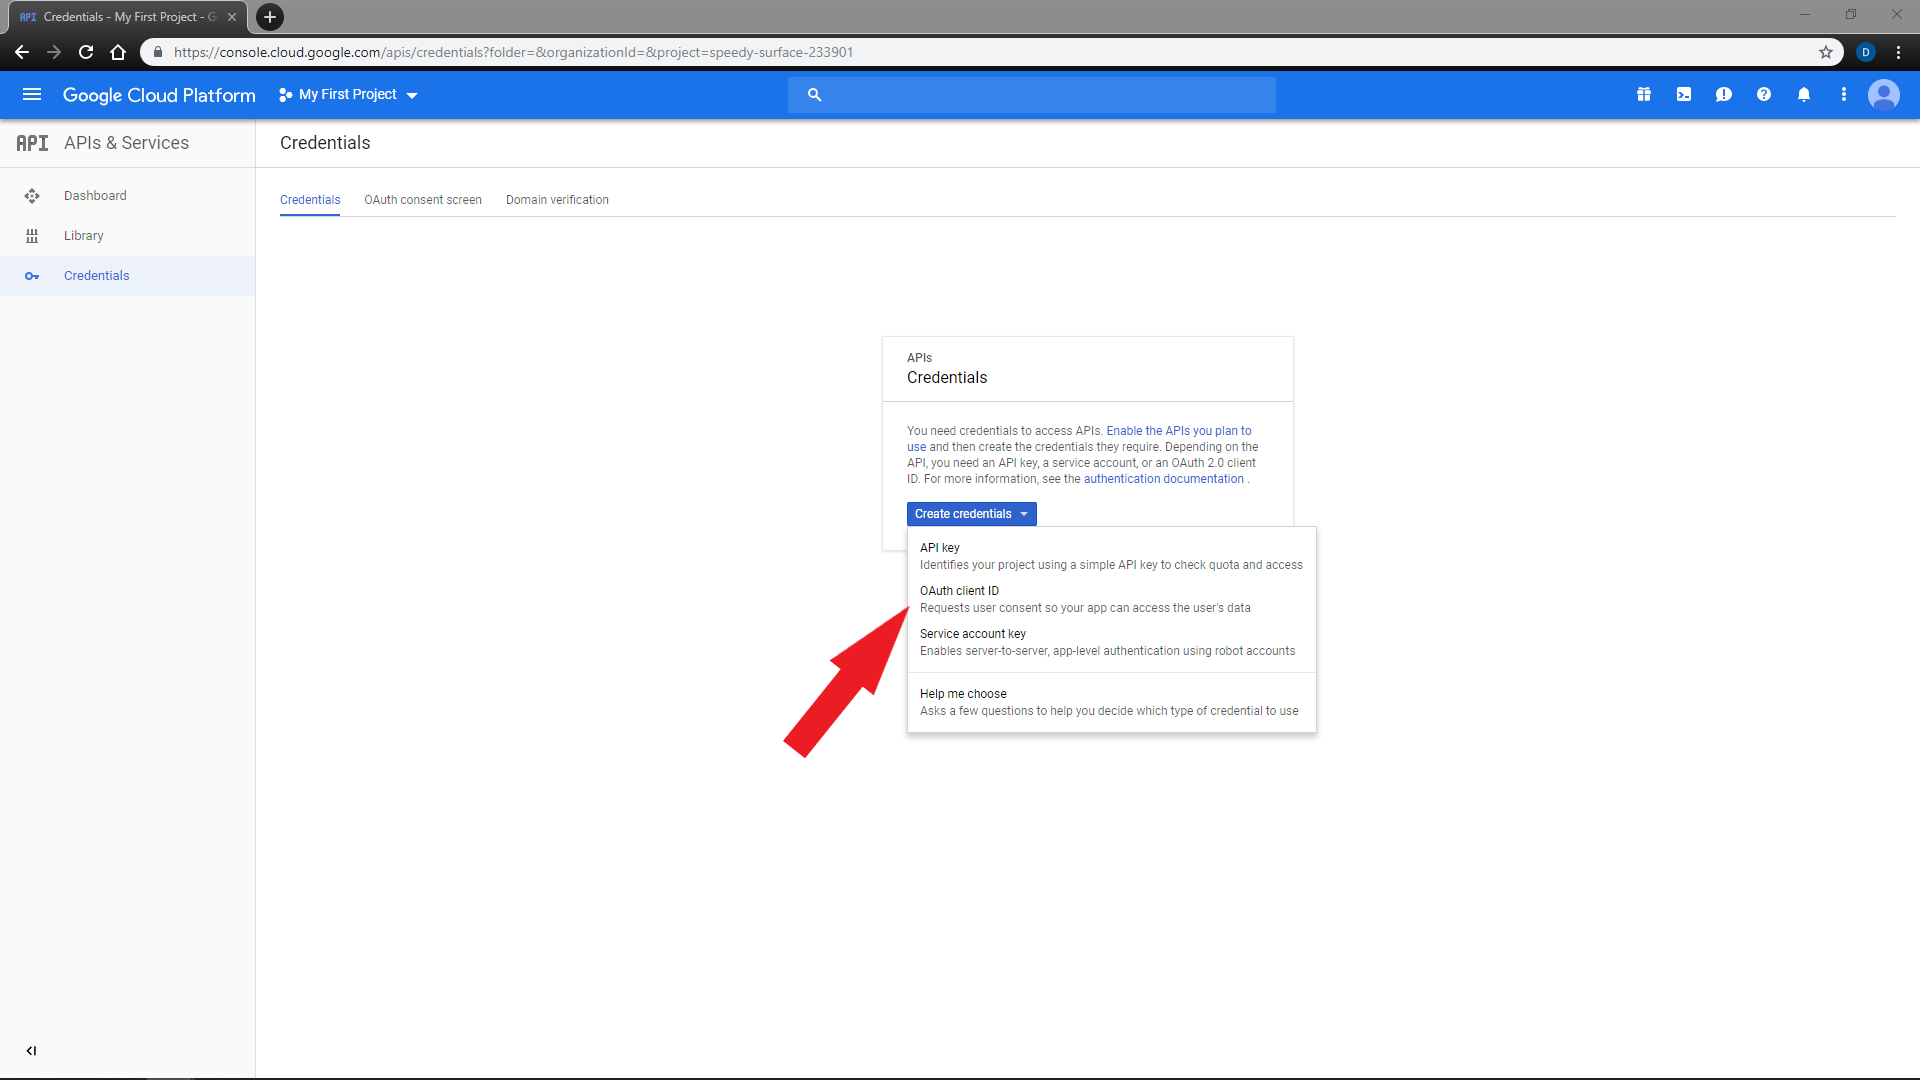
Click
Create credendials,Service Account Key -
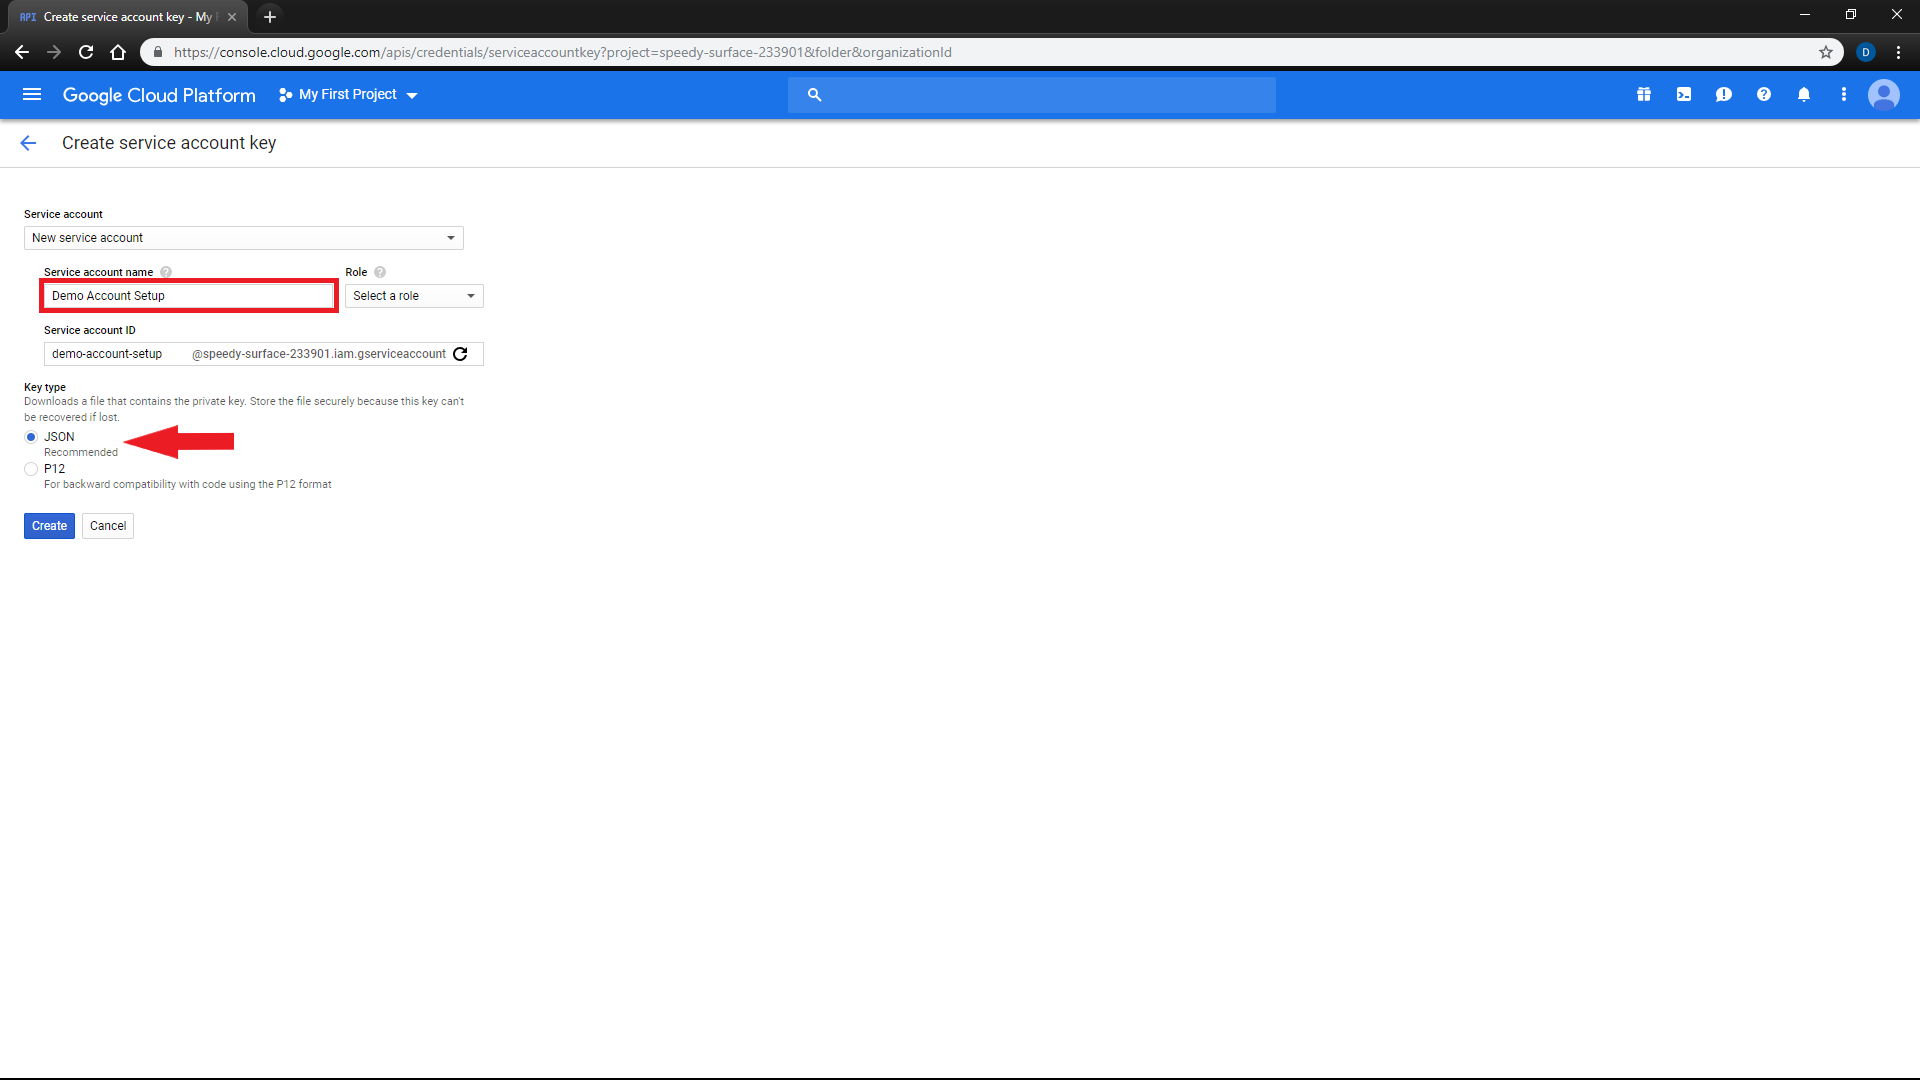
Choose any service account name for your reference. You may leave the
Rolefield empty -
Make sure key type is
JSONand click onContinue -
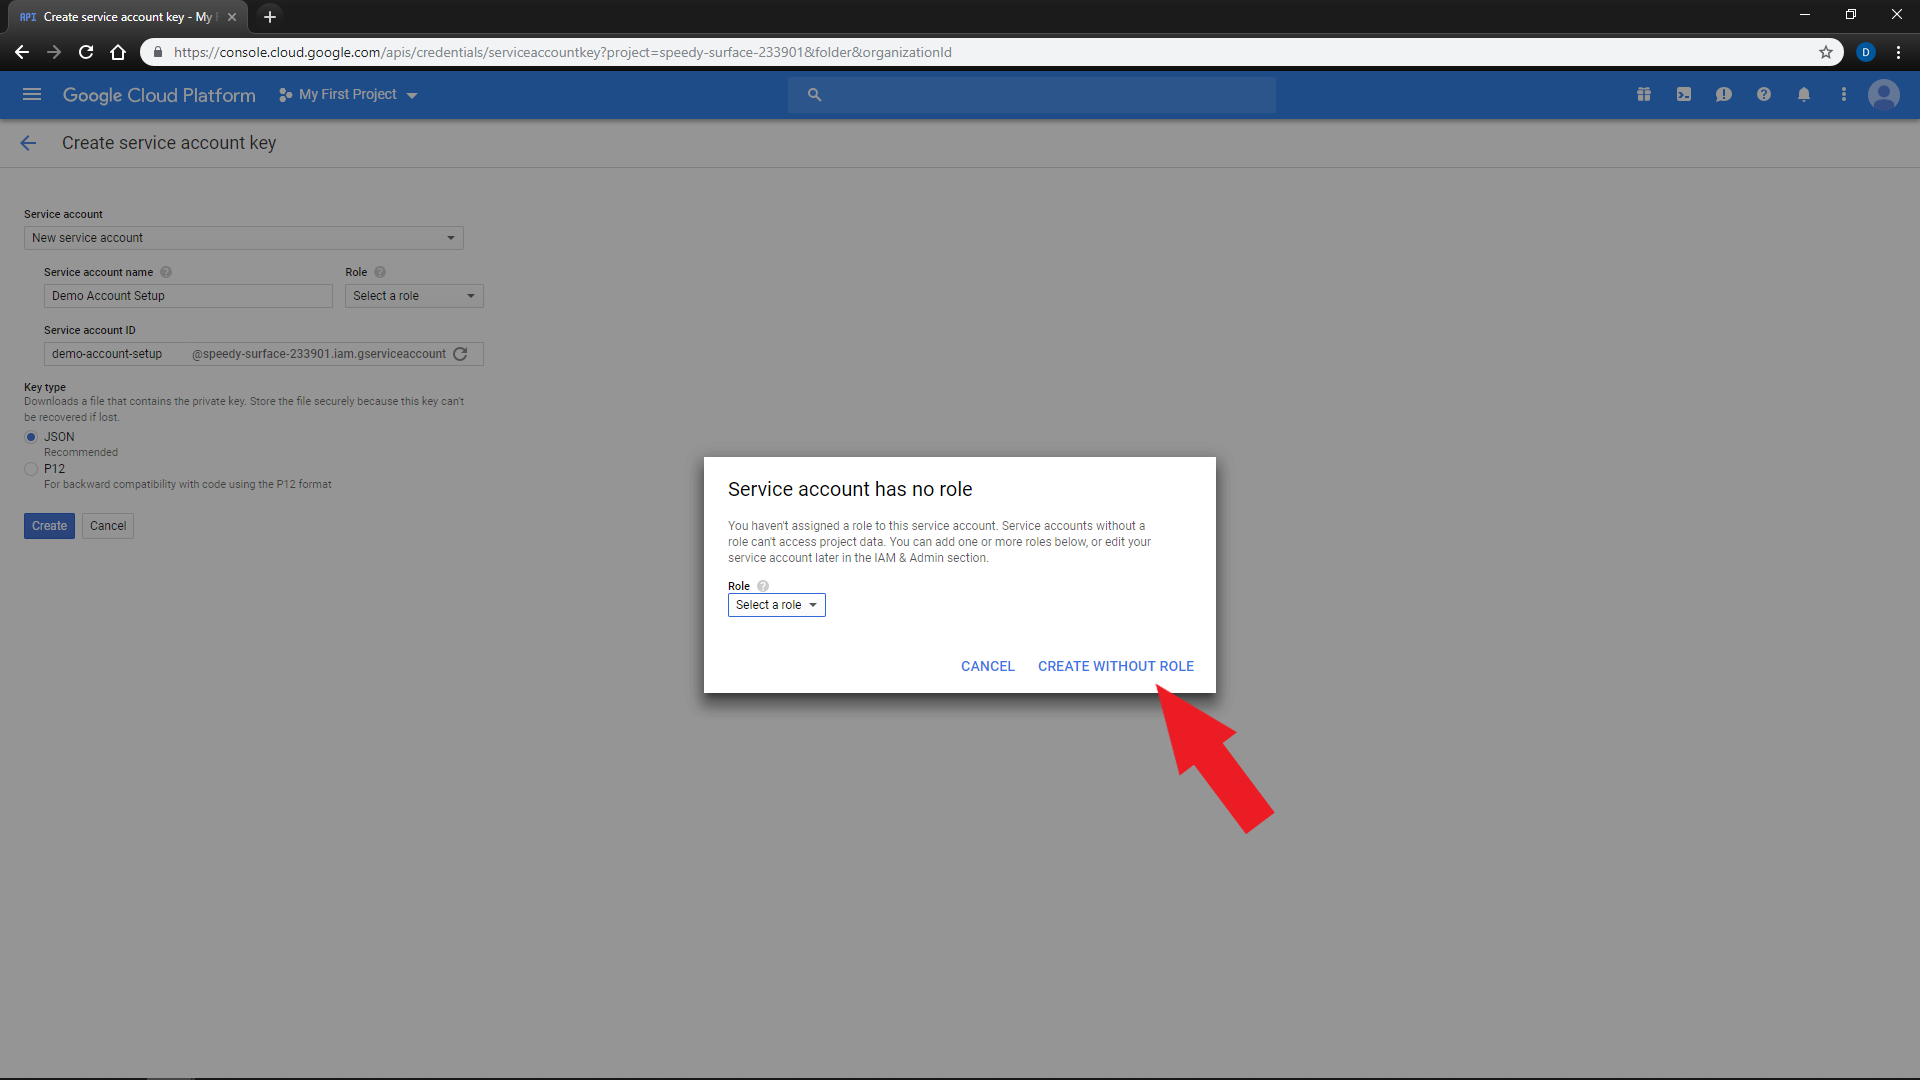
If you did not assign a role, you would be prompted. You may continue by clicking
'CREATE WITHOUT ROLE' -
You will see a prompt and your service key will automatically download
-
Rename the downloaded file to
google.jsonand move it into the same directory as neonSetup.shNote: The premium models are only available in US English and provide some enhancements to phone and video audio which do not apply to this project. The options with Data Logging allows Google to use your audio and transcriptions to train their model. You may select the option without logging to opt out (note that the option with logging is discounted).

At this point, Neon can be partially tested without Amazon translations and Wolfram information skills. You may run
setup without continuing, but Amazon and Wolfram|Alpha services are highly recommended.
-
Go to:
-
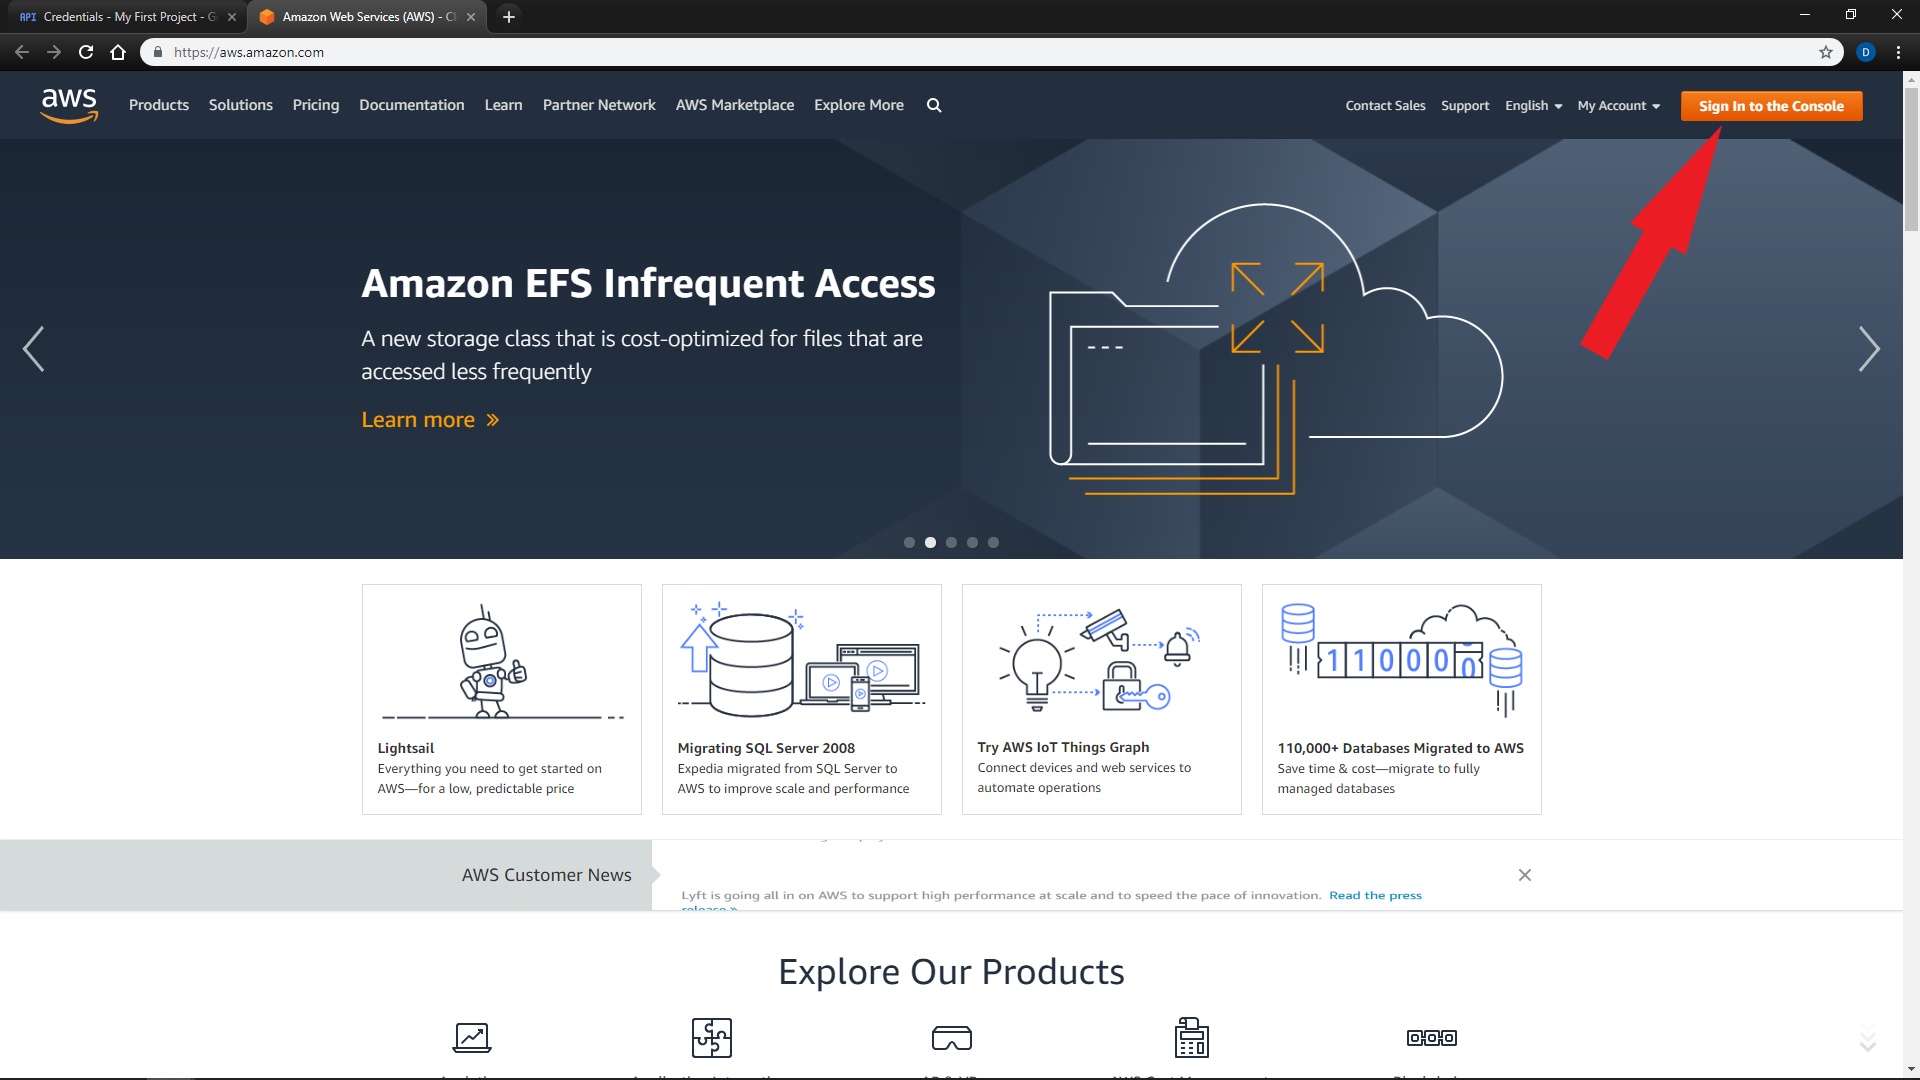
Click
"Sign into the Console"at the top right of the screen -
Sign in or register for an account
-
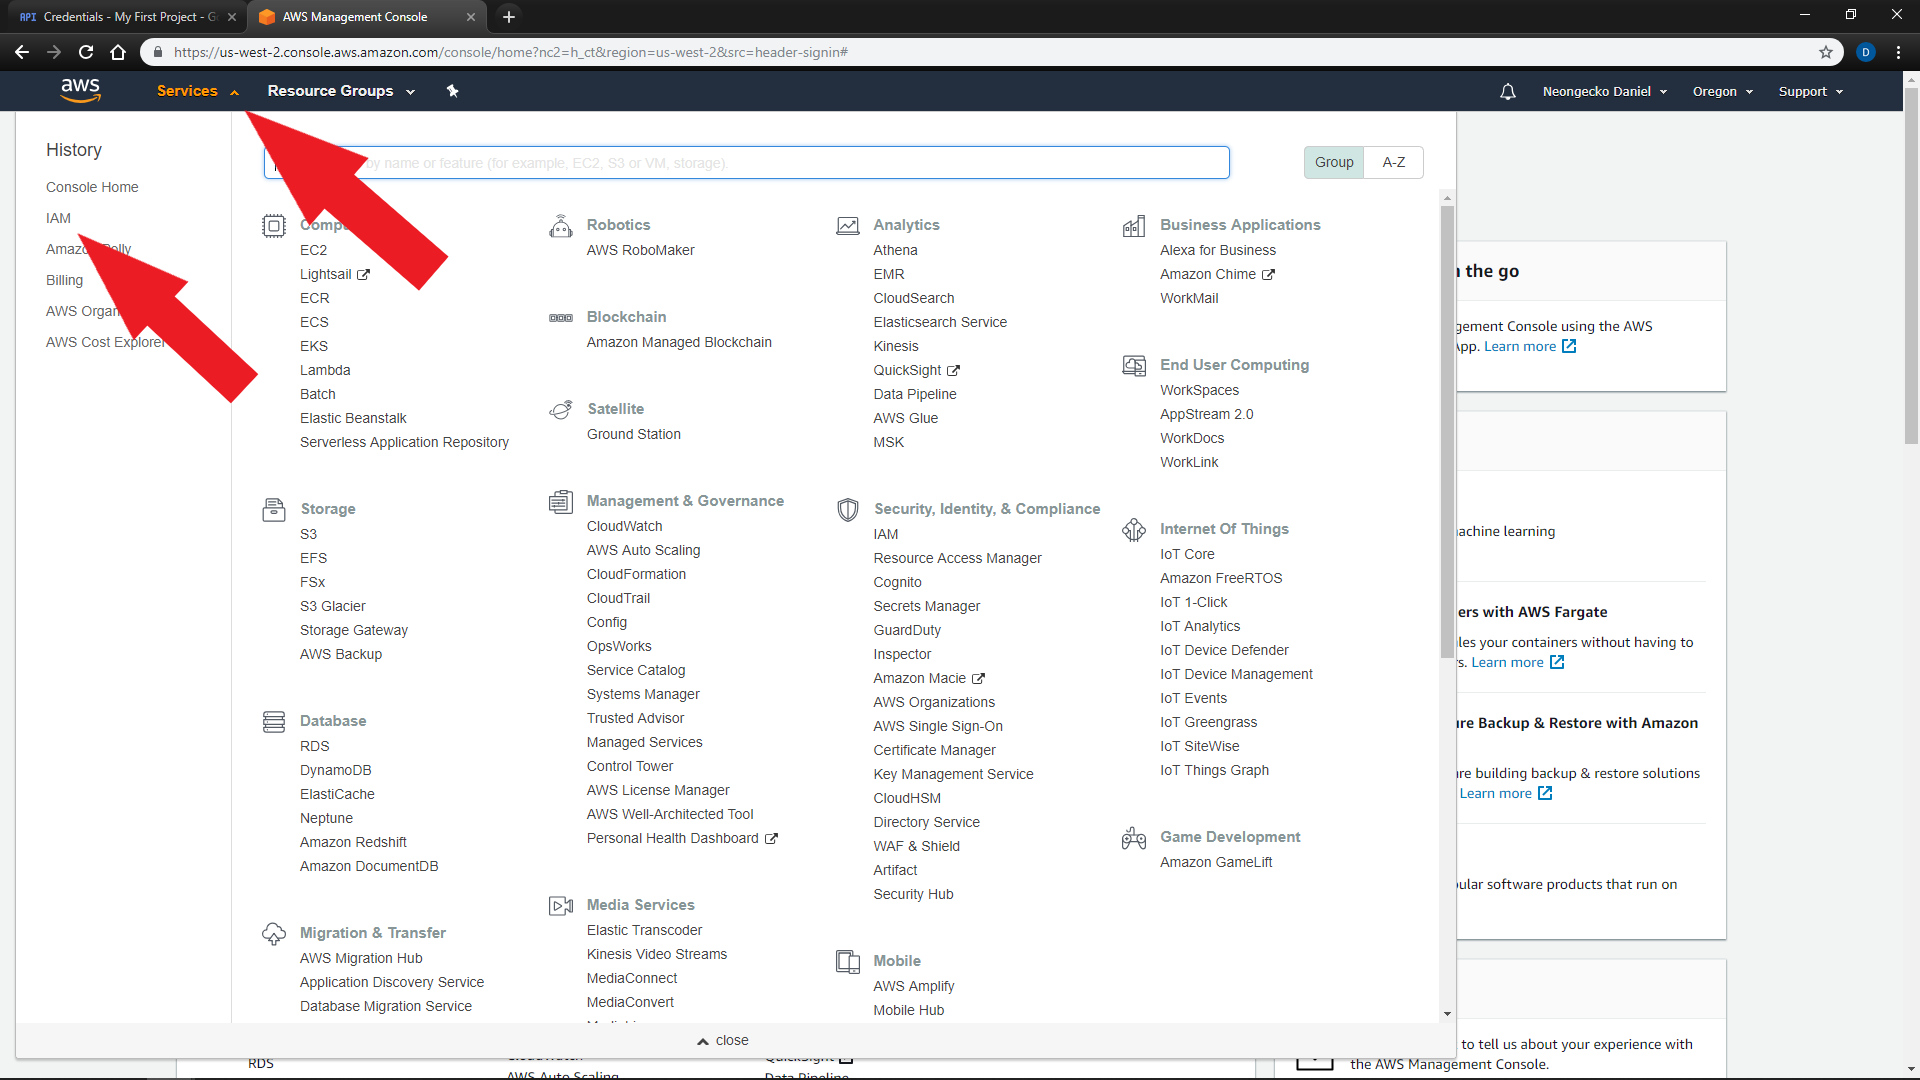
Go to the
Services Menuat the top left of the screen and clickIAM -
Select
Usersfrom the left side menu and clickAdd user -
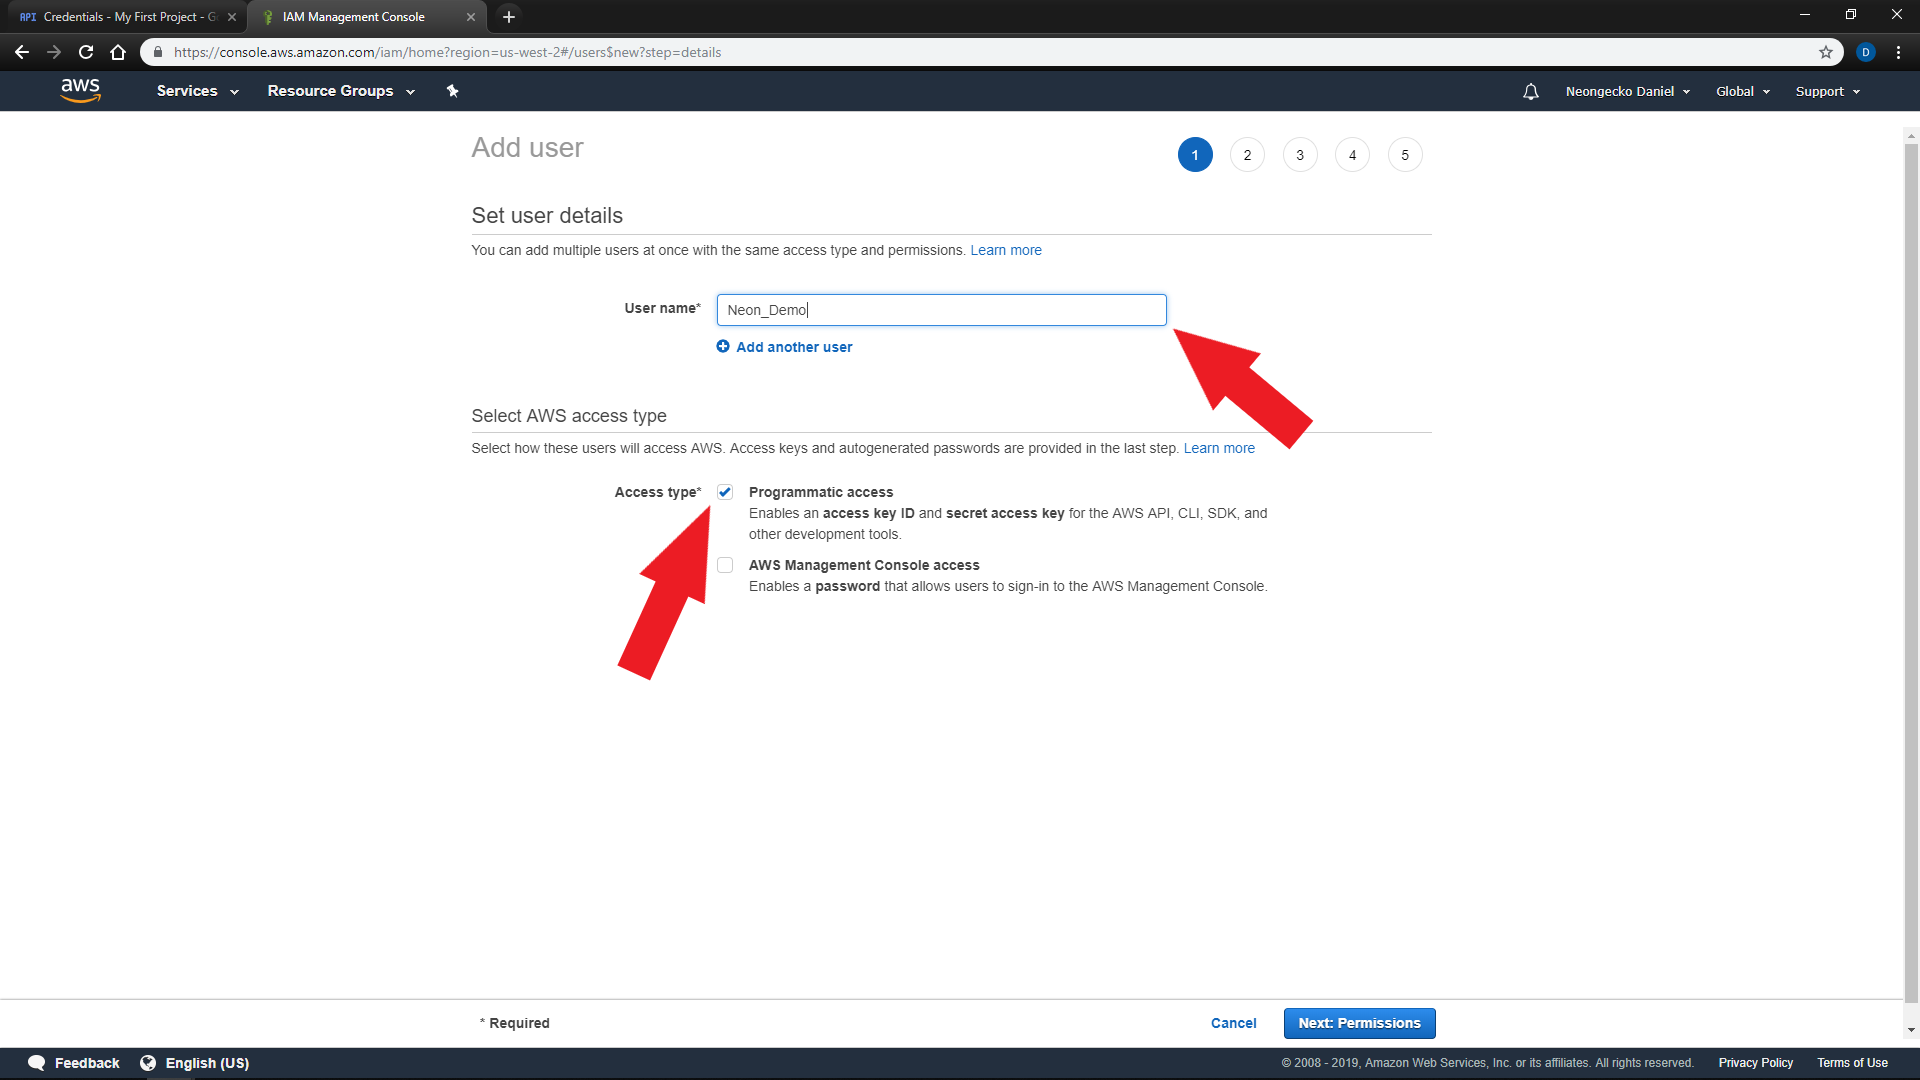
Enter a
User nameand check the box forProgrammatic access -
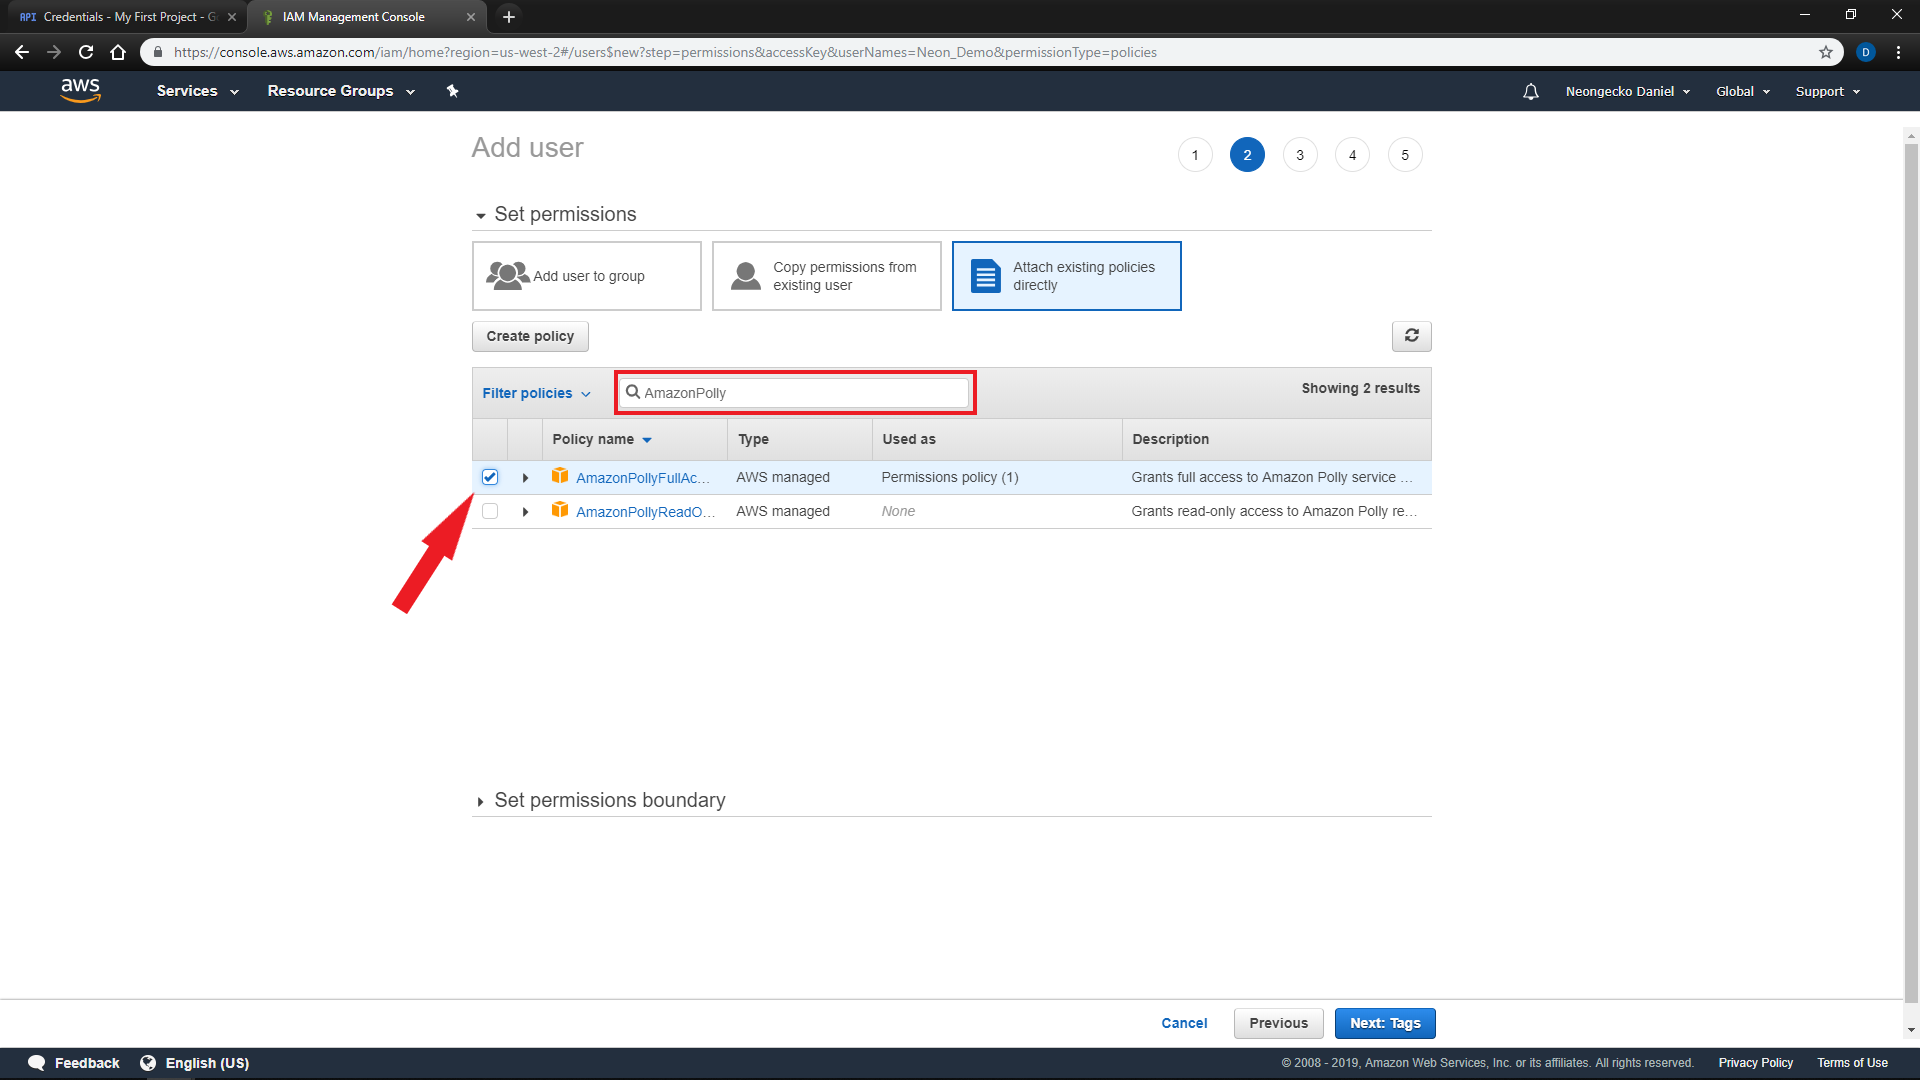
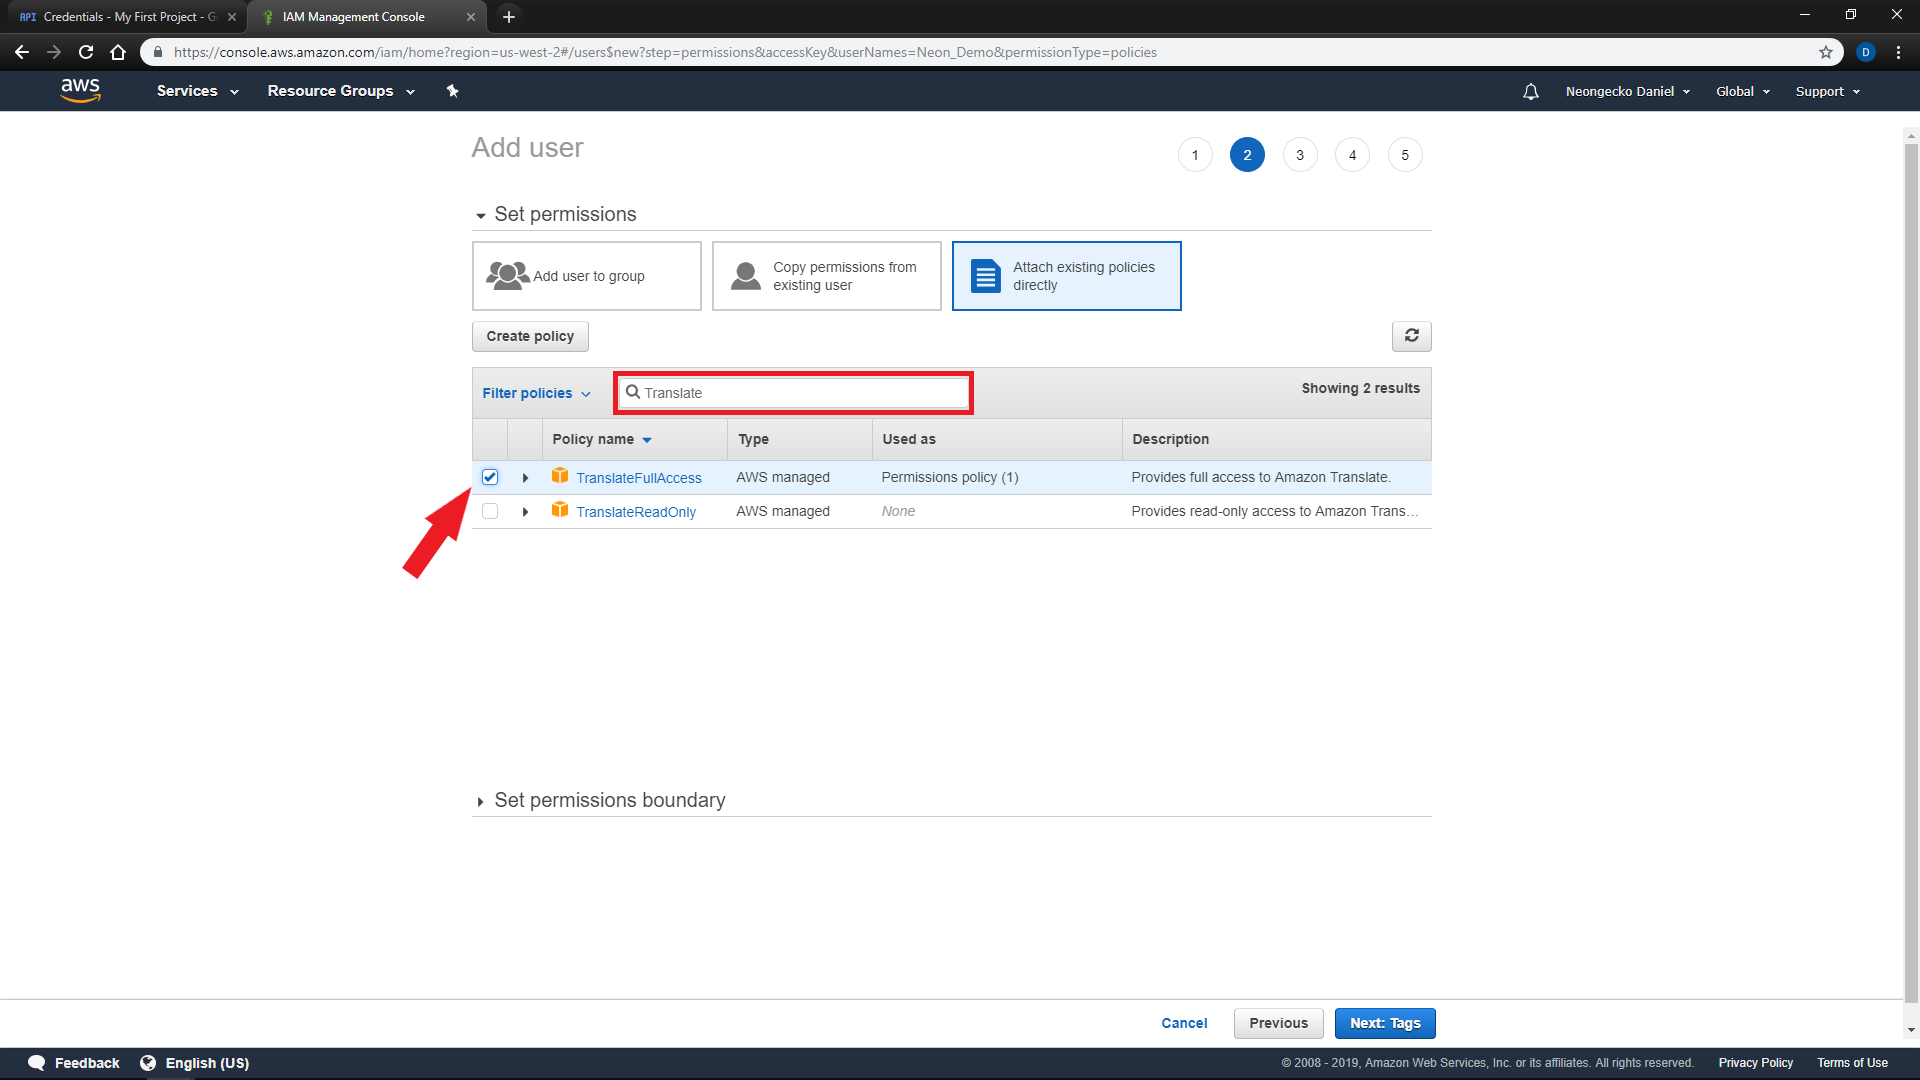
On the next page, Select
'Attach existing policies directly'and search for'AmazonPollyFullAccess'and'TranslateFullAccess' -
You may add tags on the next page if desired
-
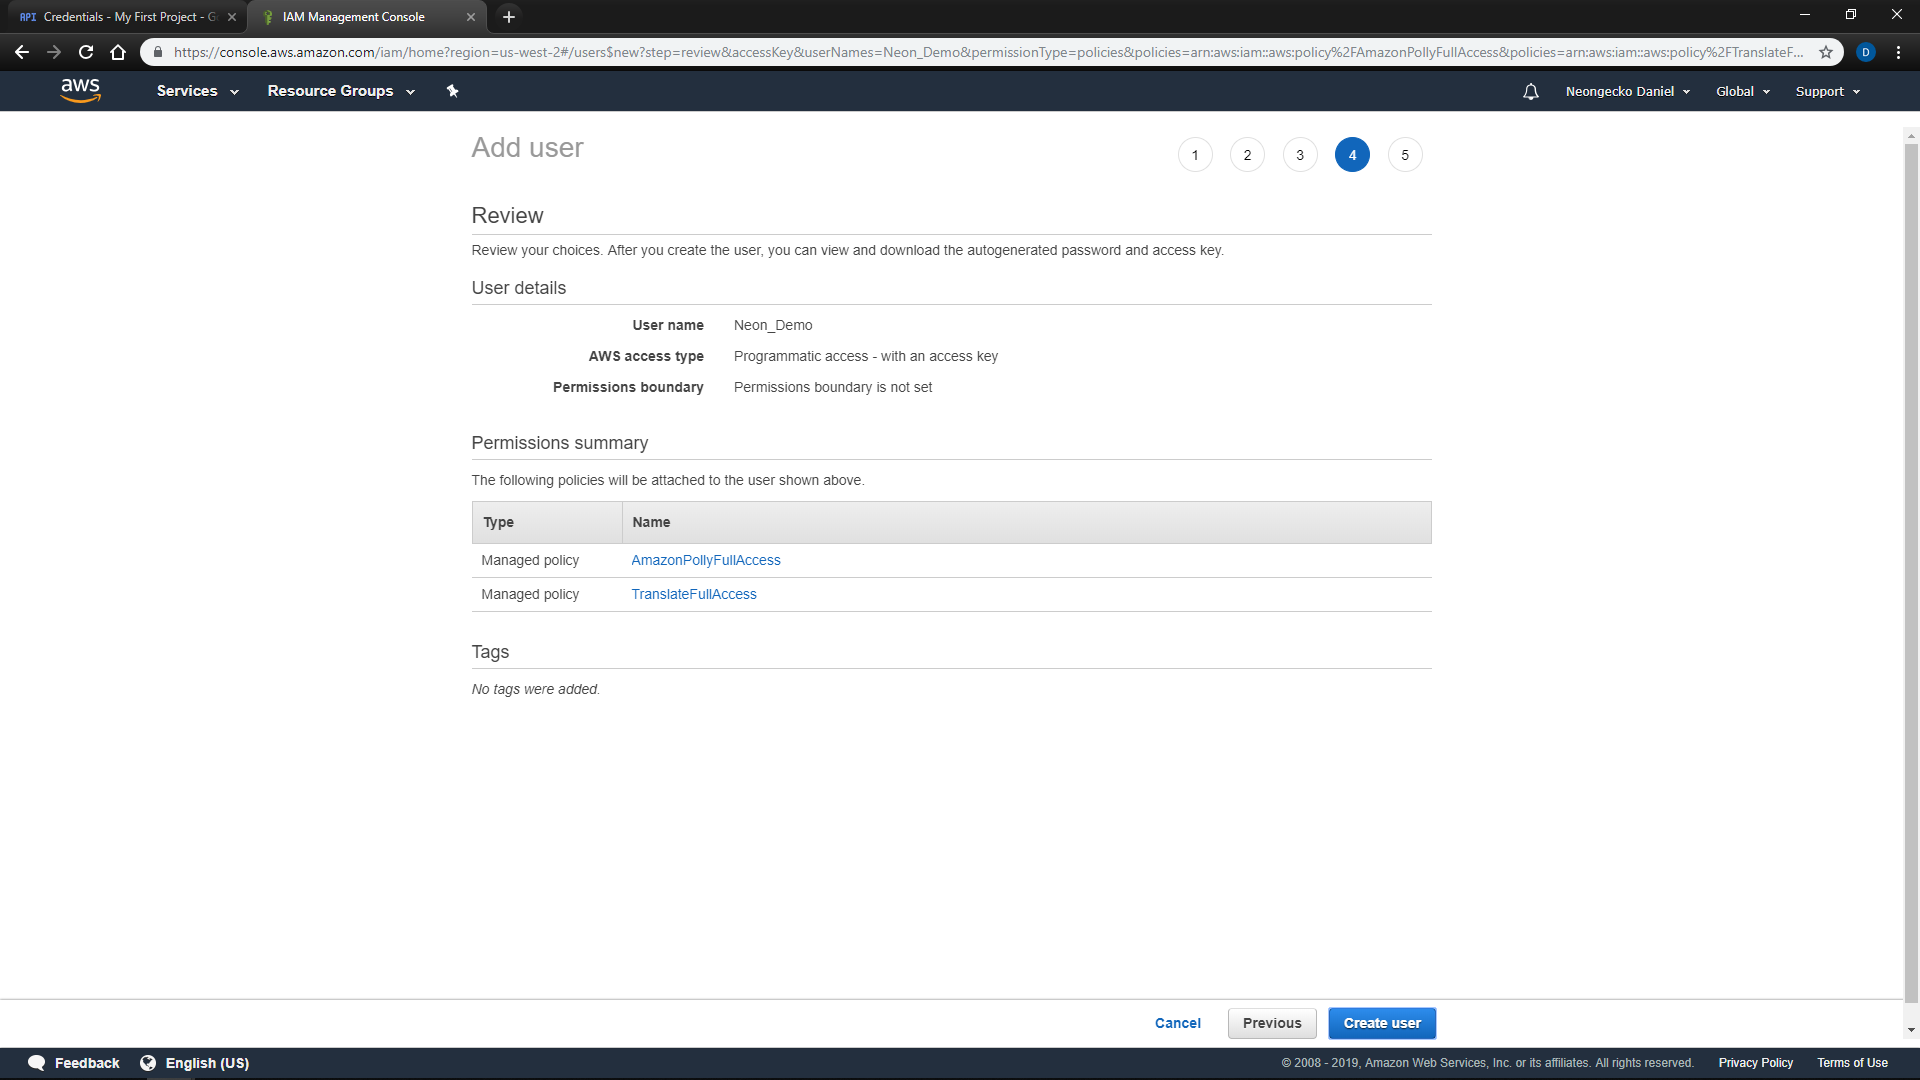
Review your selections on the next page and
Create user -
On the next page you can see your
Access key IDandSecret access key -
Click the
Download .csv filebutton to save your credentials to your computer -
Copy or move the downloaded
accessKeys.csvto the same directory as neonSetup.shNote: You will not be able to view your secret access key after it is generated, so if you need a secret access key, you will have to generate a new Access key.
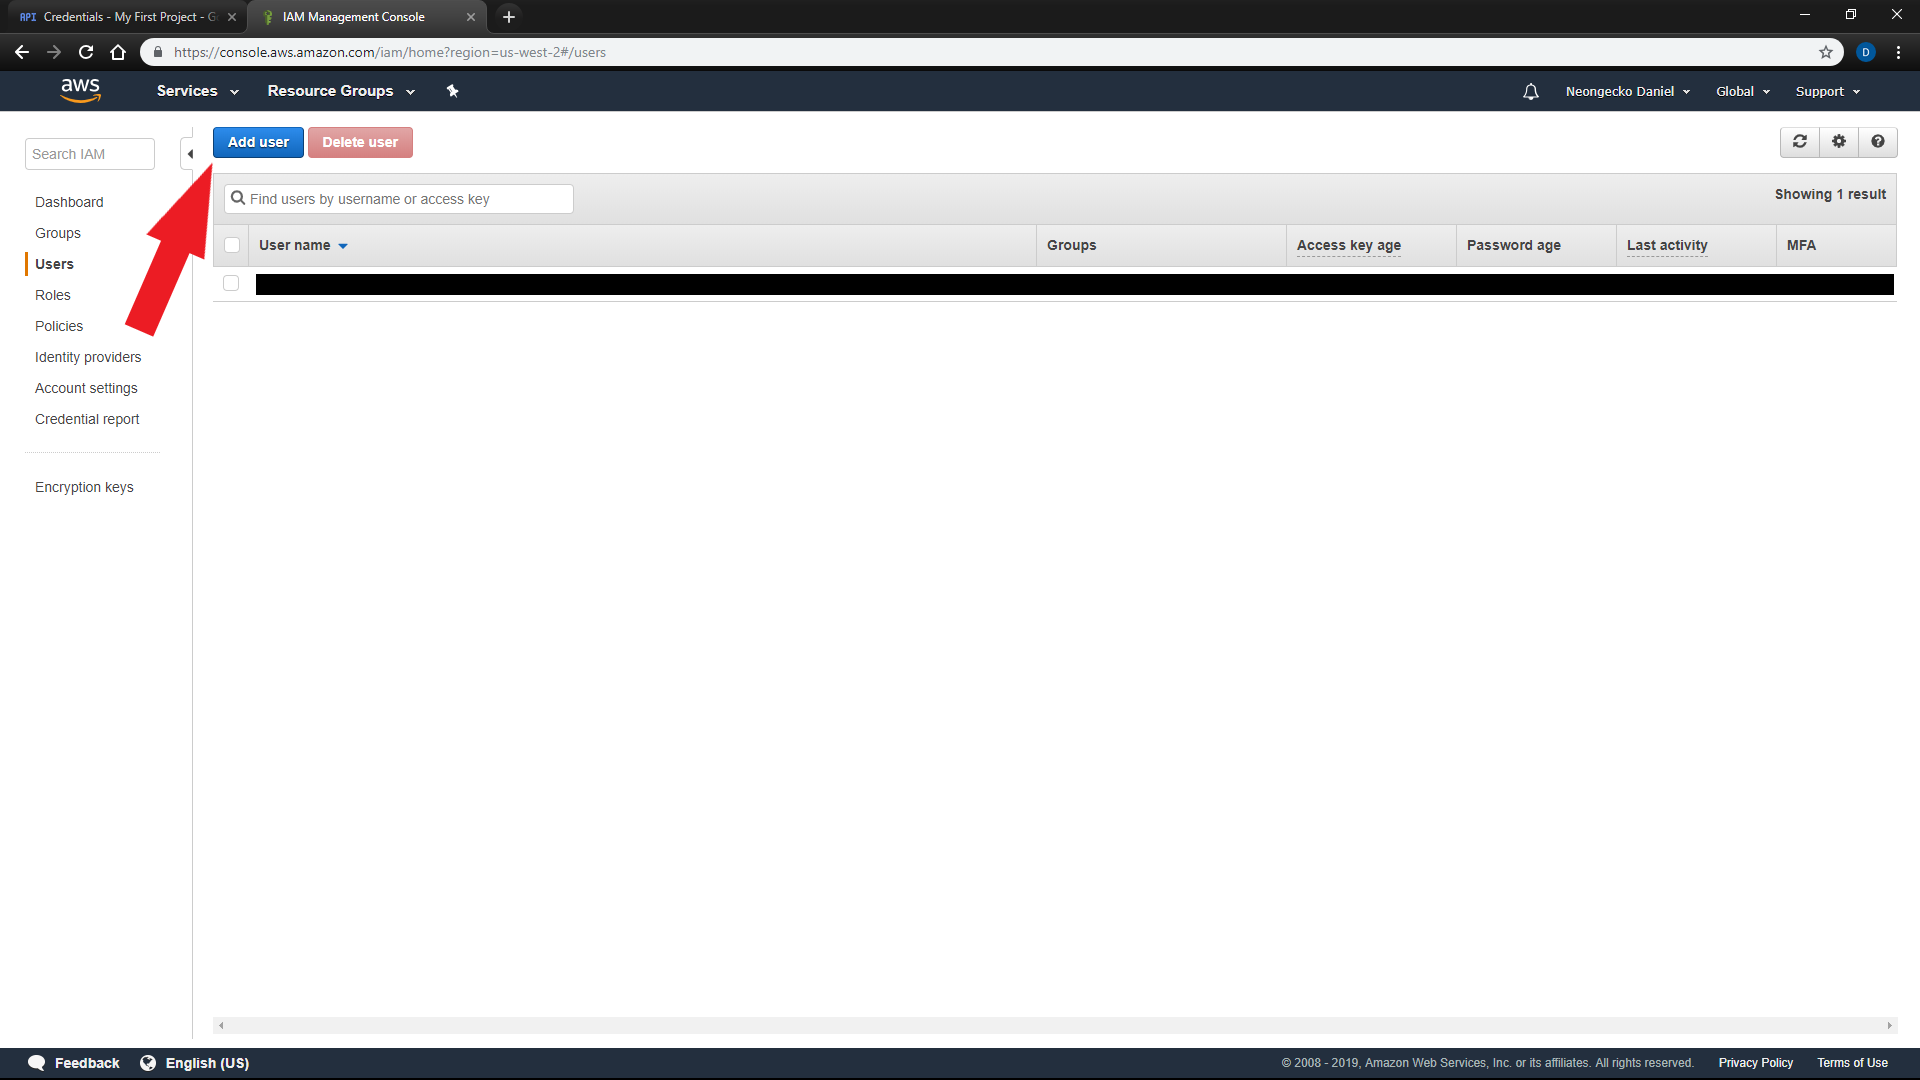

The Users menu lets you create new users and new access keys per user as you wish, as well as modify permissions.
Before continuing, make sure you have your hardware setup ready for installation. You will need the following:
-
A computer running up-to-date Ubuntu 20.04
You can find our video tutorial for installing Ubuntu in a virtual machine here, or you can find written instructions here
Note: If you prefer to use Windows for your development environment, you can install the Windows Subsystem for Linux. You can find our video tutorial here. Audio and gui functionality will be limited in this case; you will only be able to interact with Neon via command line.
-
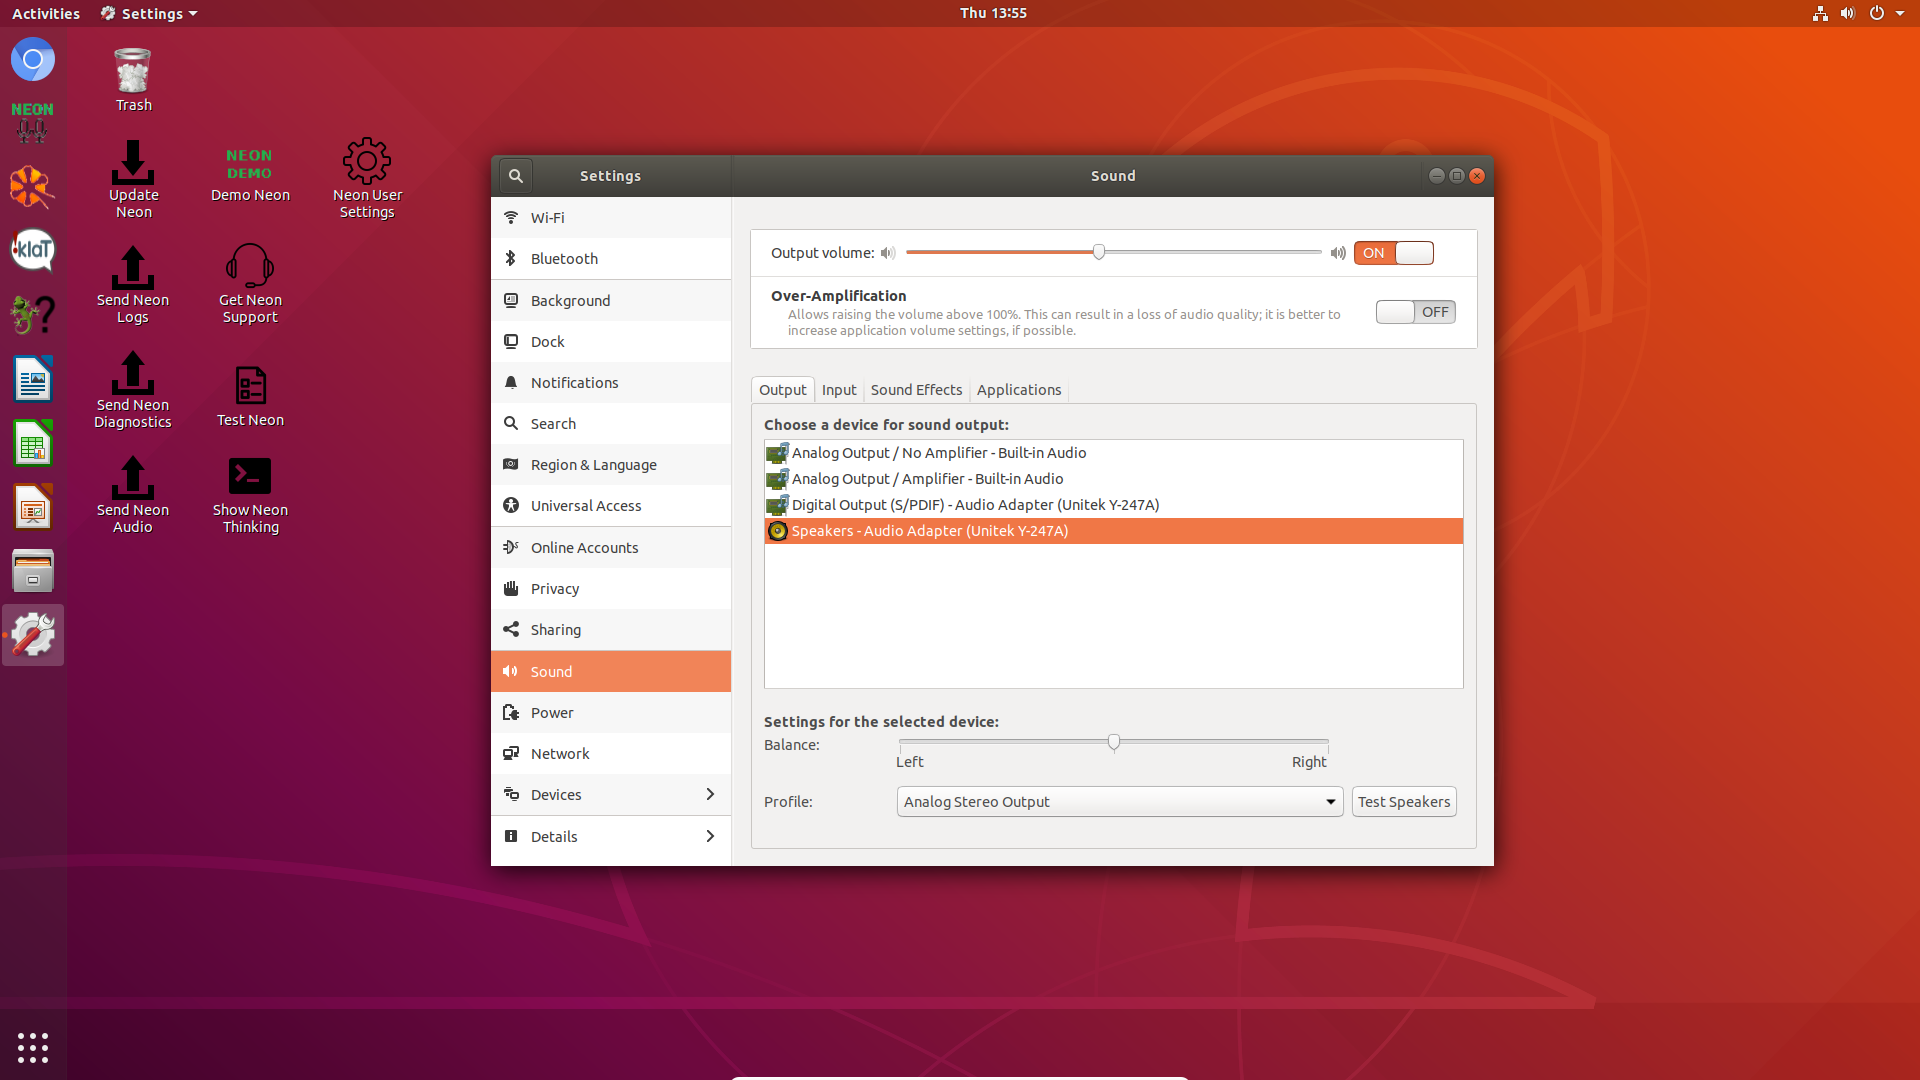
Speakers and a microphone recognized by Ubuntu
You can verify Ubuntu sees your devices by accessing
Settingsand thenSound- If you are unsure of which device to select, you can click
Test Speakersto play a test tone through the selected Output device - You can test your microphone under the
Inputtab, the Input level should move when you speak into the microphoneIf you do not see any microphone activity, make sure the correct device is selected and the Input volume is set above 50%
- If you are unsure of which device to select, you can click
-
Webcam (optional)
Some functionality requires a webcam (ex. USB Cam Skill). Most webcams also include a microphone that can be used for Neon.
-
An active internet connection
Note: A connection of at least 10Mbps is recommended. On slower connections, installation may take several hours.
-
At least
10GBof available disk space (15 GBif installing Mimic)Neon AI occupies less than 1GB itself. With dependencies, the installation takes about 5GB on an up-to-date Ubuntu 20.04 system. Mimic local speech-to-text requires about 3.5 GB. Additional space is used while installing packages during installation and updates. Several gigabytes is recommended in order to keep local transcriptions and audio files.
-
A system with at least 2GB RAM and 2 or more processing threads is required, with 4GB RAM and 4 threads recommended
Some features such as the vision service may not work on systems only meeting the minimum requirements. Responses and speech processing will take longer on lower performance systems.
This guide includes instructions for installing in both a Development environment and a User environment. User environment is more lightweight and does not assume any existing IDE. Developer environment will have more consoles, debug outputs, and logs available. See details below.
A development environment is designed to be a testable installation of NeonAI that can be connected to an IDE
(ex. Pycharm) for modifications and skill development. This guide assumes installation in a development environment from
an unmodified fork of NeonAI. After installation, any changes and additions can be pushed to git or hosted on a private
server.
A user environment is designed to be an installation on a device that will be used normally as a voice assistant. You
may want to test how your changes affect performance on less powerful hardware or test how changes may be deployed as
updates.
If you are developing in a virtual machine, installation on physical hardware in a user environment is useful for
testing audio and video I/O which can be difficult in many virtualized environments.
Before starting here, make sure you have already completed
setting up your service accounts. You should have google.json,
wolfram.txt, and accessKeys.csv already saved to the machine you are installing to.
All of the following options, such as autorun and automatic updates can be easily modified later using your voice, profile settings, or configuration files.
- Clone NeonCore from your forked repository into a local directory.
- Configure a virtual environment and install any desired requirements
Note:
requirements.txt,dev.txt,test.txt, andremote_speech_processing.txtare recommended for installation
Installing in a User Environment differs from a developer environment; you will not be able to modify Neon Core if you use this installation method.
- Take your
setup.shfile and place it in your home directory - Make sure you have your
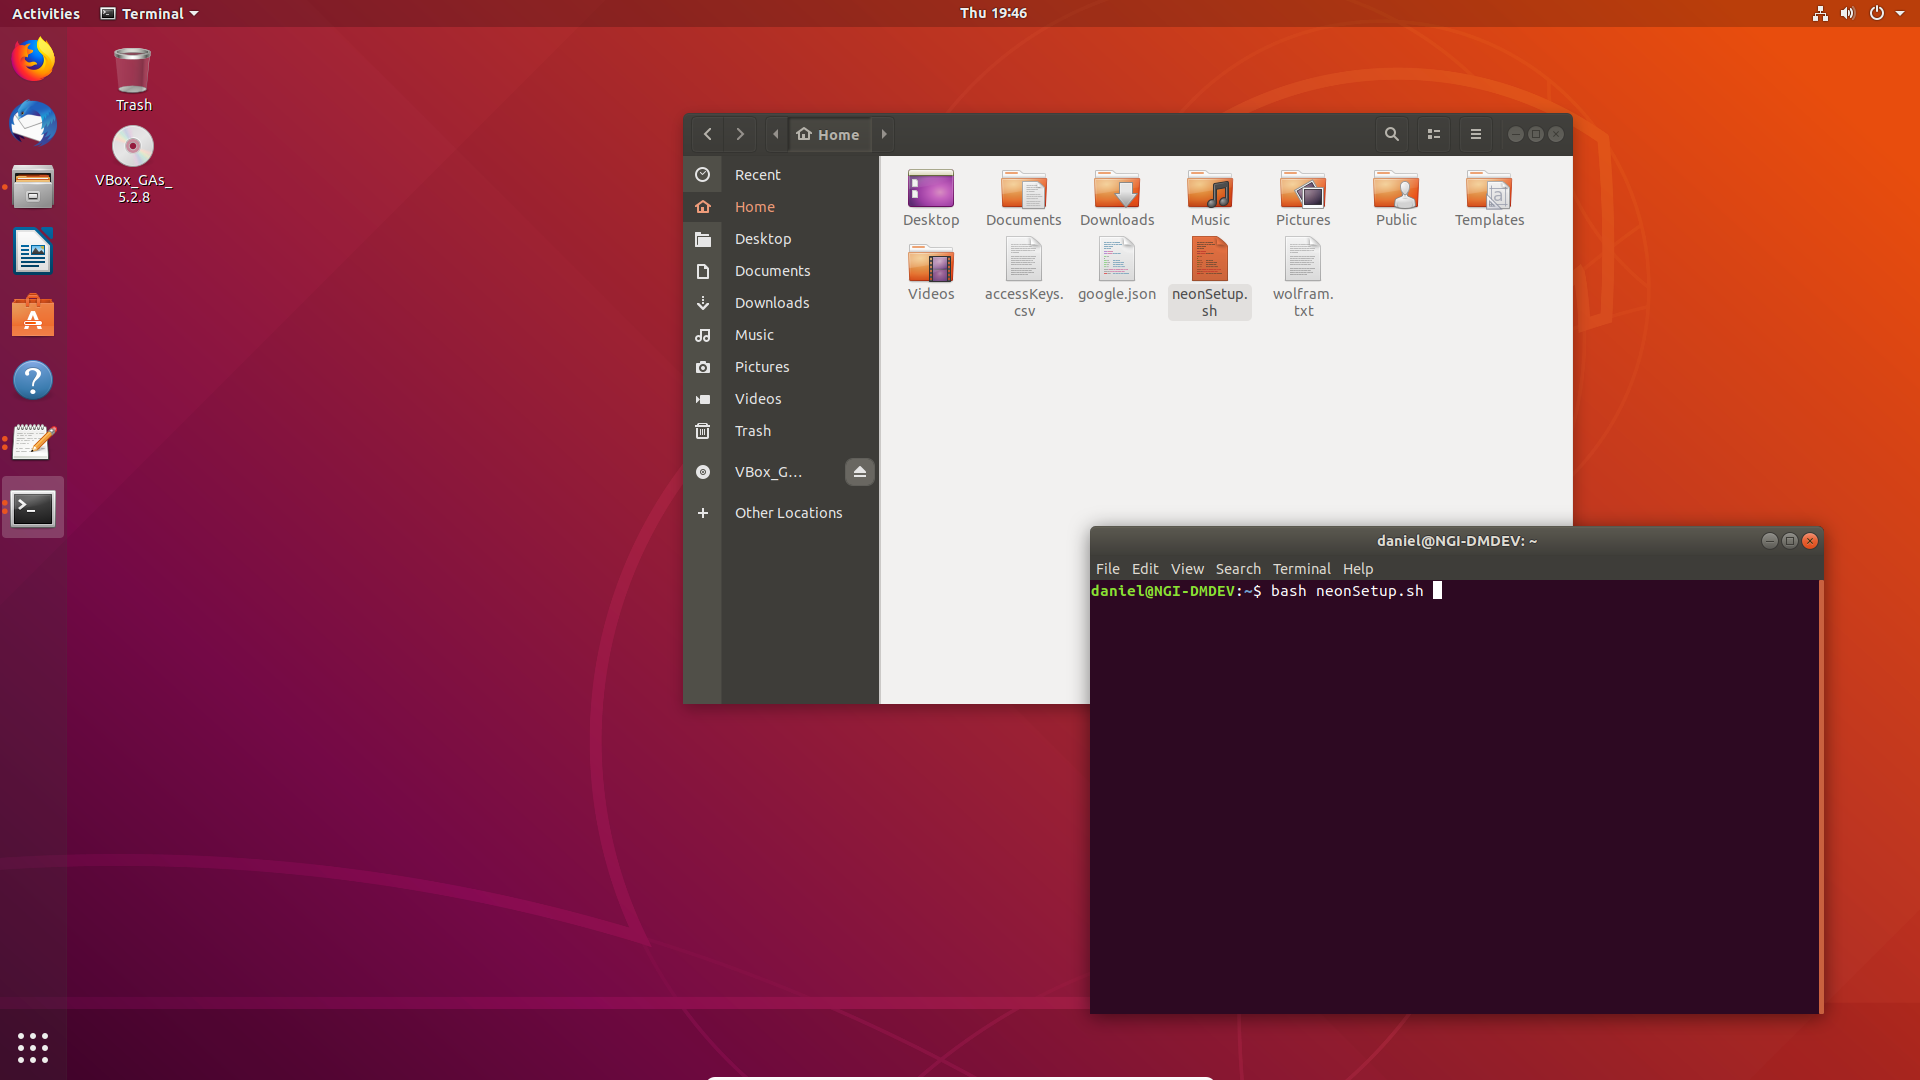
accessKeys.csv,google.json, andwolfram.txtfiles here as well, otherwise you will be prompted for credentials during setup - Open a terminal in your home directory (
ctrl+alt+t) - Type in
bash setup.sh ${GITHUB_TOKEN}and pressEnter(where${GITHUB_TOKEN}is your Github token) - Type
nto Install in User Mode (Not Developer Mode) - Type
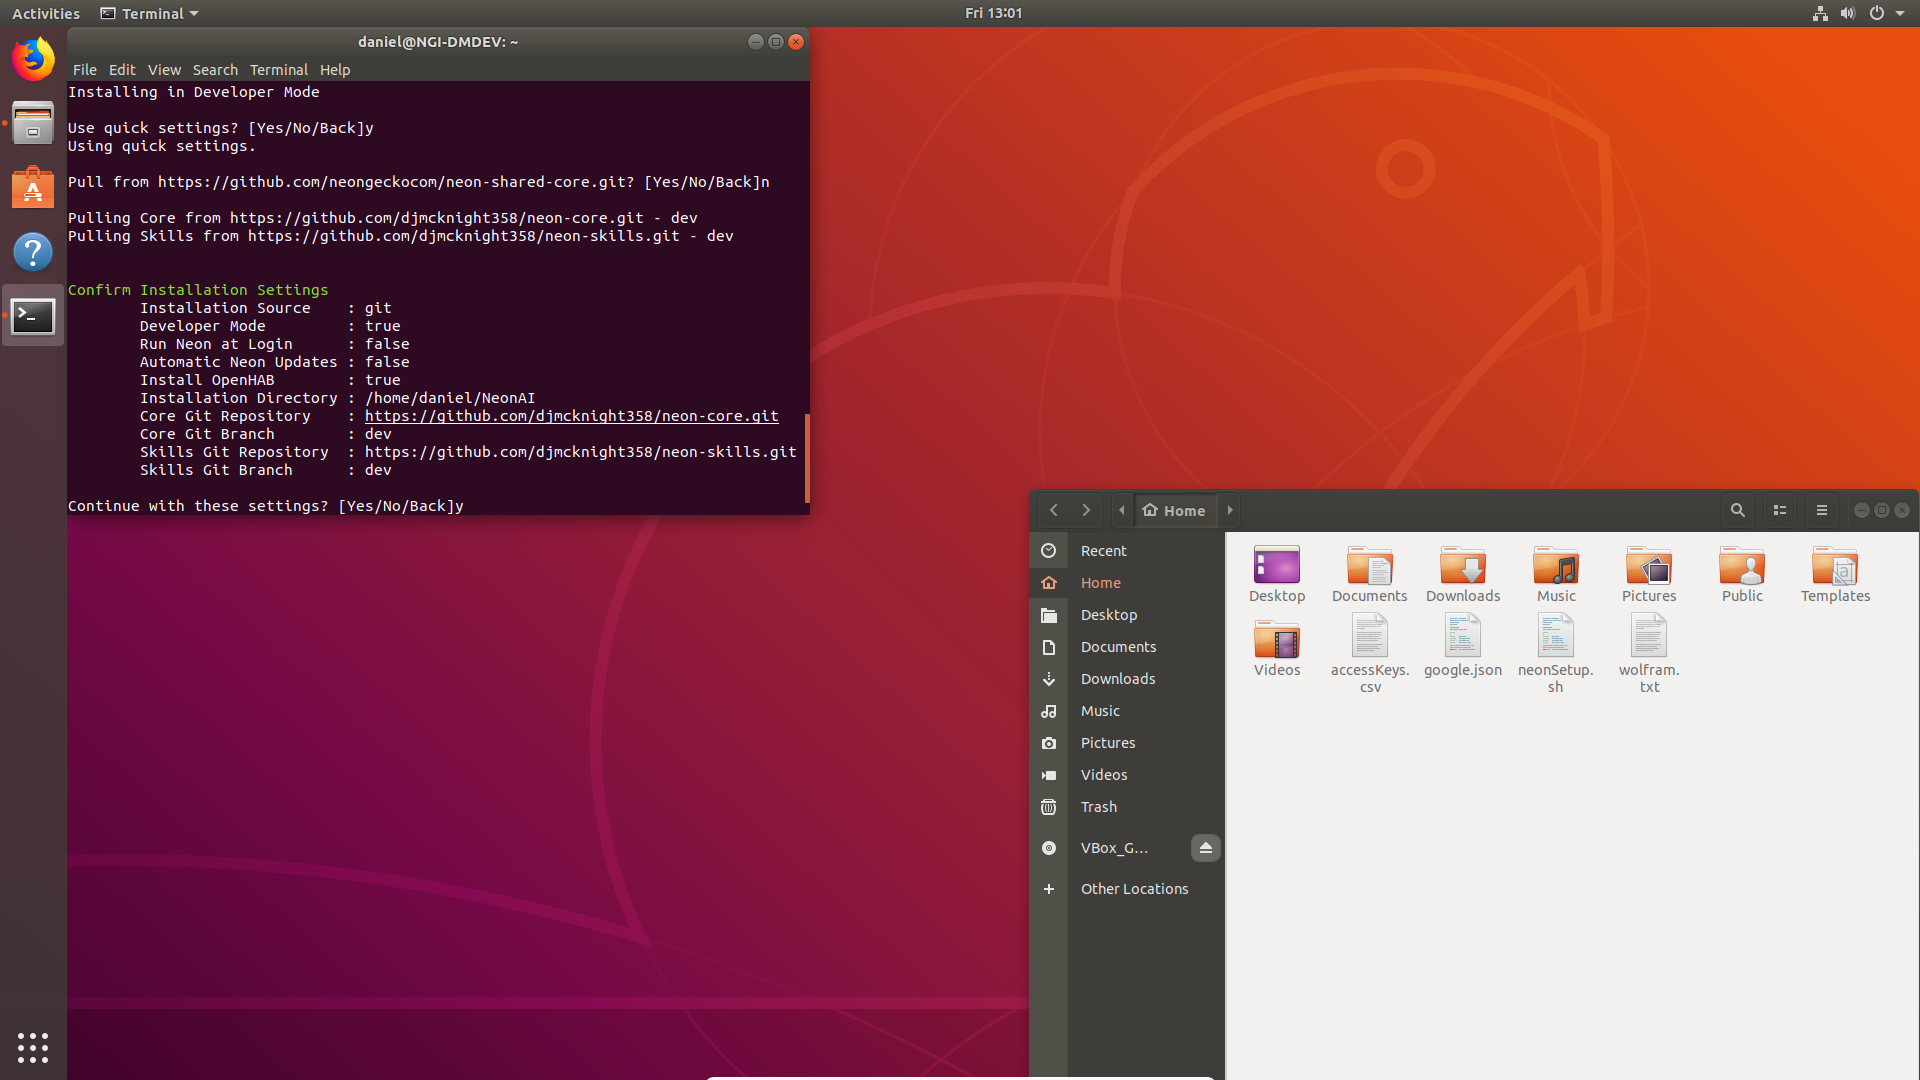
nto Input Custom settingsNote: You may use quick settings and skip the following prompts
-
Type
nto install in User mode (yfor full Developer mode) -
Autorunis recommended (y) on for User Environments -
Automatic updatesare recommended (y) on for User Environments -
Local STTis NOT recommended (n) if you have google and aws keys as remote processing is faster and more accurate -
Install GUIis recommended (y) so long as you are running a current/supported version of Ubuntu and your device has a display -
Find out more about OpenHAB here
-
Serveris NOT recommended (n) unless you know otherwise -
You will be prompted to confirm your settings, press
yto continue,nto start over, orbto go back and correct a previous setting -
When setup is complete, you will be able to start neon via
start_neon.sh
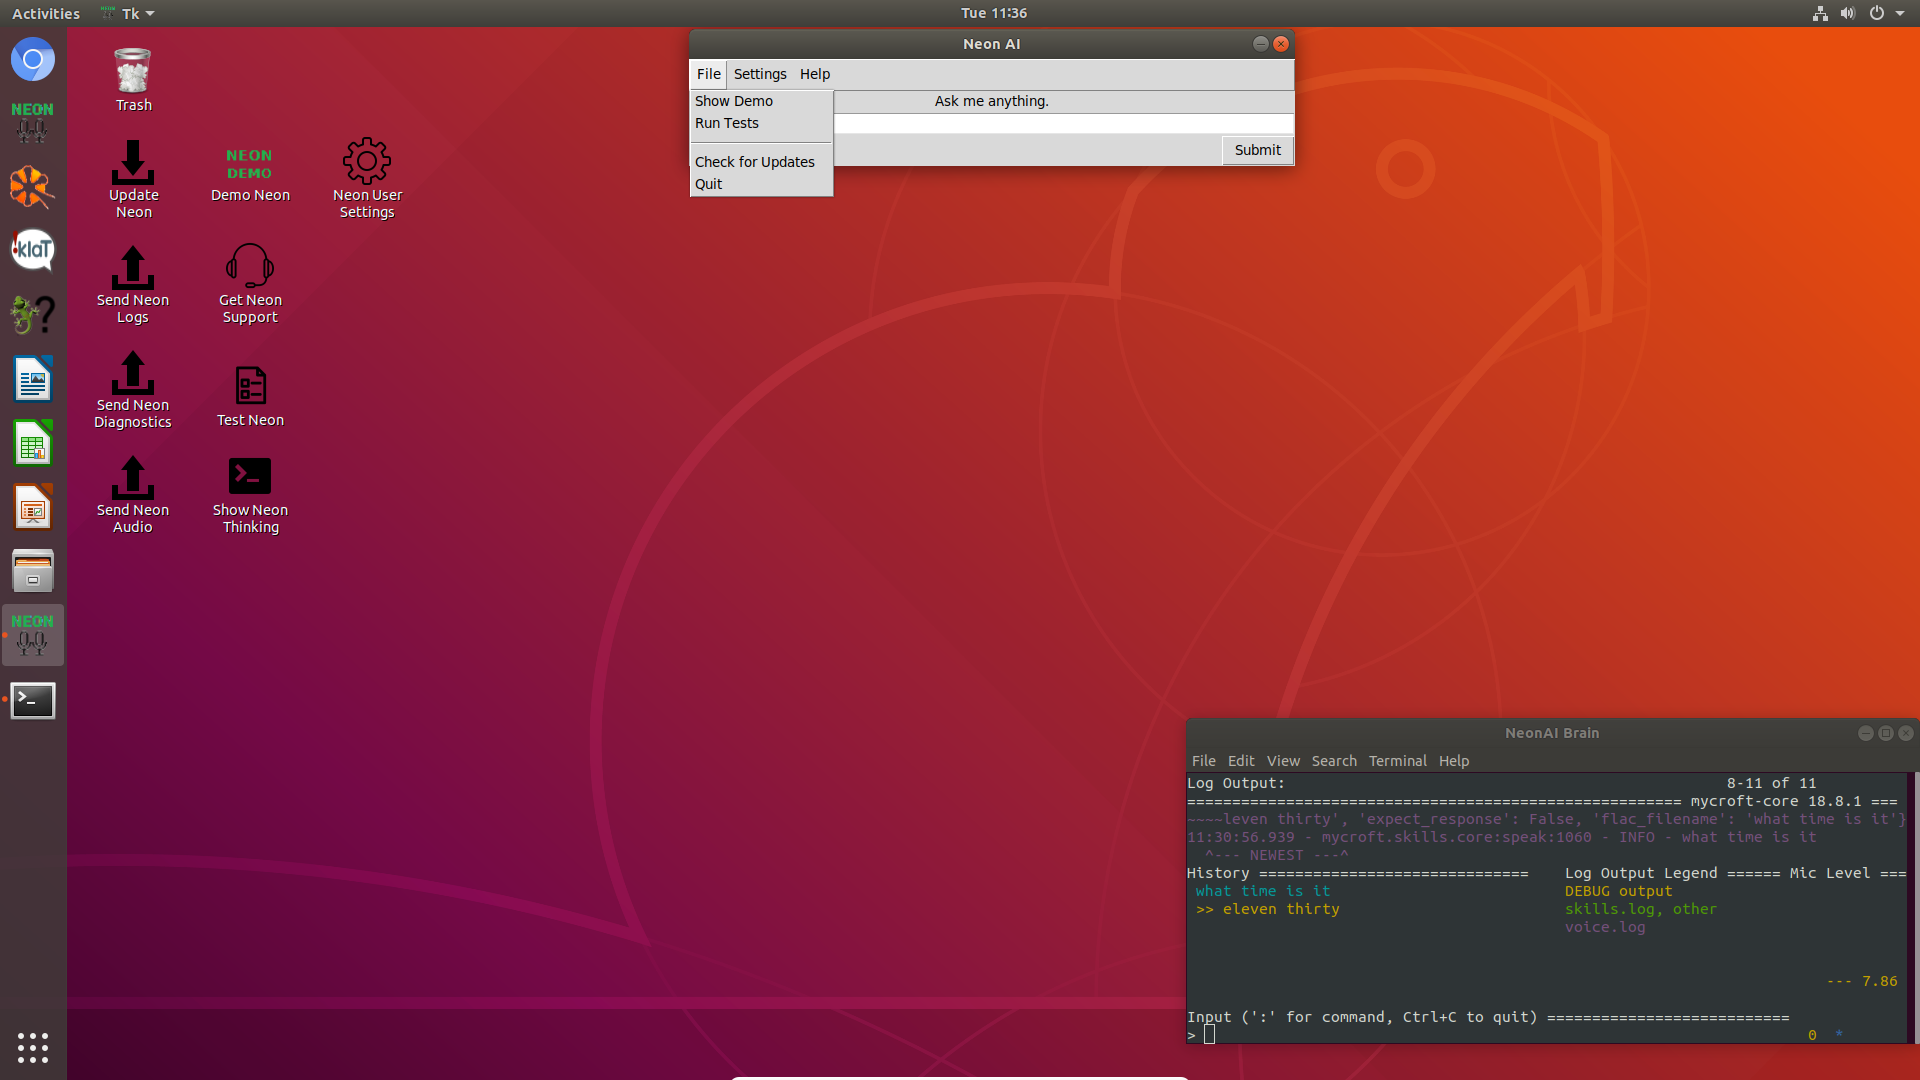
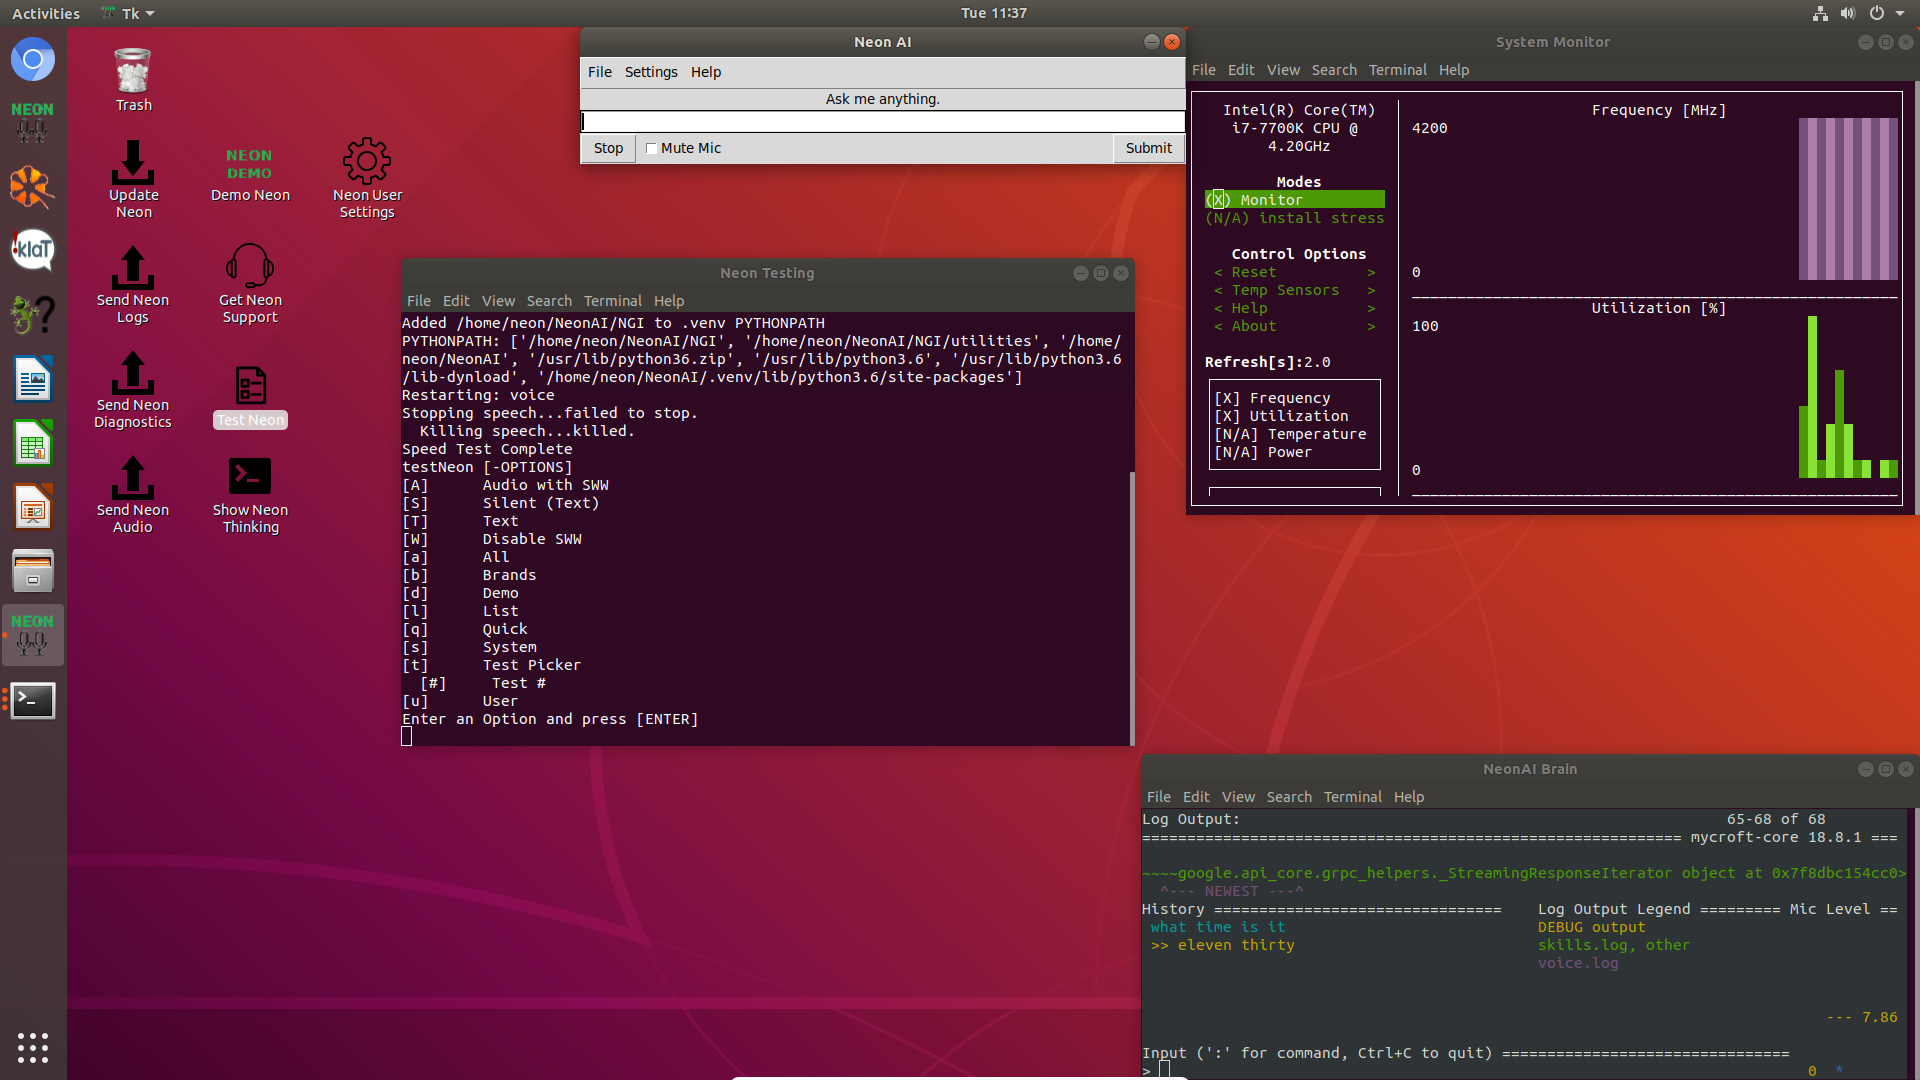
After you have completed Installing Neon, you will have a fully functional system ready to test. A useful first step after a new installation or update is to run an automated test of your skills.
-
With Neon running, use the desktop shortcut
Test Neonor File menu optionRun Teststo run tests -
The test program will automatically backup your user settings and run a network speed test and then present you with the test options
The upper case options determine the way testing is run (Text or Audio).
The lower case options determine which skills are tested. -
Type in the options you wish to test with, you may string multiple together (ex.
TaAawould run all tests as Text and then all tests as Audio)Note: If running audio tests, you must loop back audio output to audio input (the easiest way to do this is to run a 3.5mm cable from your speaker port to your microphone port)
-
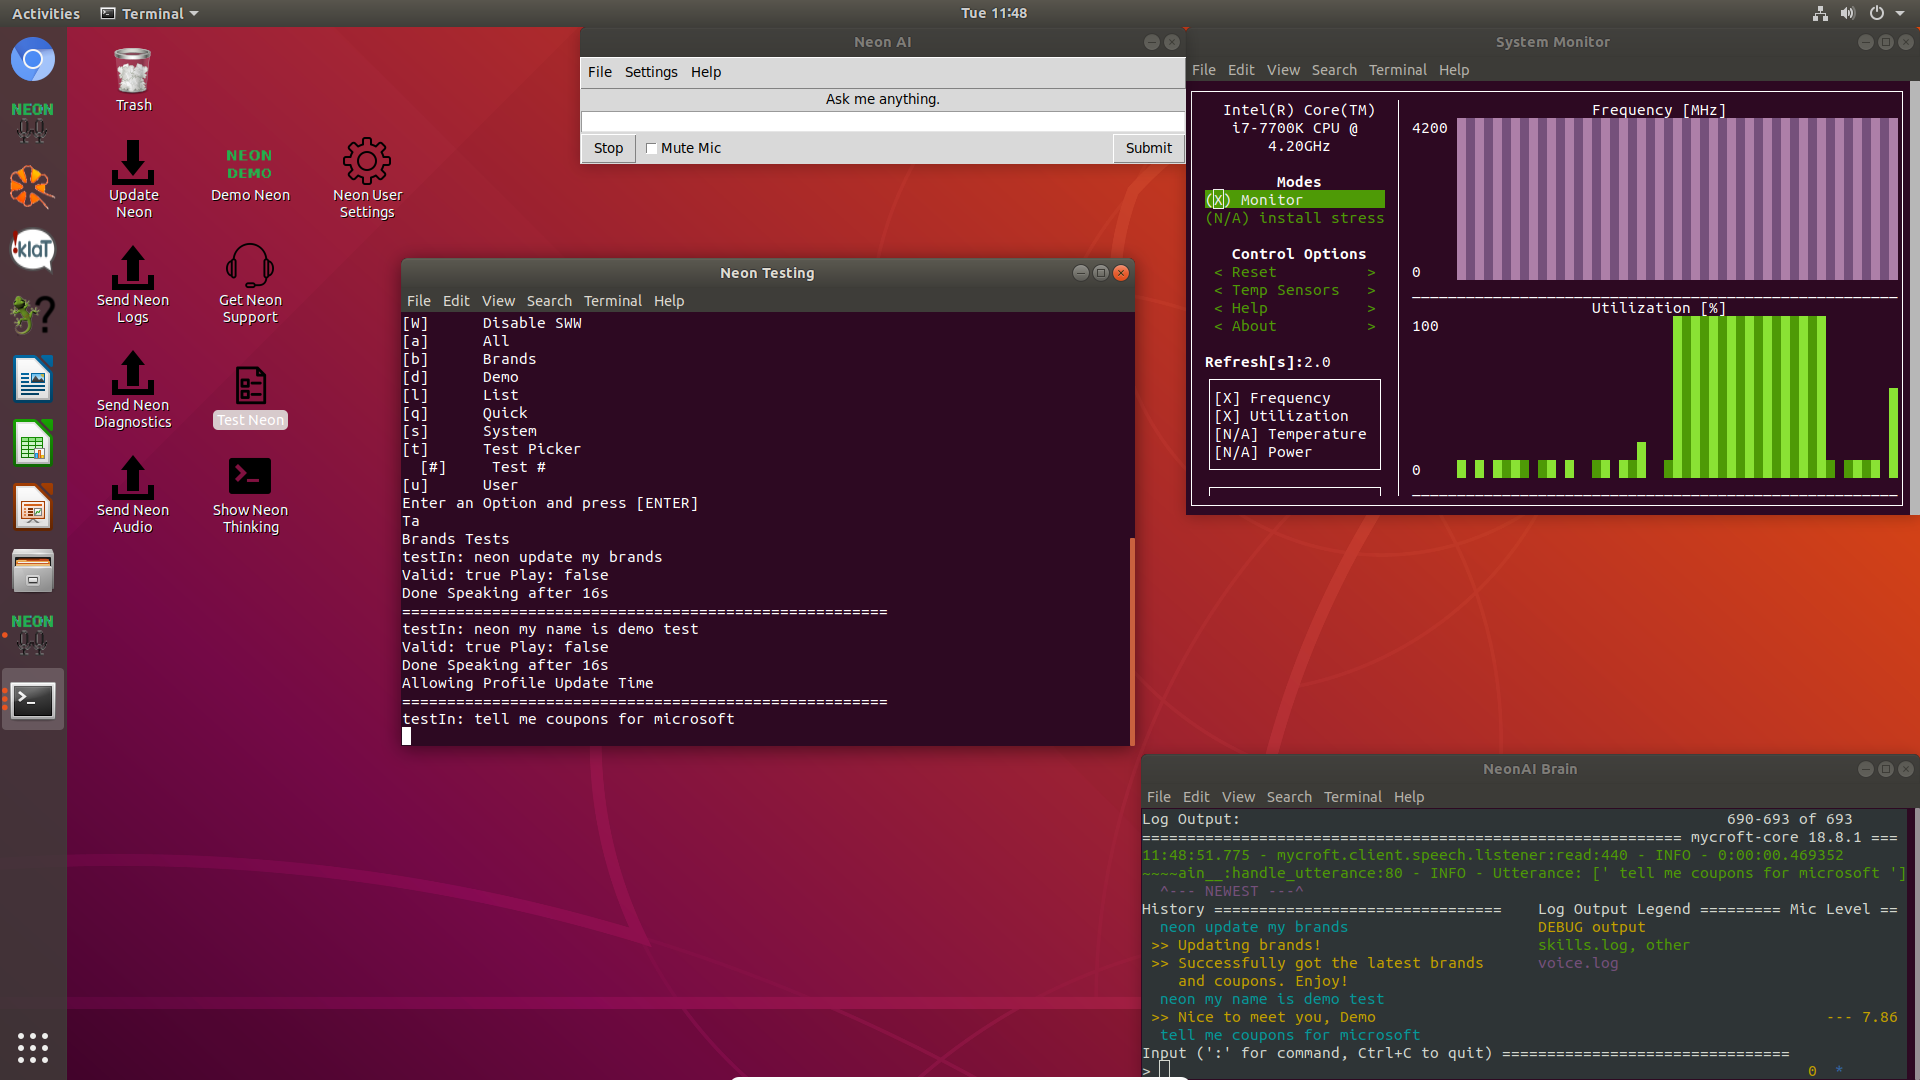
After selecting your options and pressing
Enter, you will see the test pass either text or audio to Neon. -
The
System Monitorwill show available statistics such as CPU Utilization, Temperature, and PowerNote: This data is saved with test results
-
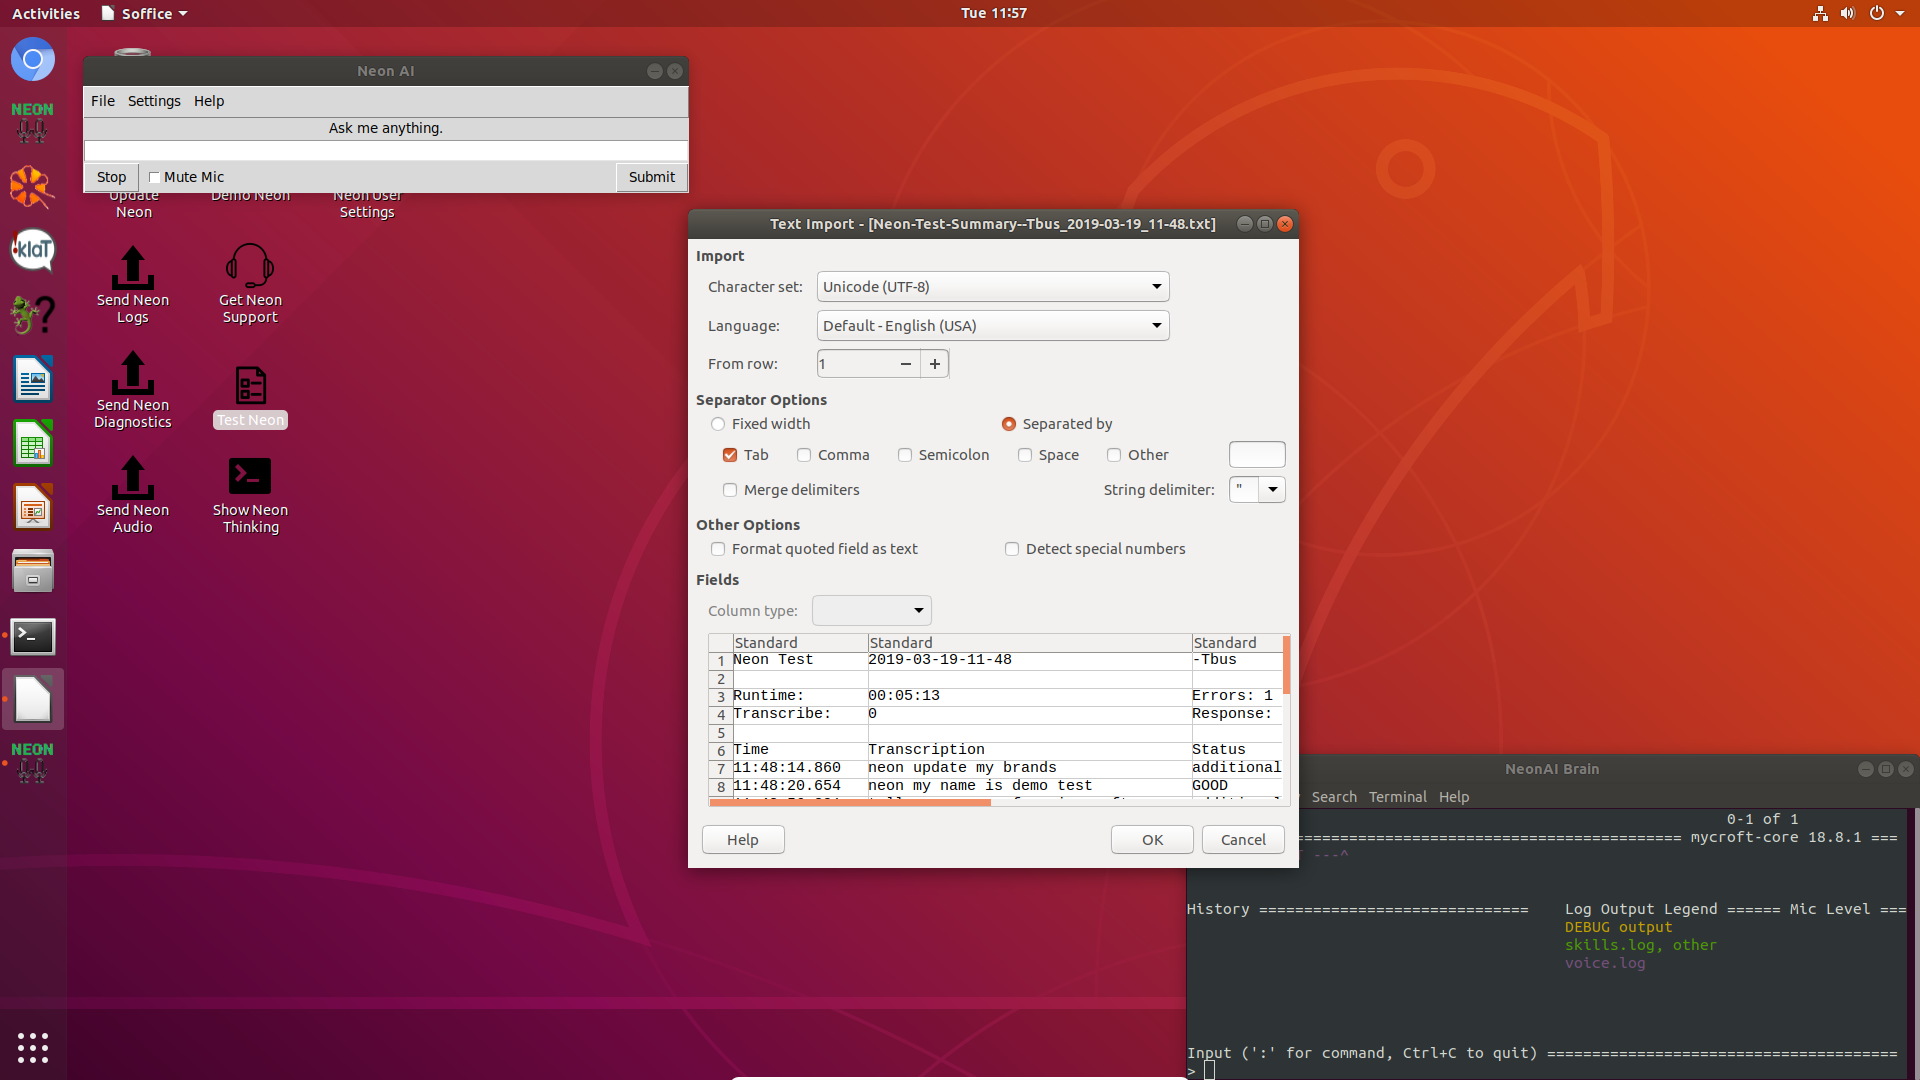
After the tests have completed, Neon will restart and you will see an option to review test results. The results are saved as
Tabseparated values, so make sure only theTaboption is selected. -
More complete logs and information can be found in the Diagnostics directory
By default, this is at
~\NeonAI\Diagnostics\testingfor Development Machines and~\Documents\NeonGecko\Diagnostics\testingfor User Machines.
If you encounter any of the following issues while using Neon, please try these troubleshooting steps
-
My computer is slow to respond
Check for high memory usage in
System Monitor. If your Memory and Swap both show 100% utilization underResources, try exiting PyCharm and Neon AI. If there is still abnormal memory usage, open a Terminal and type in:sudo systemctl stop openhab2.service
If you can determine the offending program, see if restarting the program or your computer resolves your issues. If not, you may find common solutions online.
-
Neon AI is not transcribing anything I say
Check that your microphone is working and active by going to
SoundtheSettingsMenu. Go to theInputtab and make sure the correct microphone is selected. Make sure theInput Levelis up and turned on and look for activity on theInput Levelbar when you tap the mic. If you change devices here, restart Neon AI. -
Some audio is very quiet, while other audio is louder
Check that the audio level for the affected application is turned up by going to
SoundtheSettingsMenu. Go to theApplicationstab.For quiet responses from Neon, ask Neon something with a longer response (ex. "Tell me a joke"). When an application named
neon-voiceappears, make sure it is not muted and that the volume is set to the maximum. Do the same for any other applications that are too quiet; start playing something and check the Application's volume. -
AVMusic will not pause or resume
If AVMusic playback is changed by something other than Neon, the skill can lose track of whether something is playing or paused. If something is paused and Neon will not resume, you may say "pause" to resume playback. "Stop" should work in any case.
-
Errors in the log when installing or updating Neon
Installation of dlib can fail if system memory is completely full; you can open System Monitor during installation or updates to monitor memory usage. A minimum 2GB RAM is required, 4GB+ recommended. Errors may also occur if system storage becomes full. You may monitor storage availability in System Monitor as well; keep in mind that cached files will be removed when installation fails, so your file system will show some available space before and after the error occurs.
-
Any other issues
If you encounter any other issues while using Neon, they can often be solved by restarting Neon or your computer. If this does not resolve you issue, please contact support at [email protected].
After completing setup and testing, you are ready to begin making changes and creating skills. An example workflow for making a change would be:
- Make any changes to the
coreorskills - Test changes in the Developer Environment (Look for errors in logs, unexpected behaviour, etc)
- Run
Test Neonto check that all skills and TTS/STT behave as expected - Commit and Push changes to git
- Check for updates in User Environment
- Run complete tests using
Test Neon - Check logs for any errors
There are two aspects of the Neon AI system: core and skills.
The core is composed of several modules, but generally includes:
speechfor handling user inputs and performing speech-to-text (STT)skillsfor processing user input to find intent and provide a responseaudiofor speaking the response generated in skillsbusfor handling all communications between modules
Other modules may also be running for gui functionality, etc and may be added to provide new functionality.
skills provide the functionality of handling user inputs and generating responses or performing actions.
Check out our three part youtube series on how to create a skill: https://youtu.be/fxg25MaxIcE https://youtu.be/DVSroqv6E6k https://youtu.be/R_3Q-P3pk8o
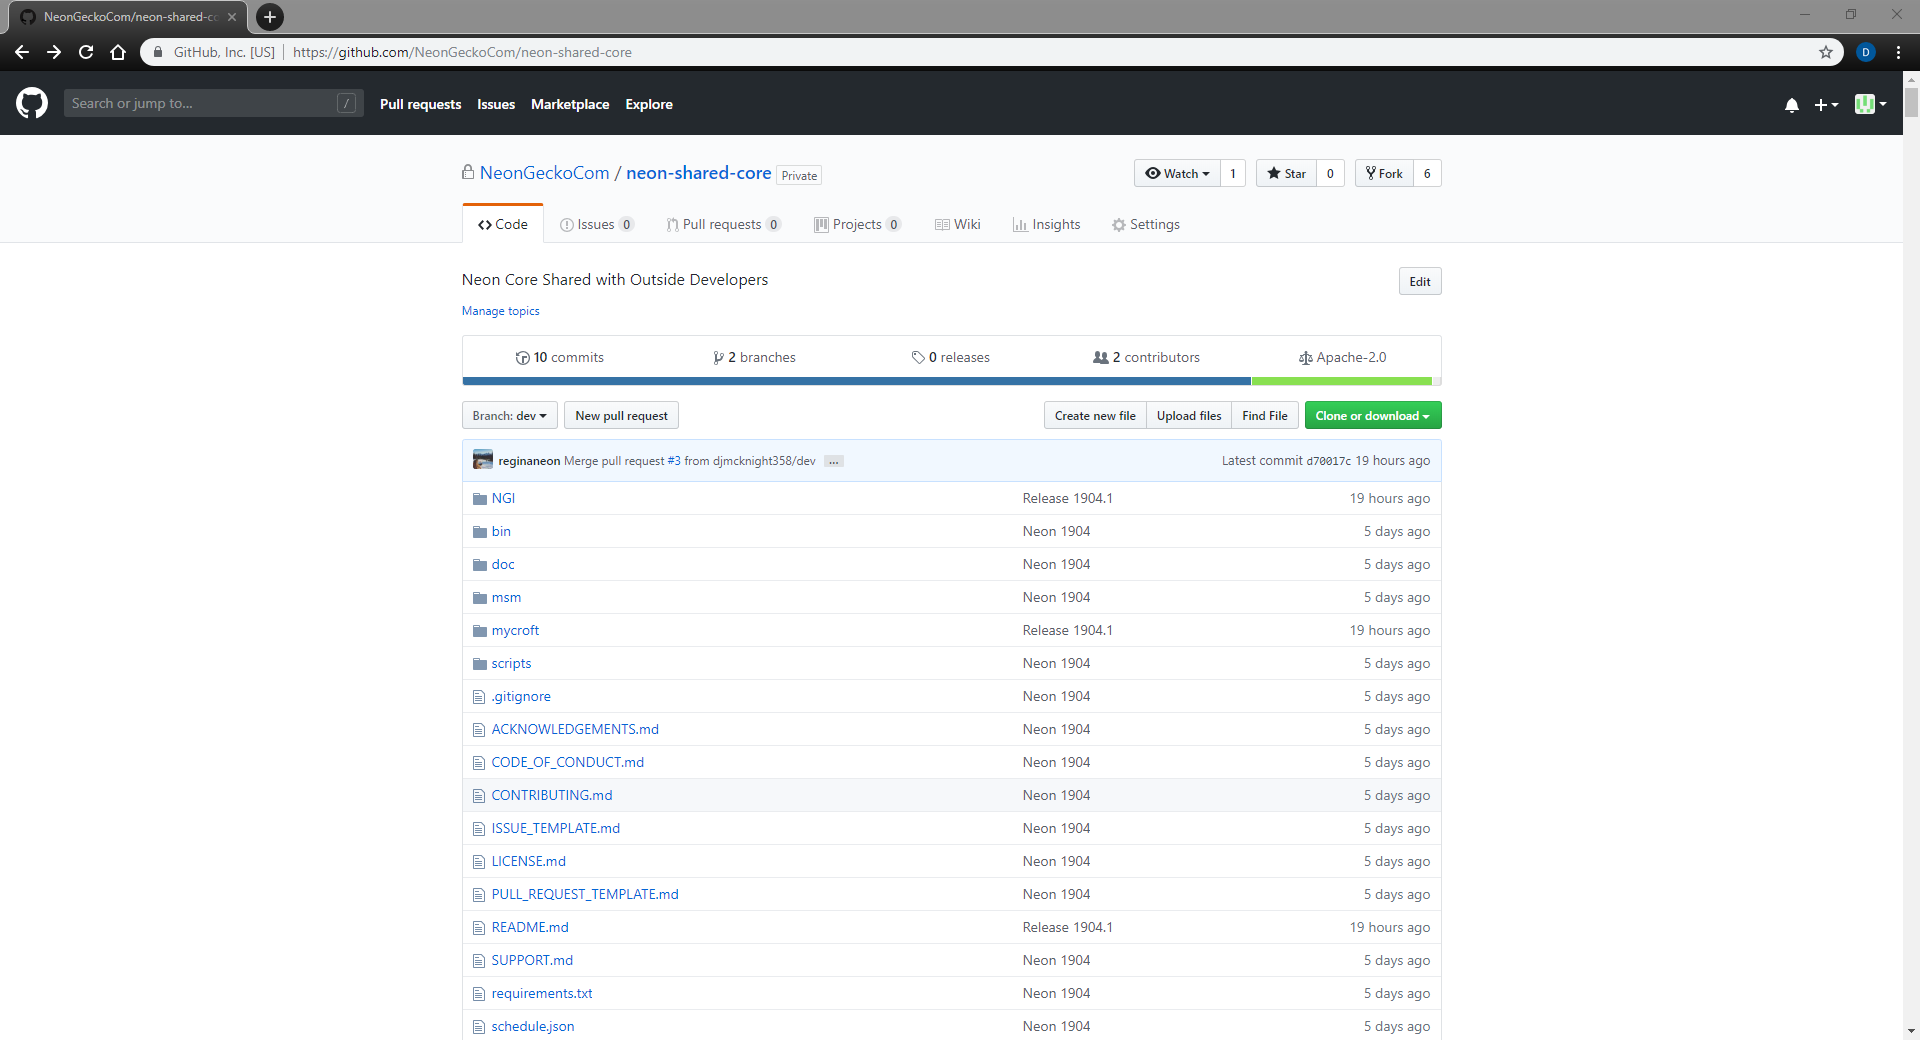
Neongecko will regularly release updates to the Neon core and skills via GitHub. It is recommended that you merge these updates into your own fork so that you get the latest feature updates and bug fixes. To update your repository to the latest release:
- Go to GitHub and sign in.
- Go to the Neongecko neon-shared-core repository.
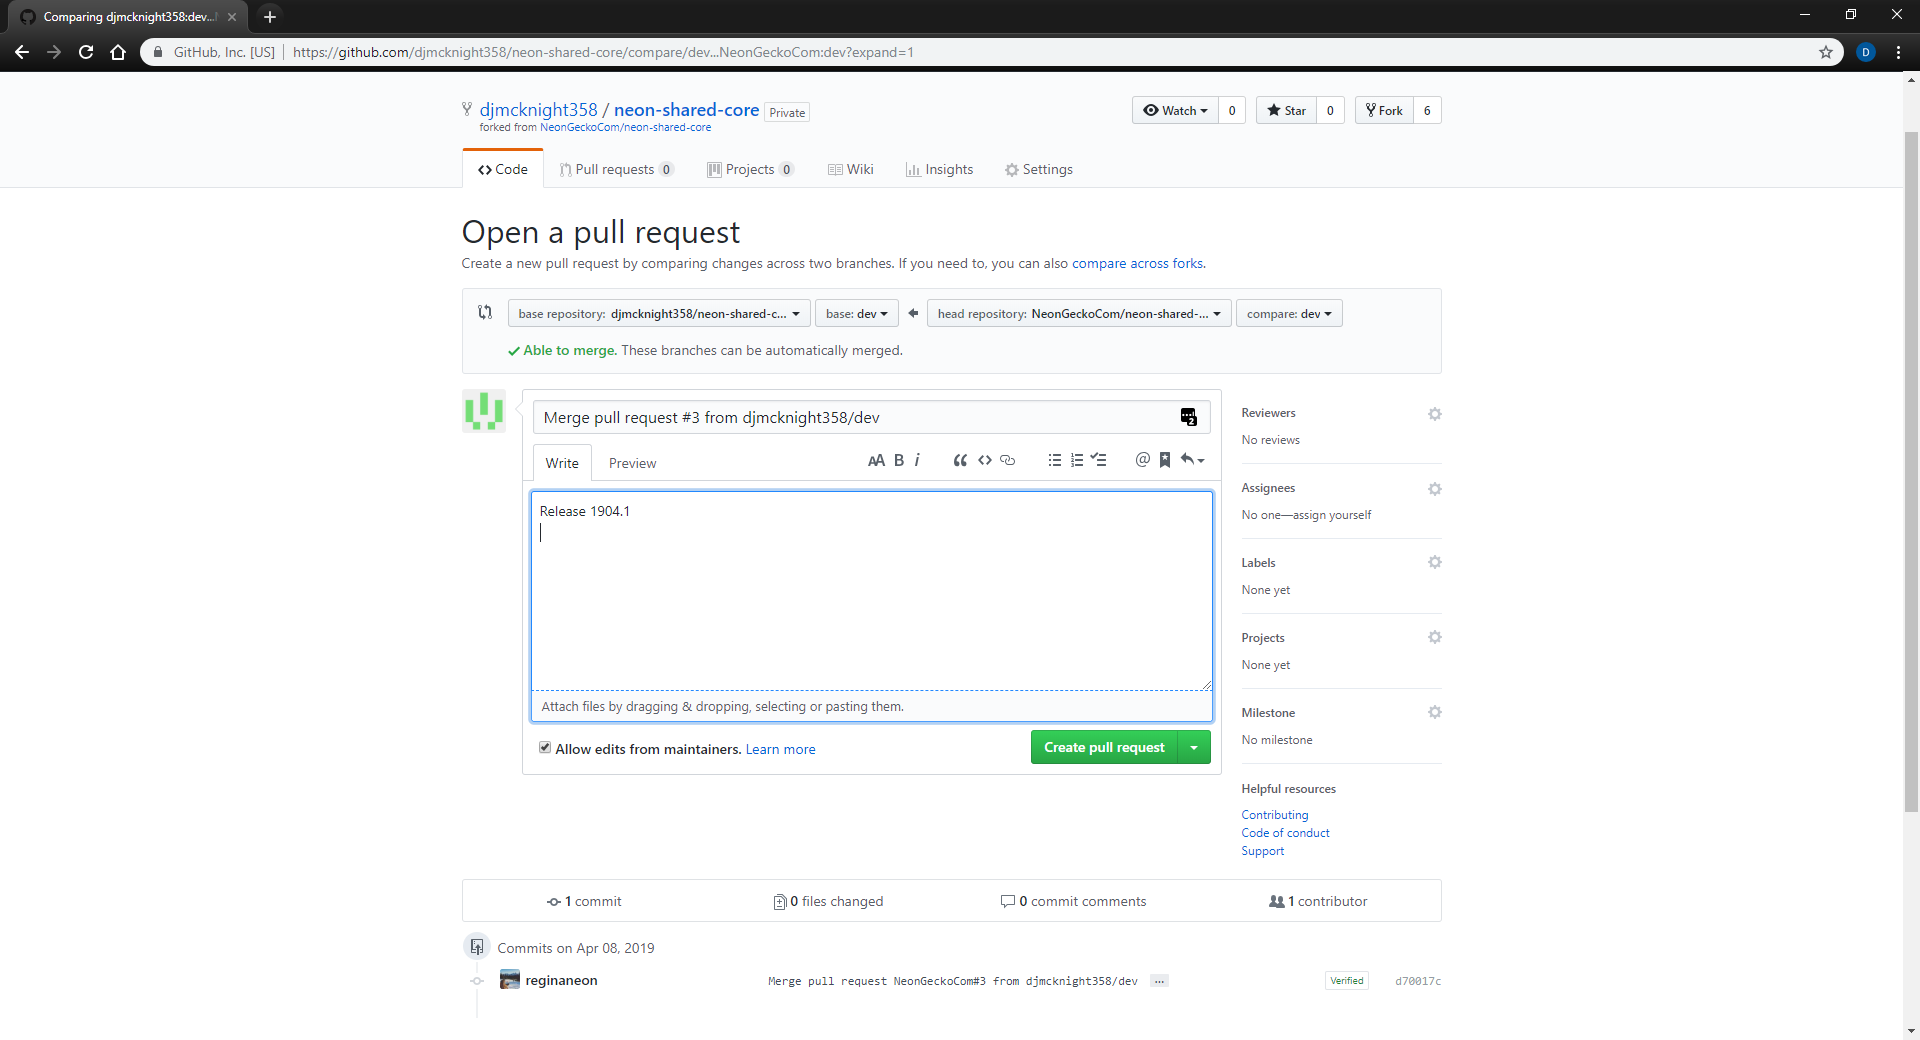
- Open a
New pull request - Click
compare across forks - Select your forked repository from the
base repositorydrop-down on the left - You may modify the pull request title and description (optional)
Note: All changes are displayed per file on this page. You may want to change the title for your own reference later.
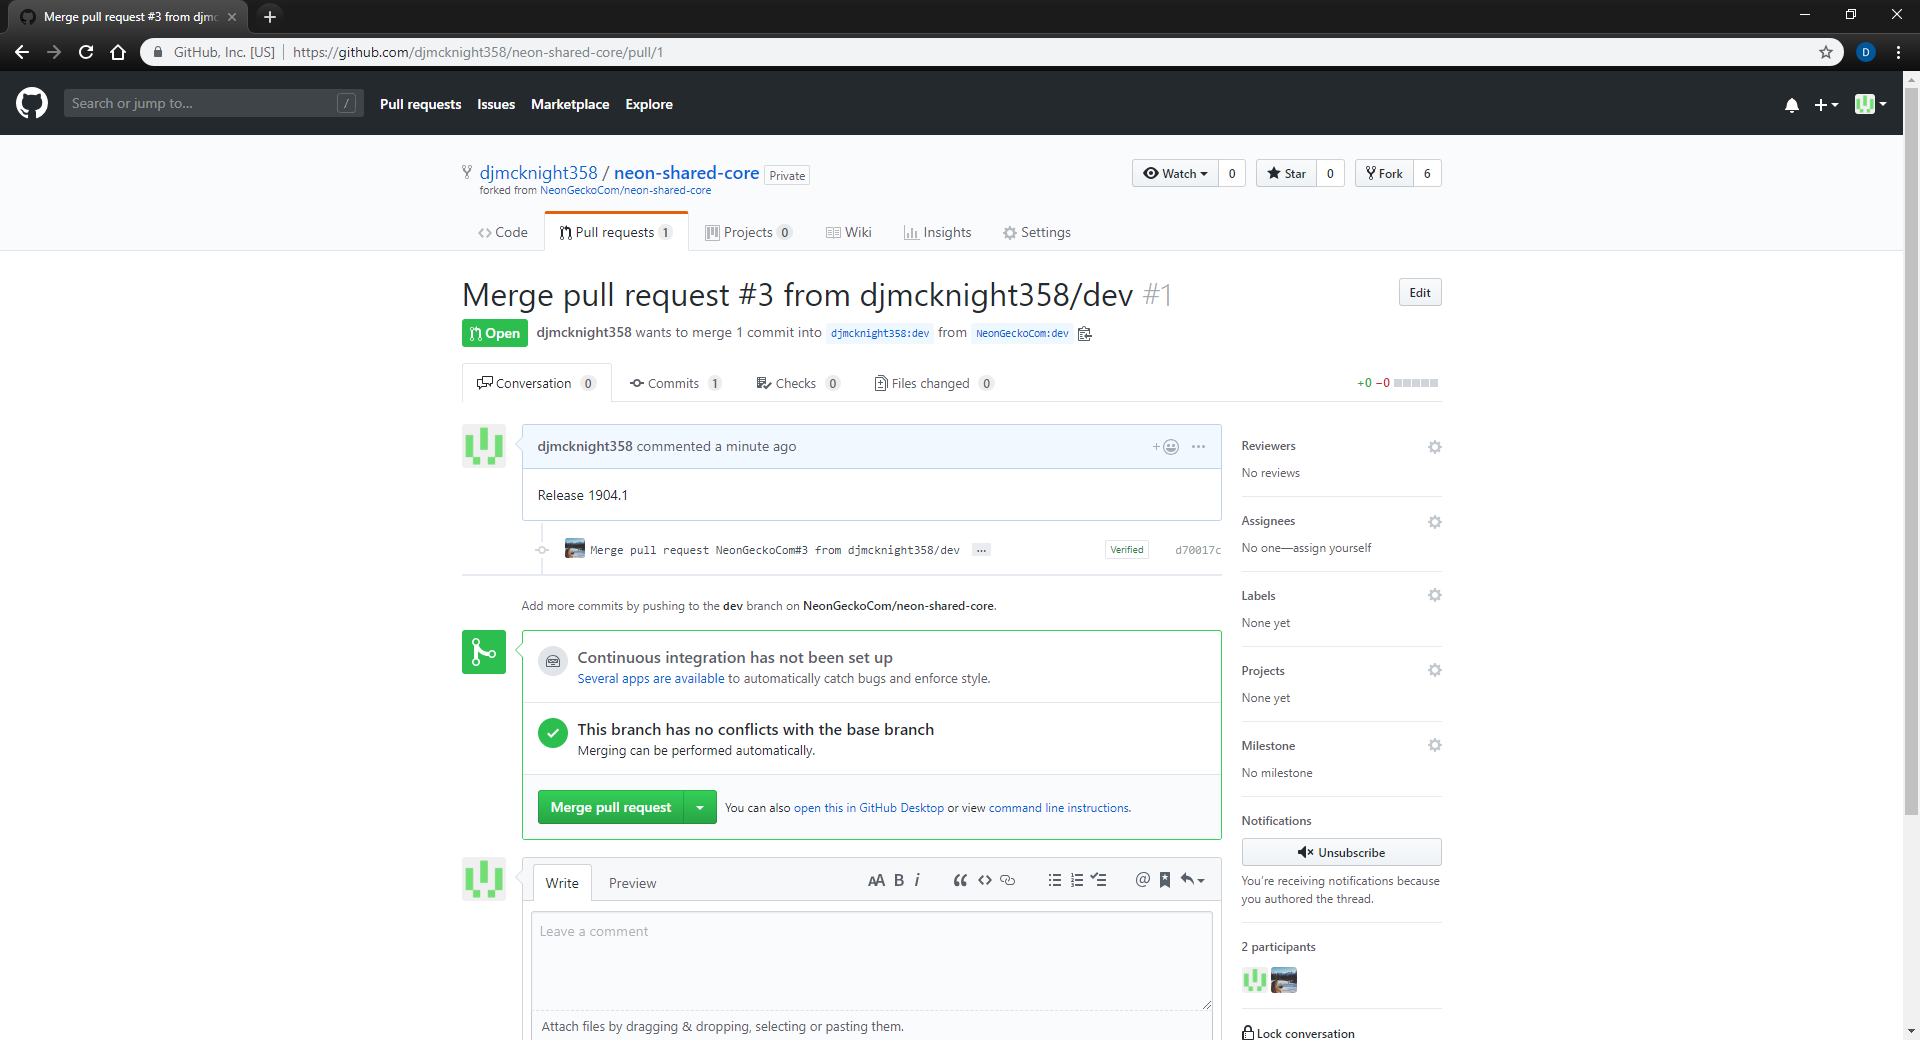
- Click
Create pull requestafter you have reviewed the changes - Click
Merge pull requeston the next page to finish merging the changes to your branch - Go to the Neongecko neon-skills-submodules and repeat
the above steps to update your skills
Note: If you have modified your forked submodules repository, you may want to update the submodules in your repository instead of pulling changes here. You can find more information about submodules here.
- You are now using the latest release of Neon AI, make sure to update any installations if they are not set to update automatically
- Use the desktop shortcut
Update Neonor File menu optionCheck for Updatesto update Neon
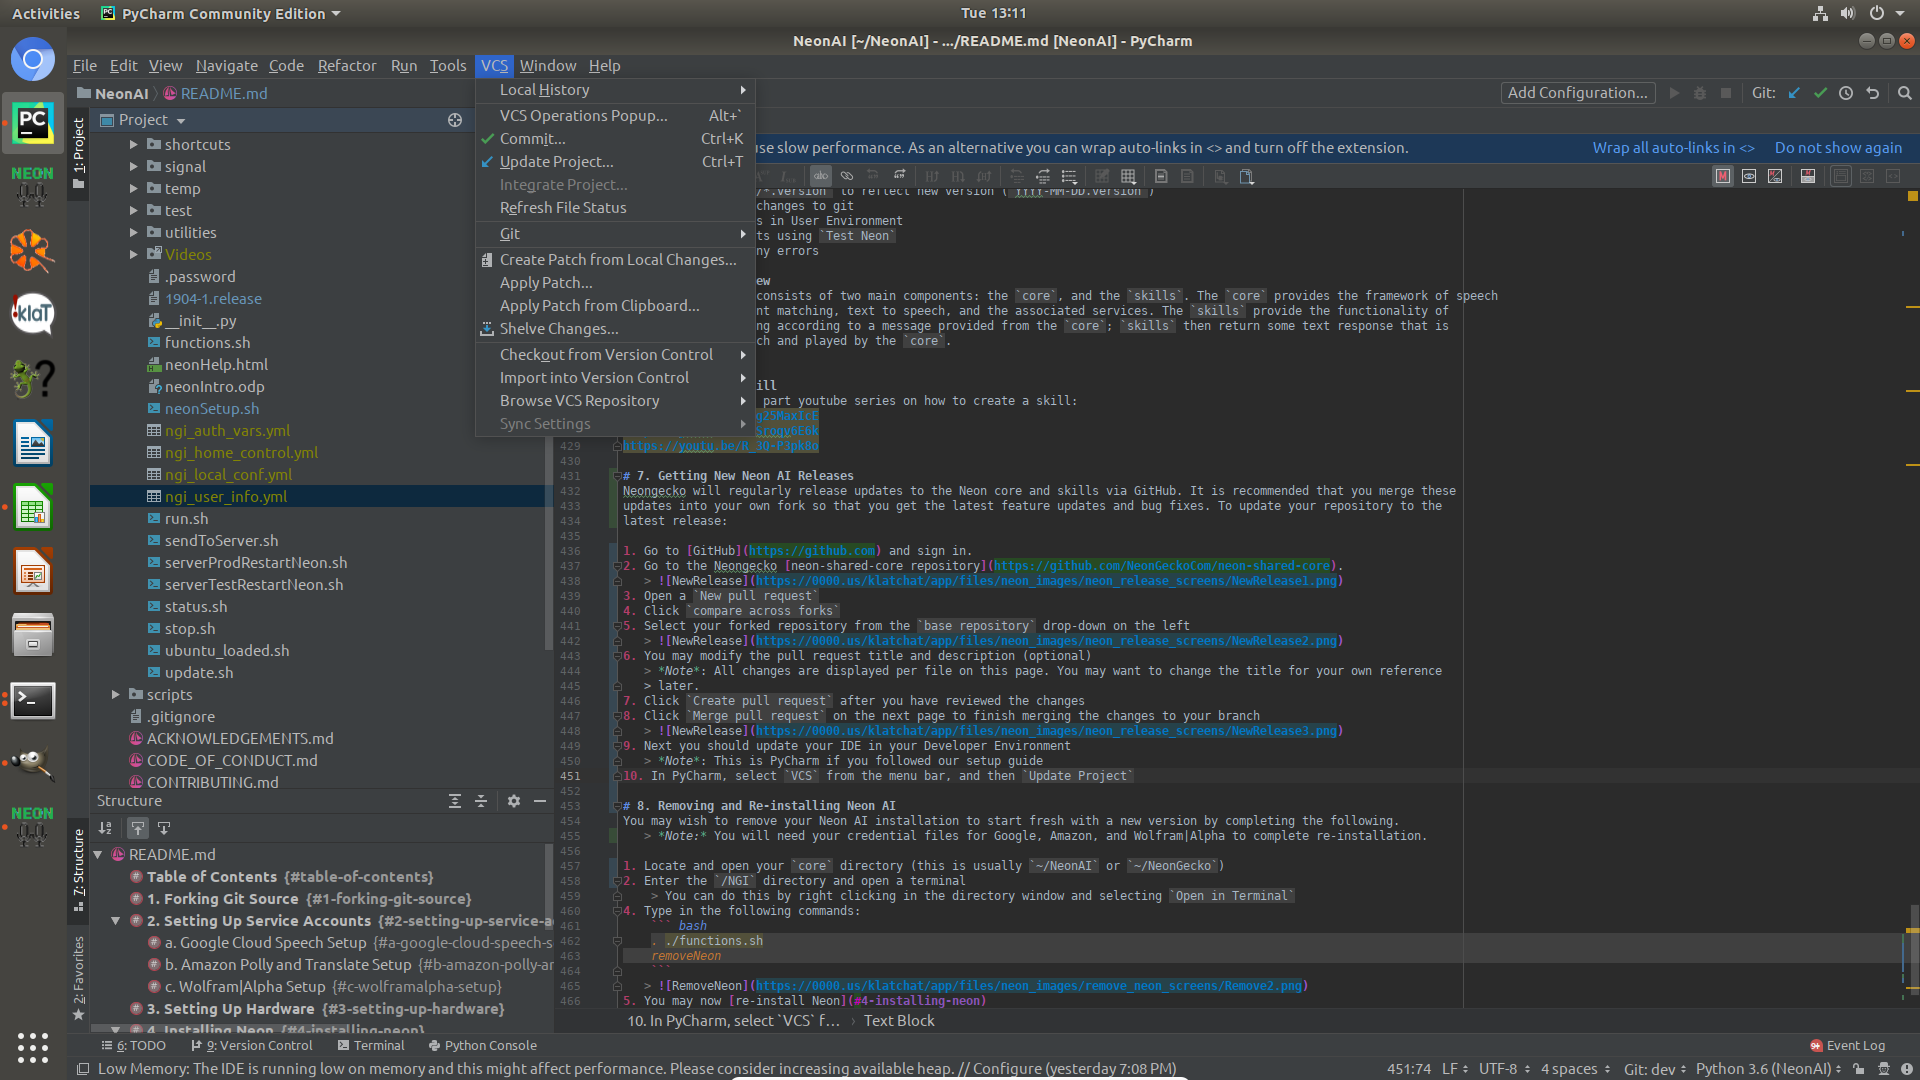
- Next you should update your IDE in your Developer Environment
Note: This is PyCharm if you followed our setup guide.
- In PyCharm, select
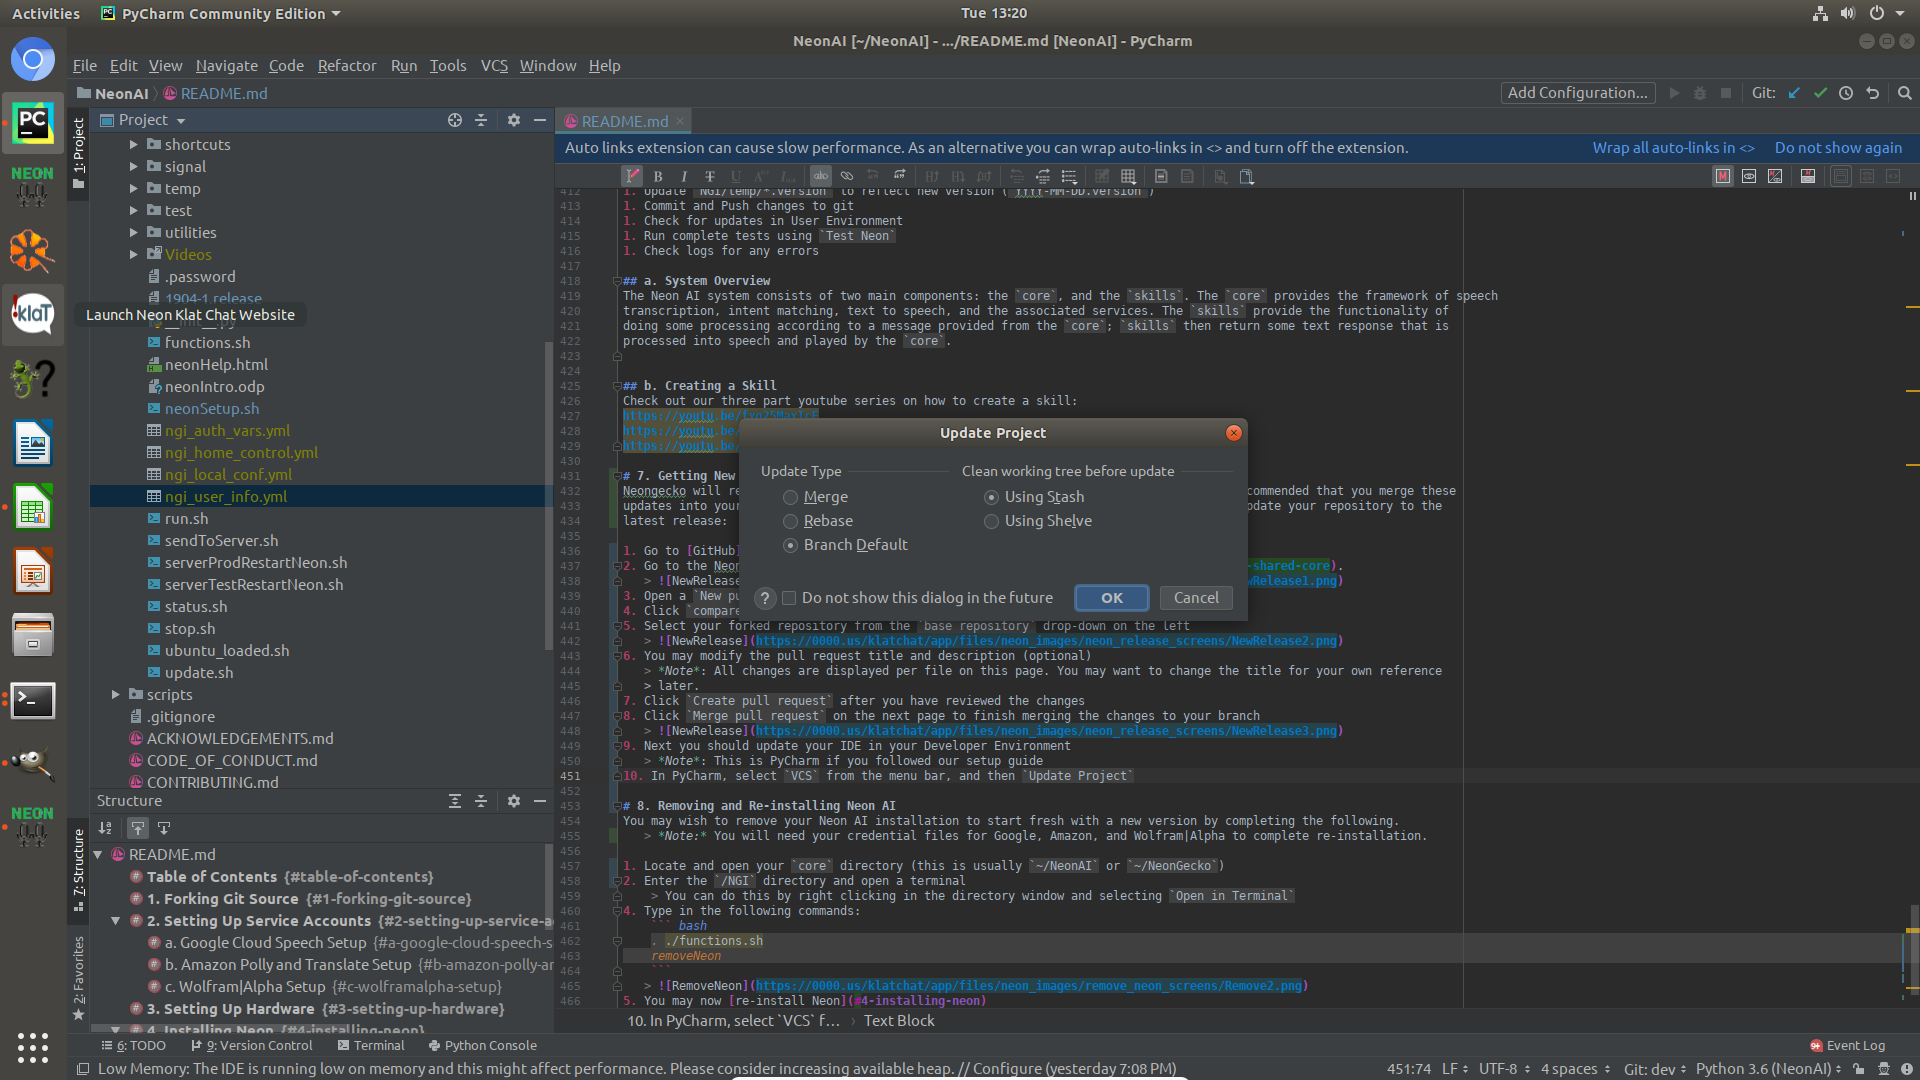
VCSfrom the menu bar, and thenUpdate Project - You will be prompted to
Update Project, you may leave the default settings and clickOK
You may wish to remove your Neon AI installation to start fresh with a new version. Below is a list of locaitons where Neon may have saved files:
Note: You will need your credential files for Google, Amazon, and Wolfram|Alpha to complete re-installation.
~/.neon~/.local/share/neon~/.local/cache/neon/opt/neon/tmp/neon~/Documents/NeonGecko~/Pictures/NeonGecko~/Videos/NeonGecko~/Music/NeonGecko
- You may now re-install Neon