Lesson4
- Asynchronous vs Multithreading
- Asynchronous & Multithreading in C#
- More XAML Data Binding
- Issues with Parallel Processing
What is asynchronous programming?
It means that multiple tasks can yield control to each other. This is usually used when a task is purely waiting for something, such as waiting for response from server.
For the diagram above, imagine
- Task 1 - Server call to get data
- Task 2 - Run the spinning wheel UI
- Task 3 - Data processing
Sequence of events:
- Task 1 calls the server
- Task 1 waits for server to respond
- Task 1 lets task 2 run while it is waiting
- Task 1 obtains response from server, so task 1 takes over again (task 2 is temporarily suspended)
- Task 1 launches Task 3 as it finishes
- Task 2 is resumed when Task 3 finishes
Result: It can seem as if Task 1,2,3 are run in parallel, but in reality they are not, they are just yielding control over to each other.
What is multithreading?
Based on the diagram in the previous section, basically multithreading is running all 3 tasks at the same time, using 3 CPU cores (if available). This is true parallel processing, unlike asynchronous. Typically for a 2 core processor, you can only run 2 threads at the same time (without Intel Hyper-Threading).
Further explanation
Multithreading is a process of executing multiple threads simultaneously. So at this point we will ask our selves what a thread is . A thread is a lightweight subprocess, a smallest unit of processing. It is a separate path of execution. It shares the memory area of process. So in short, Multithreading is a technique that allows a program or a process to execute many tasks concurrently. at the same time and parallel. It allows a process to run its tasks in parallel mode on a single processor system.
async stands for asynchronous, while await stands for asynchronous wait.
- async is used to mark a function as async, which means it is a function that can yield control halfway and then jump back in when needed. Whenever a function with return type Task<T> is marked async, the function only needs to return a value of type T.
- await is used to yield control, and the target to be awaited has to be a Task
- Task represents an asynchronous operation in general
public static async Task AsyncConsolePrint(){
    for(int i = 0; i < 10; i++){
        Console.WriteLine(i);
        await Task.Delay(10); //yields control back to the function caller for 10ms
    }
}
Note that in Example 1 there is no need to return a Task, as the method is marked async which will remove the Task wrapper, so the function should only return void, even if the return type is marked as Task
Remember to include these in your file:
using System.Threading;
using System.Threading.Tasks;
Trying out example 1: Main function:
static void Main()
{
    Task task1 = AsyncConsolePrint();
    Console.WriteLine("Hello World");
    task1.Wait();
    Thread.Sleep(10000); // for some extra time for us to look at the console output
}
The "Hello World" will be printed while the AsyncConsolePrint is running, this is because during the await statement in AsyncConsolePrint the code execution will return to Main() before the await completes.
public static async Task<int> AsyncCalculate()
{
    Random rnd = new Random();
    int temp = 0;
    for (int i = 0; i < 1000; i++)
    {
        temp += rnd.Next(10); //adds a number from 0 to 9
    }

    return temp;
}
In Example 2, you would get warnings saying that the method runs synchronously. What this means is that throughout the entire function call, you never yielded control back to the caller, so it is not considered asynchronous!
Note: The return type of this function is Task<int> but we only return int from the function
public static async Task<int> AsyncCalculate()
{
    Random rnd = new Random();
    int temp = 0;
    await Task.Run(() =>
    {
        for (int i = 0; i < 1000; i++)
        {
            temp += rnd.Next(10); //adds a number from 0 to 9
        }
    });

    return temp;
}
In Example 3, we combine the concept of multithreading and asynchronous together. Task.Run will create a separate thread to run the function that is given inside. This will create a task, which we can asynchronously wait for. So now by awaiting this task we will yield control back to the caller before the function inside this thread finish running.
Note: The ()=>{} syntax is known as a lambda expression, also called an anonymous function. This is basically a function without a name, which allows you to declare a function inside a function.
Remember to include these in your file:
using System.Threading;
using System.Threading.Tasks;
Main function:
static void Main()
{
Task task1 = AsyncConsolePrint();
Task<int> task2 = AsyncCalculate();
Task task3 = AsyncConsolePrint();
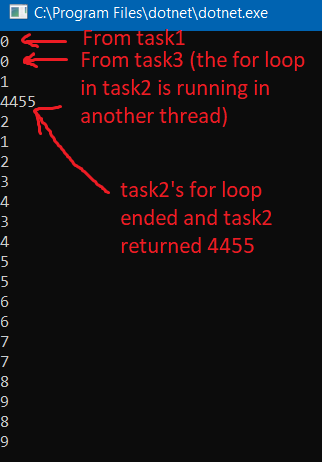
Console.WriteLine(task2.Result);
task1.Wait();
task3.Wait();
Thread.Sleep(5000); // for some extra time for us to look at the console output
}In case it is not clear what "yield control back to the caller means" from the previous section, it basically means continue running in Main() when the function reaches an await. This means when AsyncConsolePrint() reaches the await statement, Main() will run for 10ms before returning back to AsyncConsolePrint() to print another value.
Note that the entire program runs on the Main thread, with the exception of task2's for loop.
Sample console output:
Note that I am about to demonstrate horrible code that pretends to be async but is not. The function that you call will never return to the caller until it returns in this case, similar to a normal function.
Example:
public static Task BadAsync()
{
    for (int i = 0; i < 100; i++)
    {
        Console.Write(i);
    }
    Console.WriteLine("-------------");
    return Task.CompletedTask;
}
Because this function is not marked async, we need to return a Task instead of nothing.
This example is poison, try awaiting this inside AsyncConsolePrint() before the function returns, like so:
public static async Task AsyncConsolePrint()
{
    await BadAsync();
    for (int i = 0; i < 10; i++)
    {
        Console.WriteLine(i);
        await Task.Delay(10); //yields control back to the function caller for 10ms
    }
}
You will realise that when awaiting BadAsync() the program never goes back to Main()!!!! If you remove await Task.Delay, then this function just became truly synchronous... even when it is marked async...
The aim of this is to notify the UI for a re-rendering whenever a data has changed in the ViewModel. For example, when you set the Name property through a function inside the ViewModel, you will realise that the UI that is binded to the Name property will not update.
To demonstrate this, follow up on the code from the previous lesson, edit the Print() function to update the Name property. This is demonstrated below:
public class MainViewModel
{
    public string Name { get; set; }
    public string StudentId { get; set; }
    public string Email { get; set; }

    public ICommand ClickCommand {
        get { return new Xamarin.Forms.Command(Print); }
    }
    private void Print()
    {
        Debug.WriteLine($"Name is originally {Name}");
        Name = "New Name"
        Debug.WriteLine($"Name is now {Name}");
        Debug.WriteLine($"StudentId: {StudentId}");
        Debug.WriteLine($"Email: {Email}");
    }
}
Now verify that the text in the Entry does not update itself, even if the binded property's value has changed.
In order to notify the UI to update whenever a property in the ViewModel has changed, we need to implement the INotifyPropertyChanged interface to the ViewModel. This is done as such:
public class MainViewModel : INotifyPropertyChanged
{
    public string Name { get; set; }
    public string StudentId { get; set; }
    public string Email { get; set; }

    public ICommand ClickCommand {
        get { return new Xamarin.Forms.Command(Print); }
    }
    private void Print()
    {
        Debug.WriteLine($"Name is originally {Name}");
        Name = "New Name"
        Debug.WriteLine($"Name is now {Name}");
        Debug.WriteLine($"StudentId: {StudentId}");
        Debug.WriteLine($"Email: {Email}");
    }
    //INotifyPropertyChanged requirement
    public event PropertyChangedEventHandler PropertyChanged;

    //INotifyPropertyChanged helper
    protected virtual void OnPropertyChanged([CallerMemberName] string propertyName = null)
    {
        PropertyChanged?.Invoke(this, new PropertyChangedEventArgs(propertyName));
    }
}
Note: A helper function is also implemented, such that our code below will be easier to understand.
Now our requirement is to notify the UI to update whenever we set the Name property, so we override the setter of Name such that every time Name is set, the UI is notified. This can be done as such:
Original:
public string Name { get; set; }New:
private string _name;
public string Name
{
    get => _name;
    set
    {
        _name = value;
        PropertyChanged?.Invoke(this, new PropertyChangedEventArgs("Name"));
    }
}
What we have done here
The basic flow is:
- View bind to a ViewModel that implements INotifyPropertyChanged
- ViewModel invokes the PropertyChanged event required by INotifyPropertyChanged, with a string that corresponds to the name of the changed property, i.e. if the xaml binds to the Name property, then call PropertyChanged?.Invoke("Name")
- The UI will now know which property has changed and the UI will re-render accordingly, i.e. Updating the Entry that is binded to the Name property
Working from the stuff from last week,
public class MainViewModel : INotifyPropertyChanged
{
    public string Name { get; set; }
    public string StudentId { get; set; }
    public string Email { get; set; }

    public ICommand ClickCommand {
        get { return new Xamarin.Forms.Command(Print); }
    }
    private void Print()
    {
        Debug.WriteLine($"Name: {Name}");
        Debug.WriteLine($"StudentId: {StudentId}");
        Debug.WriteLine($"Email: {Email}");
    }
    //INotifyPropertyChanged requirement
    public event PropertyChangedEventHandler PropertyChanged;
}
The INotifyPropertyChanged requires an event called PropertyChanged, so just creating it will meet the requiment of the interface.