Demonstration 2
This demonstration consists of a series of activities used to introduce the RF Pipe radio model.
Background information for this demonstration includes:
This activity will introduce the RF Pipe radio model and show how to configure the model to mimic certain characterics of other waveforms.
-
Change directory into the Demonstration 2 directory
[me@host emane-tutorial]$ cd 2 -
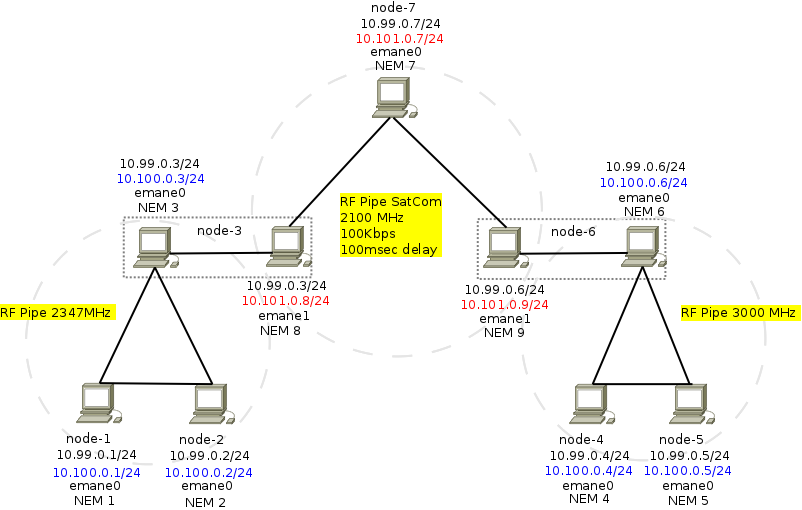
Starting this demonstration will produce the following network
Let's take a look at the platform.xml file and see how to configure this topology. This is the most complicated emulator configuration in the entire tutorial, but the basic mechanisms for configuring NEMs still hold.
<?xml version="1.0" encoding="UTF-8"?>
<!DOCTYPE platform SYSTEM "file:///usr/share/emane/dtd/platform.dtd">
<platform>
  <param name="otamanagerchannelenable" value="off"/>
  <param name="eventservicegroup" value="224.1.2.8:45703"/>
  <param name="eventservicedevice" value="lo"/>
  <param name="controlportendpoint" value="0.0.0.0:47000"/>

  <nem id="1" definition="rfpipenem.xml" transport="external">
    <param name="platformendpoint" value="10.99.0.100:8201"/>
    <param name="transportendpoint" value="10.99.0.1:8301"/>
    <transport definition="transvirtual.xml">
      <param name="address" value="10.100.0.1"/>
      <param name="mask" value="255.255.255.0"/>
    </transport>
    <phy>
      <param name="frequencyofinterest" value="2.347G"/>
      <param name="frequency" value="2.347G"/>
    </phy>
  </nem>

  <nem id="2" definition="rfpipenem.xml" transport="external">
    <param name="platformendpoint" value="10.99.0.100:8202"/>
    <param name="transportendpoint" value="10.99.0.2:8302"/>
    <transport definition="transvirtual.xml">
      <param name="address" value="10.100.0.2"/>
      <param name="mask" value="255.255.255.0"/>
    </transport>
    <phy>
      <param name="frequencyofinterest" value="2.347G"/>
      <param name="frequency" value="2.347G"/>
    </phy>
  </nem>

  <nem id="3" definition="rfpipenem.xml" transport="external">
    <param name="platformendpoint" value="10.99.0.100:8203"/>
    <param name="transportendpoint" value="10.99.0.3:8303"/>
    <transport definition="transvirtual.xml" group="3-8">
      <param name="address" value="10.100.0.3"/>
      <param name="mask" value="255.255.255.0"/>
    </transport>
    <phy>
      <param name="frequencyofinterest" value="2.347G"/>
      <param name="frequency" value="2.347G"/>
    </phy>
  </nem>

  <nem id="4" definition="rfpipenem.xml" transport="external">
    <param name="platformendpoint" value="10.99.0.100:8204"/>
    <param name="transportendpoint" value="10.99.0.4:8304"/>
    <transport definition="transvirtual.xml">
      <param name="address" value="10.100.0.4"/>
      <param name="mask" value="255.255.255.0"/>
    </transport>
    <phy>
      <param name="frequencyofinterest" value="3G"/>
      <param name="frequency" value="3G"/>
    </phy>
  </nem>

  <nem id="5" definition="rfpipenem.xml" transport="external">
    <param name="platformendpoint" value="10.99.0.100:8205"/>
    <param name="transportendpoint" value="10.99.0.5:8305"/>
    <transport definition="transvirtual.xml">
      <param name="address" value="10.100.0.5"/>
      <param name="mask" value="255.255.255.0"/>
    </transport>
    <phy>
      <param name="frequencyofinterest" value="3G"/>
      <param name="frequency" value="3G"/>
    </phy>
  </nem>

  <nem id="6" definition="rfpipenem.xml" transport="external">
    <param name="platformendpoint" value="10.99.0.100:8206"/>
    <param name="transportendpoint" value="10.99.0.6:8306"/>
    <transport definition="transvirtual.xml" group="9-6">
      <param name="address" value="10.100.0.6"/>
      <param name="mask" value="255.255.255.0"/>
    </transport>
    <phy>
      <param name="frequencyofinterest" value="3G"/>
      <param name="frequency" value="3G"/>
    </phy>
  </nem>

  <nem id="7" definition="satcomnem.xml" transport="external">
    <param name="platformendpoint" value="10.99.0.100:8207"/>
    <param name="transportendpoint" value="10.99.0.7:8307"/>
    <transport definition="transvirtual.xml">
      <param name="address" value="10.101.0.7"/>
      <param name="mask" value="255.255.255.0"/>
    </transport>
  </nem>

  <nem id="8" definition="satcomnem.xml" transport="external">
    <param name="platformendpoint" value="10.99.0.100:8208"/>
    <param name="transportendpoint" value="10.99.0.3:8308"/>
    <transport definition="transvirtual.xml" group="3-8">
      <param name="device" value="emane1"/>
      <param name="address" value="10.101.0.8"/>
      <param name="mask" value="255.255.255.0"/>
    </transport>
  </nem>

  <nem id="9" definition="satcomnem.xml" transport="external">
    <param name="platformendpoint" value="10.99.0.100:8209"/>
    <param name="transportendpoint" value="10.99.0.6:8309"/>
    <transport definition="transvirtual.xml" group="9-6">
      <param name="device" value="emane1"/>
      <param name="address" value="10.101.0.9"/>
      <param name="mask" value="255.255.255.0"/>
    </transport>
  </nem>
</platform>
The first thing you probably noticed is that all of the NEMs in this demonstration will be instantiated by a single emulator instance. Depending on your scenario and radio model resource requirements, there may be performance issues when running multiple NEMs per emulator instance. In this case, we'll be fine.
This demonstration creates 3 RF Pipe networks at difference frequencies:
- 2.1GHz SatCom network
- 2.347GHz Radio Network
- 3GHz Radio Network
All three networks have 3 NEMs each. Each Radio Network contains one test node with two transport boundary instances. These transport boundary instances are associated with two vifs: emane0 and emane1. The olsrd routing protocol is configured to route traffic between the two interfaces. We can think of these two test nodes: node-3 and node-6 as multichannel gateways.
There are two NEM definitions being used: rfpipenem.xml and satcomnem.xml. Both use the same rfpipemac.xml definition so we can start there.
<?xml version="1.0" encoding="UTF-8"?>
<!DOCTYPE mac SYSTEM "file:///usr/share/emane/dtd/mac.dtd">
<mac library="rfpipemaclayer">
  <param name="enablepromiscuousmode" value="off"/>
  <param name="datarate"              value="1M"/>
  <param name="jitter"                value="0"/>
  <param name="delay"                 value="0"/>
  <param name="flowcontrolenable"     value="off"/>
  <param name="flowcontroltokens"     value="10"/>
  <param name="pcrcurveuri"
         value="file:///usr/share/emane/xml/models/mac/rfpipe/rfpipepcr.xml"/>
</mac>
For this demonstration we are interested in the following two RF Pipe parameters:
The rfpipenem.xml definition does not override any of the radio model parameters in rfpipemac.xml. Unless configuration parameters are specified in a <mac> element as part of an NEM using the rfpipenem.xml definition , the radio model values in rfpipemac.xml will be used.
<?xml version="1.0" encoding="UTF-8"?>
<!DOCTYPE nem SYSTEM "file:///usr/share/emane/dtd/nem.dtd">
<nem>
  <transport definition="transvirtual.xml"/>
  <mac definition="rfpipemac.xml"/>
  <phy>
    <param name="fixedantennagain"         value="0.0"/>
    <param name="fixedantennagainenable"   value="on"/>
        <param name="bandwidth"                value="1M"/>
    <param name="noisemode"                value="outofband"/>
    <param name="propagationmodel"         value="precomputed"/>
    <param name="systemnoisefigure"        value="4.0"/>
    <param name="subid"                    value="2"/>
    <param name="txpower"                  value="0.0"/>
  </phy>
</nem>
The satcomnem.xml definition overrides the datarate and the delay parameters. Unless the same configuration parameters are specified in a <mac> element as part of an NEM using the satcomnem.xml definition, these values for datarate and delay will be used.
The satcomnem.xml definition also changes the default transmit frequency to 2.1GHz. You must add every frequency that you intend to receive on to the physical layer's frequencyofinterest parameter. It is not enough to just set frequency.
<?xml version="1.0" encoding="UTF-8"?>
<!DOCTYPE nem SYSTEM "file:///usr/share/emane/dtd/nem.dtd">
<nem>
  <transport definition="transvirtual.xml"/>
  <mac definition="rfpipemac.xml">
    <param name="datarate"                 value="100K"/>
    <param name="delay"                    value=".1"/>
  </mac>
  <phy>
    <param name="fixedantennagain"         value="0.0"/>
    <param name="fixedantennagainenable"   value="on"/>
    <param name="bandwidth"                value="1M"/>
    <param name="noisemode"                value="outofband"/>
    <param name="propagationmodel"         value="precomputed"/>
    <param name="systemnoisefigure"        value="4.0"/>
    <param name="txpower"                  value="0.0"/>
    <param name="subid"                    value="10"/>
    <param name="frequencyofinterest"      value="2.1G"/>
    <param name="frequency"                value="2.1G"/>
  </phy>
</nem>
You probably also noticed that this demonstration uses external transports. Take a closer look at the NEM 1 definition in patform.xml.
<nem id="1" definition="rfpipenem.xml" transport="external">
  <param name="platformendpoint" value="10.99.0.100:8201"/>
  <param name="transportendpoint" value="10.99.0.1:8301"/>
  <phy>
    <param name="frequencyofinterest" value="2.347G"/>
    <param name="frequency" value="2.347G"/>
  </phy>
  <transport definition="transvirtual.xml">
    <param name="address" value="10.100.0.1"/>
    <param name="mask" value="255.255.255.0"/>
  </transport>
</nem>
The <nem> element's transport attribute is set to external and both platformendpoint and transportendpoint parameters are set. NEM 1 will transmit messages destined for its respective transport boundary to 10.99.0.1:8301. Likewise, it will listen on an endpoint bound to 10.99.0.100:8201 for messages sent by its respective transport boundary. These transport messages are sent via UDP datagrams.
Let's take a look at transportdaemon1.xml. This is the XML input file for emanetransportd, the application instantiating the external transport for NEM 1.
<?xml version='1.0' encoding='UTF-8'?>
<!DOCTYPE transportdaemon SYSTEM "file:///usr/share/emane/dtd/transportdaemon.dtd">
<transportdaemon>
  <instance nemid="1">
    <param name="platformendpoint" value="10.99.0.100:8201"/>
    <param name="transportendpoint" value="10.99.0.1:8301"/>
    <transport definition="transvirtual.xml">
      <param name="mask" value="255.255.255.0"/>
      <param name="address" value="10.100.0.1"/>
    </transport>
  </instance>
</transportdaemon>
You might be thinking: Wow, that is pretty redundant. It is all the same information. If so, you are correct. No worries, 99.9% of the time you will not have to hand edit emanetransportd configuration. You can use the emanegentransportxml script to generate the required input files from platform XML.
[me@chaos 2]$ chmod u+w transportdaemon?.xml && emanegentransportxml -v platform*.xml
processing XML: platform.xml
processing XML: rfpipenem.xml
processing XML: transvirtual.xml
processing XML: rfpipenem.xml
processing XML: transvirtual.xml
processing XML: rfpipenem.xml
processing XML: transvirtual.xml
processing XML: rfpipenem.xml
processing XML: transvirtual.xml
processing XML: rfpipenem.xml
processing XML: transvirtual.xml
processing XML: rfpipenem.xml
processing XML: transvirtual.xml
processing XML: satcomnem.xml
processing XML: transvirtual.xml
processing XML: satcomnem.xml
processing XML: transvirtual.xml
processing XML: satcomnem.xml
processing XML: transvirtual.xml
generating XML: transportdaemon1.xml
generating XML: transportdaemon2.xml
generating XML: transportdaemon3.xml
generating XML: transportdaemon4.xml
generating XML: transportdaemon5.xml
generating XML: transportdaemon6.xml
generating XML: transportdaemon7.xml
The chmod u+w transportdaemon?.xml portion of the command was only required if you would like to try now for yourself. The tutorial test flow generates these files for you and makes them read-only as a reminder that you don't need to edit them.
-
Start the demonstration with demo-start.
[me@host 2]$ sudo ./demo-start -
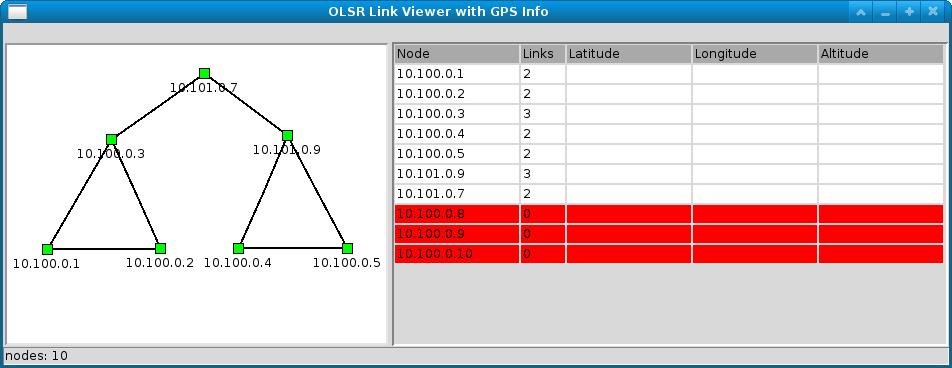
Start up the OLSR topology viewer
[me@host 2]$ ../scripts/olsrlinkview.py &After events are published (roughly 30 seconds after demo-start) and dragging your nodes around the topology canvas you should see something that looks like this:
-
Lets see what emanesh can tell us about the running emulation. We can use the show command to see which NEMs are running in the emulator instance and get config to see the running configuration.
In this demonstration, the emulator instance is running on the host so we can connect to the EMANE Shell via locahost.
[me@host ~]$ emanesh localhost
[emanesh (localhost:47000)] ## show
nem 1   mac(rfpipemaclayer) phy(emanephy)
nem 2   mac(rfpipemaclayer) phy(emanephy)
nem 3   mac(rfpipemaclayer) phy(emanephy)
nem 4   mac(rfpipemaclayer) phy(emanephy)
nem 5   mac(rfpipemaclayer) phy(emanephy)
nem 6   mac(rfpipemaclayer) phy(emanephy)
nem 7   mac(rfpipemaclayer) phy(emanephy)
nem 8   mac(rfpipemaclayer) phy(emanephy)
nem 9   mac(rfpipemaclayer) phy(emanephy)
[emanesh (localhost:47000)] ## get config nems mac delay
nem 1   mac  delay = 0.0
nem 2   mac  delay = 0.0
nem 3   mac  delay = 0.0
nem 4   mac  delay = 0.0
nem 5   mac  delay = 0.0
nem 6   mac  delay = 0.0
nem 7   mac  delay = 0.10000000149
nem 8   mac  delay = 0.10000000149
nem 9   mac  delay = 0.10000000149
[emanesh (localhost:47000)] ## get config nems phy frequency frequencyofinterest
nem 1   phy  frequency = 2347000000
nem 1   phy  frequencyofinterest = 2347000000
nem 2   phy  frequency = 2347000000
nem 2   phy  frequencyofinterest = 2347000000
nem 3   phy  frequency = 2347000000
nem 3   phy  frequencyofinterest = 2347000000
nem 4   phy  frequency = 3000000000
nem 4   phy  frequencyofinterest = 3000000000
nem 5   phy  frequency = 3000000000
nem 5   phy  frequencyofinterest = 3000000000
nem 6   phy  frequency = 3000000000
nem 6   phy  frequencyofinterest = 3000000000
nem 7   phy  frequency = 2100000000
nem 7   phy  frequencyofinterest = 2100000000
nem 8   phy  frequency = 2100000000
nem 8   phy  frequencyofinterest = 2100000000
nem 9   phy  frequency = 2100000000
nem 9   phy  frequencyofinterest = 2100000000
All get commands are similar, if you do not specify a name it will retrieve everything. You should also try hitting the Tab key. The shell does a smart auto-complete of all statistic, statistic table, and configuration parameter names, as well as NEM Ids present and their layers. If you do a get or a set on different model layers at the same time using all, the auto-complete will only show you the union of the item types you are requesting.
[emanesh (localhost:47000)] ## get config 1 all nem 1 mac datarate = 1000000 nem 1 mac delay = 0.0 nem 1 mac enablepromiscuousmode = False nem 1 mac flowcontrolenable = False nem 1 mac flowcontroltokens = 10 nem 1 mac jitter = 0.0 nem 1 mac neighbormetricdeletetime = 60.0 nem 1 mac pcrcurveuri = file:///usr/share/emane/xml/models/mac/rfpipe/rfpipepcr.xml nem 1 mac radiometricenable = False nem 1 mac radiometricreportinterval = 1.0 nem 1 phy bandwidth = 1000000 nem 1 phy fixedantennagain = 0.0 nem 1 phy fixedantennagainenable = True nem 1 phy frequency = 2347000000 nem 1 phy frequencyofinterest = 2347000000 nem 1 phy noisebinsize = 20 nem 1 phy noisemaxclampenable = False nem 1 phy noisemaxmessagepropagation = 200000 nem 1 phy noisemaxsegmentduration = 1000000 nem 1 phy noisemaxsegmentoffset = 300000 nem 1 phy noisemode = outofband nem 1 phy propagationmodel = precomputed nem 1 phy subid = 2 nem 1 phy systemnoisefigure = 4.0 nem 1 phy timesyncthreshold = 10000 nem 1 phy txpower = 0.0 -
Open a terminal and ssh to node-1 and let's do a little pinging.
[me@host 2]$ ssh node-1First lets ping the multi-channel gateway in node-1's Radio Network: radio-3
[me@node-1 ~]$ ping radio-3 -c 5
PING radio-3 (10.100.0.3) 56(84) bytes of data.
64 bytes from radio-3 (10.100.0.3): icmp_seq=1 ttl=64 time=2.48 ms
64 bytes from radio-3 (10.100.0.3): icmp_seq=2 ttl=64 time=2.47 ms
64 bytes from radio-3 (10.100.0.3): icmp_seq=3 ttl=64 time=2.50 ms
64 bytes from radio-3 (10.100.0.3): icmp_seq=4 ttl=64 time=2.33 ms
64 bytes from radio-3 (10.100.0.3): icmp_seq=5 ttl=64 time=2.49 ms
--- radio-3 ping statistics ---
5 packets transmitted, 5 received, 0% packet loss, time 4005ms
rtt min/avg/max/mdev = 2.334/2.458/2.508/0.089 ms
Next lets go up one leg of the SatCom link: 10.101.0.7
[me@node-1 ~]$ ping 10.101.0.7 -c 5
PING 10.101.0.7 (10.101.0.7) 56(84) bytes of data.
64 bytes from 10.101.0.7: icmp_seq=1 ttl=63 time=219 ms
64 bytes from 10.101.0.7: icmp_seq=2 ttl=63 time=219 ms
64 bytes from 10.101.0.7: icmp_seq=3 ttl=63 time=219 ms
64 bytes from 10.101.0.7: icmp_seq=4 ttl=63 time=219 ms
64 bytes from 10.101.0.7: icmp_seq=5 ttl=63 time=219 ms
--- 10.101.0.7 ping statistics ---
5 packets transmitted, 5 received, 0% packet loss, time 4004ms
rtt min/avg/max/mdev = 219.061/219.267/219.483/0.533 ms
Now lets ping down to the other SatCom leg: 10.101.0.9
[me@node-1 ~]$ ping 10.101.0.9 -c 5
PING 10.101.0.9 (10.101.0.9) 56(84) bytes of data.
64 bytes from 10.101.0.9: icmp_seq=1 ttl=62 time=729 ms
64 bytes from 10.101.0.9: icmp_seq=2 ttl=62 time=459 ms
64 bytes from 10.101.0.9: icmp_seq=3 ttl=62 time=458 ms
64 bytes from 10.101.0.9: icmp_seq=4 ttl=62 time=480 ms
64 bytes from 10.101.0.9: icmp_seq=5 ttl=62 time=544 ms
--- 10.101.0.9 ping statistics ---
5 packets transmitted, 5 received, 0% packet loss, time 4000ms
rtt min/avg/max/mdev = 458.559/534.615/729.210/102.259 ms
Each leg of the SatComm link adds a 100msec delay. Since we are pinging, it will add 200msec to the RTT.
-
Now lets say we want to increase the delay for all packets transmitted from NEM 8 to 200msec. We have two options. We can change the XML and restart the emulation or we can use emanesh to change the running configuration of NEM 8.
emanesh (localhost:47000)] ## set config 8 mac delay=.2
nem 8   mac  configuration updated
Now lets try the single SatCom hop ping again.
[me@node-1 ~]$ ping 10.101.0.7 -c 5 PING 10.101.0.7 (10.101.0.7) 56(84) bytes of data. 64 bytes from 10.101.0.7: icmp_seq=1 ttl=63 time=319 ms 64 bytes from 10.101.0.7: icmp_seq=2 ttl=63 time=319 ms 64 bytes from 10.101.0.7: icmp_seq=3 ttl=63 time=355 ms 64 bytes from 10.101.0.7: icmp_seq=4 ttl=63 time=319 ms 64 bytes from 10.101.0.7: icmp_seq=5 ttl=63 time=319 ms --- 10.101.0.7 ping statistics --- 5 packets transmitted, 5 received, 0% packet loss, time 4000ms rtt min/avg/max/mdev = 319.109/326.765/355.920/14.578 ms -
Once you are finished, stop the demonstration with demo-stop.
[me@host 2]$ sudo ./demo-stop
This activity will show how emanesh is aware of NEM component plugin information.
-
Take another look at rfpipemac.xml
<?xml version="1.0" encoding="UTF-8"?>
<!DOCTYPE mac SYSTEM "file:///usr/share/emane/dtd/mac.dtd">
<mac library="rfpipemaclayer">
  <param name="enablepromiscuousmode" value="off"/>
  <param name="datarate"              value="1M"/>
  <param name="jitter"                value="0"/>
  <param name="delay"                 value="0"/>
  <param name="flowcontrolenable"     value="off"/>
  <param name="flowcontroltokens"     value="10"/>
  <param name="pcrcurveuri"
         value="file:///usr/share/emane/xml/models/mac/rfpipe/rfpipepcr.xml"/>
</mac>
The library attribute tells you the name of the radio model plugin: rfpipemaclayer.
-
Using the emaneinfo application, we can generate an XML manifest detailing the configuration parameters, statistics, and statistic tables a plugin makes available.
Give it a try. The resulting document is too big to be useful here.
[me@host 2]$ emaneinfo rfpipemaclayer -mThe schema for the manifest is installed in /usr/share/emane/schema/manifest.xsd.
-
You can generate a manifest for any emane plugin that works with EMANE 0.9 or greater.