A Stable Diffusion desktop frontend with inpainting, img2img and more!
trailer.mp4
- Install the dependencies (for example using
pip). The dependencies include :
PyQt5,numpy,pytorch,Pillow,opencv-python,requests,flask,diffusers,transformers,protobuf,qasync,httpx
Package versions given in "requirements.txt" may, depending on environment, need to be supplemented by:
- jinja2==2.10.1
- markupsafe==0.23.0
- itsdangerous==0.24.0
- werkzeug==0.15.0
Note that if you want to run StableDiffusion on Windows locally, use requirements-localgpu-win64.txt
pip install -r requirements-localgpu-win64.txt
Note: On linux, if you encounter Could not load the Qt platform plugin "xcb" error, run this:
pip uninstall opencv-python     (solve a xcb compatibility issue)
pip install opencv-python-headless     (solve a xcb compatibility issue)
-
Create a huggingface account and an access token, if you haven't done so already. Request access to the StableDiffusion model at CompVis/stable-diffusion-v1-4.
-
Clone this repository and run
python unstablefusion.py
-
Install the dependencies (see the previous section)
-
Open this notebook and run it (you need to enter your huggingface token when asked).
-
When you run the last cell, you will be given a url like this:
-
Run
python unstablefusion.py -
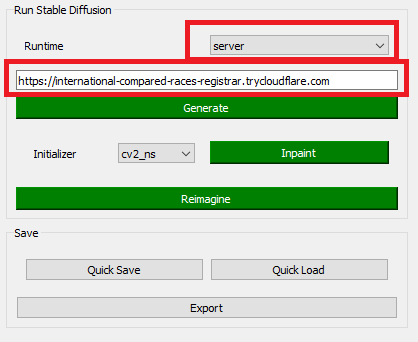
In the runtime section, select server and enter the address you copied in the server field. Like this:
- You can select a box by clicking on the screen. All of your operations will be limited to this box. You can resize the box using mouse wheel.
- You can erase the selected box by right clicking, or paint into it by middle clicking (the paint color can be configured using
Select Colorbutton) - To generate an image, select the destination box, enter the prompt in the
prompttext field and press theGenerate button(inpainting and reimagining work similarly) - You can undo/redo by pressing the
undo/redobutton or pressingControl+Z/Control+Shift+Zon your keyboard. In fact most other functions are bound to keys as well (you can configure them inkeys.jsonfile) Increase Size/Decrease Sizebuttons adjust the size of the image by adding/removing extra space in the margins (and not by scaling, this is useful when you want to add more detail around an image)- You can open a scratchpad by pressing
Show Scratchpadbutton. This window is capable of doing everything the main window can (using keyboard shortcuts only). The selected box in scratch pad will be mirrored and scaled into the selected box in the main window. This is useful when trying to import another generated/local image into the main image.
Admittedly, the UI for advanced inpainting is a little unintuitive. Here is how to works:
- You clear the part of the image that you want to inpaint (just like normal inpainting)
- Select the target box (again, like normal inpainting), but instead of clicking on the inpaint button, click on
Save Maskbutton. From now on, the current mask and current selected box will be used for inpainting no matter how you change the box/image (until you pressForget Maskbutton) - This means that you are free to edit the initial image as you please using other operations. For example, you can autofill the masked area using
Autofillbutton, or manually paint the target area or paste any image from scratchpad. Since this initial image will be used to initialize the masked part, it will heavily affect the final result. Therefore by controlling this initial image, you can modify the final result to your will.

