-
Notifications
You must be signed in to change notification settings - Fork 12
Installation
Before you can start using your new Tsunami, you'll need to set up your computer and the Arduino IDE to work with it.
If you do not already have the Arduino IDE installed, you will need to install it. If you already have it, check it is up to date: the Tsunami requires at least IDE 1.6 to operate. You can download the Arduino IDE here.
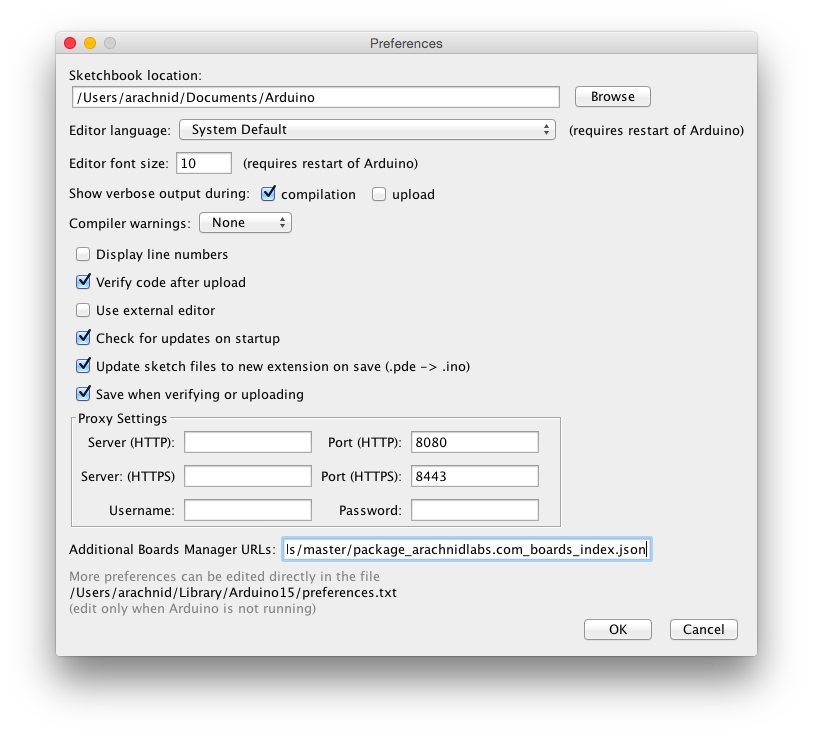
Once you have installed the Arduino IDE, you need to install the Tsunami hardware definitions. First, open the Arduino preferences dialog:

Down the bottom is a text field labelled "Additional Boards Manager URLs". Into that field, paste the following URL: https://raw.githubusercontent.com/arachnidlabs/arachnidlabs-boards/master/package_arachnidlabs.com_boards_index.json then click OK.
If there are already URLs in that field, separate the new URL from the existing ones with a comma.
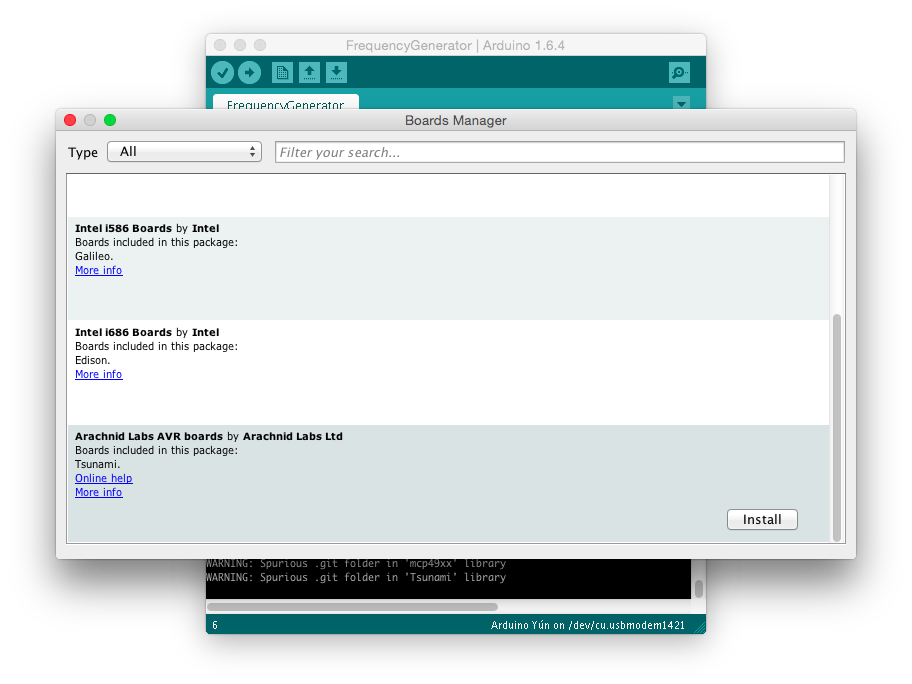
Next, click on Tools -> Board -> Boards Manager. The Arduino IDE will download a list of board definitions. Scrolling to the bottom, you should see a new entry for the Tsunami:

Highlight that entry and click "Install". Once installation is complete, close the board manager dialog. Congratulations, you have installed the Tsunami hardware definitions!
Next, click on Sketch -> Include Library -> Manage Libraries. The library manager will load. Click on the search box and enter "Tsunami". The entry for the Tsunami libraries should show up; click on that and click "Install". Once done, you can close the library manager dialog.
If you are using OSX or Linux, you're done! You can proceed to the Getting Started tutorial. If you're using Windows, you still have a couple of steps to do before you can use your Tsunami - read on!
Windows requires drivers in order to interact with the Tsunami. These were included in the hardware definitions you downloaded in the previous steps; you just need to tell Windows how to find them.
Plug your Tsunami in and wait for Windows to recognise it and start the driver installation process. If the installer does not launch automatically, open Device Manager (Start -> Control Panel -> Hardware) and find the entry for "Arachnid Labs Tsunami" under 'Other Devices'. Right click and choose 'Update driver'.
At the next screen, choose "Browse my computer for driver software" and click next.
Click the 'Browse' button, and navigate to your Arduino sketchbook folder. You will find the drivers in a directory under that, called packages/arachnidlabs/hardware/avr/1.0.0/driver. Select that folder and click OK.
Windows will warn you that the driver has not passed Windows Logo testing. Click OK to continue.
Windows will tell you you have finished installing the drivers. You can now continue to the Getting Started tutorial.
Microsoft has made it rather harder to install unsigned drivers in Windows 8, unfortunately, so doing so involves some jumping through hoops.
First, open the charm bar by moving your cursor to the right hand side of the screen, and choose Settings. Then, click on Power. Hold down the shift key and click on 'Update and restart'. A new fullscreen menu will appear.
Click on 'Troubleshoot', then 'Advanced options', then 'Startup settings', then 'Restart'.
On the next screen, press 7 on your keyboard to select the option "Disable driver signature enforcement".
Once the computer finishes restarting, plug in your Tsunami. Windows will pop up a dialog, and you can follow instructions as described in the Windows 7 section above in order to install the drivers. Once you are done, proceed to the Getting Started tutorial.