In this guide we will share how you can migrate your existing federation between AWS IAM and Azure AD over to using AWS Single Sign-On. We'll explain how you can complete the migration seamlessly; without causing interruption to your users, and while maintaining your existing set of permissions and assignments.
Note: If you have not previously integrated your existing identity store with AWS Identity and Access Management (without AWS SSO) then you do not need to follow the steps in this guide, and can easily set up federation into AWS Single Sign-On by following the setup guide in the AWS Single Sign-On documentation.
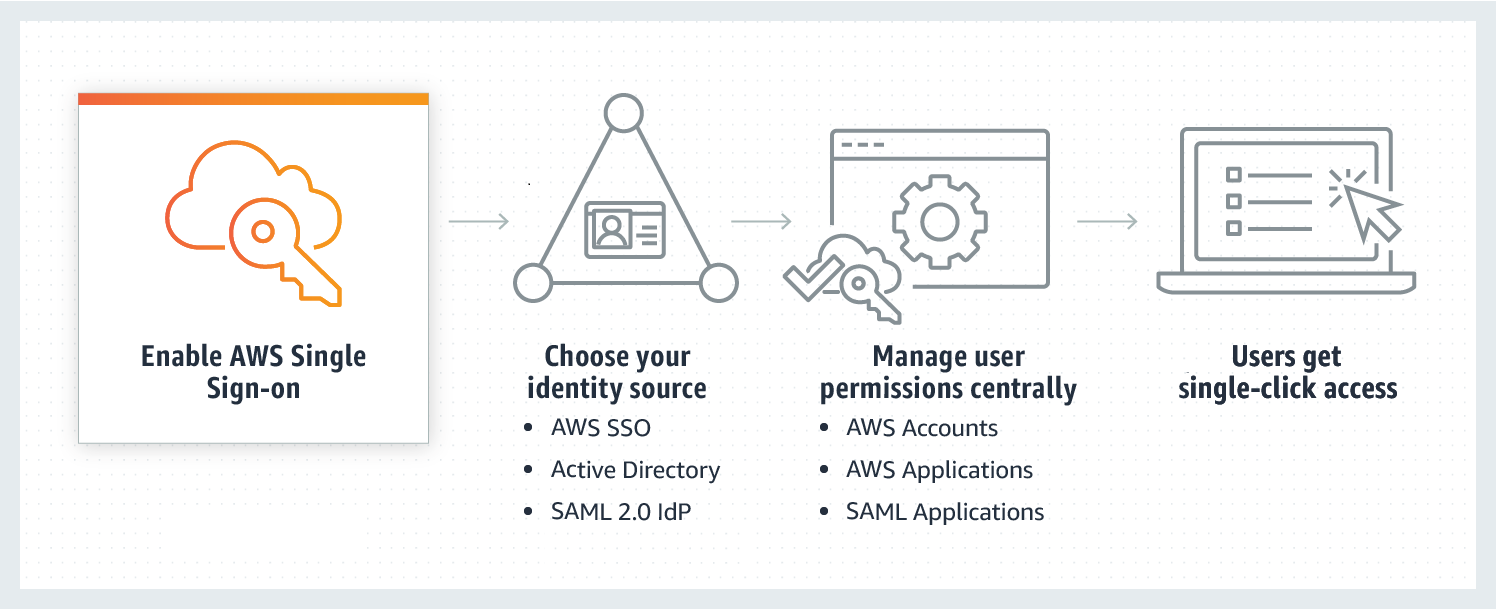
The AWS Single Sign-On (AWS SSO) service is AWS’s solution for human workforce access into AWS accounts. AWS SSO is a free, fully-managed service that allows customers to easily and securely use their existing identity store with their AWS accounts via the industry standard protocols (SAML and SCIM) without the need for additional scripting or customization.
Prior to the launch of AWS Single Sign-On it was common for customers to utilize integration scripts to bridge the gap between Azure AD and AWS (we have previously blogged about one such solution here), however customers found it cumbersome to maintain the custom scripts and keep them functioning without errors long term.
This guide will walk you through the process of exporting your current user-role assignments within Azure AD and import these same assignments into AWS Single Sign-on. This will allow you to seamlessly transition your users across to AWS Single Sign-on while maintaining their existing access within the AWS platform. The steps of this guide can be implemented in parallel with your existing federation to AWS IAM. It is recommended to complete these migration steps and test that user access is working correctly before migrating users over to AWS Single Sign-on and turning off the old federation implementation.
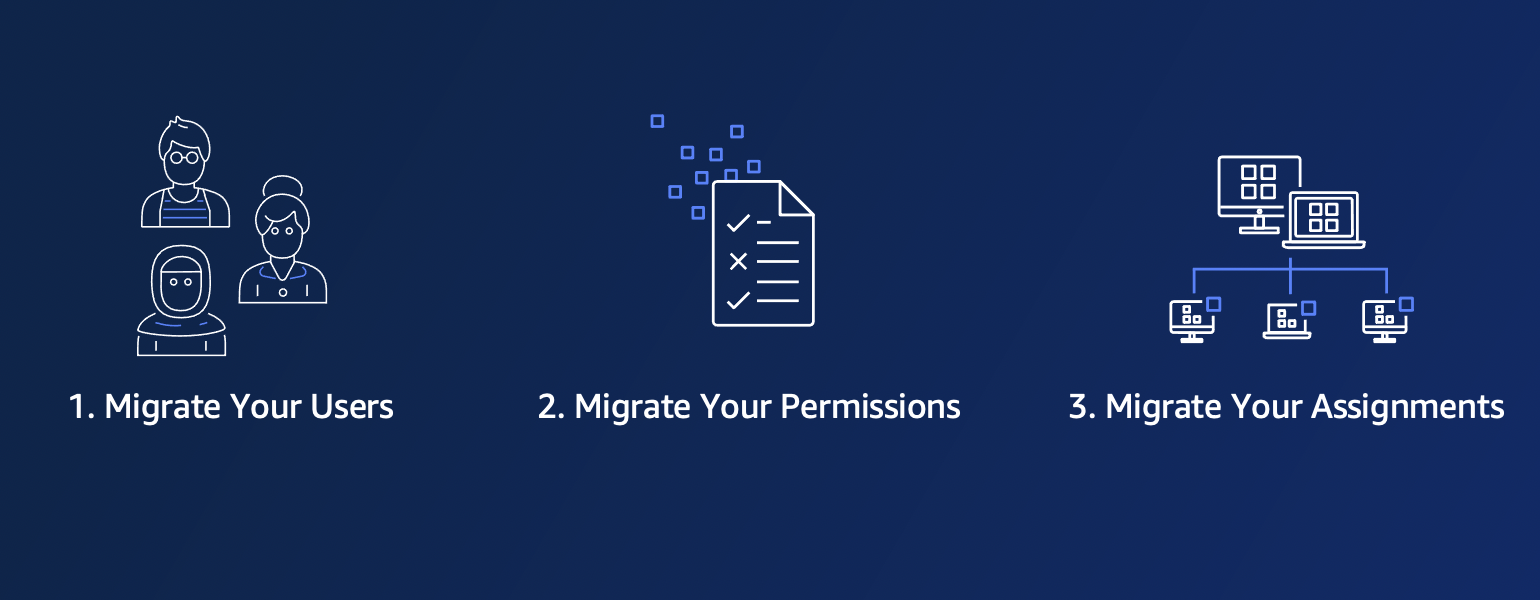
The migration process in this guide consists of three main phases:
- Migrate your Users
Federate AWS Single Sign-On with Azure AD and import your existing users. This will allow your users to login to AWS Single Sign-On, but they will not be able to access anything as they do not have any permissions assigned yet - Migrate your Permissions
Import your existing AWS IAM Roles and Policies into AWS Single Sign-On as Permission Sets which can be assigned to users - Migrate your Assignments
Recreate the existing User-Role assignments from Azure AD into AWS Single Sign-On
After completion of phase three, your users will be able to access AWS via Single Sign-On with the same permissions that they had previously. To make the process easier, the steps of this migration have been automated using PowerShell scripts which are available within this repo.
The steps in this guide assume that your organization already has federation established that allows your staff to access your AWS accounts using their credentials in Azure AD, similar to the method described in this blog post.) In other words, this guide is applicable if you have a single Enterprise Application in Azure AD that allows your staff to access multiple AWS accounts.
To execute the steps of the migration you will require an environment where you can run PowerShell scripts and access the Azure and AWS APIs. A Windows workstation or laptop should work fine, otherwise you can launch a Windows EC2 instance and run the scripts there. Windows PowerShell comes installed by default in all modern versions of Windows. All of the scripts and commands in the rest of this guide should be run within the Windows PowerShell app. This environment also needs to have two additional modules installed. Follow the links below to find the installation guides for these modules.
To execute the steps of the migration you will need administrator access within both your AWS and Azure AD environments. To simplify the rest of this guide, it is recommended to pre-authenticate within the PowerShell instance where you will execute the remaining steps of this guide.
Pre-authenticate to Azure AD
Within your PowerShell window, run the following command:
Connect-AzureADThis command will pop open a Microsoft login form. Login with an Azure AD user that has administrator access to (or “ownership” of) your existing “Amazon Web Services (AWS)” Enterprise Application within Azure AD
Pre-authenticate to AWS
To authenticate programmatically to AWS, you will need the AWS Access Key and Secret Key of an IAM User or Role with administrator permissions in your AWS Organization Payer account. For instructions on how to retrieve your AWS access keys, please refer to the AWS documentation.
To load these credentials within your PowerShell environment you can run the following command, passing in the values of your access key and secret access key:
Set-AWSCredential -AccessKey '<Access Key ID>' -SecretKey '<Secret Access Key>'Note: If you are using an AWS IAM Role (with temporary access keys) then you will also pass your SessionToken value. For further details, please refer to the Set-AWSCredential Cmdlet documentation.
Follow the steps within the AWS Single Sign-On documentation to:
Once you have automatic provisioning configured, take a note of all the users and groups that have access to your existing “Amazon Web Services (AWS)” application in Azure AD, and add all of these users and groups to your new “AWS SSO” application. This step is necessary as it ensures all users/groups exist within AWS SSO when we recreate their assigned permissions in Phase 3 below.
Adding users to the application will give those users a new “AWS SSO” tile when they log into Microsoft 365. However, if the user clicks on this tile they will be unable to access AWS as they do not have any permissions assigned yet.
Before moving on, verify that your users and groups have been created within AWS SSO successfully by navigating to the AWS SSO console.
Note: Provisioning of users and groups into AWS SSO can take up to 40 minutes to complete. If you don’t see your users and groups appear within the AWS SSO console, then try these common troubleshooting steps.
AWS Single Sign-on uses “Permission Sets” to represent the IAM Roles that can be assigned to users within your AWS accounts. Now that we have AWS Single Sign-on enabled we are ready to create Permission Sets that match the existing IAM Roles that are federated with Azure AD.
The internal identifier of the existing “Amazon Web Services (AWS)” Enterprise Application can be used to reliably identify the existing IAM Roles in your AWS Accounts that have a trust relationship to this application. This identifier can be obtained from the following steps:
-
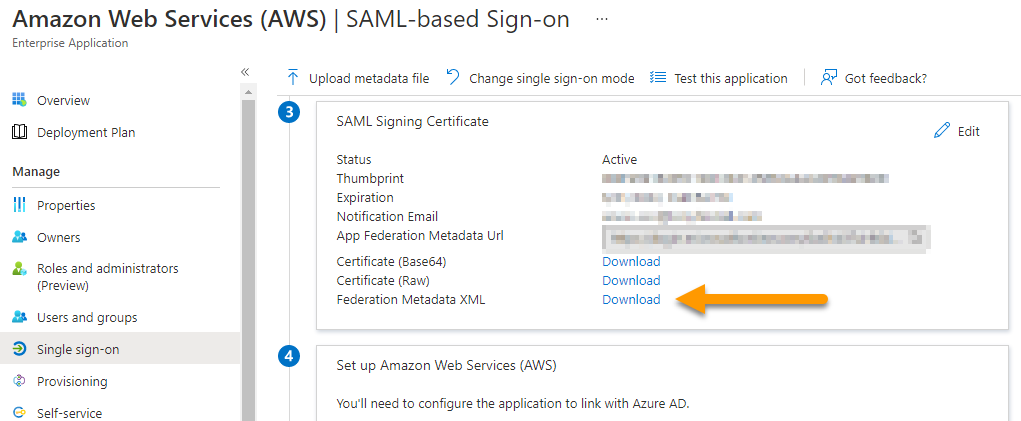
Within Azure AD, navigate to the existing Enterprise Application that you have federated with your AWS Accounts (not the new Enterprise Application you just created for AWS SSO), and then click on “Single sign-on” in the left-hand menu
-
Scroll down to the third section “SAML Signing Certificate” and then click “Download” next to “Federation Metadata XML”, and then open this file in your favorite text editor
- Near the start of this file there is a tag named
EntityDescriptorwhich contains an attribute namedID. Copy the value of the ID attribute and save this as we will need this value in a later step

In order to export the existing IAM Roles from each of your AWS Accounts we need to have a consistently named IAM Role in each AWS account with permission to read IAM Roles within the account. The export script in the following step will assume this role in each AWS Account when it runs.
If you have previously followed the steps from our earlier blog post then this role should exist and be named AWS_IAM_AAD_UpdateTask_CrossAccountRole.
If your integration with Azure AD was customized from the one described in the earlier blog post then the role may exist but have a different name. You’ll need to investigate your existing set up to determine the correct role name to use.
If a suitable role does not exist, then you will need to create one. You can use a CloudFormation Stack Set to do this by following the steps under “Managing multiple AWS accounts from a root account” within this blog post.
Note down the IAM Role name as we will need this in the following step.
We are now ready to export a copy of the existing IAM Roles from your AWS Organization. Within the GitHub repository accompanying this blog there is a PowerShell script called Export-IAMSAMLRoles.ps1 that will do this for you.
- Ensure you have completed the Prerequisite steps above to install the required PowerShell modules and authenticate to AWS and Azure AD
- Run the script and pass in the Entity Descriptor ID and IAM Role name you collected in previous steps. Your command should look something like this:
.\Export-IAMSAMLRoles.ps1 -EntityDescriptorID '<Entity Descriptor ID>' -CrossAccountRole '<IAM Role Name>'The script will output a CloudFormation template containing the set of your IAM Roles reformatted to be AWS SSO Permission Sets. The script attempts to de-duplicate IAM Roles where the same role exists in multiple AWS Accounts – for example, if you have a role called “Admin” in all of your AWS Accounts, you would want this to be a single Permission Set called “Admin” in AWS SSO that can be reused. The script may not get the de-duplication perfect, so I recommend you review this CloudFormation template before proceeding to the next step.
We are now ready to execute the CloudFormation template from the previous step to create Permission Sets within AWS SSO.
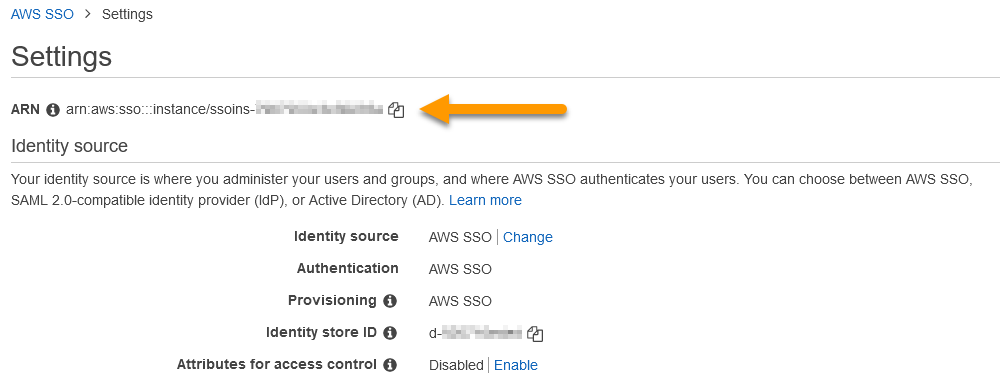
- Navigate to “Settings” section of the AWS SSO console and make a note of the “ARN” value shown at the top of the page. This value will be needed in the following step.
- Navigate to the CloudFormation service within the AWS Console (make sure you are within your AWS Organization payer account and in the same AWS Region as your AWS SSO instance) and click on “Create Stack”
- Under “Specify template” click on “Upload a template file” and then “Choose file”. Browse to the CloudFormation template generated in the previous step (permission-sets.json) and select it, then click “Next”
- On the next screen enter a suitable stack name (e.g. “SSO-Permission-Sets”) and also populate the “SSOInstanceArn” parameter with the ARN value you copied earlier, then click “Next”
- Click “Next” again to leave all the stack options on the next screen as defaults, and then finally click “Create stack” to begin creating the CloudFomation stack
The CloudFormation stack will take a few minutes to finish creating, and while it is running you can monitor progress on the “Events” tab. When the stack status reaches CREATE_COMPLETE you can verify the stack was successful by confirming your Permission Sets now exist within AWS SSO as expected.
- Navigate to AWS SSO within the AWS Console and then click on “AWS Accounts” in the left-hand menu
- Navigate to the “Permission sets” tab and you should see your Permission Sets in the list
If you don’t see the permission sets you expect then verify that your CloudFormation stack has completed successfully. The stack may still be executing or may have failed and rolled back.
After completing the previous steps, the AWS SSO identity store now contains a representation of all the users and groups from Azure AD that currently have access to AWS. AWS SSO also contains Permission Sets which represent all of the permissions those users have within AWS. The final step is to create the assignments of these permissions to the users and groups so that they will be able to access the AWS platform via AWS SSO with the same permissions they use currently.
Similar to Phase 2 above, we will use a PowerShell script to export the existing assignments into CloudFormation which will allow us to import the assignments into AWS.
The provided script requires the ID and AWS Region of your newly created AWS SSO instance in order to correctly map the users and groups from Azure AD to their corresponding identifiers within AWS SSO. You can obtain these values through the following steps:
- Navigate to “Settings” section of the AWS SSO console and make a note of the “ARN” value shown at the top of the page and also the “Identity Store ID” value. These values will be needed in a following step
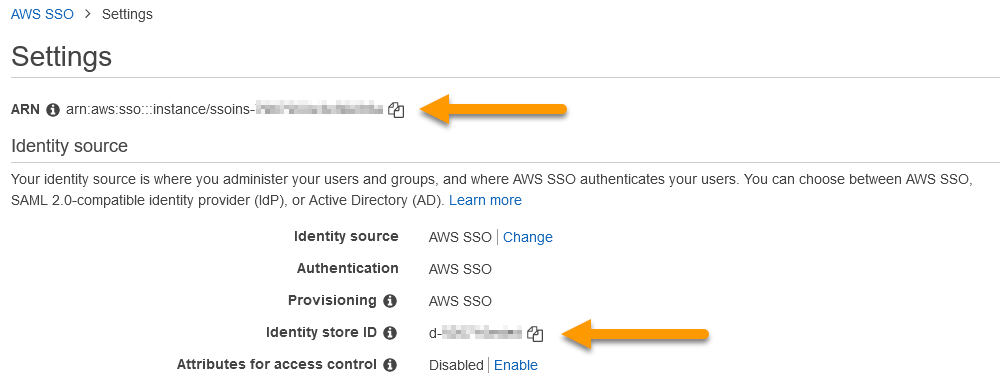
- While on the settings page also note down the AWS Region your AWS SSO is deployed within. Click on the region name in the top bar and take note of the region code (e.g. us-west-2) which will be needed in a following step
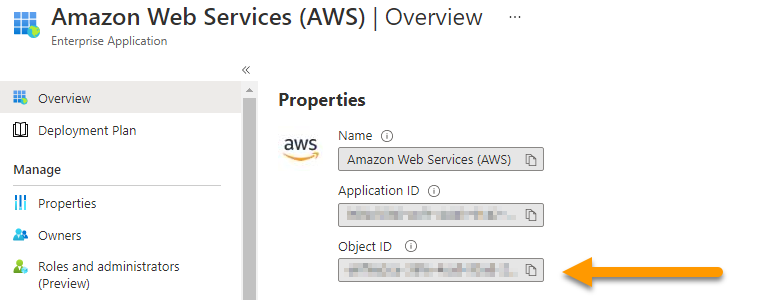
The internal AppObjectID identifier of the existing “Amazon Web Services (AWS)” Enterprise Application will be used to reliably identify the existing role assignments in Azure AD that give users permissions within AWS. This identifier can be obtained from the following steps:
- Within Azure AD, navigate to the existing Enterprise Application that you have federated with your AWS Accounts (not the new Enterprise Application you created for AWS SSO), and copy the “Object ID” value. This value will be needed in a following step
We are now ready to export a copy of the existing user role assignments from Azure AD. Within the GitHub repository accompanying this blog there is a PowerShell script called Export-AADAssignments.ps1 that will do this for you.
- Ensure you have completed the Prerequisite steps above to install the required PowerShell modules and authenticate to AWS and Azure AD
- Run the script and pass in the Object ID, SSO ARN, Identity Store ID and Region code you collected in previous steps. Your command should look something like this:
.\Export-AADAssignments.ps1 -AppObjectId '<App Object ID>' -IdentityStoreId 'd-XXXXXXXXXX' -SSOInstanceArn 'arn:aws:sso:::instance/ssoins-XXXXXXXXXXXXXXXX' -AWSRegion '<AWS Region Code>'The script will output a CloudFormation template containing the set of user role assignments reformatted for AWS SSO. The script attempts to automatically handle cases where two similar roles were deduplicated in Phase 2 above.
We are now ready to execute the CloudFormation template from the previous step to create the assignments within AWS SSO.
Note: Executing this CloudFormation template will assign permissions to users and allow them to access AWS. It is strongly recommended you review the assignments generated in the previous step and ensure there are no unintended permissions being granted, before executing the CloudFormation template within your AWS account.
- Navigate to the CloudFormation service within the AWS Console (make sure you are within your AWS Organization payer account and in the same AWS Region as your AWS SSO instance) and click on “Create Stack”
- Under “Specify template” click on “Upload a template file” and then “Choose file”. Browse to the CloudFormation template generated in the previous step (assignments.json) and select it, then click “Next”
- On the next screen enter a suitable stack name (e.g. “SSO-Assignments”), then click “Next”
- Click “Next” again to leave all the stack options on the next screen as defaults, and then finally click “Create stack” to begin creating the CloudFormation stack
The CloudFormation stack will take a few minutes to finish creating, and while it is running you can monitor progress on the “Events” tab. When the stack status reaches CREATE_COMPLETE you can verify the stack was successful by confirming your Permission Sets now exist within AWS SSO as expected.
- Navigate to AWS SSO within the AWS Console. Click on “AWS Accounts” in the left-hand menu and then click on an AWS Account where user assignments should exist
- Review the list of assigned users and groups under “Assigned users and groups” and ensure that the assignments match what is expected
If you don’t see the assignments you expect, then verify that your CloudFormation stack has completed successfully. The stack may still be executing or may have failed and rolled back.
Users within your organization can now test logging in to the AWS Console via the new “AWS SSO” application and verify that their permissions are working as expected.
After completing the steps in this guide your users will be able to access the AWS Console through AWS SSO. The processes replicating user changes in AWS and creation of IAM Roles with your AWS Accounts is now automated and managed by Azure AD and AWS SSO respectively – you no longer need to maintain any custom scripts to facilitate the integration.
For future changes to Permission Sets or Assignments within AWS SSO you can modify and reapply the CloudFormation scripts generated by the steps in this guide (generally recommended) or, if you prefer, simply update the configuration directly within the AWS SSO Console UI.
Your existing federation into AWS (prior to AWS SSO) has not been modified and will continue to work, so users have the option to switch back to this method quickly if they encounter issues. Once user access via AWS SSO has been confirmed it is recommended to remove the unused application from Azure AD and the unused Roles from within AWS IAM.
See CONTRIBUTING for more information.
This library is licensed under the MIT-0 License. See the LICENSE file.