-
-
Notifications
You must be signed in to change notification settings - Fork 23
Getting started
Popochiu works on Godot 3.3 and later versions.
This steps are for a Windows setup and a new Godot user. If you have experience with Godot, and with using addons, jump to Popochiu dock (quick view)
- Download the latest version of the engine here.
- Unzip its content and open the .exe file.
- Create a new project by clicking the New project button.
- Give it a name and then click on Create Folder.
- Click on Create & Edit. The Editor will open.
[
- Download Popochiu from its itch.io page. Or directly from here.
- Unzip the file and copy the addons folder into your project's folder.
If you don't know where your project is, right-click the res:// folder in the FileSystem dock and then select Open in File Manager.
- Enable the plugin: Project > Project Settings... > Plugins (the tab on the top). Click on the Enable checkbox.
- A popup will ask you to restart Godot. Close the Project Settings window and then Project > Reload Current Project.
- You'll see the Popochiu dock at the right. And this message in the Output panel.
[es] Estás usando Popochiu, un plugin para crear juegos point n' click
[en] You're using Popochiu, a plugin for making point n' click games
▒▒▒▒▒▒▒▒▒▒▒▒▒▒▒▒▒▒▒▒▒▒▒▒▒▒▒▒▒▒ \( o )3(o)/ ▒▒▒▒▒▒▒▒▒▒▒▒▒▒▒▒▒▒▒▒▒▒▒▒▒▒▒▒▒▒
-
 Rooms: Are the scenes of the game. Here is where characters can move. You can use them to build other scenes like: main menu, a splash screen, logo, and so on.
-
 Props: The visual Objects in the room, including background and foreground. They can have interaction.
 -
 Hotspots: Clickable areas in the room.
 -
 Walkable areas: The areas where characters can move.
 -
 Regions: Areas that can trigger events when the player walks on them.
 -
 Points: Named Position2D that can be easily accessed in scripts (i.e. to make characters move to them).
-
-
 Characters: Antthing that can talk, walk, move between rooms, etc.
 -
 Inventory items: Items that can be collected and used on other objects (like props, hotspots, characters, other inventory items).
 -
 Dialogs: Branching dialogs that show options for players to select and trigger actions.
 - AudioCues: Audio clips (music or sounds) that can be played, faded, or stopped. You can modify their properties to alter how they sound. They are grouped in: music, sound effects, voices, and graphic interface (UI).
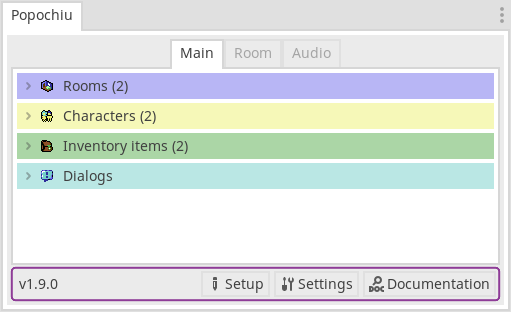
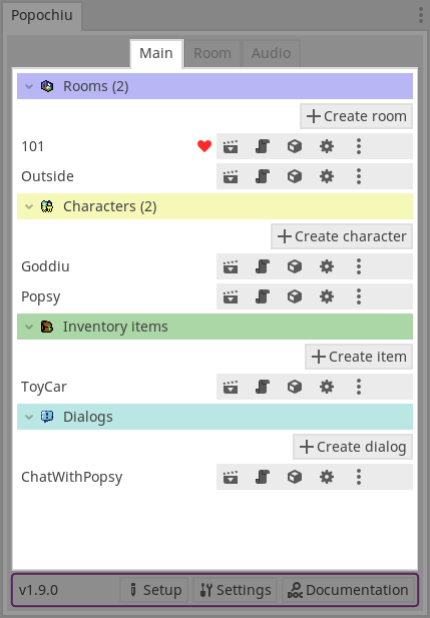
Shows the Rooms, Characters, Inventory items and Dialog trees in your game. You can think of it as the hub for your project. In each group you'll see a button to create ➕ a new object for each type.
You can read more about this here.
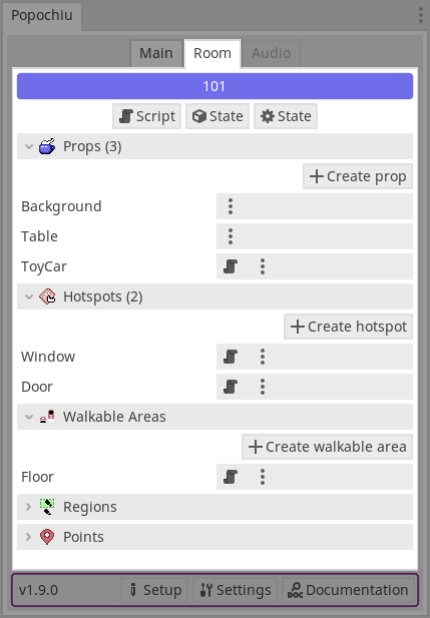
Shows the Props, Hotspots, Walkable areas, Regions and Points (not working at the moment) in the Room that is being edited in the Editor. The Props, Hotspots, Walkable areas and Regions groups have a create ➕ button that will allow you to create a node of each type. The name of the room appears on the top with a blue background.
You can read more about this here.
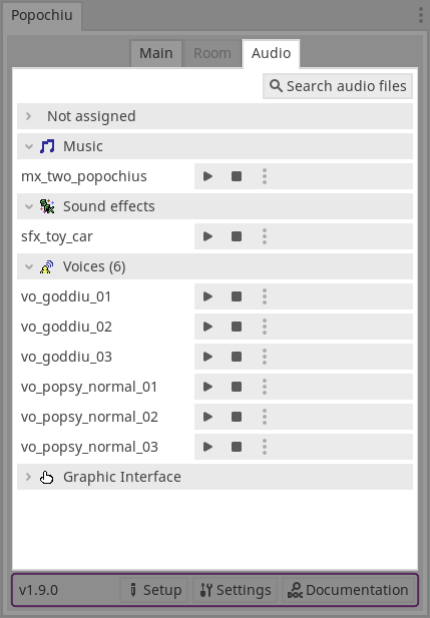
Shows the audio files in the project. Popochiu defines four categories for this: music, sound effects (sfx), voices, and graphic interface (a.k.a. UI).
You can read more about this here.

Allows you to modify properties related to the game behavior.
You can edit this properties by clicking the Settings button in the footer of the Popochiu dock:

You can read more about this here.
When scripting, Popochiu gives you access to functions that will help you to make an adventure game. Those functions are split between Engine (E), Room (R), Character (C), Inventory (I), Dialog (D), Audio (A), Graphic interface (G), and Cursor (Cursor). The letters are the names you have to use when writting code. Those are Singleton classes you can use in any script.
Let's see examples of each one:
-
E. (for Engine) Is the shortcut for
Popochiu.gd. It is the system main class, and is in charge of a making the game you build to work.E.goto_room('FirstFloor') E.run([ 'Player(Happy): Hi', 'Player: How is it going?' ]) E.wait(3) E.current_room.get_props() E.runnable(self, 'open_vault', [], 'completed')
-
R. (for Room) The shortcut for
IRoom.gd. The singleton that you can use to access props, hotspots, regions and walkable areas in the current room; or to access to data from other rooms.R.get_prop('DeckOfcards') R.get_hotspot('Window') R.Garage.state.is_locked = false
-
C. (for Character) The shortcut for
ICharacter.gd. The singleton that you can use to make characters do actions.C.walk_to_clicked() C.player_say('My scythe!') C.get_character('Meche').face_left() C.get_character('Glottis') C.character_say('Glottis', 'Ey! Manny')
⬇️ Since version 1.9.0 ⬇️
C.Meche.face_left()
C.Glottis.say('Ey! Manny')
C.Glottis.walk_to_prop('Car')
-
I. (for Inventory). The shortcut for
IInventory.gd. Use it to handle the inventory.I.add_item('Key') I.add_item_as_active('CeremonialBread') I.remove_item('Beer') I.set_active_item('ChewingGum')
⬇️ Since version 1.9.0 ⬇️
I.Key.add()
I.CeremonialBread.add_as_active()
I.Beer.remove()
I.ChewingGum.set_active()
-
D. (for Dialog). The shortcut for
IDialog.gd. Use it to start branching dialog.D.show_dialog('Welcome') D.show_inline_dialog(['Yes', 'Nope', "Don't know..."])
⬇️ Since version 1.9.0 ⬇️
D.Welcome.start()
-
A. (for Audio). The shortcut for
IAudio.gd. Use it to play music and sounds.A.play('sfx_open_door') A.play_music('mx_shop') A.change_cue_pitch('sfx_alarm', 2.1)
⬇️ Since version 1.9.0 ⬇️
A.sfx_open_door.play()
A.mx_shop.play_now()
A.sfx_alarm.change_stream_pitch(2.1)
-
G. (for Graphic interface). The shortcut for
IGraphicInterface.gd. Use it to show or hide elements in the graphic interface.G.hide_interface() G.show_history() G.show_inventory()
-
Cursor. (for the mouse pointer). The shortcut for
Cursor.tscn. Use it to show or hide the mouse pointer.Cursor.set_cursor(Cursor.Type.WAIT) Cursor.toggle_visibility(false) Cursor.block()


