- OKD: Origin Community Distribution of Kubernetes, see: https://www.okd.io/
- docker multistage: https://docs.docker.com/develop/develop-images/multistage-build/
- s2i: source2image, see down below
- oc: OpenShift Client (CLI) commands
oc new-projectoc new-buildoc start-buildoc getoc describeoc logsoc ... -o yaml- creating, processing
oc processand usingoc applytemplates
- Please research the following concepts yourself
- build vs. buildConfig (bc)
- secret
- configMap
- container vs. pod
- image vs. imageStream (is)
- deployment vs. deploymentConfig (dc)
- Start minishift OR login to an cluster
- Check if everything is working (is your client working, are you logged in on CLI?)
01-basic-components/setup.sh # to setup a project
Goal: To give you the understanding about docker multistage builds, play around with and get a feel for it. Understand the concepts, commands and how to chain different stages together. Check out the Dockerfile.
cd 02-docker-multistage
IMAGE_NAME=spring-test

docker build -t $IMAGE_NAME . # builds default stage
docker build -t ${IMAGE_NAME}:runtime-alpine --target runtime-alpine . #builds runtime-alpine stage
docker build -t ${IMAGE_NAME}:debug --target debug . # builds debug stage


TAG_TO_RUN=runtime-alpine
docker run --rm -p 8080:8080 ${IMAGE_NAME}:${TAG_TO_RUN}

# Now let's translate this to OpenShift v3.9"Although ADD and COPY are functionally similar, generally speaking, COPY is preferred. That’s because it’s more transparent than ADD. COPY only supports the basic copying of local files into the container, while ADD has some features (like local-only tar extraction and remote URL support) that are not immediately obvious. Consequently, the best use for ADD is local tar file auto-extraction into the image, as in ADD rootfs.tar.xz /."
--init # https://github.com/krallin/tini
https://docs.docker.com/engine/reference/builder/#entrypoint
Further resoruces
- https://medium.com/@tonistiigi/advanced-multi-stage-build-patterns-6f741b852fae
- https://docs.docker.com/develop/develop-images/dockerfile_best-practices/
Goal: We want to translate a multistage build now to OpenShift. For that we're using at the first step a s2i appraoch to build the first part of the chain.
You'll see how to use the source2image tool within openshift.
Used base images: https://hub.docker.com/r/fabric8/s2i-java // https://github.com/fabric8io-images/s2i
cd 03-okd-s2i
-
Import the base image:
oc import-image -h # check which params you can setoc apply -f imagestream.yml # create imagestream -
create s2i-build-config:
# process template via: oc process -f s2i.yml -p APPLICATION_NAME=XY -p REPOSITORY_URL=re...
oc process -f s2i.yml \
  -p APPLICATION_NAME=spring-boot \
  -p REPOSITORY_URL=https://github.com/spring-guides/gs-spring-boot.git \
  -p CONTEXT_DIR=complete \
| oc apply -f -- start a build:
oc start-build spring-boot-dev -w # -w watches the output - wait till the build finishes or add the following to the next command:
--allow-missing-imagestream-tags - Create svc and dc:
oc new-app --image-stream spring-boot
https://docs.openshift.com/online/dev_guide/builds/advanced_build_operations.html https://docs.openshift.com/online/dev_guide/builds/build_strategies.html
Goal: Build a secon buildConfig which builds our runtime image.
See README.md in 04-okd-chained-build. You'll see how to chain build to get a minimal runtime-image and automatically trigger the second build after the previous ran.
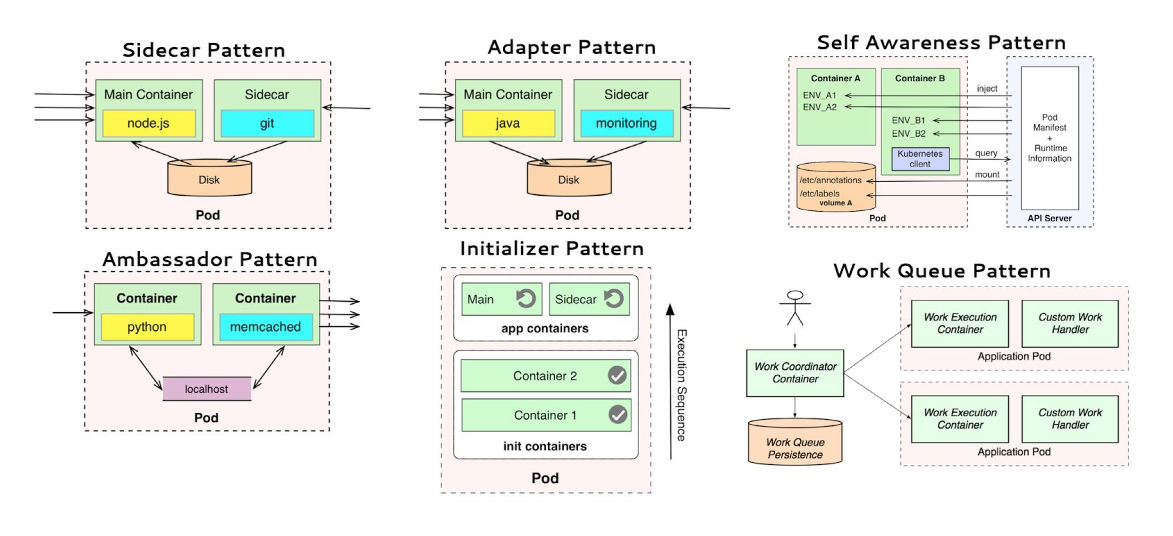
- Single node multi container: sidecar, ambassador, adapter
- Multi node: leader election, work queue, scatter/gather
Goal: Use examples and get a feel for the platform pattern
Run the files via oc apply -f <file/directory>
The main container communicates or gets called through an ambassador. (Proxy, name resolver, ...) https://github.com/openshift/oauth-proxy/blob/master/contrib/sidecar.yaml
Enhances basic pod functionality. Logging, circut breaker, ...
Like an adapter in software development. Changes the interface or converts the requests from or to the main container
Goal: See secrets and configmaps in action. Checkout the OpenShift web-ui, open a terminal within a running pod and see the mounted or as environment available configs and secrets.
cd 08-12factor
oc apply -f . # creates secret, configMap, and two pods

# checkout the two pods with the secrets and configs within web-ui and via CLIoc delete project <yourProject>
