-
-
Notifications
You must be signed in to change notification settings - Fork 7
Home
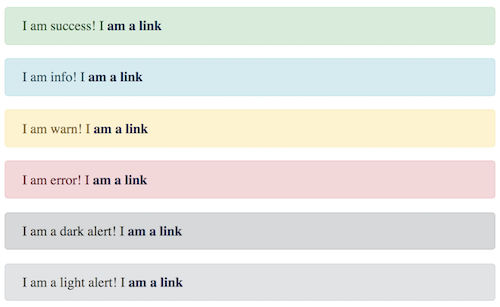
The MessageBox module is a very small but super useful UI module that allows you to create informative HTML message boxes by leveraging ColdBox's Flash RAM to save messages across relocations.
The supported message types are
infowarnerrorsuccessdarklight

You can find all the methods in our API Docs: https://apidocs.ortussolutions.com/#/coldbox-modules/cbmessagebox/
Methods for setting messages:
-
info(): To render info message directly -
warning(): To render a warning message -
error(): To render an error message -
success(): To render a success message -
dark(): To render a dark background message -
light(): To render a light background message -
setMessage( type, message, messageArray ): Set a message according to passed type
Methods for manipulating messages:
-
append(): To append messages -
appendArray(): To append array of messages -
prependArray(): To prepend array of messages -
getMessage(): To get the messages to be outputed -
clearMessage(): To clear the current message -
isEmptyMessage(): Verify if you have any messages
Metadata addition to messages:
-
addData(): Add name-value pairs of metadata to the flash structure as metadata for messages -
putData( struct ): Incorporate a struct of metadata to the flash structure -
getData(): Get the metadata structure -
getDataJSON(): To get the metadata as JSON
Rendering methods:
-
renderit(): To render the messagebox -
renderMessage( type, message ): To render an a-la-carte messagebox
Just drop into your modules folder or use CommandBox to install
box install cbmessagebox
The module registers the MessageBox model: messagebox@cbmessagebox that you can use to emit messages. Check out the API Docs included in the download for all the possible functions.
You can use the MessageBox as is with the current skin or use the functions or settings to overide styles and skinning. You must place the settings in your ColdBox.cfc file under a messagebox struct:
messagebox = {
    // The default HTMl template for emitting the messages
	template 		= "#moduleMapping#/views/MessageBox.cfm",
    // Override the internal styles, true to override
	styleOverride 	= false
};Once you have set you need to render messages. You have two choices for this:
-
renderIt([clearMessage=true], [template])'\ : To render the message -
renderMessage(type, message, [messageArray], [template]): A-la-carte rendering
#getModel( "messagebox@cbmessagebox" ).renderIt()#
#getModel( "messagebox@cbmessagebox" ).renderMessage( "info", "This is an info from message land!" )#
Important: Please note that the MessageBox module leverages the FlashRAM and all messages are cleared for you automatically after rendering. You can delay that if you use the
clearMessage=falseargument.
The MessageBox module will render out the MessageBox HTML according to our standards. However, we all know the developers are picky beings and very individualistic. Therefore, we allow the usage of your own templates for rendering out the MessageBox. You can do this by using the custom settings in your ColdBox.cfc configuration file
messagebox = {
    // The default HTMl template for emitting the messages
	template 		= "#moduleMapping#/views/MessageBox.cfm",
    // Override the internal styles, true to override
	styleOverride 	= false
};
The template can then be written:
<cfscript>
	switch( msgStruct.type ){
		case "info" : {
			local.cssType = " alert-info";
			local.iconType = "icon-info-sign";
			break;
		}
		case "error" : {
			local.cssType = " alert-error";
			local.iconType = "icon-minus-sign";
			break;
		}
		default : {
			local.cssType = "";
			local.iconType = "icon-warning-sign";
		}
	}
</cfscript>
<cfoutput>
<div class="alert#local.cssType#" style="min-height: 38px">
	<button type="button" class="close" data-dismiss="alert">×</button>
	<i class="#local.iconType# icon-large icon-2x pull-left"></i> #msgStruct.message#
</div>
</cfoutput>
You can also ignore the global setting and use the template argument via the renderIt() and renderMessage() methods:
#getModel( "messagebox@cbmessagebox" ).renderit(template=path)#
#getModel( "messagebox@cbmessagebox" ).renderMessage(type="info", message="Hello", template=path)#
You can also append messages to the MessageBox Flash RAM entry by leveraging the, drum roll please......, append() or appendArray() methods:
getModel( "messagebox@cbmessagebox" ).append( "Hello" );
getModel( "messagebox@cbmessagebox" ).appendArray( [ "Hello", "You Welcome!" ] );
getModel( "messagebox@cbmessagebox" ).prependArray( [ "Hello", "You Welcome!" ] );
The plugin also sports some convenience methods:
-
getMessage(): Retrieve the raw message structure -
clearMessage(): Clear the Flash RAM -
isEmptyMessage(): Verify if we have messages to show
You can also store custom metadata alongside your custom messages. This is great for storing any type of information you might need again back when rendering the messages. For this we have the following methods:
-
putData(array data): Add an array of data that can be used for arbitrary stuff -
addData(key, value): Store key-value pairs of metadata alongside the message -
getData([clearData=true]): Get your array of data back -
getDataJSON([clearData=true]): Get your array of data back as JSON
If you want to style your own MessageBox you will need to use the styleOverride messagebox settings in your ColdBox.cfc. Then make sure the CSS for the MessageBox exists in the request, usually in your main CSS file or layout:
messagebox = {
    // Override the internal styles, true to override
	styleOverride 	= true
};
Important : Please note that the
MessageBoxmodel has getters/setters for all of its properties so you can manipulate its instance data.