STM32MP1 Board Support Package
This board features interesting processor stack up. It has a dual core ARM Cortex-A7 and ARM Cortex-M4 in a single package. I choose this board for development, because it interests me how Linux would be built for such a complicated configuration.
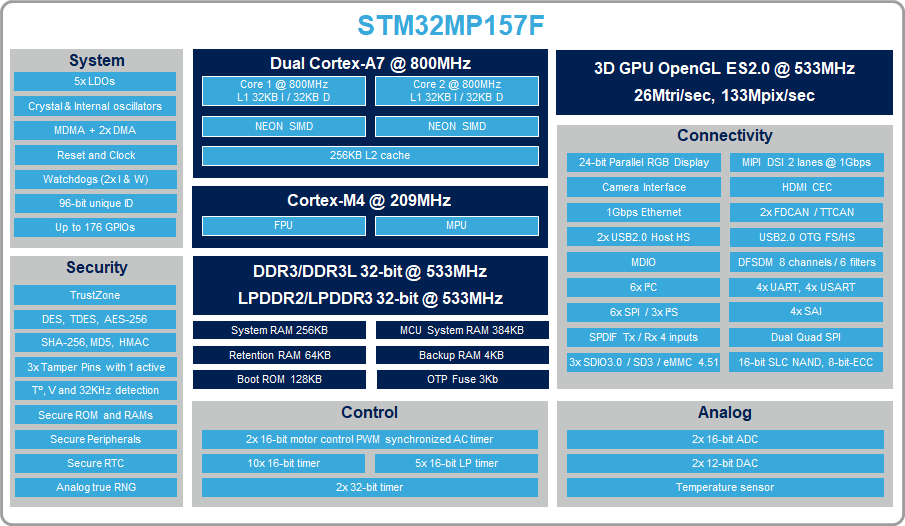
STM32MP1 Microprocessor Architecture Information Page
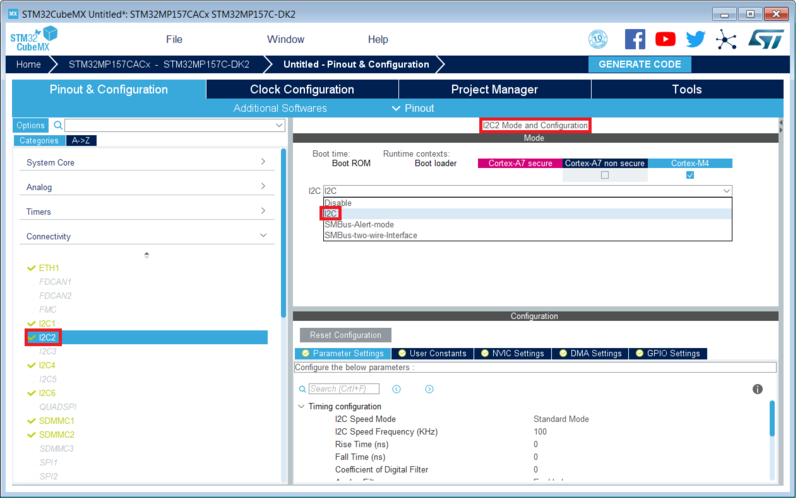
This will be used to configure the hardware and generate device tree files for Linux distribution.
This can be used to flash the STM32MP157A-DK1 board through USB from the host PC. I have made a choice to pack the binaries for x86_64 system into the repository. flash.sh script uses this program to flash through USB.
Use this to verify applications.
This will be used to build target distribution and layer our custom application, or custom distribution, or custom machine setup.
Use the starter package to test basic system functionality.
-
Use the master branch to layout the git submodules, and build scripts.
-
Execute
build.shto start a build. -
Connect the STM32MP157A-DK1 Board as mentioned here
-
Boot the board as specified here
-
Check the boot sequence and access to the board terminal - Boot Sequence and Terminal Guide
-
A
meta-aesdlayer was added, add recipe to this layer. -
Add the recipe through devtool
a.
devtool add <recipe-name> <url>to add the recipe to workspaceb.
devtool finish <recipe-name> <layer-name>to add the recipe to your layer -
Add
CORE_IMAGE_EXTRA_INSTALL += " <recipe-name>"to layers/meta-st/meta-aesd/recipes-st/images/st-image-aesd.bb -
Build the image
st-image-aesd
This part is tricky to track down to the basics. ST has their own layers and recipes that take care of default device tree configuration. However, whatever we add from the STM32CubeMX generated files.
- Set the device up in STM32CubeMX and generate device tree files - How to assign peripherals
- Add the device tree files into the distribution. Please refer to the repository to understand how to create files in your layer.

- Verify the device tree settings - Instructions to verify Cortex A7 devices
Here, we need some more resources to verify. First, get the reference manual for STM32MP157 processors. You can find peripheral addresses from Page 159. Once you find the peripheral address, you can see all the peripherals in
/proc/device-tree/soc. Below are the screenshots for further verification.


Note: Assigning different peripherals to different processor will result in some changes in device tree files. If you are curious about the changes, look at these pull request
-
Temporarily, we are using applications made by STMicroelectronics. Hence, following their directory structure.
-
Create a new recipe
recipes-extended. Add a folderm4projectsin the recipe directory. Further, addm4projects-stm32mp1.bbappendintom4projectsfolder. This step is required to leverage ARM Cortex M4 application build support in OpenSTLinux Distribution Package. Here, we are just doing to replace the variables set inmeta-st-stm32mp/recipes-extended/m4projects/*files. -
Refer to this commit change to understand how to develop recipes for Custom M4 Applications - link