For this experiment we will use the following tools and systems:
- AWS EC2
- Docker daemon
- Docker cli
- Docker compose
- Docker swarm
- CoreOS
- ETCD2
- Debian
- Strongswan
- OpenSSL
To better understand how we ride, see this pattern topology:
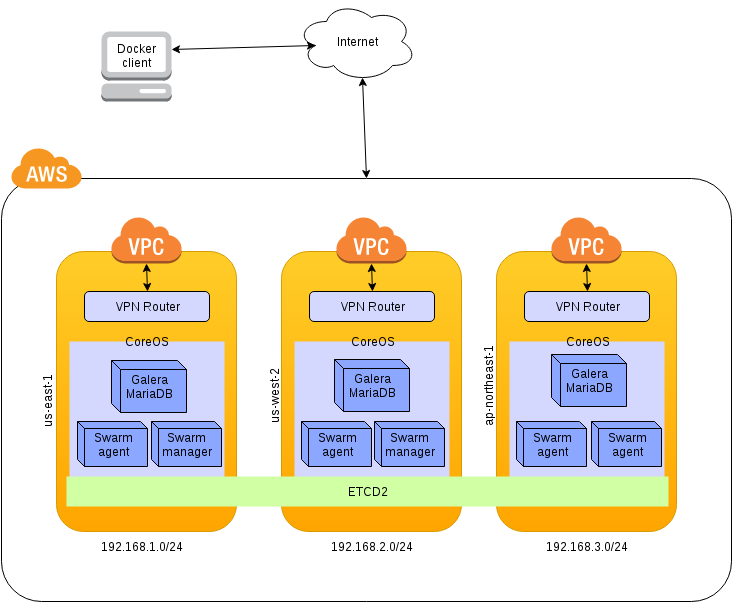
The first thing we do is define the networks that we use in different regions of AWS. For this experiment I used: "us-east-1", "us-west-2" and "ap-northeast-1". In each must follow the following steps:
In the services section of Amazon, we headed to VPC. There, in the list of VPCs create a new one specifying which network to use, well 192.168.1.0/24, well 192.168.2.0/24 or 192.168.3.0/24. Then we create a subnet from the section of subnets associated with the VPC and the same subnet network configuration.
Once we create the subnet, we will modify the behavior of public IPs allocation. Right-clicking on it found the "Modify Auto-Assign public ip" option. We activate it.
In order to have access to the Internet, we need to associate an Internet Gateway (IGW) to our VPC. We created one from the section Internet Gateways and associate the new VPC.
Now we must configure the routing table for the machines doing they know what is their default route. In the section of Route Tables, select one that corresponds to the new VPC and in the routes tab, edit it to add the following:

The dropdown will show us the IGW created. If not, copy and paste the reference from Internet Gateways tab.
First we get 3 Elastic Ips (one per zone) for each of the routers. We can do it from the submenu Elastic IPs. Then in each area we create 3 groups of security, from the submenu "Security Groups". These are associated with the VPC, so we select the right in its creation. The rules are as follows:
| Inbound Rules | Type | Protocol | Port Range | Source |
|---|---|---|---|---|
| SSH(22) | TCP(6) | 22 | 0.0.0.0/0 |
| Inbound Rules | Type | Protocol | Port Range | Source |
|---|---|---|---|---|
| All Traffic | ALL | ALL | <elastic_ip_1>/32 |
|
| All Traffic | ALL | ALL | <elastic_ip_2>/32 |
|
| All Traffic | ALL | ALL | <elastic_ip_3>/32 |
| Inbound Rules | Type | Protocol | Port Range | Source |
|---|---|---|---|---|
| All Traffic | ALL | ALL | 192.168.1.0/24 |
|
| All Traffic | ALL | ALL | 192.168.2.0/24 |
|
| All Traffic | ALL | ALL | 192.168.3.0/24 |
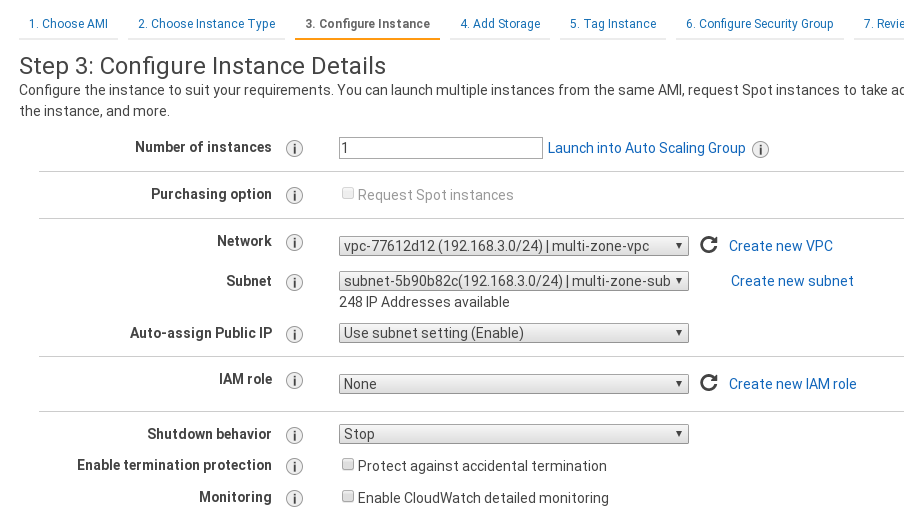
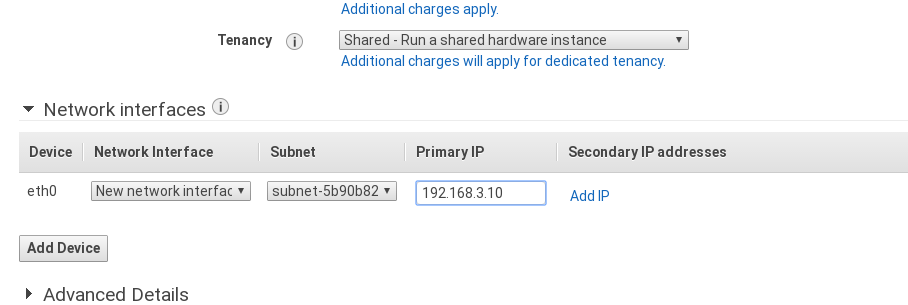
Now we turn to the EC2 service. There began an instance in each area, which will act as VPN router between our networks. We choose Debian 8 (Jessie) as operating system. Then the instance type. And then the configuration to use the VPC we created earlier and a fixed private IP. That will be for each network 192.168.1.10, 192.168.2.10 and 192.168.3.10. To make it more clear I leave a screenshot of the configuration form:
We add to the 3 security groups created earlier, create the instance and associate each "elastic IP" to one of the machines.
Then we login by ssh on each of the machines to configure them. Proceed to execute the following commands:
sudo apt-get update && sudo apt-get install -y vim curl strongswan openssl
sudo mkdir -p /etc/ssl/private/strongswan
sudo cat 1 > /proc/sys/net/ipv4/ip_forward
Also we uncomment the line where it says net.ipv4.ip_forward = 1 to the file /etc/sysctl.conf This will make our machine to route connections.
Next we will generate a self-signed certificate for authenticating tunnels. Here I'll use the same for all 3 machines, so we can generate locally and then copy it. Or generate it in one and copy it to rest with vim or whatever. To generate use the following command:
sudo openssl req -x509 -newkey rsa:2048 -keyout key.pem -out cert.pem -days 730 -nodes -subj "/C=US/ST=Oregon/L=Portland/O=Company Name/OU=Org/CN=www.example.com"This gives us the public key cert.pem and private key.pem without DES authentication (specified with the -nodes argument). Then move to the directory created for them in /etc/ssl/private/strongswan.
Now edit the /etc/ipsec.secrets file and add the following line, specifying key certificates that we will use:
: RSA /etc/ssl/private/strongswan/key.pem
Then we proceed to configure VPN connections in the /etc/ipsec.conf file.
In the global configuration (section "config setup") must add or comment out the line:
uniqueids = no
And then add the connections as follows:
conn us-west-2-to-us-east-1
    leftsubnet=192.168.2.0/24
    leftcert=/etc/ssl/private/strongswan/cert.pem
    leftsendcert=never
    right=52.86.70.175
    rightsubnet=192.168.1.0/24
    rightcert=/etc/ssl/private/strongswan/cert.pem
    auto=start
In the first line we specify the connection name.
With the parameter leftsubnet indicate the local network of the machine.
leftcert and rightcert are certificates; for our example will be the same.
The right parameter specifies the public IP address of the server with which to connect. Are the "Elastic Ips" that have associated before.
rightsubnet is the network of the remote machine.
auto = start we tell ipsec to connect and lift the tunnel automatically.
Once they are 3 servers configured, we restart ipsec service.
sudo service ipsec restartAnd we verify that the connections are set correctly:
ipsec status
# or
journalctl -b -f -u stronswan.service
With -b we say show us the logs of the last boot with -f to go displaying them in real time and we will specify the service with -u.
Now we must configure routing between networks. And for this we must return to the section VPC routing tables with the identifier of the machine we have created for each network and add a route destination specifying it as the identifier of the machine serving as a router.
Now let's start other 3 machines (1 per region) and give them the parameters to be synced through ETCD2 service. All configuration will be passed in the configuration step. We chose as base image the last available CoreOS (HVM) we can go CoreOS and then search in "Comunity amis" for the latest version. Select the appropriate VPC and we will give them a private IP. In this case the number 20 of each network (192.168.1.20, 192.168.2.20 and 192.168.3.20).
Before moving to the next step, we deploy at the bottom under Advanced Options and we will paste the settings on each machine. It is important that the first line be # cloud-config. Here's an example:
#cloud-config

coreos:
  etcd2:
    advertise-client-urls: http://$private_ipv4:2379,http://$private_ipv4:4001
    initial-advertise-peer-urls: http://$private_ipv4:2380
    listen-client-urls: http://0.0.0.0:2379,http://0.0.0.0:4001
    listen-peer-urls: http://$private_ipv4:2380,http://$private_ipv4:7001
    name: "damodara"
    initial-cluster: "damodara=http://192.168.3.20:2380,mukesha=http://192.168.1.20:2380,mitra=http://192.168.2.20:2380"
    initial-cluster-state: "new"
    initial-cluster-token: "suresha"

  units:
    - name: etcd2.service
command: start- name: the name of the node.
- initial-cluster: will be used for the bootstrap of the cluster and to know the initial nodes. This is where you must pass all nodes with its name.
- initial-cluster-state: with
newyou specify that is a new cluster. - initial-cluster-token: is the name of the cluster.
In each machine that we launch we must modify the name parameter whichever corresponds.
When CoreOS 3 machines are raised, we do ssh in them. And we can see that everything has gone right with the following commands:
etcdctl member list
etcdctl cluster-healthFirst we will expose API Docker and specify the cluster service to be used. To do this run on 3 machines the following commands:
sudo mkdir -p /etc/systemd/system/docker.service.d/
sudo vim /etc/systemd/system/docker.service.d/custom.conf
# and paste the following
[Service]
Environment="DOCKER_OPTS=-H=0.0.0.0:2376 -H unix:///var/run/docker.sock --cluster-advertise eth0:2376 --cluster-store etcd://127.0.0.1:2379"
# Restart the service
sudo systemctl daemon-reload
sudo systemctl restart docker
And we verify that docker has exposed the port that we have indicated:
docker -H :2376 infoThe following command is not essential, but as I use a terminal manager who write in the 3 servers at once, I had to keep private ip in a variable:
export ip=$(ifconfig | sed -n '10 p' | awk '{print $2}')In the above command, 10 is the line to get the IP in ifconfig. If the above command is not executed replace the variable $ip in the following command by private ip 192.168.*.20 of each server.
Start Swarm joiner:
docker run -d --restart=always --name swarm-agent --net=host swarm join --addr=$ip:2376 etcd://127.0.0.1:2379And then the manager. Although only need 1 in one of the nodes, but for convenience I threw them in the 3 to connect to any of them indifferently.
docker run -d --restart=always --name swarm-manager --net=host swarm manage etcd://127.0.0.1:2379The only thing left is to open the port 2375 of one (or all nodes). This is possible by creating a security group and giving permission to our IP, and assigning it to the node in the cluster.
To do this run the following command:
export DOCKER_HOST=tcp://<any_cluster_node_public_ip>:2375
docker info
And we find that all nodes are included and a status: healthy. We will also see information grouped CPUs and memory we have.
To create the containers of Galera will use a docker-compose.yml where we define 3 containers that will run on each node and make use of a Swarm "overlay" network to interconnect eachone. Also we create a Dockerfile to load Galera certificates and MariaDB settings. We will use the following Galera image "diegomarangoni/mariadb-galera". With the configuration that can be seen below:
[mysqld]
datadir=/var/lib/mysql
socket=/var/run/mysqld/mysqld.sock
user=mysql
binlog-format=ROW
default-storage-engine=InnoDB
innodb-autoinc-lock-mode=2
innodb-flush-log-at-trx-commit=0
innodb-buffer-pool-size=122M
innodb-doublewrite=1
innodb-flush-method=O_DIRECT
wsrep-provider=/usr/lib/galera/libgalera_smm.so
wsrep-cluster-name=galera_cluster
wsrep-sst-method=rsync
query-cache-size=524288
log-error=/dev/stderr

[mysql_safe]
log-error=/dev/stderr
pid-file=/var/run/mysqld/mysqld.pid

[sst]
tcert=/etc/ssl/mysql/cert.pem
tkey=/etc/ssl/mysql/key.pem
FROM diegomarangoni/mariadb-galera

COPY my.cnf /etc/mysql/my.cnf
RUN mkdir -p /etc/ssl/mysql
COPY cert.pem /etc/ssl/mysql/
COPY key.pem /etc/ssl/mysql/
version: "2"
networks:
  galera-tier:
    driver: overlay
services:
  galera1:
    build: .
    hostname: galera1
    cap_add:
      - ALL
      - NET_ADMIN
      - SYS_ADMIN
    networks:
      - galera-tier
    environment:
      MYSQL_ROOT_PASSWORD: 'r00tPW'
      MYSQL_DATABASE: 'test'
      MYSQL_USER: 'user'
      MYSQL_PASSWORD: 'user'
    ports:
      - "13306:13306"
      - "3306:3306"
      - "4444:4444"
      - "4567:4567"
      - "4568:4568"
  galera2:
    build: .
    hostname: galera2
    cap_add:
      - ALL
      - NET_ADMIN
      - SYS_ADMIN
    networks:
      - galera-tier
    environment:
      MYSQL_ROOT_PASSWORD: 'r00tPW'
      MYSQL_DATABASE: 'test'
      MYSQL_USER: 'user'
      MYSQL_PASSWORD: 'user'
    ports:
      - "13306:13306"
      - "3306:3306"
      - "4444:4444"
      - "4567:4567"
      - "4568:4568"
  galera3:
    build: .
    hostname: galera3
    cap_add:
      - ALL
      - NET_ADMIN
      - SYS_ADMIN
    networks:
      - galera-tier
    environment:
      MYSQL_ROOT_PASSWORD: 'r00tPW'
      MYSQL_DATABASE: 'test'
      MYSQL_USER: 'user'
      MYSQL_PASSWORD: 'user'
    ports:
      - "13306:13306"
      - "3306:3306"
      - "4444:4444"
      - "4567:4567"
      - "4568:4568"
Once you have created the files locally you can run the following command. Which will build and rise one by one the images and the containers indicated. The Swarm scheduler will take care of distributing the containers one at each node as they expose the same ports. We can also set up filters and tell the scheduler where should go every container. But that for another section.
docker-compose up -dWhen the process is complete, the startup script of this images opens a port to listen to a command (TCP 13306). We start the Galera cluster using the command NetCat. One by one going up the cluster. To the first node:
echo "mysqld --wsrep-new-cluster --wsrep-cluster-address=gcomm://galera1,galera2,galera3" | nc <node1_public_ip> 13306For the other two:
echo "mysqld --wsrep-cluster-address=gcomm://galera1,galera2,galera3" | nc <node2_public_ip> 13306
echo "mysqld --wsrep-cluster-address=gcomm://galera1,galera2,galera3" | nc <node3_public_ip> 13306
We can verify that there have not been problems viewing the container logs with the command:
docker-compose logs@author David Peralta