MIDI via RS 232 or USB to serial
You can send MIDI data to mt32-pi using a serial port directly using suitable cabling and software such as Hairless MIDI on a modern computer, or SoftMPU on a vintage computer.
mt32-pi supports a wide range of baud rates on the GPIO UART, which can be configured with the gpio_baud_rate option in the configuration file. This means you use serial ports that cannot operate at the standard MIDI baud rate of 31250.
USB to serial converters can be used either on the PC side or the Raspberry Pi side, or both, depending on what you want to achieve.
For modern computers, you can use a USB to serial converter to directly connect mt32-pi to the machine without the need for a USB MIDI interface, which can be more cost-effective than purchasing a USB MIDI interface for the PC and a GPIO MIDI interface for the Raspberry Pi. You can then use mt32-pi for:
- Playing games using DOSBox with MIDI support.
- Playing MIDI files, e.g. ripped from games or original compositions.
- Making music with a modern DAW (digital audio workstation) that uses classic MT-32 sounds.
Some vintage computers (e.g. old laptops, "thin client" machines) lack a game port or any sort of way to give the machine an MPU-401-like interface for connecting MIDI hardware the traditional way.
Fortunately, many of these machines feature the venerable serial port (aka. RS-232 port, or COM port). With appropriate driver software and hardware interfacing, you can use the serial port to get MIDI out of the machine and into mt32-pi.
The catch is that the receiving equipment must be able to handle PC baud rates. MIDI uses a baud rate of 31250bps, which is not a standard PC baud rate. The closest standard PC baud rate is 38400bps, and most synthesizers with a "PC" connection such as the Roland SC-55MkII or SC55-ST will use this baud rate.
The method of connection varies depending on what kind of host computer you are using. Here are some examples of how you can create a serial port connection.

As of version 0.10.0, you can use USB to serial converters on the Raspberry Pi (i.e. the USB connection is made with the Raspberry Pi and the serial port connection is made with a vintage computer). This allows you to conveniently connect mt32-pi directly to a vintage computer with a single cable.
Only the following chipsets are supported:
- CDC class devices
- CH341
- CP2102
- FT231x
- PL2303
The RS-232 end of your cable should be female and wired for null-modem connections (i.e. RX/TX crossed) to connect directly to your PC. If the gender is incorrect or the cable is wired for a straight connection instead of null-modem, you may need to use a null-modem cable and/or a gender changer between the PC and the USB to serial cable to route the signals correctly.
One good example is the StarTech.com ICUSB232FTN, which has a female RS-232 connector and is wired for null-modem. Hence, it can be connected directly between the PC's serial port and one of the Raspberry Pi's USB ports.
mt32-pi will automatically detect and use your USB to serial converter if one is connected and it has a supported chipset.
⚠️ Note: Theusb_serial_baud_rateconfiguration file option is used to control the baud rate of USB to serial converters. Valid baud rates may vary for different chipsets.
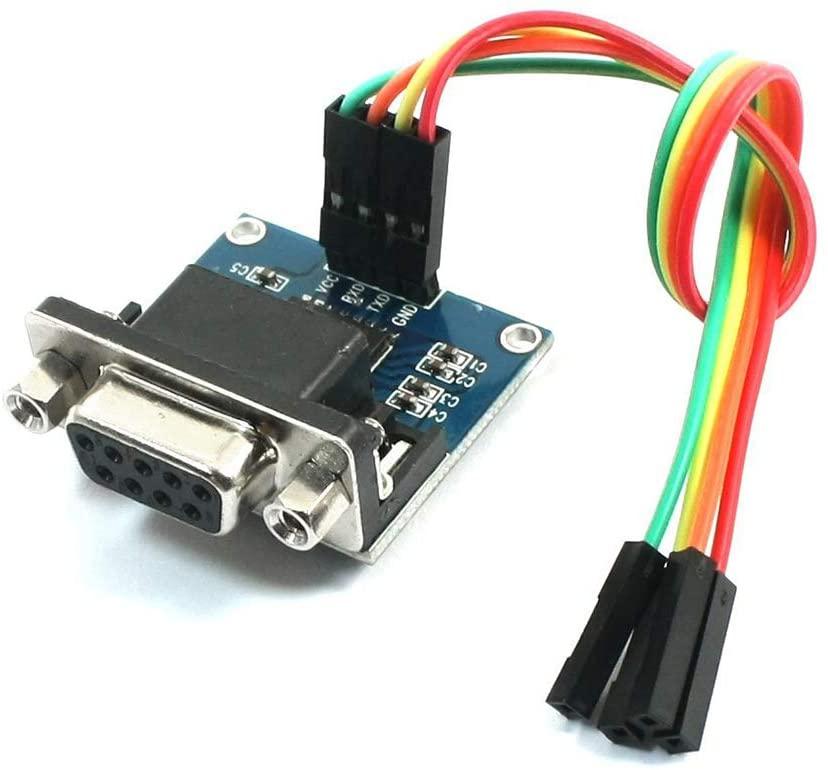
RS-232 ports use signalling voltages that are dangerous to the Raspberry Pi! In order to safely connect a Raspberry Pi to a PC's serial port, you must use an appropriate level shifter to convert the signals to suitable levels.
One example is a simple module based on the MAX3232 chip - search for "MAX3232" or "RS-232 to TTL converter". These are available very cheaply from various online suppliers.
Connect the module as follows:
| Converter pin | Raspberry Pi pin |
|---|---|
| VCC | 1 (3.3V) |
| GND | 6 (GND) - or any other GND pin |
| RXD | 10 (UART RXD) |
| TXD | 8 (UART TXD) - not required* |
⚠️ Note: mt32-pi does not transmit any MIDI unlessgpio_thruis enabled, so you can leave the TXD signal from the Pi disconnected if you want.
You can now connect the module to the host computer's serial port. It may be convenient to use a serial port extension cable, or maybe even a null modem cable between the PC and the module, but you will need to ensure that the cable connector genders are correct and that the RXD/TXD signals are going to the right pins.
USB to serial converters are inexpensive (e.g. some varieties can be found for less than $1-2 on AliExpress!) and many varieties are available. You may even have one handy if you have worked on any Arduino/microcontroller projects before. They are often based around chipsets such as the FT232RL from FTDI, or CP2102 from Silicon Labs.
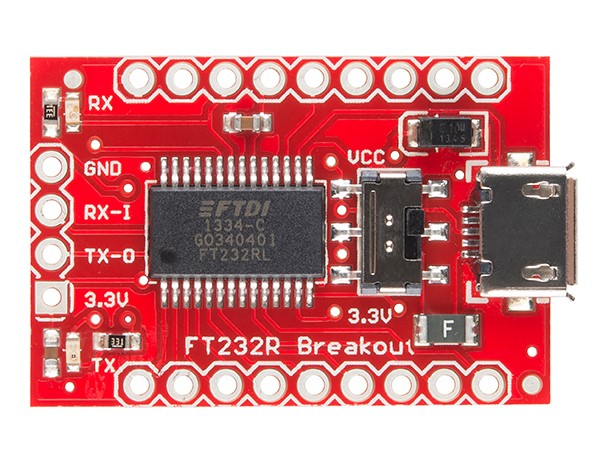

⚠️ Note: Make sure that the converter outputs 3.3V signals or can be set to do so! Converters using 5V signalling will damage the Raspberry Pi!
Connect the converter as follows:
| Converter pin | Raspberry Pi pin |
|---|---|
| GND | 6 (GND) - or any other GND pin |
| TXD | 10 (UART RXD) |
| RXD | 8 (UART TXD) - not required* |
⚠️ Note: Do not connect any power (VCC/+5V/+3.3V etc.) pins between the devices. Only GND and the TXD/RXD signals should be connected.
⚠️ Note: mt32-pi does not transmit any MIDI unlessgpio_thruis enabled. You can leave the TXD signal from the Pi disconnected if you want; though you may want to ground the RXD signal on the converter to prevent noise/garbage being received.
As serial ports are not usually treated as MIDI interfaces by the operating system or application software, some additional software is needed to "bridge" the serial port to the application and make it usable as a MIDI device.
SoftMPU is a clever piece of software for MS-DOS that emulates an "intelligent-mode" MPU-401 interface, which solves the problem of older games failing to work properly with later "non-intelligent" interfaces found on Sound Blaster cards and similar.
One of its features is to allow MIDI output via the serial port instead of the game port. Unfortunately, SoftMPU cannot work with software that uses "protected mode" (e.g. via DOS extenders) such as Doom, due to the way SoftMPU's port trapping works.
To use the serial port feature of SoftMPU with mt32-pi:
- Set the
gpio_baud_rateoption (orusb_serial_baud_rateif using a USB to serial converter on the Pi side) in the mt32-pi configuration file to 38400. - Make a connection between the host computer and the Raspberry Pi as described above and power on the Raspberry Pi.
- Install SoftMPU onto the MS-DOS machine and start it with
SOFTMPU.EXE /MPU:330 /OUTPUT:COM1.- If your machine has multiple COM ports, you may need to change the
/OUTPUTswitch toCOM2or another value.
- If your machine has multiple COM ports, you may need to change the
- Start your game. You should see the status LED on the Raspberry Pi blinking to indicate MIDI reception, and hear MIDI being played from mt32-pi.
- If it doesn't work, try swapping the RXD/TXD connections between the module and the Pi - some modules may be wired differently.
Some games (both real mode and protected mode) have unofficial patches available so that MIDI data is redirected to the serial port. You can find some of these patches spread throughout the following forum threads:
- https://www.vogons.org/viewtopic.php?f=62&t=81178
- https://www.vcfed.org/forum/forum/genres/tandy-radio-shack/71478-a-trick-up-its-sleeve-midi-with-the-tandy-pssj
Once installed, set the gpio_baud_rate option (or usb_serial_baud_rate if using a USB to serial converter on the Pi side) in the mt32-pi configuration file to 38400 and make a connection between the host computer and the Raspberry Pi using one of the methods above.
A special driver from Roland can be used to make a serial port appear as a MIDI device at the operating system level, which is more convenient than using something like Hairless MIDI to bridge the serial port to a virtual MIDI device.
Two versions are available:
A control panel is provided with the driver to select which COM port to use - make sure you pick the correct port.
Once installed, set the gpio_baud_rate option (or usb_serial_baud_rate if using a USB to serial converter on the Pi side) in the mt32-pi configuration file to 38400 and make a connection between the host computer and the Raspberry Pi using one of the methods above.
There are two pieces of software required to use your serial port as a MIDI device:
- Hairless MIDI - this creates a bridge between a standard Windows MIDI device and your serial port.
- loopMIDI - this creates a virtual MIDI device for your application/game to use.
To use them to connect mt32-pi to a modern computer via a USB to serial converter:
- Launch loopMIDI, type a memorable name in the "New port-name" box, and click the "+" button. This creates a virtual MIDI device for you to use. You can now close this window and it will be hidden in the system tray.
- Launch Hairless MIDI, open File -> Preferences and make a note of the baud rate.
- The default of 115200 is fine, or you can increase it to reduce latency if your serial device supports it.
- Baud rates below 31250 should not be used as they are slower than the MIDI standard baud rate.
- Set the
gpio_baud_rateoption (orusb_serial_baud_rateif using a USB to serial converter on the Pi side) in the mt32-pi configuration file to match the baud rate in the previous step, and start mt32-pi. - Click OK to return to the main window.
- From the "Serial port" dropdown on the left-hand-side, choose your USB to serial device.
- From the "MIDI In" dropdown on the right-hand-side, choose the virtual MIDI device you created earlier in loopMIDI.
- Make sure the "Serial<->MIDI Bridge" checkbox is checked to enable the connection.
- You can now use any MIDI-capable software to output MIDI to mt32-pi by setting it to use the virtual loopMIDI device you created.
- A good test would be to try playing a MIDI file with a program such as MidiPlay.
To use DOSBox under Windows with the setup described above, you can carry out the following:
- Launch DOSBox, type
MIXER /LISTMIDI, and make a note of the number corresponding to the virtual MIDI device you created earlier. This is the ID of your MIDI device. -
Open your DOSBox configuration file and find the
[midi]section. Setmididevice=win32, andmidiconfigto the ID you noted earlier (e.g.midiconfig=2). - Relaunch DOSBox and start a game. You may need to configure the game to use MT-32 or General MIDI music output. You should see the status LED on the Raspberry Pi blinking to indicate MIDI reception, and hear MIDI being played from mt32-pi.
![]() © Dale Whinham 2020-2022. Released under the GNU General Public License v3.0.
© Dale Whinham 2020-2022. Released under the GNU General Public License v3.0.
