-
Notifications
You must be signed in to change notification settings - Fork 47
Release Procedure
The tracked GitHub repository for the ExoMy docu shall contain the source files (SolidWorks, Fritzing, Code, etc.). All exported file formats (STL, STEP, PNG, PDF, etc.) shall be packaged into a zip file, that is attached to a release. This helps to reduce the total file size of the repository.
Downloading the exported part should be enough to build ExoMy with the instructions from the wiki. The files from the repository should be downloaded if one wants to modify ExoMy
The software is organized in the separate repository https://github.com/esa-prl/ExoMy_Software.
The .fzz file contains everything you need to open the project again. It is an archive file that can be opened with a standard archive manager like 7-Zip. To create the exported files:
- Go to Breadboard view
- File -> Export -> as Image
- Store as .svg, .pdf and .jpg
- Do the same for the Schematic view
The export, modification and updating of all files is drastically simplified with the use of #TASK.
- Make sure all parts are in the assembly. This includes cables, screws, zip ties, glue, etc. The bill of materials are generated from the drawings so only if it is Solidworks, will it be ordered.
- Copy Template ExoMy Release v0.0.0 and rename to remove Template and set the release number.
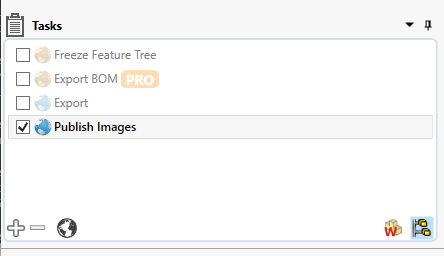
It is important that the tasks will be run on all configurations. Active the option in the bottom right corner of the task window as shown here:
Enable Feature freezing in Solidworks.
Freeze all parts using #TASK.
Items Scope: ExoMy/Mechanical Design
Tasks: Freeze Feature Tree
- Naming of files should be for assemblies & parts and '''[$title]''' for drawings.
Options applying for all parts exports.
Output File Name: '''[$title]_[$conf]'''
Drag and drop all 3D print parts (not assemblies) into the item scope.
Items Scope: ExoMy/Mechanical Design/P*_FILENAME.SLDPRT
Task: Export
Destination Folder: ExoMy/ExoMy Release vx.x.x/Parts/STL
Manually export the *.STL files of the bodies by selecting all bodies that should be printed in a color and saving them as an STL with option "save only selected bodies". Then do the same for the bodies of the second color.
Name them as follows:
FILNAME_INKL_CONFIGURATION_1.SLDPRT
FILNAME_INKL_CONFIGURATION_2.SLDPRT
Delete the batch exported two color print stl to avoid confusion.
Go to Options > Export > File Format: > TIF/PSD/JPG/PNG
Set Output as = Print capture
Set DPI: 100
Paper Size: Custom (200 mm x 200 mm)
Items Scope: ExoMy/Mechanical Design
Task: Publish Images
Publish Options: Zoom To Fit, Isometric, (Photo Realistic Images (Did not work for me...)) Watermark Location: Bottom Right Watermark Image: /ExoMy.wiki/images/release_instructions/esa_logo_black.bmp Output Folder: ExoMy/ExoMy Release vx.x.x/Parts/JPEG
Lets export a step file for all 3D printed parts and one for the main assembly.
Items Scope: ExoMy/Mechanical Design/P*_FILENAME.SLDPRT ExoMy/Mechanical Design/A01_ExoMy.ALDASM
Task: Export
Destination Folder: ExoMy/ExoMy Release vx.x.x/Parts/STEP
Options applying for all drawing exports.
Items Scope: ExoMy/Mechanical Design/Drawings
Output File Name: '''[$title]'''
Then go through the drawings and make sure the balloons and tables are correctly set. Changes in components usually require manual adjustment in the drawings. Especially, in the AI_Integration_BoM.SLDDRW, as a lot of components are hidden in the BoM
Task: Update And Save
Options: Rebuild, Zoom To Fit
Tasks: Save PDF
Destination Folder: ExoMy/ExoMy Release vx.x.x/Drawings/PDF
Options: Save Only Current Sheet
Go to Options > Export > File Format: > TIF/PSD/JPG/PNG
Set Output as = Print capture
Set DPI: 100
Paper Size: A3 Landscape
Task: Export
Destination Folder: ExoMy/ExoMy Release vx.x.x/Drawings/JPEG
Extension: JPEG
Task: Export Table
Destination Folder: ExoMy/ExoMy Release vx.x.x/Drawings/CSV
Output Format: csv
Match Pattern: *
Open ExoMy/ExoMy Release vx.x.x/Drawings/CSV/PI_ExoMy_All_Parts_BoM.csv in Excel
Save in ExoMy/ExoMy Release vx.x.x/BoM/PI_ExoMy_Purchasing_BoM.xlsx
Add filtering, and hide all P*_ parts. Now, only the purchased parts are visible.
Compare the BoM to the one from the previous release and copy paste the correct columns, etc.
Export as PDF into the same folder.
Open ExoMy/ExoMy Release vx.x.x/Drawings/CSV/MI_Printed_Parts_BoM.csv in Excel
Save in ExoMy/ExoMy Release vx.x.x/BoM/MI_Print_Settings.xlsx
Compare the BoM to the one from the previous release and copy paste the correct columns, etc.
There might be an easier way to do this...
Export as PDF into the same folder.
Copy Technical- & Electrical_Drawings folder into wiki and replace the old one.
Put new instructions where needed Change version number of which wiki is supported
Build
- Getting Started
- Purchasing Instructions
- Software Instructions
- Manufacturing Instructions
- Assembly Instructions
- Optional Parts
Use
Contribute
Help
