
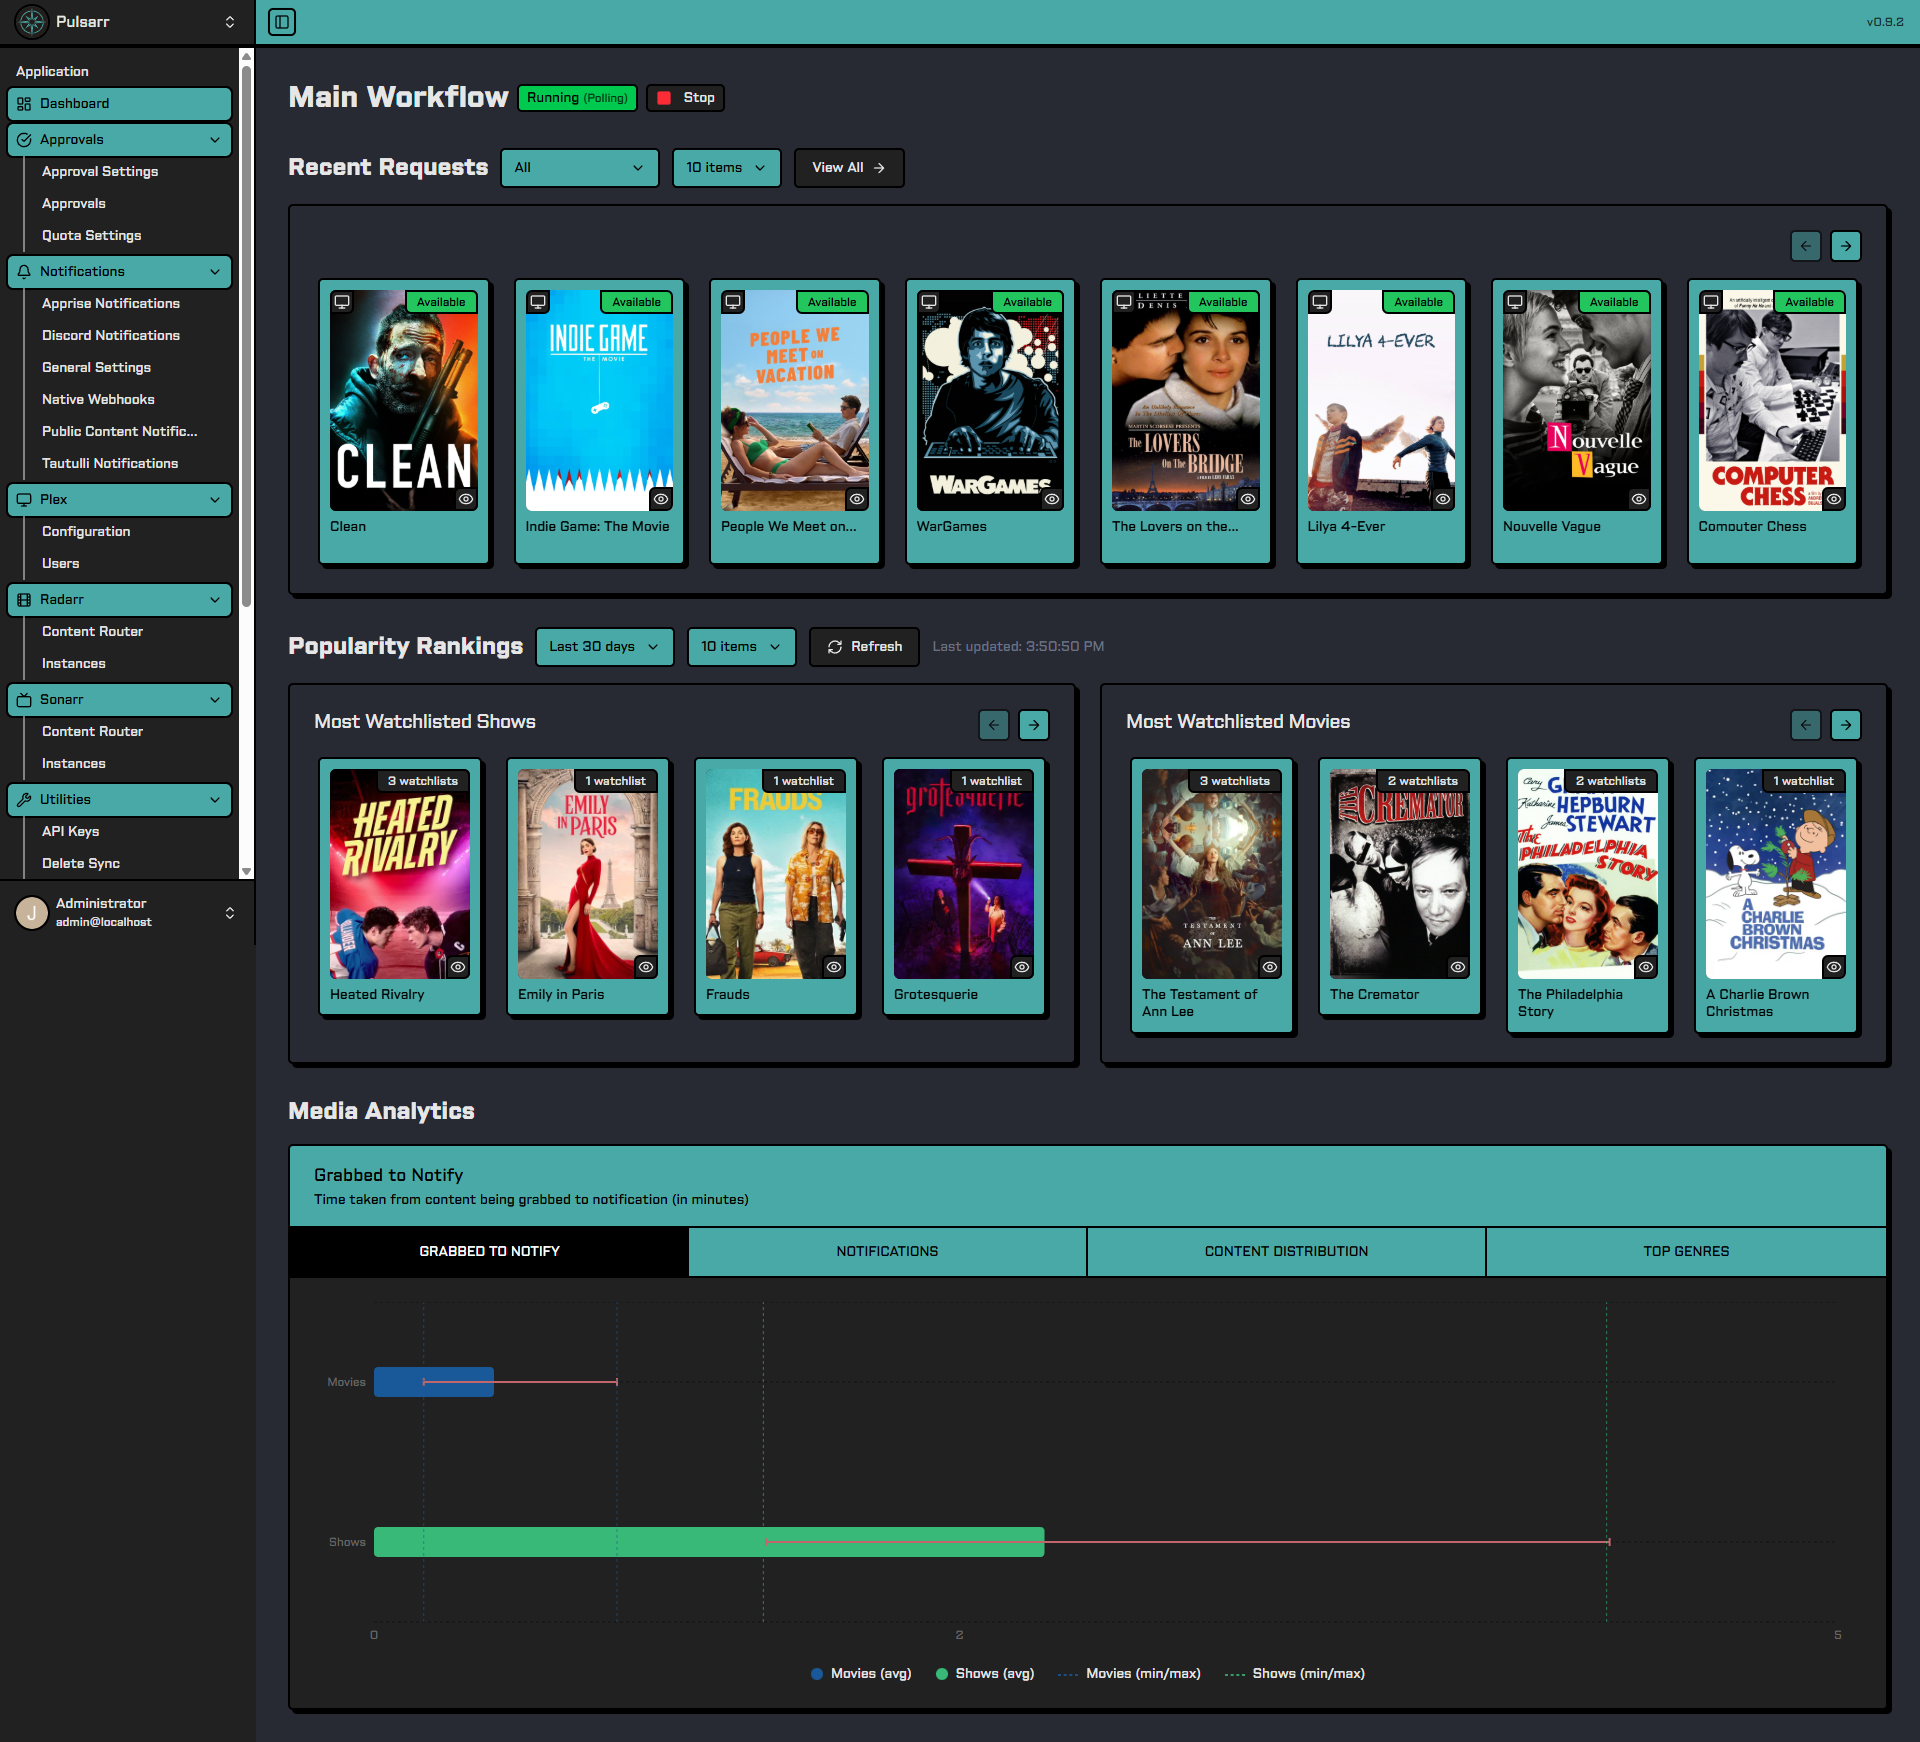
Pulsarr is an integration tool that bridges Plex watchlists with Sonarr and Radarr, enabling real-time media monitoring and automated content acquisition all from within the Plex App itself.
Enjoy all the benefits of other content discovery systems without requiring users to use additional services. All the magic happens from the pimary users Plex Token.
It provides user-based watchlist synchronization for yourself and for friends, smart content routing based on genre, and notification capabilities (Discord and Apprise).
Want to contribute? Check out our Contributing Guidelines.
(see the Quick Start Guide below to get going)
Additional screenshots below
- Features
- Architecture
- How It Works
- Quick Start
- Notification Setup
- Configuration
- Usage
- API Documentation
- Roadmap
- Contributing
- License
- Support
- Real-time & Interval-based Watchlist Monitoring:
- Real-time monitoring through RSS feeds for Plex Pass users
- 20-minute interval polling for non-Plex Pass users
- All other features remain identical regardless of Plex Pass status
- Smart Content Routing:
- Route content to different Sonarr/Radarr instances based on rules
- Multiple routing methods including:
- Genre-based routing
- Language-based routing
- User-based routing
- Year-based routing
- Extensible plugin architecture for future routing capabilities
- Discord Integration: User-friendly notification system with customizable settings via Discord bot commands. Allows users to customize their own notification settings.
- Apprise Integration: Apprise can be used to route notifications. Apprise supports many different notifications methods including email, SMS, Slack, Telegram, and many more. Users can configure their own Apprise settings via the Discord bot, or admins can set these up via the UI. System notifications can also be sent through Apprise. Please see Apprise Documentation below on setting up Pulsarr with Apprise.
- Granular User Controls: Choose which users can sync content from their watchlists.
- Automatic Configuration: Self-configures webhook endpoints in Sonarr/Radarr to route notifications as soon as your content is ready.
- Smart Notification System: Prevents notification spam with intelligent batching for season packs and individual episodes / movies.
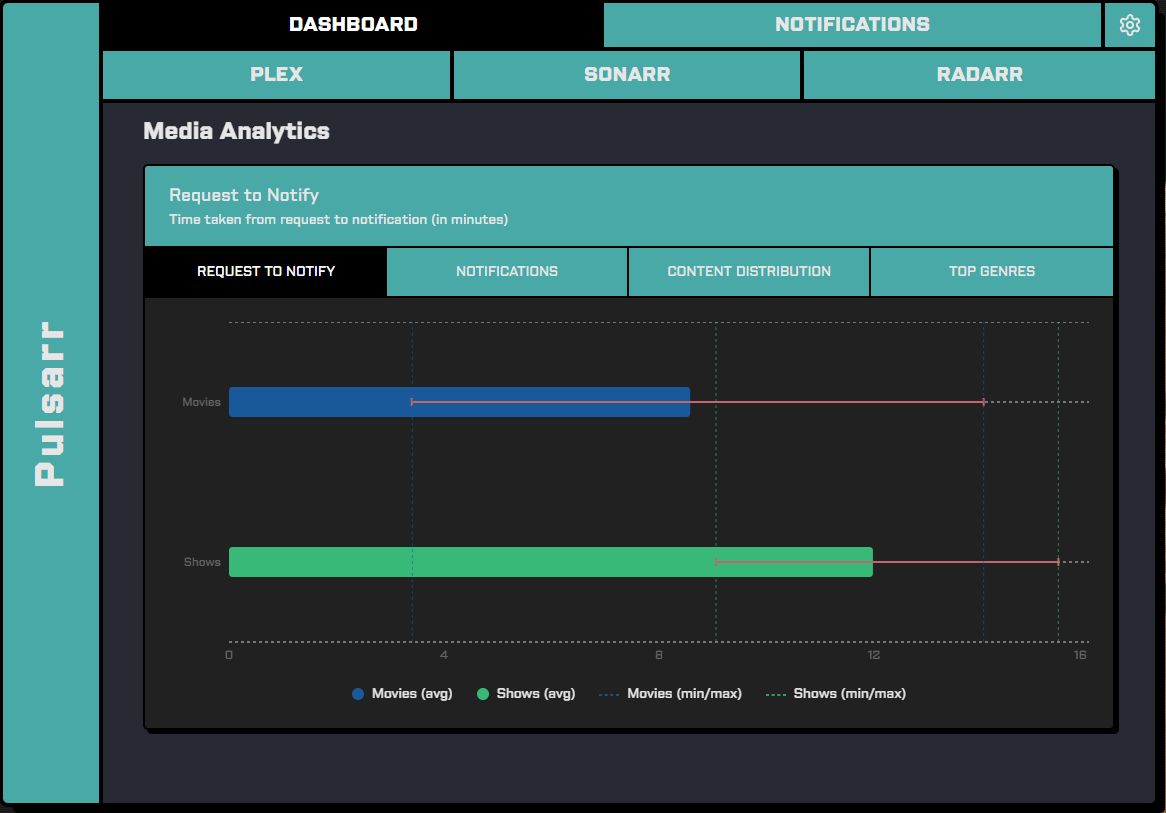
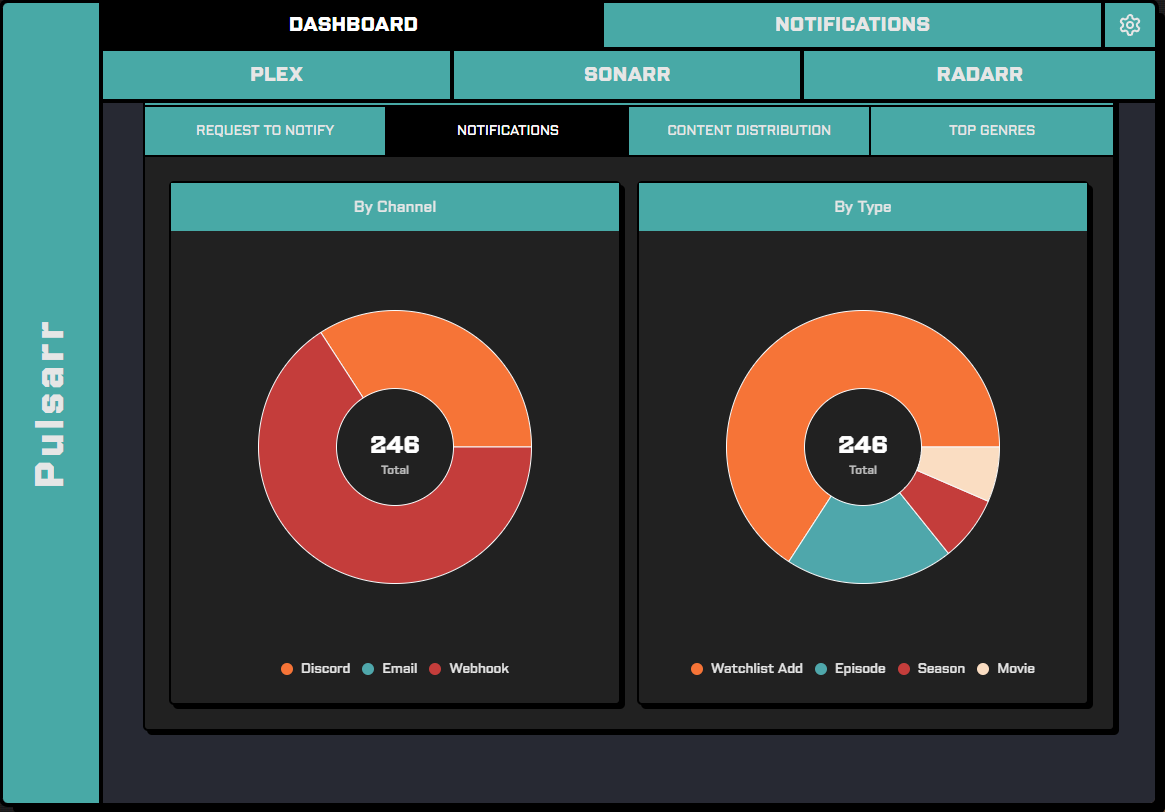
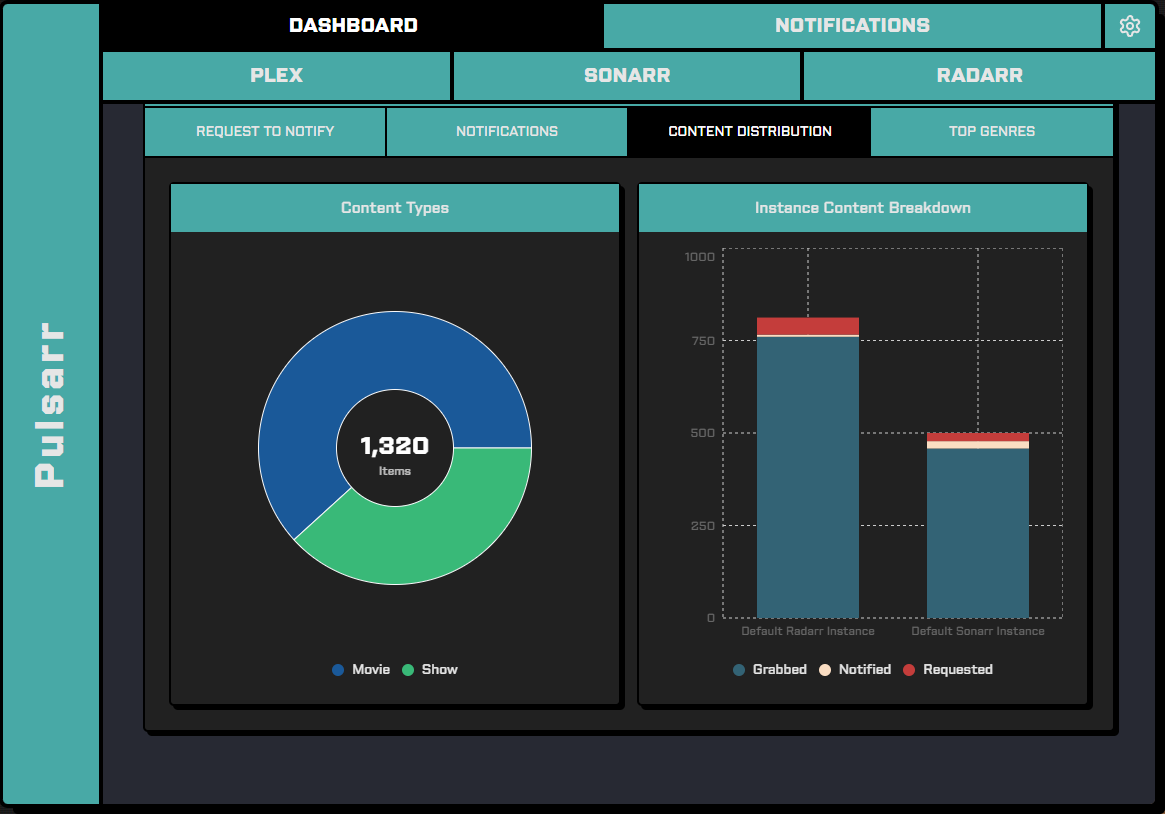
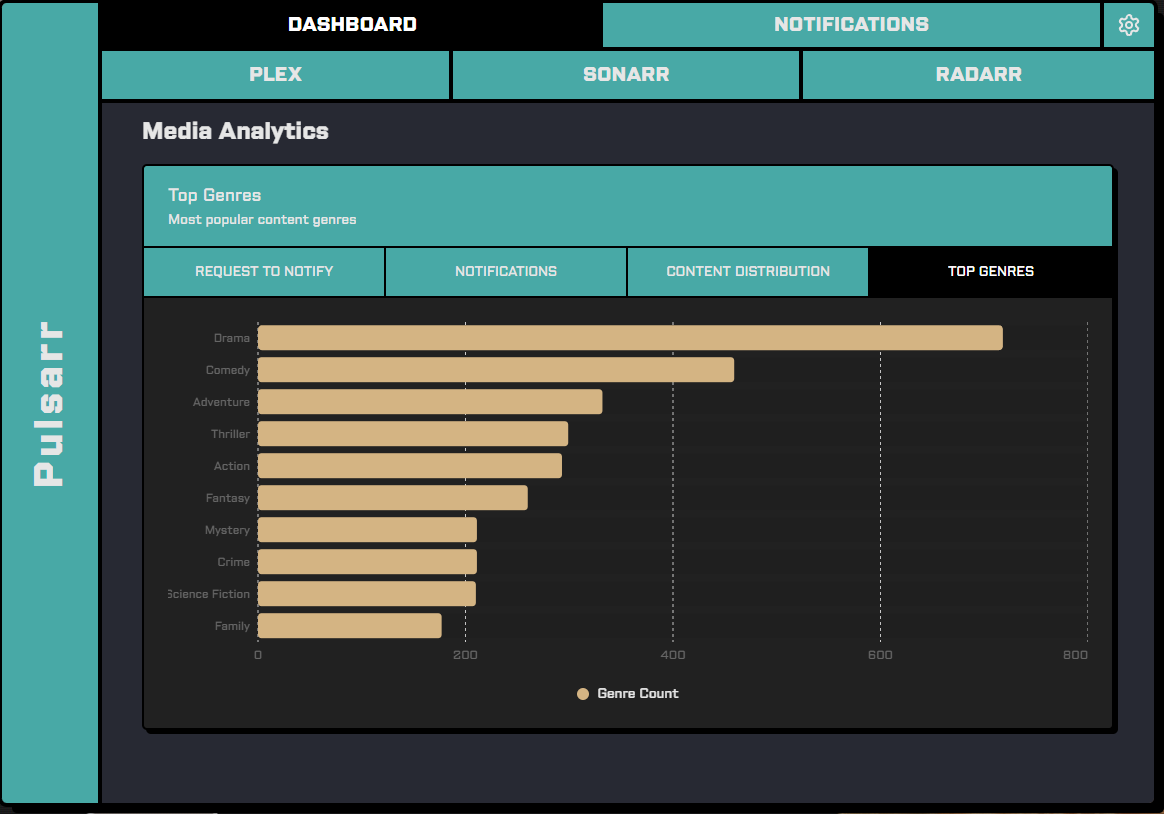
- Comprehensive Web UI: Modern interface with detailed statistics and admin settings, fully mobile friendly.
- API Documentation: Built-in Scalar UI for API exploration and interaction.
Pulsarr uses a full-stack architecture designed for reliability and performance:
- Fastify: High-performance API server with plugin system
- SQLite: Lightweight database for storing user, watchlist, and configuration data
- TypeScript: Type-safe code for better reliability and maintainability
- React: Component-based UI for responsive user experience
- Tailwind CSS: Utility-first styling for consistent design
- Vite: Modern build tool for fast development and optimized production
- Plex API: Monitors watchlist changes through RSS feeds, token syncs, and graphql calls
- Sonarr/Radarr APIs: Manages content acquisition across multiple instances
- Discord API: Delivers notifications through custom bot and webhooks
Pulsarr uses an intelligent workflow to process and route content:
- Content Detection:
- Plex Pass: Real-time monitoring via RSS feeds
- Non-Plex Pass: Regular polling every 20 minutes
- User Permissions: Verifies if the user has sync permissions enabled
- Content Analysis:
- Evaluates content metadata (genres, language, etc.)
- Applies configured routing rules
- Determines optimal target instance
- Instance Management: Routes content to appropriate instances based on rules
- Notification System: Sends configurable notifications when content is available
The notification system is designed to be informative:
- Webhook Reception: Receives webhooks from Sonarr/Radarr when content is imported
- Smart Queuing: Groups multiple episodes from the same season to prevent notification spam (when importing non-season packs)
- Batch Processing: Intelligently batches season packs into single notifications
- User Targeting: Identifies users who have the show in their watchlist and have enabled notifications
- Multi-channel Delivery: Sends personalized notifications via Discord DMs, Email (coming soon), and can send global grabs via webhooks
- Customizable Preferences: Each user can configure their notification preferences via Discord, or the admin can via the UI
- Docker (recommended for deployment)
- Plex Pass subscription (non Plex Pass coming soon)
- Sonarr/Radarr installation(s)
-
Create a
.envfile with your configuration (see Configuration below) -
Create a docker-compose.yml and copy the contents below:
services:
  pulsarr:
    image: lakker/pulsarr:latest
    container_name: pulsarr
    ports:
      - "3003:3003"
    volumes:
      - ./data:/app/data
      - .env:/app/.env
    restart: unless-stopped
    env_file:
      - .env
    environment:
      - NODE_ARGS=--log-both
      - TZ=America/Los_Angeles
The logger defaults to file logging. This can be changed by modifying the NODE_ARGS in the docker compose. Accepted values are --log-terminal, --log-both, or --log-file respectively.
- Pull the image and run Docker Compose to start the service:
docker compose pull && docker compose up -d- Navigate to the web UI (localhost:3003) to complete setup.
Pulsarr is being added to the Unraid Community Applications (CA) store. Once approved, you'll be able to install it directly from the Apps tab in Unraid.
In the meantime, you can install using the Docker Installation method above.
Prerequisites
- Node.js 23.6.0 or higher (for local build)
# Clone the repository
git clone https://github.com/jamcalli/Pulsarr.git

cd Pulsarr

# Install dependencies
npm install

# Build the server
npm run build

# Run Migrations
npm run migrate

# Start the server
npm run start:prod- Access the web interface at
http://your-server:3003 - You will be prompted to create an Admin account. Only a single admin account can be created.
- Upon first login, you should be directed to enter your Plex Token. Enter it to begin the sync. This is the only expensive operation in the entire workflow. The Plex API can rate limit this request. If you start seeing warnings in the logs, wait a minute and try again by clicking the
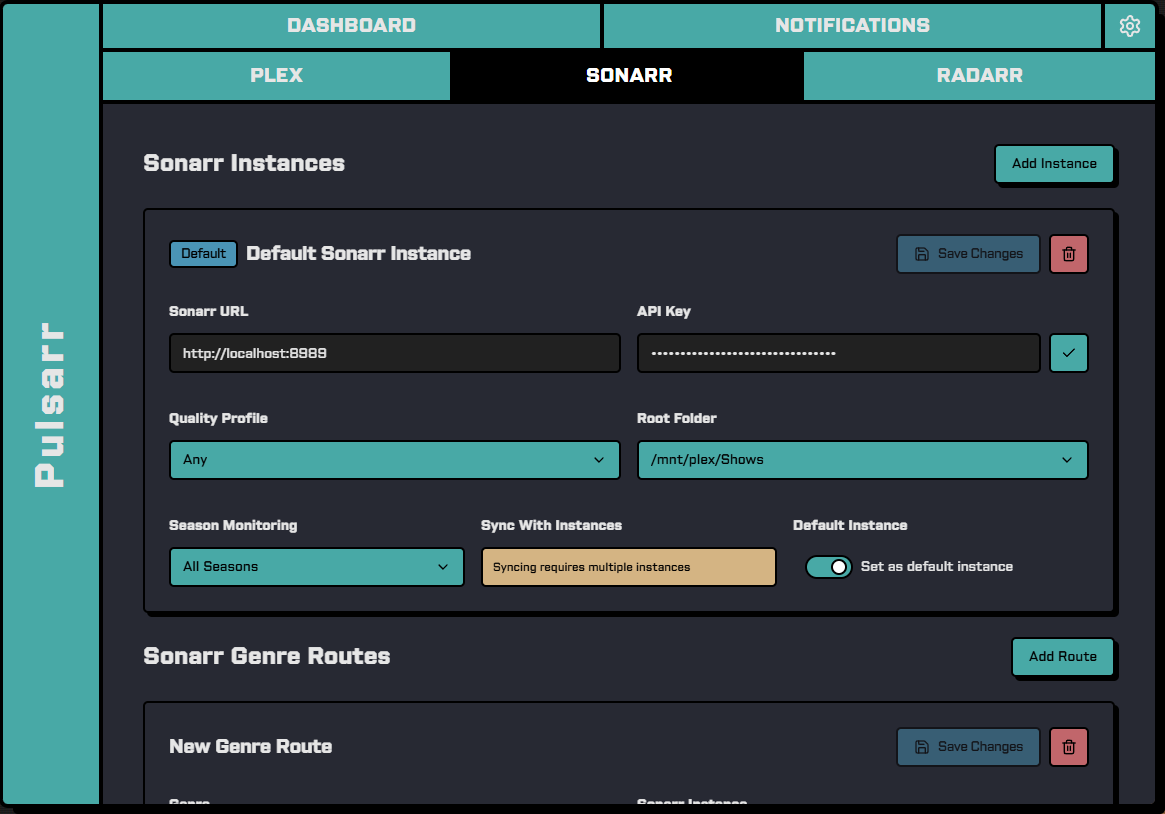
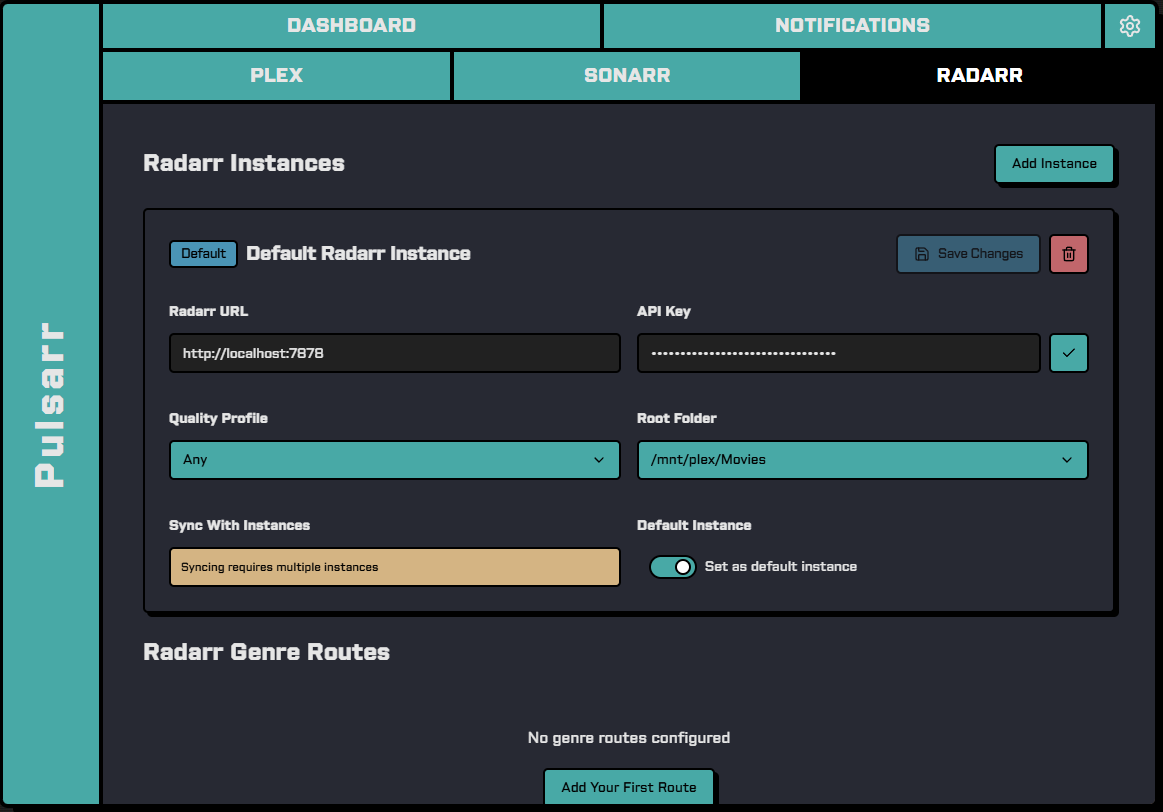
Manual Refreshbutton. Don't worry, it will never have to run this again as all metadata is cached in the database. - Configure your Sonarr and Radarr connections on their respective pages:
- Add instance details (URL, API key)
- Configure default quality profiles and root folders
- Set up genre routing rules (optional). Note: Multiple Genre Routes can be configured. E.g., You can have multiple 'Anime' routes, such as Anime to Instance A with root folder B, AND Anime to Instance B with root folder C, etc. Create as many as you'd like.
- After configuring both Sonarr and Radarr, ensure that you set all the sync permissions for any friends' watchlists you'd like to include. Head to the
Plexpage where you'll find the user table at the bottom. Click the three dots on the right to modify any of the values. IMPORTANT: All users who would like to have their watchlists synced need to ensure that their Account Visibility is set to 'Friends Only' or 'Friends of Friends'. Also, disabling any user's sync will result in a delay (approximately 1 minute) before processing. - Once you are satisfied, head to the
Dashboardpage and click on the Start button next to the Main Workflow heading. Be sure to toggle 'Auto Start' to true.
The webhook endpoint can be used without creating a Discord bot. Point this webhook at an admin-only channel to view notifications about who added what. You will receive webhooks like this:
-
Create a Discord Bot
-
Go to the Discord Developer Portal
-
Click "New Application" and give it a name (e.g., "Pulsarr")
-
Provide an icon too. Here is one you can use:

-
Go to the "Bot" section and click "Add Bot"
-
Under "Privileged Gateway Intents", enable "Message Content Intent"
-
Save your changes
-
Click "Reset Token" and copy the new token - you'll need this for your Pulsarr configuration
-
-
Configure Bot Permissions
- Go to OAuth2 > URL Generator
- Under "Scopes", select "bot" and "applications.commands"
- Under "Bot Permissions", select at minimum:
- Send Messages
- Embed Links
- Use Slash Commands
- Send Messages in Threads
- Use External Emojis
- Copy the generated URL
-
Invite the Bot to Your Server
- Paste the URL you copied into a browser
- Select your Discord server from the dropdown
- Authorize the permissions
-
Configure Pulsarr Discord Bot
- In your Pulsarr configuration, add:
- Bot Token (from step 1)
- Client ID (found in the "General Information" tab of your Discord application)
- Guild ID (your Discord server ID - enable Developer Mode in Discord settings, then right-click your server and "Copy ID")
- In your Pulsarr configuration, add:
-
Start Discord Bot
- After providing all the required fields, click the 'Start' button next to the Discord Bot Settings header.
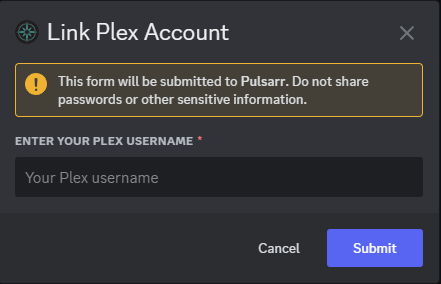
- Users can then use the
/notificationscommand within your server. They will be prompted to enter their Plex username to create the association with their watchlist.
Users can now configure their own notification preferences. These can be accessed anytime by using the
/notificationscommand.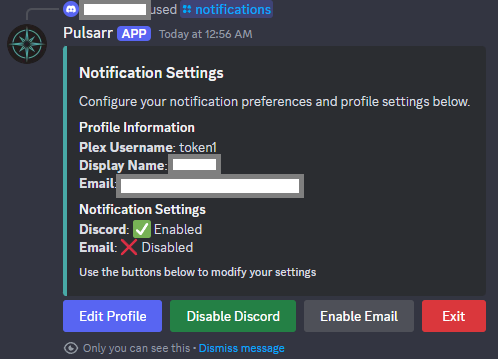
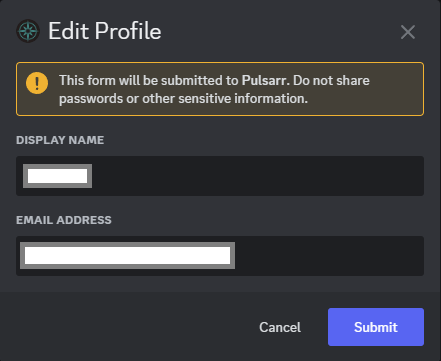
IMPORTANT: The username for the Plex Token is ALWAYS token1. Please use this when setting your own notification preferences.
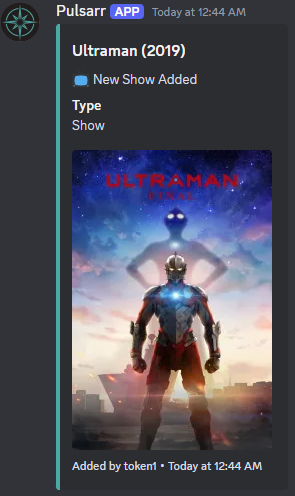
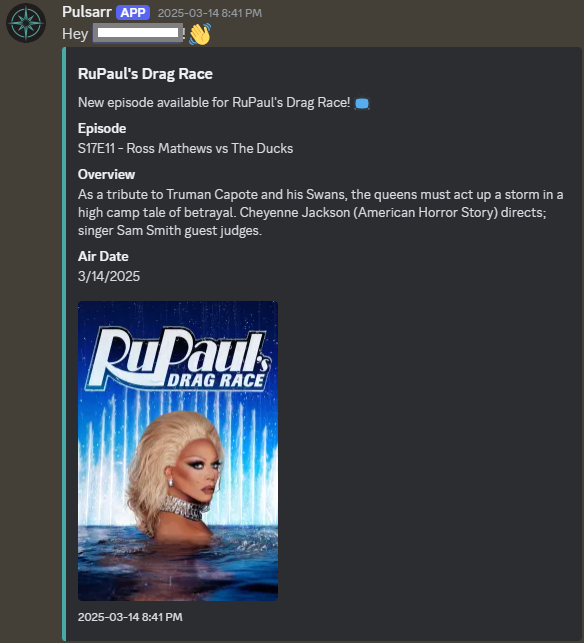
When your content is available, you will receive DMs like these:
Pulsarr supports integration with Apprise for enhanced notification capabilities. Apprise allows you to send notifications to a wide variety of supported services like Telegram, Slack, Discord, email services, SMS gateways, and many more from a single unified interface.
- Multiple notification channels: Send notifications to multiple platforms simultaneously
- Flexible configuration: Easy setup through URL-based notification channels
- Extensive service support: Works with 80+ notification services
- Customizable messaging: Send rich notifications with formatting options
- Centralized notification management: Configure and manage all your notification targets in one place
Use this combined Docker Compose file to run both Pulsarr and Apprise in the same stack:
services:
  apprise:
    image: caronc/apprise:latest
    container_name: apprise
    ports:
      - "8000:8000"
    environment:
      - PUID=${PUID:-1000}
      - PGID=${PGID:-1000}
      - APPRISE_STATEFUL_MODE=simple
      - APPRISE_WORKER_COUNT=1
    volumes:
      - ./config:/config
      - ./plugin:/plugin
      - ./attach:/attach
    restart: unless-stopped

  pulsarr:
    image: lakker/pulsarr:latest
    container_name: pulsarr
    ports:
      - "3003:3003"
    volumes:
      - ./data:/app/data
      - .env:/app/.env
    restart: unless-stopped
    env_file:
      - .env
    environment:
      - NODE_ARGS=--log-both
      - TZ=America/Los_Angeles
      - appriseUrl=http://apprise:8000
    depends_on:
      - apprise
This configuration ensures:
- Apprise starts before Pulsarr
- Both services run in the same Docker network
- Pulsarr can communicate with Apprise using internal Docker networking
If you prefer to keep them separate, you can use these two compose files:
Apprise Compose (docker-compose.apprise.yml):
services:
  apprise:
    image: caronc/apprise:latest
    container_name: apprise
    ports:
      - "8000:8000"
    environment:
      - PUID=${PUID:-1000}
      - PGID=${PGID:-1000}
      - APPRISE_STATEFUL_MODE=simple
      - APPRISE_WORKER_COUNT=1
    volumes:
      - ./config:/config
      - ./plugin:/plugin
      - ./attach:/attach
    restart: unless-stopped
Pulsarr Compose (docker-compose.yml):
services:
  pulsarr:
    image: lakker/pulsarr:latest
    container_name: pulsarr
    ports:
      - "3003:3003"
    volumes:
      - ./data:/app/data
      - .env:/app/.env
    restart: unless-stopped
    env_file:
      - .env
    environment:
      - NODE_ARGS=--log-both
      - TZ=America/Los_Angeles
When using separate compose files, you'll need to add the Apprise URL to your Pulsarr .env file:
appriseUrl=http://host-ip-address:8000Replace host-ip-address with your actual server IP (not localhost, as the containers won't be on the same network).
The Apprise integration works out of the box with no additional configuration required in the Apprise web UI. Simply:
-
Start the services using the combined Docker Compose file:
docker compose up -d
-
Verify connectivity:
- Access the Pulsarr web interface at
http://your-server:3003 - Pulsarr will automatically detect and use the Apprise service
- All notifications will be routed through Apprise seamlessly
- Access the Pulsarr web interface at
The integration is pre-configured to work immediately with no additional setup steps required.
Users can configure their own Apprise notification methods in two ways:
-
Via Discord Bot:
- Users can use the
/notificationscommand in Discord - This allows them to select Apprise as their notification method
- Users will be notified about content availability automatically
- Users can use the
-
Via Admin Panel:
- The admin user can configure Apprise notifications
- Navigate to the Notifications section in the Pulsarr admin panel
- Set the default notification method to Apprise for the system
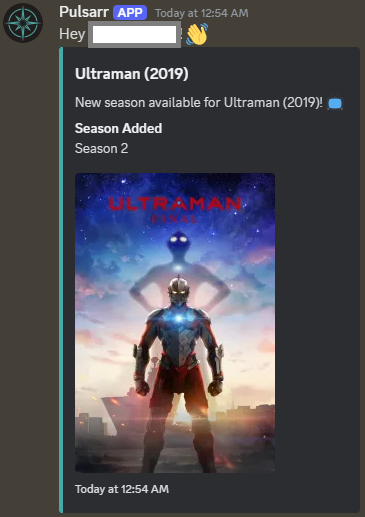
With Apprise integration enabled, Pulsarr will automatically send content availability notifications when:
- New episodes of TV shows are available
- New movies are available
- Season packs are available
All notifications are handled seamlessly through the Apprise integration without requiring additional configuration.
The integration is designed to work automatically, but if you encounter issues:
- Connection Issues: If using separate Docker Compose files, ensure the Apprise URL is correctly set in your
.envfile - Cannot reach Apprise: When using the combined Docker Compose, the service discovery is automatic. If using separate setups, verify the correct IP address is being used
- Service Not Starting: Make sure both containers have started successfully with
docker compose ps
For more information about Apprise itself, refer to the official Apprise documentation.
While Pulsarr is primarily configured through the web UI, you can also use environment variables in a .env file. Any values set in the .env file will override settings in the database.
| Variable | Description | Default |
|---|---|---|
port |
Backend port | 3003 |
baseUrl |
Base Url (NEEDS TO BE THE ADDRESS THAT PULSARR CAN BE REACHED BY BOTH SONARR/RADARR) | http://localhost |
LogLevel |
Logging level | info |
CookieSecured |
Serve Cookie only via https (can omit unless setting to true) | false |
Here is how your .env should look:
baseUrl=http://localhost
port=3003
logLevel=info
cookieSecured=false
Below is an example of a complete development environment configuration:
# Server Configuration
baseUrl=http://x.x.x.x                 # Local network address
port=3003                              # Application port
dbPath=./data/db/pulsarr.db            # SQLite database location
cookieSecret=xxxxxxxxxxxxxxxxxxxxxxxx  # Secret key for cookies (randomly generated by default)
cookieName=pulsarr                     # Name of the cookie
cookieSecured=false                    # Set to true for HTTPS only
logLevel=info                          # Logging level (defaults to silent. Recommended info)
closeGraceDelay=10000                  # Shutdown grace period in ms
rateLimitMax=100                       # Max requests per time window
syncIntervalSeconds=10                 # Sync interval in seconds
queueProcessDelaySeconds=60            # Queue processing delay in seconds

# Discord Configuration
discordWebhookUrl=https://discord.com/api/webhooks/xxxx/xxxx  # Webhook URL
discordBotToken=xxxx.xxxx.xxxx                                # Bot token
discordClientId=xxxxxxxxxxxx                                  # Client ID
discordGuildId=xxxxxxxxxxxx                                   # Server ID

# Apprise Configuration
appriseUrl=http://x.x.x.x:8000         # URL for the Apprise server (e.g., http://apprise:8000 for Docker networking)
enableApprise=true                     # This is auto set by Pulsarr based on the availability of the Apprise server
systemAppriseUrl=                      # Apprise URL for system notifications only

# General Notifications
queueWaitTime=120000                   # Queue wait time in ms
newEpisodeThreshold=172800000          # New episode threshold in ms (48h)
upgradeBufferTime=2000                 # Buffer time between upgrades in ms

# Sonarr Configuration (these will seed a single instance. Needs all the values. Only use in dev.)
sonarrBaseUrl=http://x.x.x.x:8989      # Sonarr instance URL
sonarrApiKey=xxxxxxxxxxxxxxxxxxxxxxxx  # Sonarr API key
sonarrQualityProfile=                  # Quality profile name (empty = default. Also accepts name or number)
sonarrRootFolder=                      # Root folder path (empty = default. Or accepts string of the path url)
sonarrLanguageProfileId=1              # Language profile ID
sonarrBypassIgnored=false              # Bypass ignored setting
sonarrSeasonMonitoring=all             # Season monitoring strategy
sonarrTags=[]                          # Tags as JSON array

# Radarr Configuration (these will seed a single instance. Needs all the values. Only use in dev.)
radarrBaseUrl=http://x.x.x.x:7878      # Radarr instance URL
radarrApiKey=xxxxxxxxxxxxxxxxxxxxxxxx  # Radarr API key
radarrQualityProfile=                  # Quality profile name (empty = default. Also accepts name or number)
radarrRootFolder=                      # Root folder path (empty = default. Or accepts string of the path url)
radarrLanguageProfileId=1              # Language profile ID
radarrBypassIgnored=false              # Bypass ignored setting
radarrTags=[]                          # Tags as JSON array

# Plex Configuration
plexTokens=["xxxxxxxxxxxxxxxxxxxx"]    # Plex authentication token
skipFriendSync=false                   # Skip syncing Plex friends

# Delete Configuration
deleteMovie=false                      # Auto-delete movies setting
deleteEndedShow=false                  # Auto-delete ended shows setting
deleteContinuingShow=false             # Auto-delete continuing shows setting
deleteFiles=true                       # Delete files from disk setting
deleteSyncNotify=none                  # Notify of delete sync status: 'none' | 'message' | 'webhook' | 'both'
maxDeletionPrevention=10               # Safeguard to prevent mass deletion. % of total library to allow during delete sync
- Please read through the documentation and follow the Quick Start Guide.
- Access the web interface at
http://your-server:3003 - You will be prompted to create an Admin account. Only a single admin account can be created.
- Configure your Plex, Sonarr, and Radarr connections
- Set up Discord notifications (optional)
- Start the watchlist workflow
- Add content to your Plex watchlist and watch the magic happen!
Pulsarr includes a Discord bot that allows users to manage their notification preferences:
/notifications- Configure notification settings
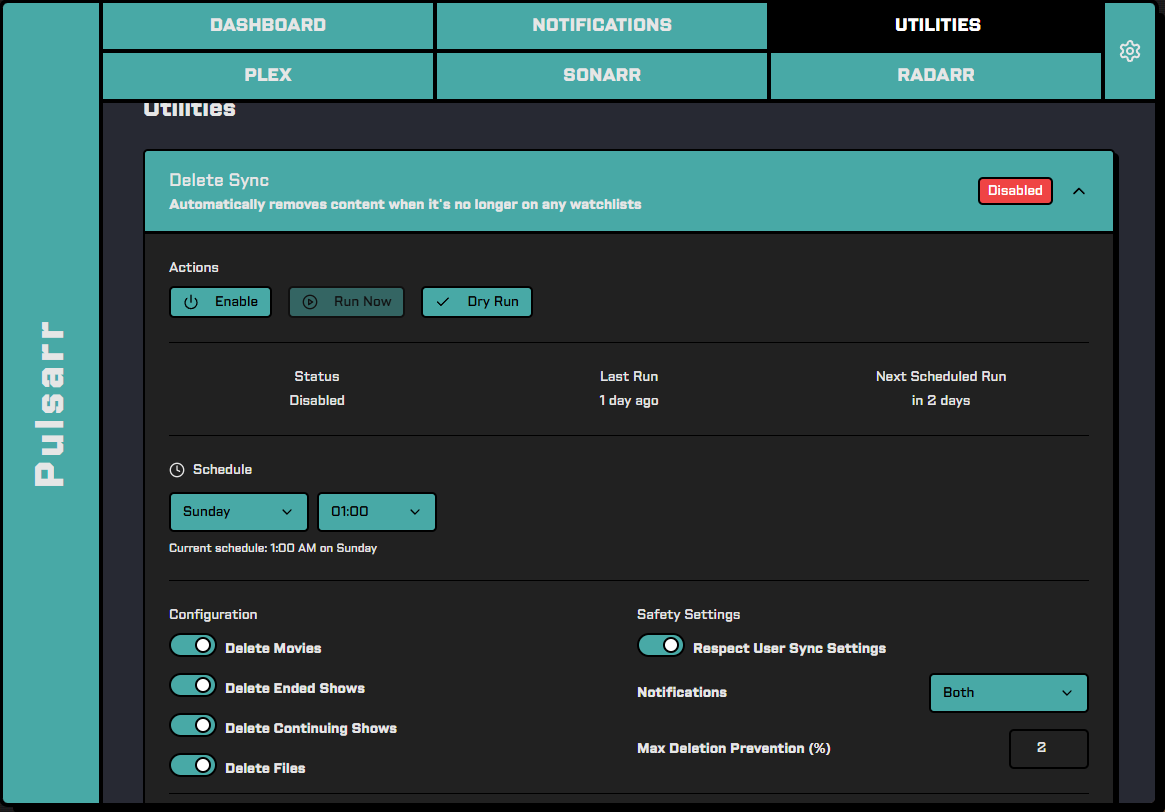
Delete Sync automatically removes content from your Sonarr/Radarr instances when it's no longer present on any user's watchlist. This completes the content lifecycle management, ensuring your libraries remain clean and optimized.
- Selective Deletion: Configure which content types to remove (movies, ended shows, continuing shows)
- File Management: Option to delete or retain actual media files when removing content
- Safety Mechanisms: Built-in protections against accidental mass deletion
- Scheduling: Configurable timing for automatic cleanup operations
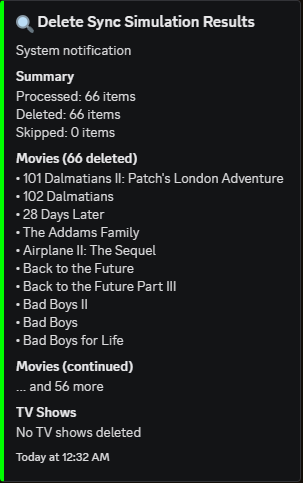
- Dry Run Mode: Preview what would be deleted before committing changes
Navigate to the Utilities page in the Pulsarr web interface and configure your deletion preferences:
- Content types to delete (movies, ended shows, continuing shows)
- Whether to delete associated files from disk
- User sync setting preferences (if someone isn't allowed to make requests, ignore their watchlist in the deletion process)
- Notification preferences for deletion events (will send results to webhook, message, both, or none)
- Maximum deletion prevention threshold (a failsafe)
Set up a schedule for automatic deletion operations
You can operate Delete Sync in several ways:
- Enable Automatic Sync: Toggle the feature on to run on your configured schedule
- Run Now: Manually trigger the deletion process immediately
- Dry Run: Preview what would be deleted without making any changes
You can configure notifications to recieve information regarding your workflow:
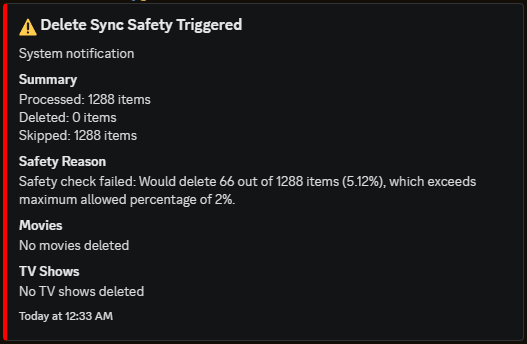
Delete Sync includes several safety measures to prevent accidental data loss:
- Mass deletion prevention based on configurable thresholds
- Selective content type targeting
- Dry run previews
- Detailed deletion logs
- Begin with a dry run to understand the impact on your libraries
- Consider keeping files for ended shows that may return for future seasons
Pulsarr's Plex Notifications feature automatically configures webhooks in all your connected Sonarr and Radarr instances to keep your Plex libraries fresh without manual intervention.
- Automatic Configuration: Sets up notification webhooks in all connected Sonarr and Radarr instances
- Server Discovery: Easily find and select your Plex server with the built-in discovery tool
- Content Synchronization: Keeps your Plex libraries updated when content is added, removed, or modified
- Multi-Instance Support: Works across all your Sonarr and Radarr instances simultaneously
- SSL Support: Secure connections to your Plex server
- Navigate to the Utilities section in the Pulsarr web interface
- Enter your Plex authentication token (defaults to the token provided during setup)
- Click "Find Servers" to automatically discover available Plex servers
- Select your server or manually enter your Plex host, port, and SSL settings
- Save your changes to automatically configure webhooks in all Sonarr and Radarr instances

Once configured, anytime content is added, modified, or removed via Sonarr or Radarr, your Plex libraries will automatically refresh to reflect these changes.

Pulsarr includes built-in API documentation accessible at /api/docs when running the server.
Email notificationsApprise for notifications- Non-Plex Pass (will update watchlists on 20 minute intervals. All other functionality remains.)
- API keys
Delete Syncing- Unit tests... 🤮
We welcome contributions to Pulsarr! This section outlines the process for contributing to the project.
-
Fork the Repository: Start by forking the Pulsarr repository to your GitHub account.
-
Branch Naming Conventions:
- For new features:
features/your-feature-name - For bug fixes:
bug-fix/brief-bug-description - For documentation:
docs/what-you-are-documenting - For performance improvements:
perf/what-you-are-improving
- For new features:
-
Create a Branch: Create a new branch following the naming conventions above.
-
Make Your Changes: Implement your feature or fix the bug.
-
Write Tests: If applicable, write tests for your changes.
-
Ensure Code Quality:
- Run linting tools (npm run fix to run biome)
- Ensure tests pass (these are coming!)
- Follow the existing code style
-
Commit Your Changes: Use clear, descriptive commit messages.
-
Push to Your Fork: Push your changes to your forked repository.
-
Submit a Pull Request: Create a pull request from your branch to the develop branch of the main Pulsarr repository.
When submitting a pull request, please:
-
Describe Your Changes: Provide a clear description of what the changes accomplish.
-
Link Related Issues: If your PR addresses an open issue, reference it using the GitHub issue linking syntax (e.g., "Fixes #123").
-
Include Screenshots: If your changes include visual elements, add screenshots to help reviewers understand the context.
-
Update Documentation: Ensure that documentation is updated to reflect your changes if necessary.
-
Be Responsive: Be prepared to address feedback and make requested changes.
If you have any questions about contributing, feel free to open an issue with the label "question".

jamcalli |
See all contributors
Pulsarr is licensed under the GPL License. See the LICENSE file for more details.
If you encounter any issues or have questions, please open an issue on GitHub.