
This repository contains an implementation of a vehicle detection pipeline that can be used on images or videos. A multi-scale sliding windows search is performed and a Linear Support Vector classifier is used to detect the vehicles in the windows. The repository contains the code used for training the classifier.
The project contains various scripts that achieve the following:
- Perform feature extraction from images using the Histogram of Oriented Gradients (HOG), spatial binning of colors and histogram of colors
- Train a linear SVM classifier using a labeled training set of images
- Detect vehicles bounding boxes in images and videos using a sliding-window technique and the trained classifier
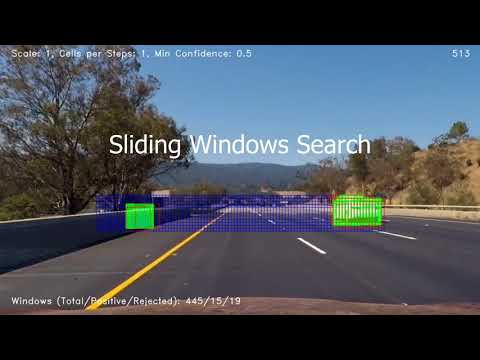
- Implementation a multi-scale sliding-window technique to search for vehicles in images and video frames using the trained classifier on the extracted windows
- Heatmap from the detected windows with thresholding on the confidence of the detection as well as on the heatmap value itself
- Average smoothing of historic heatmaps to reduce false positives with thresholding applied on the average
- Bounding box estimation from the resulting heatmap to output the detected vehicles
The project uses OpenCV and scikit-learn, also make sure that ffmpeg is setup in order to process the video.
The easiest way is to setup a conda environment that contains all the needed dependencies, Udacity provided a detailed guide to install a ready environment that will work well with this project: https://github.com/udacity/CarND-Term1-Starter-Kit/blob/master/doc/configure_via_anaconda.md.
For training the classifier I used the data supplied by Udacity, in particular:
- Labeled data for vehicles
- Labeled data for non-vehicles

These example images come from a combination of the GTI vehicle image database, the KITTI vision benchmark suite, and examples extracted from the project video itself.
Additionally Udacity supplied a labeled dataset that can be used to extract additional images. I provided a script that can be used to extract samples (for both vehicles and non-vehicles) from the first dataset (Note that you will need the csv labels from the Udacity repository).

To train the classifier to detect cars and not-cars the model.py script can be used. The script will run and save the model along with the scaler and other parameters in a pickle file.
The script can be run using python model.py --parameter_name=parameter_value and accepts the following parameters:
- dir The folder where the vehicle and non-vehicles images are stored, assumed that two sub-folders are present (vehicles and non-vehicles), default is 'data'
- rand_state A number used for the seed when shuffling the data
- color_space The color space conversion to apply when extracting features, default YCrCb
- spatial_size The dimensions for spatial binning features, None to disable, default 16
- hist_bins The number of bins for histogram of colors, default 32
- orient The number of orientation for the HOG extraction, default 16
- pix_per_cell The number of pixels in a cell for the HOG extraction, default 8
- cell_per_block The number of cells in a block for the HOG extraction, default 2
- search To perform a parameters search, the value is a json file with the parameter space, default None
- limit To limit the amount of samples when training
- disable-parallel Disable parallel processing when computing features, default is False

Two scripts are supplied in the repository to detect vehicles in images or to process an entire video:
The image_gen.py script can be run using python image_gen.py --parameter_name=parameter_value and accepts the following parameters:
- dir The folder where the images to process are stored, will read both jpg and png, default to 'test_images'
- out_dir The folder where to store the result, default to 'output_images'
- model_file The path to the file saved during training from the model.py script, default is models\model.p
- min_confidence The min confidence of predictions to keep a positive window, default is 0.3
- threshold The threshold on the heatmap built from the detected overlapping windows, default is 5
- disable-parallel Disable parallel processing when computing the sliding windows at different scales, default is False

The video_gen.py script can be run using python video_gen.py <video_file> --parameter_name=parameter_value and accepts the following parameters:
- output_dir The folder where to store the result, default to 'output_videos'
- model_file The path to the file saved during training from the model.py script, default is models\model.p
- min_confidence The min confidence of predictions to keep a positive window, default is 0.5
- threshold The threshold on the heatmap built from the detected overlapping windows, default is 3.5
- smooth_frames The number of frames to use for averaging the heatmap, default is 8
- disable-parallel Disable parallel processing when computing the sliding windows at different scales, default is False
- debug If True creates separate videos for each stage of the pipeline, similar to the output of the image processing, default is False
- lanes-detection If True also detects lane lines, default is False
- calibration_file If lanes-detection is enabled the path to the file with the camera calibration data, default to 'calibration.p'
- start The time (seconds) where to trim the start of the video
- end The time (seconds) where to trim the end of the video (only if start is present)
Note that the threshold here depends on the frame smoothing, in fact the heatmaps for each frame are collected up to smooth_frames and then averaged, the threshold is then applied to this average, in the following an example of un-thresholded heatmap vs its thresholded version:


Running the script with the --debug flag will produce several videos with the various steps of the pipeline each tagged with frame numbers, in particular the output will be:
- The processed video
- A video of the unthresholded heatmap
- A video of the thresholded heatmap
- A video of the thresholded heatmap overlayed to the input video
- A video for each of the search layers (4 by default) with information about the scale factor and the detected windows
- A video with the combined windows with information about positive, negative and rejected windows

The video processing can also detect road lane lines using the flag --lanes_detection, the code comes from the Advanced Lane Finding project that I developed previously:
