-
-
Notifications
You must be signed in to change notification settings - Fork 8
Install Guide
- ESP32 or ESP8266 (ESP32 preferred)
- RS485 adapter - (https://www.amazon.co.uk/gp/product/B07DN115BZ)
- 8 pin Micro ATX 3mm connector - (https://www.digikey.co.uk/en/products/detail/molex/2147562082/12180458)
- 5V PSU (https://www.amazon.co.uk/Power-Module-DC-DC-Supply-Converter/dp/B071ZRXKJY)
Best to use the new automatic RX/TX RS485 adapters rather than the older MAX485 RE/DE ones
As the controller board has multiple top panel connectors, we use our own. Do not try and use Y splitter
Technically we should NOT connect pins 2, 4 or 5 directly to the ESP, but it appears to be 5v tolerant. Previous use of a bi-directional level shifter causes too much of a delay, so was only suitable for read-only access

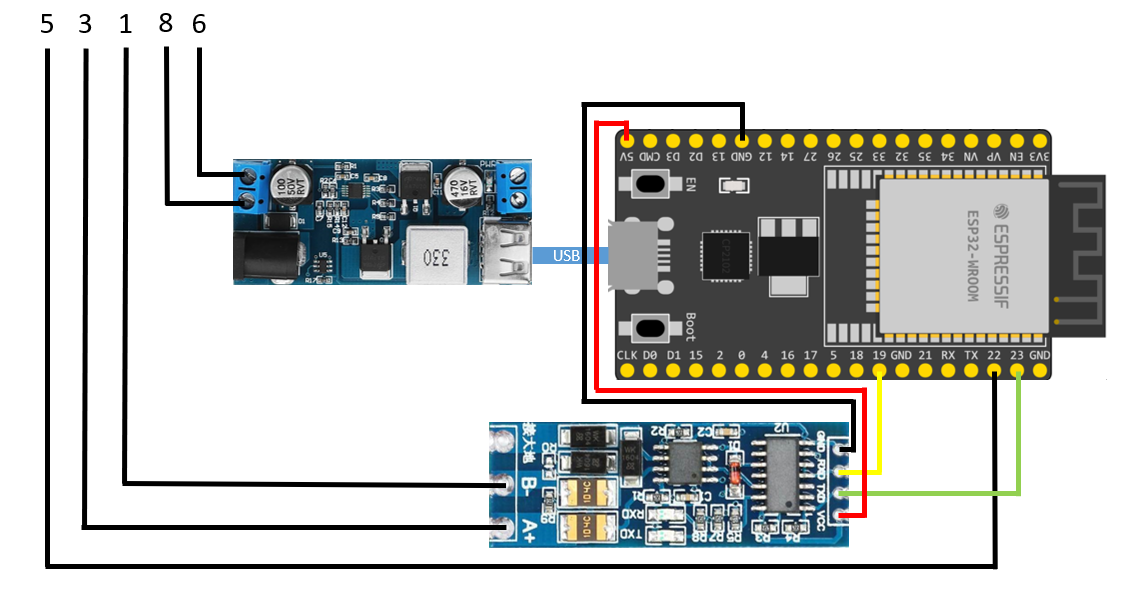
- Pin1 - RS485 - B
- Pin2 -
- Pin3 - RS485 - A
- Pin4 -
- Pin5 - 5v digital pin - Panel Select
- Pin6 - 9v connect to PSU +
- Pin8 - GND connect to PSU- / PSU GND
NOTE: do NOT use the RX/TX pins on the ESP to connect to the RS485 adapter

Install the "sensor" app from this repo. Note you will need to create wifi_secrets.h following the example content but with your own WiFi details
// *************************************************************************
#define SECRET_SSID "my-network"; /* Enter your SSID */
#define SECRET_PSK "my-wifi-passwords"; /* Enter your WPA2 passphrase */
// *************************************************************************
Watch the serial console to check the ESP boots correctly, look for the ip address the device has selected to use.
Then goto that address in the status page and see if any info about the spa status is shown, e.g temp, mode, status
Enter your MQTT connection detail into the code and deploy to the esp.
Define correct BROKER_ADDR also BROKER_USERNAME and BROKER_PASSWORD if your MQTT server uses authentication
You can use an app like MQTT Dash to confirm the messages from the spa.
Then go to Home Assistant, integration, MQTT then add device