
pyscan is a scanning library for Channel Access and beam synchronous (SwissFEL) data.
There are multiple interfaces available, but new features are available only on the new interface, therefore using the new interface is strongly recommended. The other interfaces were developed to facilitate the migration to and integration of pyscan. Only the new interface will be presented in this document. For information on how to use the other interfaces, consult their original manual. A few examples are however available at the end of this document, under the Other interfaces chapter.
The following is the minimal working example you can run on your machine with only pyscan installed.
from pyscan import *

# Collect 5 data points.
positioner = StaticPositioner(n_images=5)

# The function will count from 1 to 5 (it will be invoked 5 times, because n_images == 5).
def data_provider():
    data_provider.counter += 1
    return data_provider.counter
data_provider.counter = 0

# result == [[1], [2], [3], [4], [5]]
result = scan(positioner, data_provider)A sample scan, that uses the most common pyscan features, can be done by running:
# Import everything you need.
from pyscan import *

# Defines positions to move the motor to.
positions = [1, 2, 3, 4]
positioner = VectorPositioner(positions)

# Read "PYSCAN:TEST:OBS1" value at each position.
readables = [epics_pv("PYSCAN:TEST:OBS1")]

# Move MOTOR1 over defined positions.
writables = [epics_pv("PYSCAN:TEST:MOTOR1:SET", "PYSCAN:TEST:MOTOR1:GET")]

# At each read of "PYSCAN:TEST:OBS1", check if "PYSCAN:TEST:VALID1" == 10 and "PYSCAN:TEST:VALID2" == 12
conditions = [
    epics_condition("PYSCAN:TEST:VALID1", 10),
    epics_condition("PYSCAN:TEST:VALID2", 12)
]

# Before the scan starts, set "PYSCAN:TEST:PRE1:SET" to 1.
initialization = [action_set_epics_pv("PYSCAN:TEST:PRE1:SET", 1, "PYSCAN:TEST:PRE1:GET")]

# After the scan completes, restore the original value of "PYSCAN:TEST:MOTOR1:SET".
finalization = [action_restore(writables)]

# At each position, do 4 readings of the readables with 10Hz (0.1 seconds between readings).
settings = scan_settings(measurement_interval=0.1, n_measurements=4)

# Execute the scan and get the result.
result = scan(positioner=positioner,
              readables=readables,
              writables=writables,
              conditions=conditions,
              initialization=initialization,
              finalization=finalization,
settings=settings)In this chapter we summarize the various objects described in detail in this document. To access the objects documentation directly, you can consult the source code or simply execute, for example:
from pyscan import *
help(epics_pv)
This will give you the documentation for epics_pv, but you can substitute this with any other bolded object in this chapter.
How should we move the writables - in most cases motors - to the desired position.
- VectorPositioner: Move all the axis according to the supplied list of positions.
- LinePositioner: Move all the provided axis at once.
- AreaPositioner: Move all provided axis, one by one, covering all combinations.
- SerialPositioner: Move one axis at the time. Before moving the next axis, return the first to the original position.
- CompoundPositioner: Combine multiple other positioners, with the AreaPositioner logic (all combinations).
- TimePositioner: Sample readables, without moving motors, at a specified interval.
Which variables - motors in most cases - to write the values from the positioners.
- epics_pv: Write to epics process variable.
- function_value: Write to function you provide.
Which variables to read at each position.
- epics_pv: Read an epics process variable.
- bs_property: Read a bsread property.
- function_value: Read from a function you provide.
Which values to check after each data acquisition. Useful to verify if the acquired data is valid.
- epics_condition: Verify that an epics PV has a certain value.
- bs_condition: Verify that a bsread property has a certain value.
- function_condition: Verify that a function you provide returns True.
Action can be executed for initialization, finalization, before and after each data acquisition.
- initialization: Executed once, before the beginning of the scan.
- before_read: Executed every time before the measurements are taken.
- after_read: Executed every time after the measurements are taken.
- finalization: Executed once, at the end of the scan or when an exception is raise during the scan.
Available actions:
- action_set_epics_pv: Set an epics PV value.
- action_restore: Restore the original pre-scan values of specified PVs.
- Any method you provide. The method must be without arguments. Example:
def do_something():
passSetup the various scan parameters.
- scan_settings: All available parameters to set.
If you use conda, you can create an environment with the pyscan library by running:
conda create -c paulscherrerinstitute --name <env_name> pyscanAfter that you can just source you newly created environment and start using the library.
You can build the library by running the setup script in the root folder of the project:
python setup.py installor by using the conda also from the root folder of the project:
conda build conda-recipe
conda install --use-local pyscanThe library relies on the following packages:
- python
- numpy
- pyepics
- bsread
In case you are using conda to install the packages, you might need to add the paulscherrerinstitute channel to your conda config:
conda config --add channels paulscherrerinstituteNote: All the examples in this README can also be found in the tests/test_readme.py file.
In the following chapters, each component will be explained in more details:
- Positioner: Generates positions, according to the input values, on which to place the writables.
- Readables: PVs or BS read properties to read at each position.
- Writables: PVs (motors, in most cases) to move according to the positioner values.
- Conditions: PVs or BS read properties used to validate the readables at each position.
- Initialization: Actions to execute before the scan.
- Finalization: Actions to execute after the scan is completed or when the scan is aborted.
- Scan settings: Settings of the scan and acquisition of data.
- Scan result: List of readables values at each scan position.
For common use cases, see the chapter at the end of this document.
Positioners generate positions based on the input data received and the type of positioner selected. In case a complex scan is required, more positioners can be chained together. Alternatively, the user can generate the list of positions, and just use a Vector positioner (it just moved the motor to the provided positions).
We have different positioners for different use cases:
- Vector positioner: Scan over the provided positions, one by one. The most simple and flexible positioner.
- Line positioner: Define start, end position, and number of steps. Step values will be automatically generated.
- Area positioner: Like line positioner, but in multiple dimensions, varying one dimension at the time.
- Serial positioner: Like vector positioner, but varying one motor at the time, returning other motors at their initial position
- Compound positioner: Combine multiple positioners together, generating the desired positions.
It is recommended to start your scanning with the Vector positioner, as it is the most simple to use, and in most cases it is powerful enough.
This 2 positioners are the most common ones and they are interchangable. A Line positioner is just a different way of defining a vector positioner. In the example below, we will show how this 2 positioners work.
All the positioners specified in the code snippet below generate exactly the same positions.
from pyscan import *

# Dummy value initialization.
x1, x2, x3, x4 = range(1, 5)
y1, y2, y3, y4 = range(1, 5)

# Move to positions x1,y1; then x2,y2; x3,y3; x4,y4.
vector_positioner = VectorPositioner(positions=[[x1, y1], [x2, y2], [x3, y3], [x4, y4]])

# Start at positions x1,y1; end at positions x4,y4; make 3 steps to reach the end.
line_positioner_n_steps = LinePositioner(start=[x1, y1], end=[x4, y4], n_steps=3)

# Start at position x1,y1; end at position x4,y4: make steps of size x2-x1 for x axis and
# y2-y1 for y axis.
line_positioner_step_size = LinePositioner(start=[x1, y1], end=[x4, y4], step_size=[x2-x1, y2-y1])
Positions generated by any of the positioners above can be visualised as:
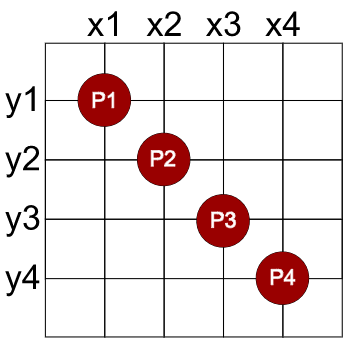
Pn denotes the point given by the positioner. In this case, the positions in ascending order are:
- P1 (x1, y1)
- P2 (x2, y2)
- P3 (x3, y3)
- P4 (x4, y4)
It is important to note:
- All axis are moved at the same time (x and y in this case).
- LinePositioner accepts either the number of steps (integer) or the step size (array of numbers, one for each axis). In case you specify the step size, (end-start) / step_size must be the same for all axis - because all axis are moved at the same time, the number of steps for each axis must be the same.
The Area positioner is a multi dimensional variation of the LinePositioner. Instead of moving all axis at the same time, it moves one axis at the time, covering all positions that can be reached by combing the given axis. With a 2 axis scan, you can imagine it as scanning line by line.
All the positioners specified in the code snippet below generate exactly the same positions. Furthermore, the input parameters for the AreaPositioner are very similar to the one used in the previous example for the LinePositioner to show the difference in output positions.
from pyscan import *

# Dummy value initialization.
x1, x2, x3, x4 = range(1, 5)
y1, y2, y3, y4 = range(1, 5)

area_positioner_n_steps = AreaPositioner(start=[x1, y1], end=[x4, y4], n_steps=[3,3])
area_positioner_step_size = AreaPositioner(start=[x1, y1], end=[x4, y4], step_size=[x2-x1, y2-y1])
Positions generated by any of the positioners above can be visualised as:

Pn denotes the point given by the positioner. In this case, the positions in ascending order are:
- P1 (x1, y1)
- P2 (x1, y2)
- P3 (x1, y3)
- P4 (x1, y4)
- ...
- P13 (x4, y1)
- P14 (x4, y2)
- P15 (x4, y3)
- P16 (x4, y4)
It is important to note:
- The first provided axis(x) is the slowest changing dimension, while the last provided axis(y) is the faster changing one.
- AreaPositioner accepts either the number of steps (array of numbers, one for each axis) or the step size (array of numbers, one for each axis).
Warning: LinePositioner accepts an integer for n_steps, while AreaPositioners accepts an array of integers. This is due to the fact that the AreaPositioner can have a different number of steps for different axis, while LinePositioner cannot. The same logic holds true for the step_size.
A serial positioners moves one axis at the time, returning the previously moved axis back to its original position.
from pyscan import *

# Dummy value initialization.
x0 = y0 = 0
x1, x2, x3, x4 = range(1, 5)
y1, y2, y3, y4 = range(1, 5)

serial_positioner = SerialPositioner(positions=[[x1, x2, x3, x4], [y1, y2, y3, y4]],
                                     initial_positions=[x0, y0])
The positions generated from the positioner above can be visualized as:
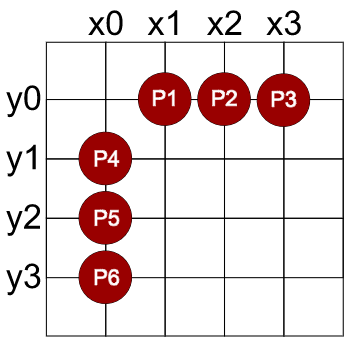
Pn denotes the point given by the positioner. In this case, the positions in ascending order are:
- P1 (x1, y0)
- P2 (x2, y0)
- P3 (x3, y0)
- P4 (x4, y0)
- P5 (x0, y1)
- P6 (x0, y2)
- P7 (x0, y3)
- P8 (x0, y4)
Warning: Unlike other positioners, in the Serial positioner the first dimension is the one that changes first. In the example above, this means that X gets iterated over first, and then Y.
A compound positioner allows you to combine multiple positioners together. This allows you to generate more complex motions without having to generate all the positions up front and passing them to the VectorPositioner. The CompoundPositioner can be compared to the AreaPositioner in the sense that it combines multiple positioners in the same way as AreaPositioner combines multiple axis.
The CompoundPositioner concatenates all positioner values in a single output. It iterates over each given positioner, one at the time, covering all possible permutations - In a 2D scan, you can imagine it as scanning line by line. The last provided positioner is always the fastest changing one, while the first provided one is the slowest.
To better explain how it works, the following example demonstrates how to create an area positioner, the one we used in the example above, from 2 VectorPositioners.
from pyscan import *

x1, x2, x3, x4 = range(1, 5)
y1, y2, y3, y4 = range(1, 5)

line_positioner = VectorPositioner([x1, x2, x3, x4])
column_positioner = VectorPositioner([y1, y2, y3, y4])

area_positioner = CompoundPositioner([line_positioner, column_positioner])
Positions generated by the positioner above can be visualised as:
Pn denotes the point given by the positioner. In this case, the positions in ascending order are:
- P1 (x1, y1)
- P2 (x1, y2)
- P3 (x1, y3)
- P4 (x1, y4)
- ...
- P13 (x4, y1)
- P14 (x4, y2)
- P15 (x4, y3)
- P16 (x4, y4)
It is important to note:
- The first provided positioner is the slowest changing dimension, while the last provided positioner is the faster changing one.
- Compound positioner accept any number and type of positioners (including itself).
- Compound positioner combines the output of all provided positioners at every position, concatenating the individual positions provided by each positioners in the same order that they were specified when constructing the CompoundPositioner.
This positioner is different from the others in the sense that it does not generate positions for the motors, but time intervals at which to sample the readables. It is useful for acquisitions that recquire a time based sampling without moving any motors. One such example you be to sample a bsread source with a certain interval.
Because this positioner does not move any motor, you should not specify any writables, as they will not be moved.
from pyscan import *

# Sample the readables at 10Hz, acquire 30 samples.
time_positioner = TimePositioner(time_interval=0.1, n_intervals=30)
# Read "PYSCAN:TEST:OBS1" epics PV.
readables = [epics_pv("PYSCAN:TEST:OBS1")]

result = scan(positioner=time_positioner, readables=readables)This positioner samples the readables for each received bsread message.
It is useful for acquiring every message in a bsread stream, and maybe reading some additional properties (for example from EPICS) when a new message is received. Positions given by this positioner are indexes of the received bsread messages.
Because this positioner is not intended to move motor you should not specify any writables - if you do, the bsread message index (within this scan) will be written to them.
Important: If you use the bsread positioner you MUST specify at least 1 bs_property() or bs_condition().
from pyscan import *

# Sample the readables at every bsread message, acquire 10 messages.
bsread_positioner = BsreadPositioner(n_messages=10)

# Read a bsread property.
readables = [bs_property("CAMERA1:OBS2")]

result = scan(positioner=bsread_positioner, readables=readables)
Writables are PVs that are used to move the motors. The positions generated by the positioner are passed to the writables. The position values are written to the writables with the set_and_match logic (discussed below).
Warning: The number of writables should always match the number of axis the positioner outputs. If we want to move 2 axis, the positioner has to output 2 values per position.
Writables can be a list or a single value of type EPICS_PV, or a function that accepts one parameter - position. EPICS_PV is a named tuple that can be generated by invoking the method epics_pv():
from pyscan.scan_parameters import epics_pv

# Define a writable, with set PV "PYSCAN:TEST:MOTOR1:SET" and readback PV "PYSCAN:TEST:MOTOR1:GET".
# When moving the motor, a tolerance of 0.01 should be used for positioning.
motor_1 = epics_pv(pv_name="PYSCAN:TEST:MOTOR1:GET",
                   readback_pv_name="PYSCAN:TEST:MOTOR1:SET",
                   tolerance=0.01)

# Define a writable, with PV "PYSCAN:TEST:MOTOR2" for both set and readback. Tolerance will be the
# default one.
motor_2 = epics_pv(pv_name="PYSCAN:TEST:MOTOR2")

# We would like to move both above defined motors in this scan.
writables = [motor_1, motor_2]
Only the pv_name argument is mandatory. If not provided, the readback_pv_name is the same as the pv_name, and tolerance is the library defined default one.
set_and_match is the logic used to set the writables PV values. We set a PV value and wait until the readback PV reaches the setpoint. If this does not happen in a defined time (write_timeout setting, check chapter Settings), an exception is thrown.
In addition to the epics_pv, you can provide your own writable function, which has to accept one positional argument representing the next position your motor (or device) should move to.
FUNCTION_VALUE is a named tuple that can be generated by invoking the method function_value():
from pyscan.scan_parameters import function_value

# Define a writable, with set PV "PYSCAN:TEST:MOTOR1:SET" and readback PV "PYSCAN:TEST:MOTOR1:GET".
# When moving the motor, a tolerance of 0.01 should be used for positioning.

def move_motor1(position):
    # Actually move the motor 2.
    pass

def move_motor2(position):
    # Actually move the motor 2.
    pass

# Define the motor 1 writable by providing the call function and the name.
motor_1 = function_value(call_function=move_motor1,
                         name="Motor1")

# You can also omit the call to the function_value: In this case you cannot specify the name of the writable.
# The name will be automatically assigned.
motor_2 = move_motor2

# We would like to move both above defined motors in this scan.
writables = [motor_1, motor_2]Instead of calling the variable definition methods as shown above (epics_pv(), bs_property(), function_value()) you can use the following conventions:
# Direct epics value definition.
epics_motor = "ca://PYSCAN:TEST:OBS1"
# Direct function value definition
def set_position(position):
    pass

writables = [epics_motor, set_position]
If you use this alternative way of defining the writables, you do not have access to the readback_pv_name, tolerance, and readback_pv_value of the epics_pv.
In this case the default values will be used:
- readback_pv_name: Same as the set PV name.
- readback_pv_value: Same as the setpoint.
- tolerance: As specified in pyscan.config.max_float_tolerance for float values.
This are variables you read at every scan position. The result of the read is saved as a list entry in the output. You can have as many readables as you like, but at least 1 is mandatory (a scan without readables does not make much sense).
Readables can be a list or a single value of types:
- epics_pv: Epics process variable.
- bs_property: BS read property.
- function_value: You provide a function that retrieves the next value for this variable.
You can mix the 3 types in any order you like. The order in which you declare the variables will be the order in which they appear in the result list.
from pyscan import *
value1 = epics_pv("PYSCAN:TEST:OBS1")
value2 = bs_property("CAMERA1:OBS2")
value3 = epics_pv("PYSCAN:TEST:OBS3")

def get_random():
    # A fair dice was used to determine the value.
    return 4
value4 = function_value(get_random, "random_value")

# bs properties with default value 'None'. See notes on the bottom.
value5 = bs_property("CAMERA1:OBS4", None)

readables = [value1, value2, value3, value4, value5]
Default values In some cases, not all bs read properties are present in each stream message. In this case, the default behaviour is to raise an Exception with the missing property. This behaviour can be changed using the default_value parameter of bs_property. If specified, when values are missing the stream, the default value is used. The same logic applies to bs_condition.
You can change the default behaviour for all bs_read properties by changing the config:
from pyscan import config
# Instead of raising an exception, the default value for missing bs read properties is None.
config.bs_default_missing_property_value = NoneInstead of calling the variable definition methods as shown above (epics_pv(), bs_property(), function_value()) you can use the following conventions:
# Direct epics value definition.
epics_value = "ca://PYSCAN:TEST:OBS1"
# Direct bs_property value definition.
bs_property = "bs://CAMERA1:OBS2"
# Direct function value definition
def get_random():
    return 0

readables = [epics_value, bs_property, get_random]This are variables you monitor after each data acquisition to be sure that they have a certain values. A typical example would be to verify if the beam repetition rate is in the desired range. The library supports PVs, bsread properties, and function conditions.
Conditions can be created by invoking epics_condition for PV condition, and bs_condition for bsread conditions. Function conditions can be created by invoking function_condition, or simply passing the condition function directly.
from pyscan import *
# Acquired data is valid when "PYSCAN:TEST:VALID1" == 10
condition1 = epics_condition("PYSCAN:TEST:VALID1", 10)
# Acquired data is valid when 4 < "CAMERA1:VALID1" < 6
condition2 = bs_condition("CAMERA1:VALID1", 5, tolerance=1)
# bs condition with default value. See notes at the bottom of this chapter.
condition3 = bs_condition("CAMERA1:VALID2", 5, default_value="5")
# Acquired data is valid when "PYSCAN:TEST:VALID2" > 10. See "Condition comparison operation".
condition4 = bs_condition("CAMERA1:VALID2", 10, default_value="5", operation=ConditionComparison.HIGHER)

# Function conditions need to return a boolean to signal if the scan can continue or not.
def i_always_fail():
    return False

condition5 = function_condition(i_always_fail)

# In this case, the condition is not defined with the function_condition call, so the condition action is ABORT (default).
def i_always_work():
    return True

conditions = [condition1, condition2, condition3, condition4, condition5 i_always_work]
When any of the condition fail (the condition value not match the specified one, or the function condition returns False), the scan is aborted or the data acquisition is done again once the condition becomes valid (based on the specified condition action).
It is important to note:
- Conditions do not use the epics monitoring feature, but do a caget every time the value is requested. This is to ensure the most recent possible value is available to the condition.
- bsread conditions match the pulse id of the acquisition data pulse id. This guarantees that the condition matches the pulse of the data acquisition.
- function conditions have to return True (continue scan) or False (stop scan).
Default values In some cases, not all bs read properties are present in each stream message. In this case, the default behaviour is to raise an Exception with the missing property. This behaviour can be changed using the default_value parameter of bs_condition. If specified, when values are missing the stream, the default value is used. The same logic applies to bs_property.
You can change the default behaviour for all bs_read properties by changing the config:
from pyscan import config
# Instead of raising an exception, the default value for missing bs read properties is None.
config.bs_default_missing_property_value = NoneWhen a condition is not fulfilled 2 possible actions can be taken:
- Abort (default)
- Retry
When using Abort (default), the data acquisition is terminated immediatly. If you select Retry, a number of attempts will be made to read again the value at a specified interval.
The number of retries and delay is specified in the config variables:
from pyscan import *

# Maximum number of retries to read the channels to get valid data.
config.scan_acquisition_retry_limit = 3
# Delay between acquisition retries.
config.scan_acquisition_retry_delay = 1
Example on how to specify the action:
from pyscan import *

# This 2 conditions are equivalent - Abort if any of the two conditions is not met.
condition1 = epics_condition("PYSCAN:TEST:VALID1", 10)
condition2 = epics_condition("PYSCAN:TEST:VALID2", 10, action=ConditionAction.Abort)

# This condition allows for a Retry - try to acquire all the data again and check if the condition is now met.
condition3 = epics_condition("PYSCAN:TEST:VALID3", 10, action=ConditionAction.Retry)The condition comparison operation allows you to specify how to compare the expected value and the read value on a condition channel.
Possible comparison operations are:
- ConditionComparison.EQUAL (default if nothing is specified)
- ConditionComparison.NOT_EQUAL
- ConditionComparison.LOWER
- ConditionComparison.LOWER_OR_EQUAL
- ConditionComparison.HIGHER
- ConditionComparison.HIGHER_OR_EQUAL
You can interprete the condition in the following way:
from pyscan import *
# If the received value is HIGHER_OR_EQUAL to (value=) 5, the condition is TRUE (the scan will acquire the readables).
bs_condition(name="CAMERA1:VALID2", value=5, operation=ConditionComparison.HIGHER_OR_EQUAL)
Example how to set conditions:
from pyscan import *

# The condition is true, if the value is equal to the received value.
condition_1 = bs_condition(name="CAMERA1:VALID2", value=5, operation=ConditionComparison.EQUAL)

# The condition is true, if the received value is lower than 5.
condition_2 = epics_condition(name="PV:VALUE", value=5, operation=ConditionComparison.LOWER)

# You can pass multiple conditions to the scanning routine by chaining them in a list.
conditions = [condition_1, condition_2]The initialization and finalization actions are executed, respectively, before the first writables move and after the last data acquisition. The finalization actions are always executed, also in case of scan abort. This methods are useful for setting up scan related attributes, and for example restoring the original variable values. The most common actions are already available in pyscan, but you can also provide your own method. The method must be without arguments.
from pyscan import *
# Just for demonstrating the writables restore.
writables = epics_pv("PYSCAN:TEST:MOTOR1:SET", "PYSCAN:TEST:MOTOR1:GET")

# Before starting the scan, move the SLIT1 into the beam.
set_slit = action_set_epics_pv(pv_name="PYSCAN:TEST:SLIT1", value=1)

# Just to demonstrate the possibility to execute any provided method.
def notify_user():
    print("Slit inserted..")
# Execute the notify_user method specified above.
notify_slit_inserted = notify_user

# When the scan is completed, restore the pre-scan SLIT1 values.
restore_slit = action_restore(epics_pv(pv_name="PYSCAN:TEST:SLIT1"))
# When the scan is completed, restore the pre-scan writables values.
restore_writables = action_restore(writables)

initialization = [set_slit, notify_slit_inserted]
finalization = [restore_slit, restore_writables]
It is important to note:
- Actions are executed in the order they are provided. You must be careful if there are any inter-dependent variables that must be set in a specific order.
- Methods you provide must have no call arguments, they can however be closures if you need access to function external variables.
The before and after move action are executed before each move and after the motors have moved and the settling time for the motors has passed.
The before and after read action are execute before each measurement (after the writables moved), and right after the measurements are finished. This actions can be used for user notifications, various verifications or data storage preparations (for example setting a measurement header etc.).
Apart from the execution points, the same actions and behaviours described in the Initialization and Finalization chapter apply. Consult that chapter for more information on usage.
Settings allow to specify the scan parameters. They provide already some defaults which should work for the most common scans. The available settings are:
- measurement_interval (Default: 0): In case we have n_measurements > 1, how much time to wait between each measurement at a specific location.
- n_measurements (Default: 1): How many measurements should be done in each position.
- write_timeout (Default: 3): Time the motors have to reach their destination. This usually needs to be set in accordance with the scan needs.
- settling_time (Default: 0): Time to wait after the motors have reached their destination.
- progress_callback (Default: print progress to console): Callback function to be invoked for progress updates. The callback function should accept 2 positional parameters: callback(current_position, total_positions)
Settings are a single value of type SCAN_SETTINGS. SCAN_SETTINGS is a named tuple that can be generated by invoking the method scan_settings(). You can define only the desired settings, others will be set to the default value.
from pyscan import *

# In each scan position, do 3 measurements with 10Hz frequency.
example_settings_1 = scan_settings(measurement_interval=0.1,
                                   n_measurements=3)

# Give the motors 10 seconds to reach their position, and wait 2 additional seconds after the
# position is reached.
example_settings_2 = scan_settings(write_timeout=10,
                                   settling_time=2)

def scan_progress(current_position, total_positions):
    """
    Print % of scan completeness to console.
    :param current_position: Index (1 based) of current position. Value is 0 before scan starts.
    :param total_positions: Total number of positions in this scan.
    """
    completed_percentage = 100 * (current_position/total_positions)
    print("Scan: %.2f %% completed (%d/%d)" % (completed_percentage, current_position, total_positions))

# Call the scan_progress function at the beginning and after every position is the scan.
example_settings_3 = scan_settings(progress_callback=scan_progress)Note: The progress_callback function is executed in the same thread as the scan. Your function should not be a long running one - in case you need to, for example, do an UI update, you should provide the appropriate threading model yourself. Your callback function will in fact be blocking the scan until it completes.
The scan results are given as a flat list, with each value position corresponding to the positions defined in the readables. In case of multiple measurements, they are grouped together inside another list.
# Dummy value initialization.
x1, x2, x3 = [1] * 3
y1, y2, y3 = [2] * 3
z1, z2, z3 = [3] * 3

from pyscan import *
# Scan at position 1, 2, and 3.
positioner = VectorPositioner([1, 2, 3])
# Define 3 readables: X, Y, Z.
readables = [epics_pv("X"), epics_pv("Y"), epics_pv("Z")]
# Define 1 writable motor
writables = epics_pv("MOTOR")
# Perform the scan.
result = scan(positioner, readables, writables)

# The result is a list, with a list of measurement for each position.
result == [[x1, y1, z1],
           [x2, y2, z2],
           [x3, y3, z3]]

# In case we want to do 2 measurements at each position.
result = scan(positioner, readables, writables, settings=scan_settings(n_measurements=2))

# The result is a list, with a list for each position, which again has a list for each measurement.
result == [[[x1, y1, z1], [x1, y1, z1]],
           [[x2, y2, z2], [x2, y2, z2]],
           [[x3, y3, z3], [x3, y3, z3]]]

# In case you have a single readable.
readables = epics_pv("X")
result = scan(positioner, readables, writables)

# The measurements are still wrapped in a list (with a single element, this time).
result == [[x1], [x2], [x3]]

# Scan with only 1 position, 1 motor, 1 readable.
positioner = VectorPositioner(1)
writables = epics_pv("MOTOR")
readables = epics_pv("X")
result = scan(positioner, readables, writables)

# The result is still wrapped in 2 lists. The reason is described in the note below.
result == [[x1]]Note: The measurement result is always wrapped in a list (even if only 1 variable is acquired). This is needed because external, processing code, can always rely on the fact that there will be an iterable object available, no matter what the readables are. For the same reason, in a scan with a single readable, single position, and 1 measurement, the output will still be wrapped in 2 lists: [[measurement_result]]
A custom format can be specified using the data_processor property of the scan function. The default data processor (described above) is called SimpleDataProcessor. In addition, a DictionaryDataProcessor is provided with the library.
The DictionaryDataProcessor stores the readables in a dictionary for each position. Example:
# Each position in the result list corresponds to the scan position.
result = [{"PV1": 1, "PV2": 2},
          {"PV1": 1.1, "PV2": 1.2}]
To change the scan result format:
from pyscan import *
from pyscan.utils import DictionaryDataProcessor

# Read 3 times.
positioner = StaticPositioner(3)

# Read 2 epics PVs
readables = [epics_pv("PYSCAN:TEST:OBS1"), epics_pv("PYSCAN:TEST:OBS2")]

# Specify a different data processor.
data_processor = DictionaryDataProcessor(readables)

# Pass the data processor the scan method.
value = scan(positioner, readables, data_processor=data_processor)

# Print the OBS1 and OBS2 values in the first position.
print(value[0]["PYSCAN:TEST:OBS1"], value[0]["PYSCAN:TEST:OBS2"])A custom format can be implemented by creating your own data processor class. You class needs to implement:
- Function process(self, position, data): Receives the position and the data associated with this position. This method will be called once per position.
- Function get_data(self): Called once, at the end of the scan, to provide the result in the desired format.
As an example, lets see how SimpleDataProcessor is implemented:
class SimpleDataProcessor(object):
    """
    Save the position and the received data at this position.
    """

    def __init__(self, positions=None, data=None):
        """
        Initialize the simple data processor.
        :param positions: List to store the visited positions. Default: internal list.
        :param data: List to store the data at each position. Default: internal list.
        """
        self.positions = positions if positions is not None else []
        self.data = data if data is not None else []

    def process(self, position, data):
        self.positions.append(position)
        self.data.append(data)

    def get_data(self):
        return self.data

    def get_positions(self):
return self.positionsCommon library settings can be set in the pyscan/config.py module, either at run time or when deployed. Runtime changes are preferable, since they do not affect other users.
For example, to change the bs_read connection address and port, execute:
from pyscan import config
config.bs_default_host = "127.0.0.1"
config.bs_default_port = 9999
To get the list of available configurations check the module source or run:
from pyscan import config
help(config)Warning: Only in rare cases, if at all, this settings should be changed. Most strictly scan related parameters can be configured using the Scan settings.
Config attribute: bs_default_missing_property_value
Sometimes, not all requested data is present in the bsread stream. This can happen due to different acquisition rates, hardware failures etc.
In case a property is missing in the stream, and you requested the property to be acquired, you have 2 possibilities:
- Raise an exception (default behavior) - the scan will be interrupted with the explanation what happened.
- Provide a place holder value - when the value is not present in the stream, the place holder value is used to mark this in the scan results.
Lets say for example that in the case when a value in the bsread stream is missing, we don't want to raise an exception, but continue with the scan and store None in the place of the missing value. You can set a config variable to change the default behaviour, but you can also specify the behaviour for each bs_property individually.
from pyscan import *
from pyscan import config

# Change the global default. In case of missing bsread attribute, None is stored.
config.bs_default_missing_property_value = None

# In this case, if x_axis is not present, bs_default_missing_property_value will be used.
readable_1 = bs_property("x_axis")

# If the image is missing from the stream, the scan cannot continue, and an Exception will be raised.
readable_2 = bs_property("image", Exception)

# If the energy is missing, -1 will be used as a place holder value.
readable_3 = bs_property("energy", -1)
By combining the default config setting and passing individual default values to bs_property you can get the desired behaviour at scan time.
from pyscan import *

# Disable logging
import logging
logging.getLogger("mflow.mflow").setLevel(logging.ERROR)

# Get current stream of local cam instance
from cam_server import PipelineClient
from cam_server.utils import get_host_port_from_stream_address

# Get the pipeline client instance.
pipeline_client = PipelineClient()

# Camera name to connect to.
camera_name = "simulation"

# Get the camera stream host and port.
_, stream_address = pipeline_client.create_instance_from_config({"camera_name": camera_name})
stream_host, stream_port = get_host_port_from_stream_address(stream_address)

# Configure bsread
config.bs_default_host = stream_host
config.bs_default_port = stream_port

positioner = StaticPositioner(5)  # Read 5 images
# Read x_axis and y_axis from bs stream -> in case the data is missing in a bs stream message, use None as default.
readables = [bs_property("x_axis", None), bs_property('y_axis', None)]

value = scan(positioner, readables)

print(value[0][0]) # Get first value of first readableIn addition to using the provided EPICS and BS DAL, you can provide your own data sources for readables, writables and coditions. In this case, you need to pass the method for retrieving, writing or checking the data yourself. This makes it also easy to mock (for testing purposes for example) hardware that currently does not exist.
from pyscan import *

# Provide a function for reading a custom source.
def read_custom_source():
    nonlocal counter
    counter += 1
    print("Reading custom counter %d" % counter)
    return counter
counter = 0

# Provide a function for moving a custom motor.
def write_custom_motor(position):
    print("Moving motor to position %s" % position)

# Provide a function to verify a custom condition.
def verify_custom_condition():
    print("Confirming..")
    return True

n_images = 5
positioner = StaticPositioner(n_images=n_images)
readables = read_custom_source
writables = write_custom_motor
conditions = verify_custom_condition

# result == [[1], [2], [3], [4], [5]]
result = scan(positioner, readables, writables, conditions)The default bsread data source is the dispatching layer. In the following example, we will do a simple scan of 3 bsread messages.
from pyscan import *

# Take 5 images.
positioner = StaticPositioner(n_images=3)

readables = [bs_property("S10CB01-DBPM220:X1"),
             bs_property("S10CB01-DBPM220:Y1")]

# result == [[X1-0, Y1-0], [X1-1, Y1-1], [X1-2, Y1-2]]
result = scan(positioner=positioner, readables=readables)This is the general example on how to read scan results executed on PShell server.
from pyscan import *

wire_scanner = "S30CB09-DWSC440"
scan_type = 'X1'
# The last two values are zero because we are using one wire (scan_type).
scan_range = [-2000, 800, 0, 0]
n_cycles = 3
# In um/s
velocity = 200
bpms = []
blms = ["S10DI01-DBLM045"]
n_backgrounds = 10
# This two parameter has to always be the same for the wire scan.
plt = None
save_raw = False

script_name = "Diagnostics/WireScan.py"
parameters = [wire_scanner, scan_type, scan_range, n_cycles, velocity, bpms, blms, n_backgrounds,
              plt, save_raw]

pshell = PShellFunction(script_name=script_name, parameters=parameters)

# 1 steps scan. Just do 1 wire scan.
n_positions = 1
positioner = StaticPositioner(n_images=n_positions)
readables = function_value(pshell.read)

# Result format: [[[cycles]], ...]
# Example: [[[10.0, 20.0, 50.0, 60.0, '...h5|x_0001/w_pos', '...h5|x_0001/blm1']]]
result = scan(positioner=positioner, readables=readables)

# Each cycle returns: cycles = [rms_com_1, rms_sigma_1, gauss_mean_1, gauss_sigma_1,
# link_to_raw_x_1, link_to_raw_y_1]This example extends the previous PShell server scan: Visualize the result while the scan is running.
In order to plot the data, you need to have the PShell Plotter running. You can start it by running:
java -cp /opt/gfa/pshell/testing ch.psi.pshell.plotter.View &from pyscan import *
from numpy import mean
wire_scanner = "S30CB09-DWSC440"
scan_type = 'X1'
# The last two values are zero because we are using one wire (scan_type).
scan_range = [-2000, 800, 0, 0]
n_cycles = 3
# In um/s
velocity = 200
bpms = []
blms = ["S10DI01-DBLM045"]
n_backgrounds = 10
# This two parameter has to always be the same for the wire scan.
plt = None
save_raw = False
script_name = "test/WireScanMock.py"
parameters = [wire_scanner, scan_type, scan_range, n_cycles, velocity, bpms, blms, n_backgrounds,
plt, save_raw]
pshell = PShellFunction(script_name=script_name, parameters=parameters)
# 1 steps scan. Just do 1 wire scan.
n_positions = 3
positioner = StaticPositioner(n_images=n_positions)
readables = function_value(pshell.read)
from PlotClient import PlotClient
plot_client = PlotClient()
plot_client.clear_plots()
rms_plot = plot_client.add_line_plot("rms", style="ErrorY")
rms_com_series = plot_client.add_line_series(rms_plot, "rms_com_1")
gauss_plot = plot_client.add_line_plot("gauss", style="ErrorY")
gauss_mean_series = plot_client.add_line_series(gauss_plot, "gauss_mean_1")
raw_data_plot = plot_client.add_line_plot("raw")
def plot_data(position, position_data):
data_rms_com_1 = mean([x[0] for x in position_data[0]])
data_rms_sigma_1 = mean([x[1] for x in position_data[0]])
plot_client.append_line_series_data(rms_com_series, position, data_rms_com_1, data_rms_sigma_1)
data_gauss_mean_1 = mean([x[2] for x in position_data[0]])
data_gauss_sigma_1 = mean([x[3] for x in position_data[0]])
plot_client.append_line_series_data(gauss_mean_series, position, data_gauss_mean_1, data_gauss_sigma_1)
raw_position_data = [x[4] for x in position_data[0]]
raw_value_data = [x[5] for x in position_data[0]]
cycle_position_data = [pshell.read_raw_data(p) for p in raw_position_data]
cycle_value_data = [pshell.read_raw_data(p) for p in raw_value_data]
plot_client.clear_plot(raw_data_plot)
for index in range(n_cycles):
series = plot_client.add_line_series(raw_data_plot, "cycle_%d" % index)
cycle_position = list(cycle_position_data[index]["data"])
cycle_value = list(cycle_value_data[index]["data"])
plot_client.set_line_series_data(series, cycle_position, cycle_value)
# Result format: [[[cycles]], ...]
# Example: [[[10.0, 20.0, 50.0, 60.0, '...h5|x_0001/w_pos', '...h5|x_0001/blm1']]]
result = scan(positioner=positioner, readables=readables, after_read=plot_data)
# Each cycle returns: cycles = [rms_com_1, rms_sigma_1, gauss_mean_1, gauss_sigma_1,
# link_to_raw_x_1, link_to_raw_y_1]This example shows how to scan over a bsread stream and use one of the channels in the stream as a scan condition (to verify if the received data is valid). In this type of scan, we collect all messages from the bsread stream.
from pyscan import *

# Do a max of 10 retries before aborting.
config.scan_acquisition_retry_limit = 10
# No delay between retries as we are using a bsread source - this limits our retry rate.
config.scan_acquisition_retry_delay = 0

# Lets acquire 10 messages from the stream.
n_messages = 10
positioner = BsreadPositioner(n_messages)

# Read camera X and Y value.
readables = [bs_property("CAMERA1:X"), bs_property("CAMERA1:Y")]

# Stream message is valid if "CAMERA1:VALID" equals 10.
# In case this message is not valid, retry with the next message (10 times before aborting, as defined above).
conditions = bs_condition("CAMERA1:VALID", 10, action=ConditionAction.Retry)

# The result will have 10 consecutive, valid, messages from the stream.
result = scan(positioner=positioner, readables=readables, conditions=conditions)If you do not want your scan to block your operations, you have to run it in a separate thread. There are a lot of ways to do that - below you can find the most simple example. The example shows 2 things: How to abort a scan (that is happening in a separate thread) and also how to get updates on scan points while the scan is still running.
from pyscan import *
from threading import Thread
from time import sleep

positioner = StaticPositioner(n_images=50)
settings = scan_settings(settling_time=0.1)

# Simple data provider, always returns 1.
def sample_data():
    return 1

# For each position, after each scan step, this function will be called by the scanning thread.
def update_graph(position, position_data):
    print("Position: ", position, " data: ", position_data)

# Generate a scan object.
scan_object = scanner(positioner=positioner, readables=sample_data, settings=settings,
                      after_read=update_graph)

result = None

# Define a scanning thread function.
def scan_thread():
    nonlocal result
    result = scan_object.discrete_scan()

# Execute the scan in a separate thread.
Thread(target=scan_thread).start()

sleep(0.5)

print("The main thread is not blocked by the scan.")

sleep(0.5)

# Abort the scan.
scan_object.abort_scan()
The output you expect from this script is the following:
Scan: 0.00 % completed (0/50)
Position:  0  data:  [1]
Scan: 2.00 % completed (1/50)
Position:  1  data:  [1]
Scan: 4.00 % completed (2/50)
Position:  2  data:  [1]
Scan: 6.00 % completed (3/50)
Position:  3  data:  [1]
Scan: 8.00 % completed (4/50)
The main thread is not blocked by the scan.
Position:  4  data:  [1]
Scan: 10.00 % completed (5/50)
Position:  5  data:  [1]
Scan: 12.00 % completed (6/50)
Position:  6  data:  [1]
Scan: 14.00 % completed (7/50)
Position:  7  data:  [1]
Scan: 16.00 % completed (8/50)
Position:  8  data:  [1]
Scan: 18.00 % completed (9/50)
Position:  9  data:  [1]
Scan: 20.00 % completed (10/50)
Exception in thread Thread-1:
Traceback (most recent call last):
  File "/anaconda/envs/pyscan/lib/python3.6/threading.py", line 916, in _bootstrap_inner
    self.run()
  File "/anaconda/envs/pyscan/lib/python3.6/threading.py", line 864, in run
    self._target(*self._args, **self._kwargs)
  File "/Users/babic_a/git/pyscan/tests/test_readme.py", line 288, in scan_thread
    result = scan_object.discrete_scan()
  File "/Users/babic_a/git/pyscan/pyscan/scanner.py", line 188, in discrete_scan
    self._verify_scan_status()
  File "/Users/babic_a/git/pyscan/pyscan/scanner.py", line 82, in _verify_scan_status
    raise Exception("User aborted scan.")
Exception: User aborted scan.
As you can see from the output, the scan was running in a separate thread, and it did stop with an exception when the main thread interrupted it.
The scanning thread was calling the update_graph function after each step. This function just wrote the position and the current scanned data (always 1) to the console, but it could be modified to update a graph while the scan is still running, for example.
In addition to the abort command, you can also call:
- scan_object.pause_scan() (pause the scan)
- scan_object.resume_scan() (resume the scan, when paused)
TBD
TBD
TBD