Using Phenex
You can learn more about using Phenex for phenotype annotation by viewing our introductory screencasts.
By default, Phenex comes pre-configured with the ontologies used for the Phenoscape project, but it can be configured to load terms from any OBO ontology from the web or a local file. Configuration of ontologies in Phenex has two components:
- adding term sources - URLs representing OBO files; and
- specifying the set of terms which should be available within each kind of entry field - an entry field can allow terms from a subset of a given ontology, or from more than one ontology.
To edit the list of terms sources, open the Ontology Sources panel by selecting View > Config > Ontology Sources from the menu. Add a new source by pressing the '+' button. Enter an HTTP or local file URL in the URL column, and an optional label of your choice in the Label column. Press "Apply" to save your list of ontology sources. You will need to relaunch Phenex in order for it to download the given files and load all the terms into its ontology session.
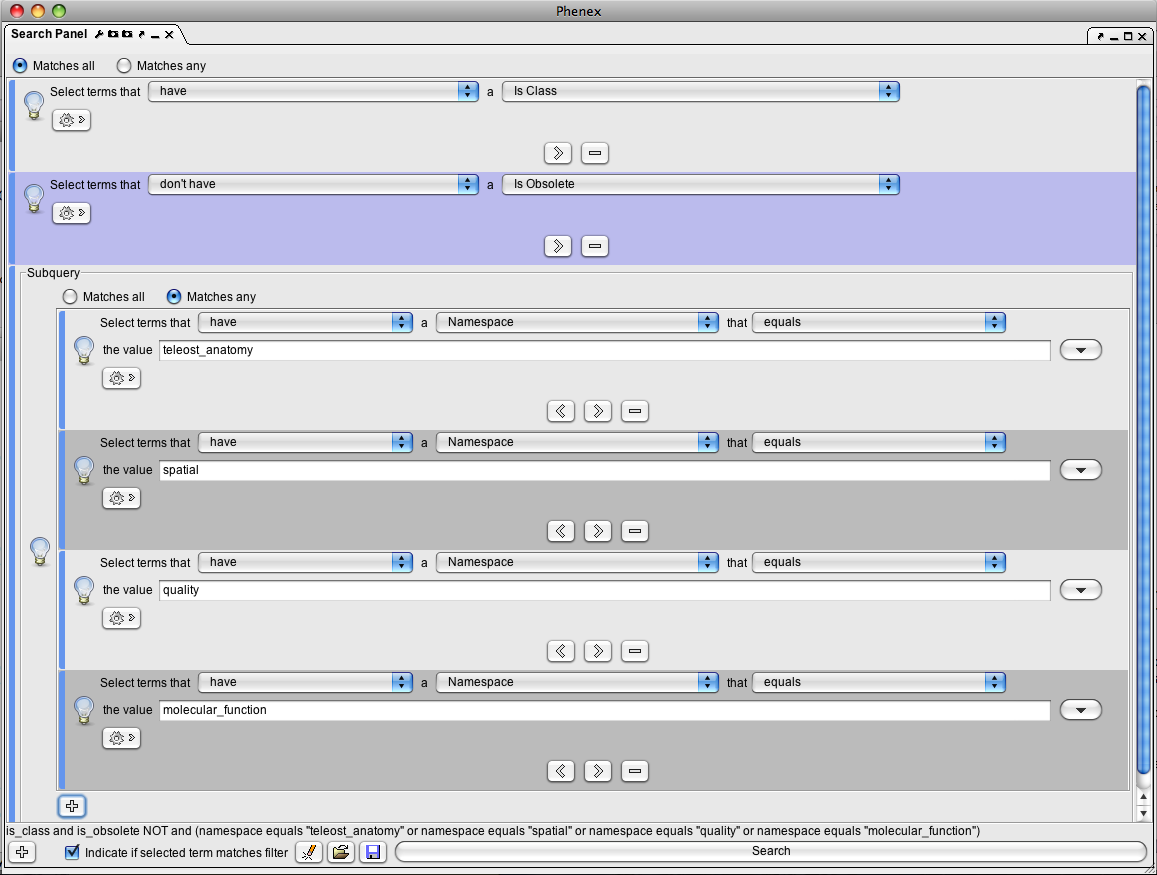
The set of terms available in a given entry field are determined by term filters. Term filters are just saved search specifications which can be created using the Search Panel. To apply a term filter to a particular type of entry field, save it in one of the standard locations (below).
Open the Search Panel from View > Ontology > Search Panel. Configure the search to specify the needed terms - you can test the result by performing the search with the Search button. Save the filter by pressing the disk icon. Here is an example of a term filter used for the entity field in the Phenoscape configuration:
To configure a particular entry field, place a filter file with the appropriate name in the Filters folder within the Phenex settings folder. You may need to create the Filters folder. You will need to relaunch Phenex for the new filters to take effect. The following types of entry fields are available:
- Taxa:
<Phenex settings folder>/Filters/taxa.xml- Used in the Taxa panel: Valid Taxon column
- Museum collections:
<Phenex settings folder>/Filters/museums.xml- Used in the Specimens panel: Collection column
- Entities:
<Phenex settings folder>/Filters/entities.xml- Used in the Phenotypes panel: Entity column, Related Entity column
- Qualities:
<Phenex settings folder>/Filters/qualities.xml- Used in the Phenotypes panel: Quality column
- Units:
<Phenex settings folder>/Filters/units.xml- Used in the Phenotypes panel: Unit column
- Relations:
<Phenex settings folder>/Filters/relations.xml- Specifies the relations available when creating post-compositions
The Phenex settings folder contains cached copies of downloaded ontology files, entry field filter files, and other settings files. Its location is dependent on the platform on which you're running Phenex.
-
Mac OS X:
<user's home>/Library/Application Support/Phenex- In Mac OS 10.7+, this folder is hidden but can be made visible by going to Finder> Go > Go to Folder, and typing in
~/Library
- In Mac OS 10.7+, this folder is hidden but can be made visible by going to Finder> Go > Go to Folder, and typing in
-
Windows:
C:\Documents and Settings\<user's name>\Phenex -
Unix:
<user's home>/.phenex
This introductory screencast demonstrates how to create, open and save files in Phenex: https://www.youtube.com/watch?v=4y68PehOnSo.
Phenex uses the NeXML file format for evolutionary data. NEXUS formatted phylogenetic matrices can be converted to NeXML format by using the NeXML plugin within Mesquite. The plugin is available from the nexml/nexml-java repository releases, currently as v0.1. To install the plugin, follow these steps:
- Download the archive of the plugin (ignore the source code archive unless you want to build it from source).
- If you use the command line, unzip the archive from within the Mesquite application folder (usually created as
Mesquite_Folder). The components of the plugin should automatically end up in the right places. - If you use Finder or a similar graphical file navigation tool, expand the archive (usually a double-click), and then move the contents of the
mesquite/andorg/folders into the correspondingly named folders in the Mesquite application folder (usually created asMesquite_Folder). See the following screenshots for illustration:

The Phenex matrix editor can handle entry of polymorphic or uncertain state values within cells. In order to enter multiple states in a single cell,you must use the matrix "quick editor". Just beneath the matrix view, there is a checkbox titled "Use quick editor". After enabling this setting, when you click to edit a cell, instead of popping up a states menu, the cell will become an editable text field, which operates very much like the matrix cell editor in Mesquite. Here you can simply type the symbol of the state you want to enter. If you want to enter a polymorphism of states 0 and 1, simply enter "0&1" (no spaces). For an uncertainty, use a slash: "0/1".
Phenex includes a Consistency Review panel which reports problematic or missing annotations. The consistency issues currently evaluated are:
- Unannotated state.
- Empty entity field.
- Empty quality field.
- Post-composition consisting of more than one differentia (may be okay).
- Relational quality used without a related entity.
- Related entity entered without a relational quality.
- Biological process entity not used with a process quality.
- Qualities descending from different attributes used in states for a given character.
Phenex includes two features that are intended to facilitate multiple curators editing shared files (such as in Dropbox).
- File change detection and reload: If a file changes on disk while it is being edited by Phenex, Phenex will detect the change and alert the user. The user will be given the opportunity to load the most current version of the file, so that conflicting edits are not produced. If the open file is in an edited, unsaved state, the unsaved edits will need to be discarded before reloading.
-
Autosave: To make it unlikely that Phenex will be holding unsaved edits at the time a file changes via Dropbox, an autosave feature is provided that immediately writes every edit to disk. This must be enabled via the menu command
File > Enable Autosave. Currently the setting is not persistent; it needs to be turned on each time Phenex is launched.
During the course of curation, a term may be needed which isn't available in a given ontology. Using ORB, the curator can request a provisional term from the Bioportal provisional term service.
- Select
ORB > Request New Term...and fill out the request dialog. - A provisional term with a temporary ID and the requested name will immediately be added to the Phenex ontology session. This term will now be available within all ontology autocomplete fields in Phenex. Provisional terms are displayed in purple within data fields.
- If the provisional term is assigned a permanent ID via the provisional term management interface (not part of Phenex), when Phenex next loads any data file containing that term, it will auto-migrate data using the provisional ID to the permanent ID.
- See the Ontology Request Broker documentation for more information on the overall workflow for handling provisional terms.