tutorial_scene

Imagine for a second that you are not a game developer anymore. Instead, You are a chef! Change your hipster outfit for a toque and a double breasted jacket. Now, instead of making games, you create new and delicious recipes for your guests.
想象一下你不是一位游戏开发者,而是一名厨师!脱下你那流行的衣服,换上厨师帽和双排扣的厨师服。现在,你不是在做游戏,而是在为你的顾客开发一道美味的的菜肴。
So, how does a chef create a recipe? Recipes are divided in two sections, the first is the ingredients and the second is the instructions to prepare it. This way, anyone can follow the recipe and savor your magnificent creation.
那么,厨师如何开发一道菜肴呢?一道料理被分为两个部分,第一部分是原料,第二部分是准备它的步骤(指令)。这样,每位顾客就能享用你的料理并且品尝到你独特的创造力。
Making games in Godot feels pretty much the same way. Using the engine feels like being in a kitchen. In this kitchen, nodes are like a refrigerator full of fresh ingredients to cook with.
使用Godot引擎开发游戏也与之相似。使用这款引擎时就像是厨师在厨房一样。置身于这间厨房,“结点(nodes)”就像是满是新鲜食材的冰箱。
There are many types of nodes, some show images, others play sound, other nodes display 3D models, etc. There's dozens of them.
结点是多种多样的,有些结点展示图片,另一些播放声音,还有一些显示3d模型,等等。
###结点
But let's go to the basics. A node is a basic element for creating a game, it has the following characteristics:
- Has a name.
- Has editable properties.
- Can receive a callback to process every frame.
- Can be extended (to have more functions).
- Can be added other nodes as children.
但首先我们要从基础入手。每个结点都是构成游戏的基本元素,它拥以下几个特点:
- 拥有一个名称(Names)。
- 拥有可供修改的属性。
- 逐帧运行以接收callback调用。
- 可扩展性(以拥有更多功能函数)。
- 能够添加其它结点为子结点。

最后一点是尤为重要的。结点可添加其他结点为子节点。当你如此组织结点是,这些结点就组成了树(tree)。
In Godot, the ability to arrange nodes in this way creates a powerful tool for organizing the projects. Since different nodes have different functions, combining them allows to create more complex functions.
在godot引擎中,这种将结点组织成树的方式构成了一个强大的管理项目的工具。不同点结点拥有不同的功能,因而将它们组织在一起可以实现更多复杂的功能。
This is probably not clear yet and it makes little sense, but everything will click a few sections ahead. The most important fact to remember for now is that nodes exist and can be arranged this way.
现在你也许还并不清楚,不太明白,然而在之后几章的学习中就会逐渐明朗起来。现阶段最重要的是要记住结点的存在以及组织结点的方式。
###场景

Now that the existence of nodes has been defined, the next logical step is to explain what a Scene is.
既然结点的存在已经定义了,下一个逻辑概念就是解释什么是场景(scene).
A scene is composed of a group of nodes organized hierarchically (in tree fashion). It has the following properties:
- A scene always has only one root node.
- Scenes can be saved to disk and loaded back.
- Scenes can be instanced (more on that later).
- Running a game means running a scene.
- There can be several scenes in a project, but for it to start, one of them must selected to be loaded first.
一个场景是由一组分级构成的结点(以树的形式)构成的。它拥有以下属性:
- 一个场景有且只有一个根节点(root node)。
- 场景可以被instanced(日后会讲)。
- 运行一个游戏本质上是在运行一个场景。
- 一个项目中可以拥有多个场景,但为了正常运行,总有一个场景要优先加载。
Basically, the Godot editor is a scene editor. It has plenty of tools for editing 2D and 3D scenes as well as user interfaces, but all the editor revolves around the concept of editing a scene and the nodes that compose it.
从本质上讲,godot引擎是一个“场景编辑器”,其中拥有大量的工具来编辑2d和3d的场景以及用户界面,但是所有的编辑器都是围绕场景以及填充场景的结点展开的。
Theory is boring, so let's change subject and go practical. Following a long tradition in tutorials, the first project will be a hello world. For this, the editor will be used.
When godot executable is run outside a project, the Project Manager appears. This helps developers manage their projects.

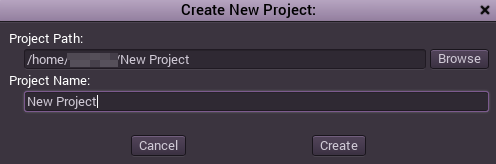
To create a new project, the "New Project" option must be used. Choose and create a path for the project and specify the project name:
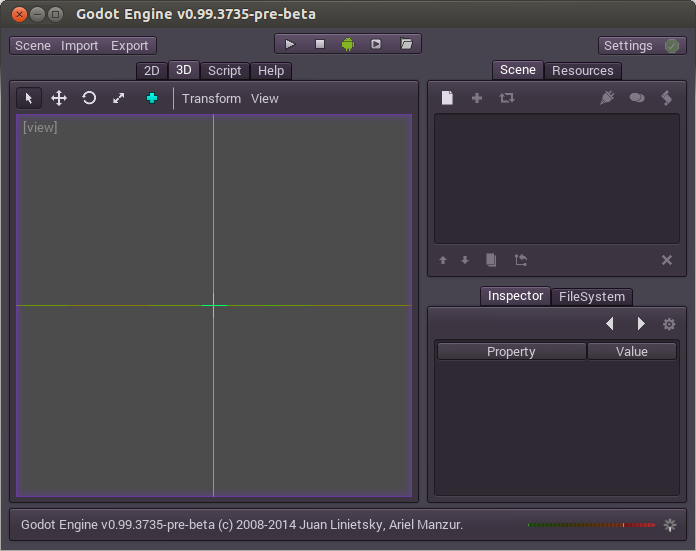
Once the "New Project" is created, the next step is opening it. This will open the Godot editor. Here is how the editor looks when freshly opened:
As mentioned before, making games in Godot feels like being in a kitchen, so let's open the refrigerator and add some fresh nodes to the project. We'll begin with a Hello World! To do this, the "New Node" button must be pressed:

This will open the Create Node dialog, showing the long list of nodes that can be created:

From there, select the "Label" node first. Searching for it is probably the quickest way:

And finally, create the Label! A lot happens when Create is pressed:

First of all, the scene is changed to the 2D editor (because Label is a 2D Node type), and the Label appears, selected, at the top left corner of the viewport. The node appears in the scene tree editor (box in the top right corner), and the label properties apear in the Inspector (box in the bottom right corner).
The next step, will be to change the "Text" Property of the label, let change it to "Hello, World!":

Ok, everything's ready to run the scene! Press the PLAY SCENE Button on the top bar (or hit F6):

Aaaand.. Oops.

Scenes need to be saved to be run, so save the scene to something like hello.scn in Scene -> Save:

And here's when something funny happens. The file dialog is a special file dialog, and only allows to save inside the project. The project root is "res://" which means "resource path. This means that files can only be saved inside the project. For the future, when doing file operations in Godot, remember that "res://" is the resource path, and no matter the platform or install location, it is the way to locate where resource files are from inside the game.
After saving the scene and pressing run scene again, the "Hello, World!" demo should finally execute:

Success!!
Ok, It's time to do some configuration to the project. Right now, the only way to run something is to execute the current scene. Projects, however, have several scenes so one of them must be set as the main scene. This scene is the one that will be loaded at the time the project is run.
These settings are all stored in the engine.cfg file, which is a plaintext file in win.ini format, for easy editing. There are dozens of settings that can be set in that file to alter how a project executes, so to make matters simpler, a project setting dialog exists, which is sort of a frontend to editing engine.cfg
To access that dialog, simply go to Scene -> Project Settings.
Once the window opens, the task will be to select a main scene. This can be done easily by changing the application/main_scene property and selecting 'hello.scn'.

With this change, pressing the regular Play button (or F5) will run the project, no matter which scene is being edited.
Going back to the project settings dialog. This dialog provides a lot of options that can be added to engine.cfg and show their default values. If the default value is ok, then there isn't any need to change it. When a value is changed, a tick is marked to the left of the name. This means that the property will be saved to the engine.cfg file and remembered.
As a side note, for future reference and a little out of context (this is the first tutorial after all!), it is also possible to add custom configuration options and read them in run-time using the Globals singleton.
This tutorial talks about "Scenes and Nodes", but so far there has been only one scene and one node! Don't worry, the next tutorial will deal with that...