Hello, gooooood morning!
🍪 Welcome to the cookiecutter-django workshop! My name is Liuyang. I am one of the maintainers of cookiecutter-django. Today allow me to introduce this awesome project to you. Hopefully you will find it useful.
What is the best practice for XXX in Django?
How can I enable HTTPS for Django?
What is the recommendation project structure for Django?
How to integrate Docker with Django?
If you ever ask yourself asking these questions, cookiecutter-django might just be the answer you are looking for.
- Git
- Docker
- Github account
- Text editor or IDE (e.g. VSCode or PyCharm)
Docker is an extremely useful tool to speed up the development and deployment cycle. We will use Docker throughout this workshop. It is available for all the major platforms. When if doubt, please reach out to the workshop conductor.
cookiecutter is a great tool developed to quickly start a project based on a certain "template". In this workshop, we will use the cookiecutter-django template which is specifically designed for Django with many best practices baked in.
# for Mac
$ brew install cookiecutter

# or generally
$ pip install cookiecutter- Createa a new Django project using cookiecutter
Later you will be asked a series of questions. Based on your answer, a customerized project will be generated. For the purpose of this workshop, you may use the follow answer as a guide.
# Here cookiecutter CLI is taking the first parameter as the template source
# In this example, it's a Github repo and cookiecutter will use the latest master at this
# point of time. The following questions may vary depending on when you run the command

$ cookiecutter https://github.com/pydanny/cookiecutter-django

project_name [My Awesome Project]: my-favorite-cookie (or whatever cool name you like)
project_slug [my_favorite_cookie]: my_favorite_cookie (or whatever cool name you like)
description [Behold My Awesome Project!]: this is my favorite cookie
author_name [Daniel Roy Greenfeld]: Your name
domain_name [example.com]: enter
email [[email protected]]: your email
version [0.1.0]: enter
Select open_source_license:
1 - MIT
2 - BSD
3 - GPLv3
4 - Apache Software License 2.0
5 - Not open source
Choose from 1, 2, 3, 4, 5 [1]: 1
timezone [UTC]: enter
windows [n]: Choose accordingly
use_pycharm [n]: n
use_docker [n]: y (***Important!***)
Select postgresql_version:
1 - 10.3
2 - 10.2
3 - 10.1
4 - 9.6
5 - 9.5
6 - 9.4
7 - 9.3
Choose from 1, 2, 3, 4, 5, 6, 7 [1]: 4 (***Important!***)
Select js_task_runner:
1 - None
2 - Gulp
Choose from 1, 2 [1]: 1
custom_bootstrap_compilation [n]: n
use_compressor [n]: n
use_celery [n]: n
use_mailhog [n]: y (***Important!***)
use_sentry [n]: n
use_whitenoise [n]: n
use_heroku [n]: y
use_travisci [n]: y
keep_local_envs_in_vcs [y]: y
debug [n]: n
 [SUCCESS]: Project initialized, keep up the good work!
That's it. You now have a production-ready Django project.
# Make sure docker and docker-compose are installed correctly
$ docker version
$ docker-compose version

# Navigate to the project
$ cd my_favorite_cookie # change to your project name

# Build docker image using docker-compose
$ docker-compose -f local.yml build
Note: if you get a Couldn't connect to Docker daemon at http+unix://var/run/docker.sock error, append the docker command with sudo, or add the current user to the docker group:
# Replace ${USER} with your username if it doesn't work
# After this command finishes, you need to log out and log in for it to take effect
$ sudo usermod -aG docker ${USER}
If you face some errors while docker build, you may need to change to another Docker registery mirror. (e.g. https://registry.docker-cn.com). Because there might be some problems with NUS Wifi.
For Mac: Open the Docker app, "Daemon" -> "Registry mirrors" -> Add "https://registry.docker-cn.com"
For Ubuntu: https://docs.docker.com/registry/recipes/mirror/#configure-the-docker-daemon
Now, this step will probably take a while, depending how fast your network is. I strongly recommend you to get a ☕. Essentially Docker is building your images based on the definition in the local.yml file. This file is for your development envionment. Similarly, you will also find production.yml in the project.
This will install all the dependecies needed to run your project, like the database, your OS dependenceis, your requirements.txt and etc. If you are interested, take a look at the logs.
# Run the docker image we just built
$ docker-compose -f local.yml up
Now we are running the images we just built, and turn them into running containers! This will start your database, apply migrations and start the developement server. This step should be pretty fast compared the last one.
Now you have a running Django project. See it in action at http://0.0.0.0:8000.
As you can probably see, it has a nice UI (powered by Boostrap 4), django-debug-toolbar, a working user registration system ready for use. Now let's try to create an account.
Fill in the email, password and repeat password, click "Sign up". You will probably wonder, where did the confirmation email go? Don't worry. cookiecutter-django actually generates a local email server (mailhog in the local.yml) for you. Now let's navigate to http://0.0.0.0:8025. The email is just lying in the mailbox. Awesome!
By default, cookiecutter-django installs https://github.com/pennersr/django-allauth for you, so we can quickly enable Github social login feature.
- Open the project in your text editor or IDE
- Navigate to
base.py - Add the following line to THIRD_PARTY_APPS. So it will look like this:
THIRD_PARTY_APPS = [
    'crispy_forms',
    'allauth',
    'allauth.account',
    'allauth.socialaccount',
    'allauth.socialaccount.providers.github', # <-- we just added this
    'rest_framework',
]
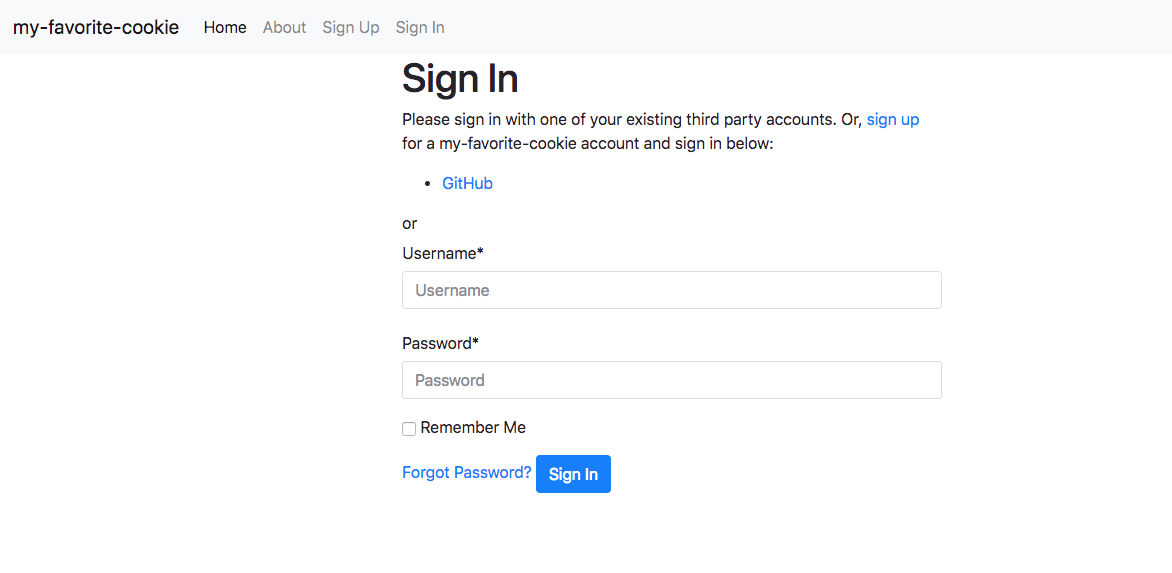
- Save and refresh. Now you will see the Github button in the sign in page (http://0.0.0.0:8000/accounts/login/)

If you click the click the link now, you will probably get a SocialApp matching query does not exist. That is because we haven't configured a Github Oauth app for django-allauth yet.
To do this, we need login to Django admin (or modify the database directly).
First let's create a superuser. Note that we now need to run the mange.py commands inside a Docker container.
# Open a new terminal tab and cd the right location
$ docker-compose -f local.yml run django python manage.py createsuperuser
Now we can log in to Django admin: http://0.0.0.0:8000/admin
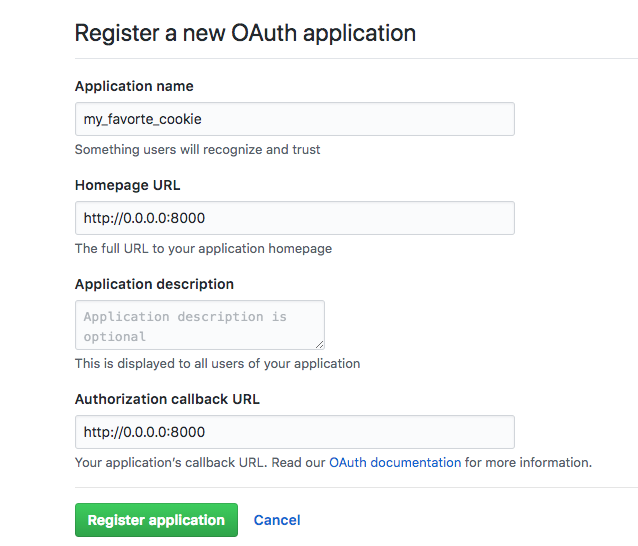
- Go to: https://github.com/settings/developers
- Click "New Oauth App"
- For Homepage URL and Authorization callback URL, just put http://0.0.0.0:8000
- Click "Register Application"
Click "Social applications", and then "Add Social Application". Fill the Client ID and Client Secret from the Oauth app we just registered with Github. Don't forget to link the site with this social app by double clicking on the "example.com", or click the right arrow.
Once this is done. Go back to the sign in page (http://0.0.0.0:8000/accounts/login/) and sign in with Github again.
Voilà, it works!
Now you have seen the power of cookiecutter-django and how easy it is to create a beautiful application with it. You may ask, why not just use the built-in django-admin startproject? Well, the default is too simple and not very useful if you want to build something fast and production-ready. For me, cookiecutter is kind of like create-react-app or vue-cli, but for Django. As you can see, there are tons of other features not covered in this workshop. Give it a shot and you will love them.
If you have any question regarding cookiecutter-django, feel free to open an issue here or shout out at the Gitter channel. The friendly community will help you out.


