This is the base code for creating cross-platform application using Flutter.
- Sourcya Flutter Boilerplate
- Getting Started
- Architecture
To use this template to create new flutter application, Follow these steps to start creating your own app:
- click use this template to create a new repository with this code.
- Clone the new repo to your local machine.
- go to
pubspec.yamland update name, description and version for the new app.
to rename app name, package name, We use Rename package to update them.
you can install Rename package globally using:
flutter pub global activate rename then if you don't pass -t or --target parameter it will try to rename all available platform project folders inside flutter project.
Run this command inside your flutter project root.
      flutter pub global run rename setBundleId --value "io.sourcy.app"
      flutter pub global run rename setAppName --value "Sourcya app"
flutter pub global run rename setAppName --targets ios,android --value "Sourcya app"Use Flutter launcher icon package to update app launcher icons.
Add your Flutter Launcher Icons configuration to your pubspec.yaml or create a new config file called flutter_launcher_icons.yaml. An example is shown below. More complex examples can be found in the example projects.
dev_dependencies:
  flutter_launcher_icons: "^0.13.1"

flutter_launcher_icons:
  android: "launcher_icon"
  ios: true
  image_path: "assets/icon/icon.png"
  min_sdk_android: 21 # android min sdk min:16, default 21
  web:
    generate: true
    image_path: "path/to/image.png"
    background_color: "#hexcode"
    theme_color: "#hexcode"
  windows:
    generate: true
    image_path: "path/to/image.png"
    icon_size: 48 # min:48, max:256, default: 48
  macos:
    generate: true
    image_path: "path/to/image.png"
If you name your configuration file something other than flutter_launcher_icons.yaml or pubspec.yaml you will need to specify the name of the file when running the package.
flutter pub get
flutter pub run flutter_launcher_icons -f <your config file name here>
Note: If you are not using the existing pubspec.yaml ensure that your config file is located in the same directory as it.
After setting up the configuration, all that is left to do is run the package.
flutter pub get
flutter pub run flutter_launcher_icons
In the above configuration, the package is setup to replace the existing launcher icons in both the Android and iOS project with the icon located in the image path specified above and given the name "launcher_icon" in the Android project and "Example-Icon" in the iOS project.
Environment variables are useful for making the credentials, configuration files or API keys that are required for successful building or integration with external services while not publishing them to external repos.
We can load configuration at runtime from a .env file which can be used throughout the application.
Env vars are easy to change between deploys without changing any code... they are a language- and OS-agnostic standard.
- Create a
.envfile in the root of your project with the example content:
FOO=foo
BAR=true
FOOBAR=$FOO$BAR
ESCAPED_DOLLAR_SIGN='$1000'
# This is a comment
- Add the
.envfile to your assets bundle inpubspec.yaml. Ensure that the path corresponds to the location of the .env file!
assets:
- assets/env/- Remember to add the
.envfile as an entry in your.gitignoreif it isn't already unless you want it included in your version control.
*.env- Load the
.envfile inmain.dartusingPlayx.runPlayxorPlayx.bootmethods.
import 'package:flutter_dotenv/flutter_dotenv.dart';

Future main() async {
  Playx.runPlayx(
    appConfig: appConfig,
    themeConfig: AppThemeConfig(),
    localeConfig: AppLocaleConfig(),
    envSettings: const PlayxEnvSettings(
      fileName: 'assets/env/keys.env', //path of the .env file
    ),
    app: const MyApp(),
  );
}
You can then access variables from .env throughout the application using PlayxEnv
Future<String> get apiKey=> PlayxEnv.getString('apiKey');

Future<int?> get number=> PlayxEnv.maybeGetInt('number_key');
We can setup codemagic to use enviroment variables that were configured form the app. This is helpful for conifguring the app with environment variables like api key without publishing them to Github, conifguring the app with different variables for each workflow and track.
For more information about the use of environment variables and a list of Codemagic read-only environment variables, refer here.
You can add environment variables to your Flutter projects in App settings > Environment variables.
- Enter the name of the variable for example
ENVIROMENT_KEY. - Copy the content of the
.envfile into the variable value field. - Check Secure if you wish to hide the value both in the UI and in build logs and disable editing of the variable. Such variables can be accessed only by the build machines during the build.
- If we want to encrypt the variables, they first need to be base64 encoded locally. To use the vars, you will have to decode them during the build.
- Click Add.
In order to use the enivroment variable stored in keys_env, We need to add a post clone script that copy the content of the keys_env env into .env file in app assets.
You can add the script variables to your Flutter projects in App settings > Post-clone script which is located after Dependency caching.
then add this command :
# Create directory if it doesn't exist
mkdir -p $CM_BUILD_DIR/assets/env

# Write out the environment variable file
echo "$ENVIROMENT_KEY" >> $CM_BUILD_DIR/assets/env/keys.envAny android app need to be signed to use google sign in and to be ready for publishing to Google play.
To use features like google play sign in the app needs to be signed in debug and release mode.
- Create a keystore file and put it in the
androiddirectory of your project. - Create a file named
keystore.propertiesin theandroiddirectory of your project that contains your signing information, as follows:
    storePassword=myStorePassword
    keyPassword=mykeyPassword
    keyAlias=myKeyAlias
    storeFile=myStoreFileLocation (../key.jks) it should be like this if keystore in android directory
Make sure don't push this file to the repo as it should be secret.
For release version, The app need to be signed on code magic using a keystore file. For more info check : https://docs.codemagic.io/flutter-code-signing/android-code-signing/ https://docs.codemagic.io/yaml-code-signing/signing-android/
To setup Google sign in in our flutter project, There is some configuration that needs to be done:
To use Google sign in in our app we need to sign our app with a keystore and extracts it's SHA key to be provided for the backend to register the app in Google cloud console with app package name and SHA key.
If you need to create a new keystore file for signing your release builds, you can do so with the Java Keytool utility by running the following command:
keytool -genkey -v -keystore sourcya_keystore.jks -storetype JKS -keyalg RSA -keysize 2048 -validity 10000 -alias sourcya_key -keypass sourcya135 -storepass sourcya135 -dname "CN=Sourcya, OU=Sourcya, O=Sourcya, L=Egypt, ST=Alexandria, C=EG" Keytool then prompts you to enter your personal details for creating the certificate, as well as provide passwords for the keystore and the key. It then generates the keystore as a file called sourcya_keystore.jks in the directory you’re in. The key is valid for 10,000 days.
We can generate SHA-1 using the Java Keytool utility by running the following command:
keytool -list -v -keystore "sourcya_key.jks" -alias sourcya_key -storepass sourcya135 -keypass sourcya135To use Google sign in in our app, The backend should create a client for ios using ios app bundle id.
Then a client id should be generated and put in core/keys.dart.
- First register your application.
- Make sure the file you download in step 1 is named
GoogleService-Info.plist. - Move or copy
GoogleService-Info.plistinto the[my_project]/ios/Runnerdirectory. - Open Xcode, then right-click on
Runnerdirectory and selectAdd Files to "Runner". - Select
GoogleService-Info.plistfrom the file manager. - A dialog will show up and ask you to select the targets, select the
Runnertarget. - Update the
CFBundleURLTypesattributes below into the[my_project]/ios/Runner/Info.plistfile.
<!-- Put me in the [my_project]/ios/Runner/Info.plist file -->
<!-- Google Sign-in Section -->
<key>CFBundleURLTypes</key>
<array>
<dict>
    <key>CFBundleTypeRole</key>
    <string>Editor</string>
    <key>CFBundleURLSchemes</key>
    <array>
        <!-- TODO Replace this value: -->
        <string>com.googleusercontent.apps.861823949799-vc35cprkp249096uujjn0vvnmcvjppkn</string>
    </array>
</dict>
</array>
    <!-- End of the Google Sign-in Section -->
On your web/index.html file, add the following meta tag, somewhere in the head of the document:
<meta name="google-signin-client_id" content="YOUR_GOOGLE_SIGN_IN_OAUTH_CLIENT_ID.apps.googleusercontent.com">For this client to work correctly, the last step is to configure the Authorized JavaScript origins, which identify the domains from which your application can send API requests. When in local development, this is normally localhost and some port.
You can do this by:
- Going to the Credentials page.
- Clicking "Edit" in the OAuth 2.0 Web application client that you created above.
- Adding the URIs you want to the Authorized JavaScript origins.
For local development, you must add two localhost entries:
http://localhostandhttp://localhost:5000(or any port that is free in your machine)
Starting flutter in http://localhost:5000
Normally flutter run starts in a random port. In the case where you need to deal with authentication like the above, that's not the most appropriate behavior.
You can tell flutter run to listen for requests in a specific host and port with the following:
flutter run -d chrome --web-hostname localhost --web-port 5000Or from Android studio click on Main.dart next to run button
Then click on Edit Configuration a window will appear, on Addition run args
add : --web-port 5000
now our web app run on the right configuration.
An app architecture defines the boundaries between parts of the app and the responsibilities each part should have. In order to meet the needs mentioned above, you should design your app architecture to follow a few specific principles.
The most important principle to follow is separation of concerns. It's a common mistake to write all your code in Widgets . These UI-based classes should only contain logic that handles UI and operating system interactions. By keeping these classes as lean as possible, you can avoid many problems related to the component lifecycle, and improve the testability of these classes.
Another important principle is that you should drive your UI from data models, preferably persistent models. Data models represent the data of an app. They're independent from the UI elements and other components in your app. This makes the app more testable and robust.
When a new data type is defined in your app, you should assign a Single Source of Truth (SSOT) to it. The SSOT is the owner of that data, and only the SSOT can modify or mutate it. To achieve this, the SSOT exposes the data using an immutable type, and to modify the data, the SSOT exposes functions or receive events that other types can call.
This pattern brings multiple benefits:
- It centralizes all the changes to a particular type of data in one place.
- It protects the data so that other types cannot tamper with it.
- It makes changes to the data more traceable. Thus, bugs are easier to spot.
The single source of truth principle is often used with the Unidirectional Data Flow (UDF) pattern. In UDF, state flows in only one direction. The events that modify the data flow in the opposite direction.
In Android, state or data usually flow from the higher-scoped types of the hierarchy to the lower-scoped ones. Events are usually triggered from the lower-scoped types until they reach the SSOT for the corresponding data type. For example, application data usually flows from data sources to the UI. User events such as button presses flow from the UI to the SSOT where the application data is modified and exposed in an immutable type.
This pattern better guarantees data consistency, is less prone to errors, is easier to debug and brings all the benefits of the SSOT pattern.
The app is built using MVVM architecture Pattern.
MVVM stands for Model, View, View Model.
Model represents the data and business logic of the app. One of the recommended implementation strategies of this layer, is to expose its data through observables to be decoupled completely from View Model or any other observer/consumer.
It acts as a link between the Model and the View. It provides the data for a specific UI component which are the widgets , and contains data handling business logic to communicate with the model. For example, the View Model can call other components to load the data, and it can forward user requests to modify the data. The View Model doesn't know about UI components, so it isn't affected by configuration changes, such as recreating an activity when rotating the device. One of the important implementation strategies of this layer is to decouple it from the View, i.e. View Model should not be aware about the view who is interacting with.
the view role in this pattern is to observe a View Model observable to get data in order to update UI elements accordingly.
The following flow illustrates the core MVVM Pattern.

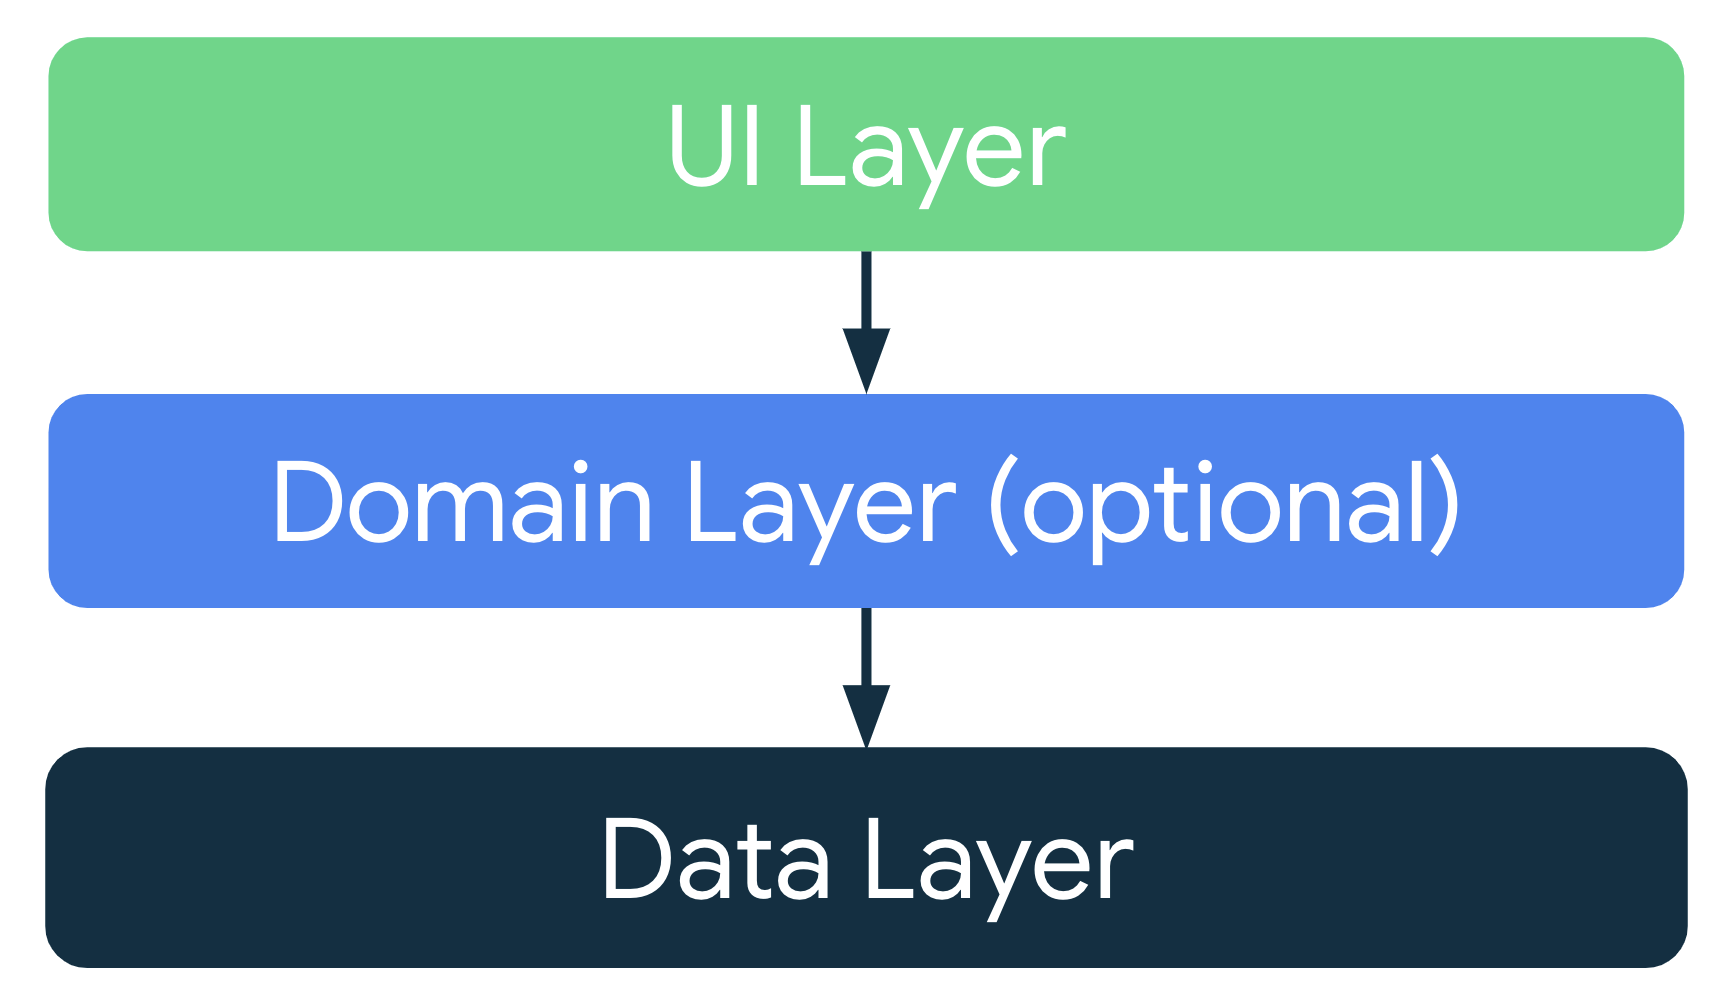
Considering the common architectural principles mentioned in the previous section, each application should have at least two layers:
- The UI layer that displays application data on the screen.
- The data layer that contains the business logic of your app and exposes application data.
You can add an additional layer called the domain layer to simplify and reuse the interactions between the UI and data layers.
The role of the UI layer (or presentation layer) is to display the application data on the screen. Whenever the data changes, either due to user interaction (such as pressing a button) or external input (such as a network response), the UI should update to reflect the changes.
The UI layer is made up of two things:
- UI elements that render the data on the screen. You build these elements using Widgets.
- State holders that hold data, expose it to the UI, and handle logic. We are currently using Getx State Mangement.

For our app our ui layer consits of :
- view : contains our screen widget. if our view is big consider separating the widget into smaller widgets.
- controller: which contains getx controller which controls the data that is coming from our data layer and handling ui events. It's main responsiblity is to update our view.
- binding : Bindings are classes where we can declare our dependencies and then bind them to the routes. it should be used to initialize view controller.

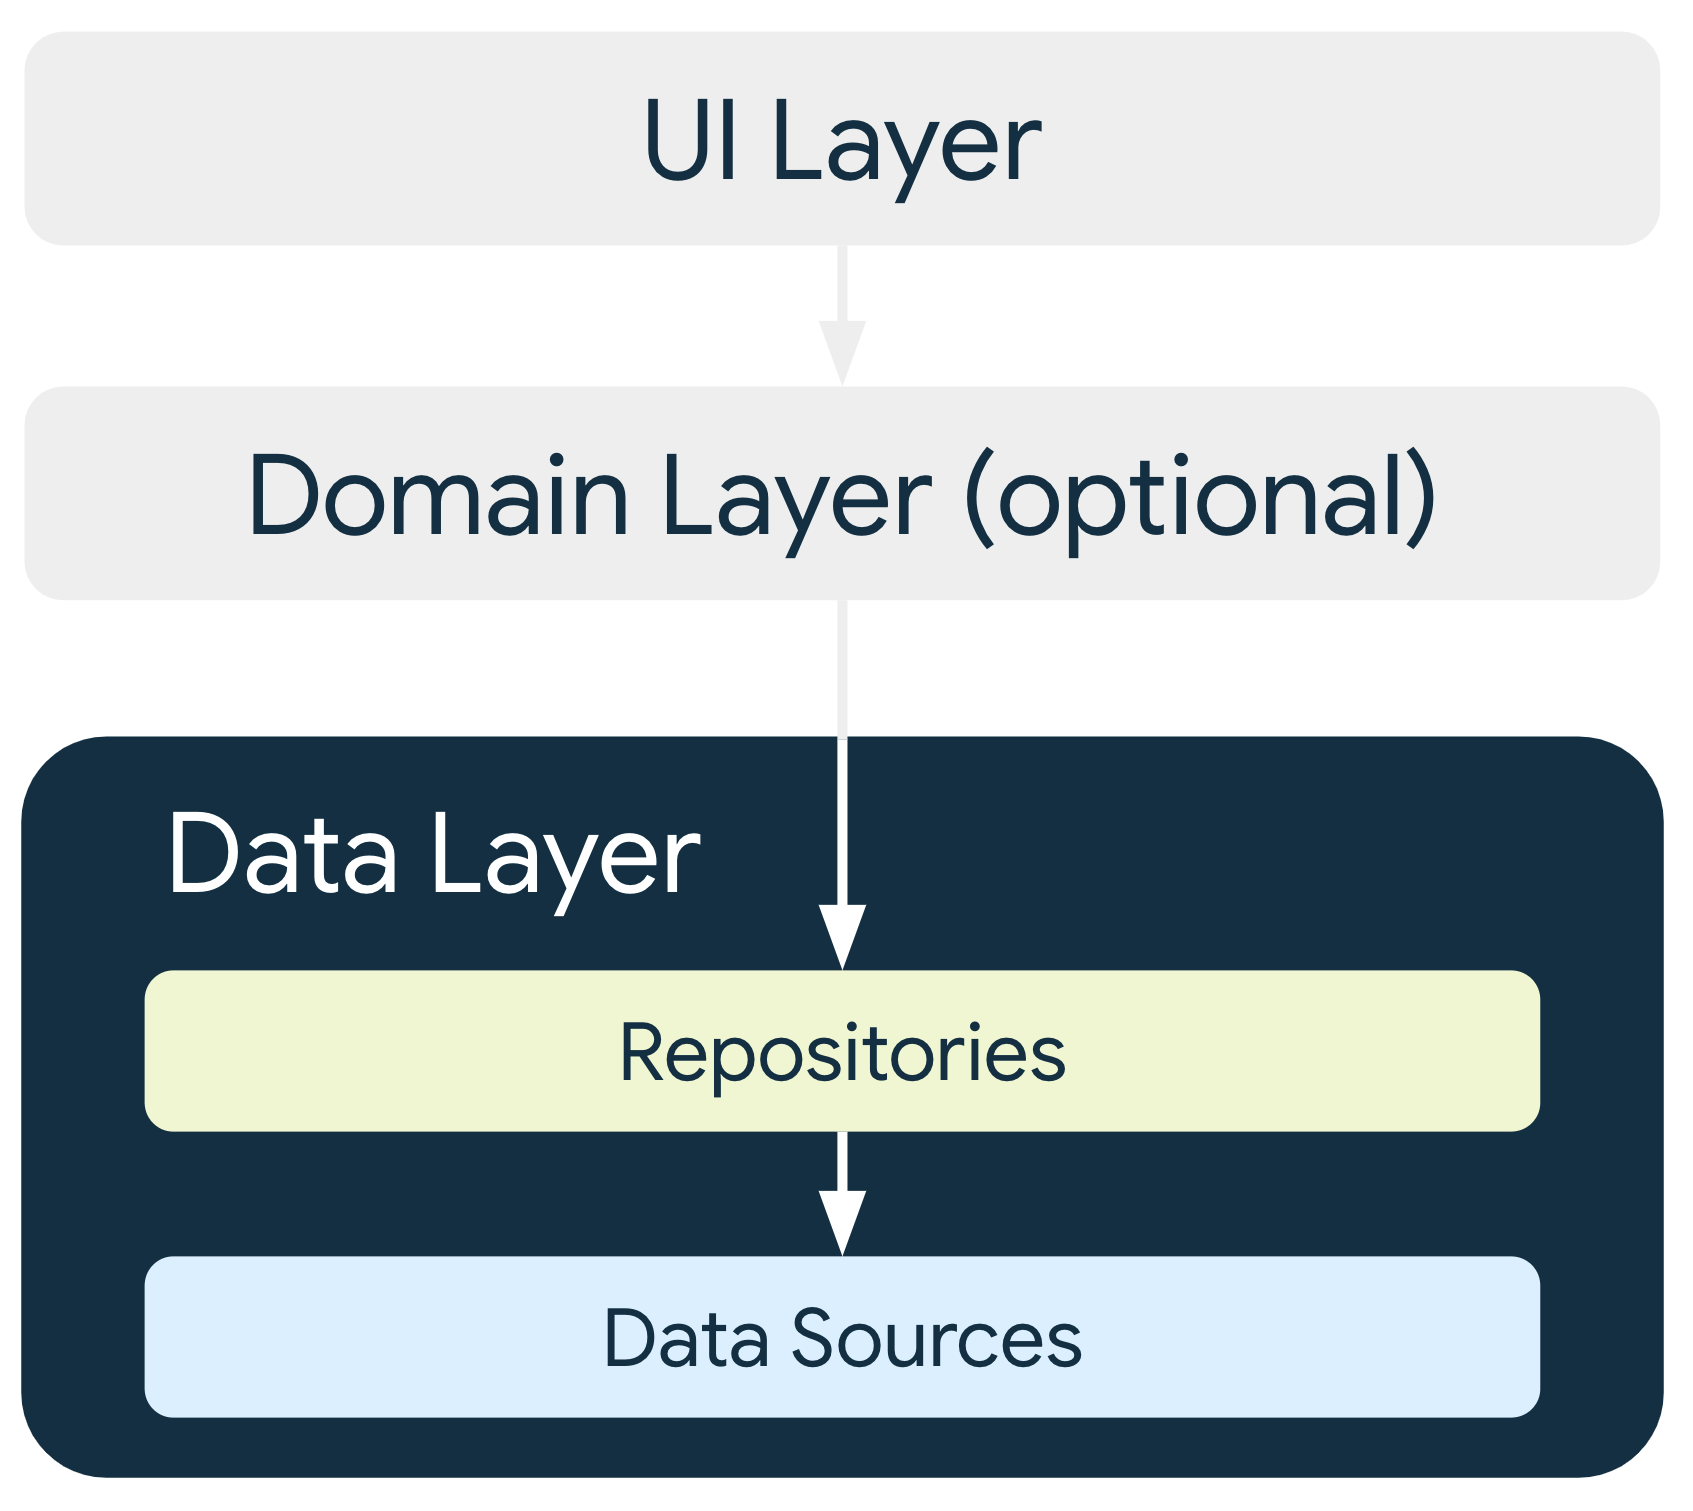
The data layer of an app contains the business logic. The business logic is what gives value to your app—it's made of rules that determine how your app creates, stores, and changes data.
The data layer is made of repositories that each can contain zero to many data sources. You should create a repository class for each different type of data you handle in your app. For example, you might create a MoviesRepository class for data related to movies, or a PaymentsRepository class for data related to payments.
Repository classes are responsible for the following tasks:
- Exposing data to the rest of the app.
- Centralizing changes to the data.
- Resolving conflicts between multiple data sources.
- Abstracting sources of data from the rest of the app.
- Containing business logic.
Each data source class should have the responsibility of working with only one source of data, which can be a file, a network source, or a local database. Data source classes are the bridge between the application and the system for data operations.
The repository should decide where the data should come from which data source to the ui layer.
For example we might only need data from api then later we need to add caching using database so we create data source for the database. In this case the repo should handle how we get data from the api and database and only return the right data for the ui.
For our data layer on the app :
We should create a data layer for each feature.
each future can consists of one data layer and one or more ui layer.
As we described earlier our data layer consists of :
- Model : data model for the feature.
Based on the app use case we may consider creating different models for each data like creating model for data that are coming from api and different model for data coming from database and model for the ui. - Data Source: getting data from a single source like api, database , etc.
- Repo: Get data from data sources and make it ready for the ui layer.

In this project structure, packages contain all classes that are required for a feature. The independence of the package is ensured by placing closely related classes in the same package. An example of this structure is given below:
    └── auth
        ├── data
            ├── model
            ├── datasources
            └── repo
        └── ui
            ├── bindings
            ├── controller
            └── view
    └── product
        ├── data
            ├── model
            ├── datasources
            └── repo
        └── ui
            ├── bindings
            ├── controller
            └── view
— Package by Feature has packages with high cohesion, low coupling and high modularity.
— Package by Feature allows some classes to set their access modifier package-private instead of public, so it increases encapsulation. On the other hand, Package by Layer forces you to set nearly all classes public.
— Package by Feature reduces the need to navigate between packages since all classes needed for a feature are in the same package.
— Package by Feature is like microservice architecture. Each package is limited to classes related to a particular feature. On the other hand, Package By Layer is monolithic. As an application grows in size, the number of classes in each package will increase without bound.
Our app consists of 2 components:
This component is responsible for all app features as it contains each feature that are packaged together by Feature as described in previous example.
Each Feature can have one or more screen as each screen has it's own ui layer and screens have one data layer or can share it with another screen.

This component contains different pieces of code that are shared between the whole app.

It contains different components:
This component contains app configuration like playx configuration, keys and constants .
Handles saving value/pair keys in shared preferences in one place.
Provides different utilities for whole app like alerts, pickers, app utils and more.
Provides different Widgets that are shared between the app.
Handles app navigation in one place.
First create your app routes.
Then every navigation between routes should be done in app navigation class.
To make it easier to maintain same behavior for navigation and make it easy if we want to use another solution for navigation in the future.
For Example :
if you want to navigate from splash to home screen navigate using this.
    void navigateFormSplashToHome() {
         Get.offAllNamed(Routes.HOME);
     }
This provides us with an api client that can do different REST calls and perform GET, POST, PUT, DELETE requests for the api with better error handling.
We are using our playx_network package which is a wrapper around Dio that can perform API requests with better error handling and easily get the result of any API request.
To use it we need to :
-
Setup
PlayxNetworkClientan configure it based on your needs. You should create only one instance of this network client to be used for the app depending on your use case.final PlayxNetworkClient _client = PlayxNetworkClient( //you can customize your dio options like base URL, connection time out. dio: Dio( BaseOptions( baseUrl: _baseUrl, connectTimeout: const Duration(seconds: 20), senTimeout: const Duration(seconds: 20), ), ), //If you want to attach a token to the client or add any custom headers to all requests. customHeaders: () async => { 'authorization': 'Bearer token' }, //Function that converts json error response from api to error message. // You should specify how to extract error message from the response. // defaults to as below: errorMapper: (json) { if (json.containsKey('message')) { return json['message'] as String? ; } return null; }, );
-
Now we can use the client to perform any GET, POST, PUT, and DELETE HTTP method.
 Future<NetworkResult<Movie>> getMovieDetails(
      String id,
  ) async {
      return client.get<Movie>(
          Endpoints.movieDetails,
           query: {
           'id': id,
              },
       fromJson: Movie.fromMap,
   );
}
We use the suitable methods of our api client like get and pass the model that will be returned.
It takes request endpoint and query and It needs from json function that converts the response to the right model.
The previous example returns NetworkResult<Movie> where movie is the model returned from reponse.
and NetworkResult is wrapper for the data which return the result of the request if it's successful it returns the data and if it's error it return NetworkException .
NetworkException is a base class for handling most api errors and provides suitable error messages for each exception.
You can customize these error messages and what errors should appear by creating a class that extends ExceptionMessage and overrides all messages with your own messages and pass it to the api client.
Here we are handling app resources like themes, color, translations and assets.
Here we put our app theme.
We are using Playx Theme to handle app theme change and theme coloring.
class AppThemeConfig extends XThemeConfig {
  @override
  List<XTheme> get themes => [
    LightTheme.theme,
    DarkTheme.theme,
  ];
}
For each theme of our app we create a file with different theme data and color scheme.
Here is an example of light theme :
abstract class LightTheme {
  static String lightTheme = 'light';
  static String lightThemeName = 'Light';

  static XTheme get theme => XTheme(
      id: lightTheme,
      nameBuilder: () => lightThemeName,
      theme: ThemeData.light().copyWith(
        appBarTheme: const AppBarTheme(
          centerTitle: true,
          backgroundColor: AppColors.appBarLight,
        ),
        primaryColor: AppColors.primaryLight,
        colorScheme: const context.colors.light(
          primary: AppColors.primaryLight,
          secondary: AppColors.secondaryLight,
          background: AppColors.backgroundLight,
          surface: AppColors.surfaceLight,
          error: AppColors.errorLight,
          onPrimary: AppColors.onPrimaryLight,
          onSecondary: AppColors.onSecondaryLight,
          onBackground: AppColors.onBackgroundLight,
          onSurface: AppColors.onSurfaceLight,
          onError: AppColors.onErrorLight,
        ),
        scaffoldBackgroundColor: AppColors.backgroundLight,
        textTheme: GoogleFonts.rubikTextTheme(),
        sliderTheme: const SliderThemeData(
          showValueIndicator: ShowValueIndicator.always,
        ),
      ),
      colorScheme: LightColorScheme());
} We can create custom color scheme for each theme. Each theme can have its own color scheme that is configured in XThemeConfig As we each XTheme have it's own color scheme. To create custom color scheme, We can create for each theme a class that extends XColorScheme and define it's color values like primary and secondary. For example :
class LightColorScheme extends XColorScheme{
  @override
  Color get background => Xcontext.colors.white;

  @override
  Color get error => Xcontext.colors.red;

  @override
  Color get onBackground => Xcontext.colors.black;
}
If you want to extend the colors that are defined in XColorScheme You can define another base class that extends XColorScheme and adds more colors to it.
For example:
abstract class BaseColorScheme extends XColorScheme {
  ///Colors that needs to implemented for each theme.
  Color get containerBackgroundColor;

  ///Colors that needs to is used for each theme.
  static const Color blue = Colors.blue;
}
Then, We can make each theme color scheme class to extend BaseColorScheme.
For example:
class LightColorScheme extends BaseColorScheme {
  @override
  Color get containerBackgroundColor => Xcontext.colors.white;

  @override
  Color get background => Xcontext.colors.white;

  @override
  Color get error => Xcontext.colors.red;

  @override
  Color get onBackground => Xcontext.colors.black;
}
Now we can have access to colors that defined in both XColorScheme and BaseColorScheme in each theme color scheme.
Then, We can access each theme color scheme like this:
 final colorScheme = AppTheme.colorScheme as BaseColorScheme;
final primary = context.colors.primary;
and use it in widget like this :
@override
Widget build(BuildContext context) {
  return ColoredBox(color: context.colors.primary);
}
This class is responsible for providing asset's items paths.
You can use it or use class that is auto generated from assets plugin in Android studio.
We are using our playx_localization package to handle translation for our apps.
-
Translations files are added like this, If you want to add another locale, Add it to translations folder .
 assets
 └── translations
     ├── en.json
     └── ar.json
If you need to add another locale on iOS you need to add supported locales to ios/Runner/Info.plist as described here.
Example:
<key>CFBundleLocalizations</key>
<array>
<string>en</string>
<string>ar</string>
</array>
This class contains all keys for each word that need to be translated in the app.
abstract class AppTrans {
  static const String appName = "app_name";
  static const String requestCancelled = "requestCancelled";
  static const String unauthorizedRequest = "UnauthorizedRequest";
} you can customize locale configuration with settings like supported locales, start locale, path to translations and more by editing AppLocaleConfig file.
class AppLocaleConfig extends XLocaleConfig{

  AppLocaleConfig() : super(path: 'assets/translations',);

  @override
  List<XLocale> get supportedLocales => [
    //Make sure your passing language code and country code same as in your translation folder as described above.
    const XLocale(id: 'en', name: 'English', languageCode: 'en', countryCode: 'US'),
    const XLocale(id: 'ar', name: 'العربية', languageCode: 'ar'),
  ];

  @override
  XLocale? get startLocale => supportedLocales[0];

  @override
  XLocale? get fallbackLocale => supportedLocales[0];

}
With PlayxLocalization you will have access to current app locale, it's index, name and id. You can change current app locale to the next Locale, by id, by index, by device locale and more.
   FloatingActionButton.extended(
onPressed: () {
//updates locale by index
PlayxLocalization.updateByIndex(
PlayxLocalization.isCurrentLocaleArabic() ? 0 : 1);
},
//label text changes after updating locale.
label: Text(AppTrans.changeLanguage.tr),
icon: const Icon(Icons.update),
)
The package uses Easy Localization under the hood to manage translations and Plurals as below.
Main function for translate your language keys
You can use extension methods of [String] or [Text] widget, you can also use tr() as a static function.
Text('title').tr() //Text widget

print('title'.tr)); //String

var title = tr('title') //Static function

Text(context.tr('title')) //Extension on BuildContext
- Guide to app architecture By android
- Ui Layer By android
- Data Layer By android
- How To Use MVVM in Flutter
- Package by Layer vs Package by Feature
- Dio
- Getx