
A wrapper on Android native API to reduce repeated tasks.
- Summary
- Video Tutorial
- Guideline step by step
- Project guideline
- RightMesh Integration
- Room
- Outgoing event
- ImagePicker
- RecyclerView
- BaseToolBar
- Widget
- Dialog
- Interface
- Issues!!!
This project is to prepare a framework for W3Engineers android development. Initially this is based on our base project.
It contains few tools to ease developers daily development. Framework provides:
- Enhanced support for Room (migration, creation of database, columns etc.)
- Custom Widgets (BaseButton, BaseRecyclerView, BaseEditText etc.)
- Custom components (BaseActivity, BaseFragment, BaseAdapter etc.)
- Close Coupled Behavior with Widget and Components
- Separate release and build application class with predefined library attached
- Few configurable options (Crashlytics, debugDatabase, Toasty etc. Still we are improving here)
- Necessary library added such a way so that developers can use without including in their gradle file (Timber, Multidex, Crashlytics, Debug Database etc.)
- Timber facilitates clickable logs with method name, line number prefixed and automatic TAG of class name. It distinguishes expected release build and debug build behavior
- BaseSplashViewModel provides time calculation facility and enforce ViewModel LiveData communication (provided sample app has the usage)
- All the processes are showing in this video step by step
Framework minimum SDK vesion is 16 and target SDK version is 27.
- At first you will create a new project, after loading this project you should go your project directory and need to sync with frame-work project
- Go to this link to clone the project to your local machine.
- In your Android project root's folder copy versions.gradle file


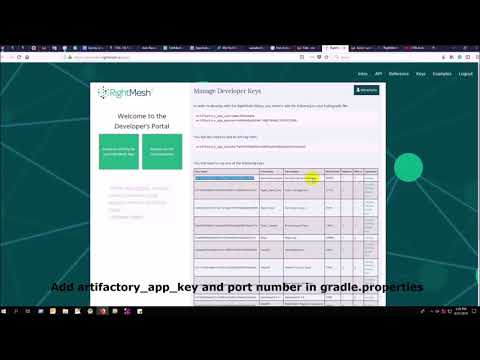
```
artifactory_app_key = ----
port_number = ----
```
- Open settings.gradle file and copy include ':framework' then Sync your project
- Go to File -> Project Structure...
- Add Module Dependency as shown below


```
//right-mesh config start
buildscript {

    //to load rm username and password from local.properties file

    repositories {
        maven {
            url "https://research.rightmesh.io/artifactory/libs-local"
            credentials {
                username artifactory_app_username
                password artifactory_app_password
            }
        }
        mavenCentral()
    }

    dependencies {
        classpath 'io.left.rightmesh:rightmesh-plugin:1.6'
    }
}
apply plugin: 'io.left.rightmesh.rightmesh-plugin'
preBuild.dependsOn("rightmesh")


configurations.all {
    resolutionStrategy.cacheChangingModulesFor 0, 'seconds'
}

repositories {
    mavenCentral()
    jcenter()
    maven {
        url "https://research.rightmesh.io/artifactory/libs-local"
        credentials {
            username artifactory_app_username
            password artifactory_app_password
        }
    }

    maven {
        url "https://jitpack.io"
    }
}
//right-mesh config end
```
-
If you faced any life-cycle version related problem then you should add the bellow snippet to you projects root level build.gradle file
subprojects { project.configurations.all { //Here we applied only version wise fix configuration for lifecycle library based on group name only //You can add any forced configuration for the whole projects here resolutionStrategy.eachDependency { details -> if (details.requested.group == 'android.arch.lifecycle') { details.useVersion versions.lifecycle } } } } -
You should use Multidex, databinding and Java 1.8 compatibility. So, add below code inside android tag in module level build.gradle:
//To support lambda
compileOptions {
    sourceCompatibility 1.8
    targetCompatibility 1.8
}
//To use databinding android force module wise configuration
dataBinding {
    enabled = true
}
and below code inside android tag's defaultConfig:
defaultConfig { ....... ....... //To use multidex android force module wise configuration multiDexEnabled true } -
If you do not want crashlytics then add org.w3.crashlytics=false in your gradle.properties file:
org.w3.crashlytics=false
also remove Fabric.with(this, new Crashlytics()); from App
file otheriwse simply put your crashlytics apiKey
Above process would be simplified a lot as we release the jcenter dependency
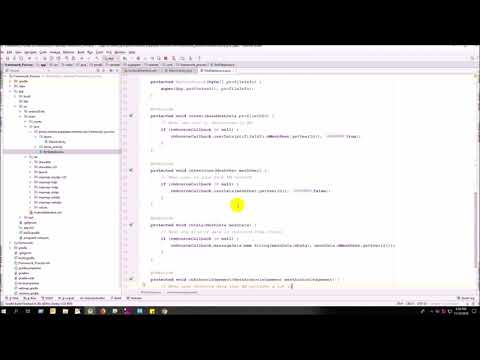
18. To start with the framework you can create a new Activity as shown below.

You should extend BaseActivity
always rather native activity.
19. Implement required methods. They are pretty self explanatory.
20. Generate a layout file and return the id through getLayoutId() method.
Do not forget to add Activity to manifest file.
21. If it is a simple Activity then upon hitting the run button you are good
to start with the framework.
22. Inside the project's sample and
imagepickersample application you will get
major usages/benefits of the framework
- Framework comes with internal distinguished behavior of release and debug build. If you want to extend or modify the behavior then please use BaseApplication and BaseReleaseApplication
You can read the guideline here.
- All the processes are showing in this video step by step
N.B. You should use Timber insted of Log
In this video only showing primary stage of integrating RightMesh with your project.
Framework facilitates room with database creation, migration, Extending DAO, BaseEntity which facilitates BaseObservable for databinding and Parcelable (developers are encourage to use this plugin to generate parcelable fields) - parcelable with databinding might generate attractive reactive UI impact etc. We have plan to add some reflective facility to provide selection facility in future. Developers are encourage to export schema and add them to git so that they can visually easily track the schema changes, query etc and easily maintain their database.
Event and ForEvent are two classes to manage outgoing events with Reactive and LiveData compatibility approach. You will find usage of these here
To pick image from device. It combines camera and gallery both. Developers are encouraged to use this class to pick images. It provides varipus benefit with databinding using ImagePickerDataModel. It uses BindingAdapter which use Glide also it provide the scope to provide optional placeholder image which is pretty much convenient with Glide then traditional way. Here is an example.
Example of how to use BaseRecyclerView:
BaseRecyclerView is a wrapper class of android RecyclerView
<RelativeLayout
        android:layout_width="match_parent"
        android:layout_height="match_parent">

        <TextView
            android:id="@+id/empty_layout"
            android:layout_width="wrap_content"
            android:layout_height="wrap_content"
            android:layout_centerInParent="true"
            android:text="No data found"
            android:visibility="gone" />

        <com.w3engineers.ext.strom.application.ui.widget.BaseRecyclerView
            android:id="@+id/rv"
            android:layout_width="match_parent"
            android:layout_height="match_parent"
            app:brv_defaultAnimation="false"
            app:brv_emptyLayoutId="@id/empty_layout" // Empty View id. This is mandatory field
            app:brv_viewMode="vertical" />

    </RelativeLayout>
app:brv_emptyLayoutId="@id/empty_layout"This is compulsory filed if it does't set then you will get Runtime exceptionapp:brv_viewMode="vertical"indicate how the RecyclerView scroll horizontally or verticallyapp:brv_defaultAnimation="false"Mark default animation enable or disable
BaseAdapter
BaseAdapter is a generic RecyclerView adapter which is capable to work with all types of data model.
Example
public class ExampleAdapter extends BaseAdapter<User> {
    @Override
    public boolean isEqual(User left, User right) {
        return false;
    }

    @Override
    public BaseAdapterViewHolder newViewHolder(ViewGroup parent, int viewType) {
        return null;
    }
}
Child class needs to implement isEqual() and newViewHolder() methods. No needs to override onBindViewHolder()
BaseViewHolder
Example
private class Viewholder extends BaseAdapterViewHolder<User>{

        public Viewholder(ViewDataBinding viewDataBinding) {
            super(viewDataBinding);
        }

        @Override
        public void bind(User item) {

        }

        @Override
        public void onClick(View v) {

        }
    }
This is generic view holder class. Developer needs to implement bind() method.
activity_home.xml
<com.w3engineers.ext.strom.application.ui.base.BaseToolBar
  android:id="@+id/home_toolbar"
  ...
  app:showHomeButton="true"            // this will show toolbar home button
  app:customTitle="@string/app_name"  // this will show toolbar title
  >
</com.w3engineers.ext.strom.application.ui.base.BaseToolBar>
HomeActivity.java
 @Override
     protected int getToolbarId() {
         return R.id.home_toolbar;
     }
BaseButton:
BaseButton is a custom View class. You can design any types of Button with and without image, round corner and there are various properties with it.
-app:bb_drawable="@drawable/button_gradient_blue" is a mandatory field. If developer does not set this property
it may causes Runtime exception
<com.w3engineers.ext.strom.application.ui.widget.BaseCompositeButton
                    android:id="@+id/btn_facebook_like"
                    android:layout_width="wrap_content"
                    android:layout_height="wrap_content"
                    android:layout_marginBottom="10dp"
                    android:padding="10dp"
                    android:textStyle="italic"
                    app:btn_borderColor="#FFFFFF"
                    app:btn_borderWidth="1dp"                       // Button border width
                    app:btn_defaultColor="#3b5998"
                    app:btn_focusColor="#5577bd"                    // When click show this focus color
                    app:btn_fontIconSize="15sp"
                    app:btn_iconPosition="right"                    // Icon position (left, right, top, bottom)
                    app:btn_iconResource="@drawable/facebook"
                    app:btn_radius="30dp"                           // Button corner radious
                    app:btn_text="Like my facebook page"
                    app:btn_disabledBorderColor="@color/colorAccent"
                    app:btn_disabledTextColor="@color/colorAccent"
                    app:btn_disabledColor="@color/colorAccent"
                    app:btn_textGravity="start"
                    app:btn_iconColor="@color/colorAccent"
                    app:btn_textColor="#FFFFFF" />
Till now nothing is mandatory, there are so many options here. This custom class will support for all types of button.
BaseEditText:
BaseEditText is a custom EditText wrapper, using this class it is possible to design EditText with and without label max, min char length and there are various options with it.
<com.w3engineers.ext.strom.application.ui.widget.BaseEditText
                android:layout_width="match_parent"
                android:layout_height="wrap_content"
                android:layout_marginLeft="10dp"
                android:hint="Floating Label"
                app:bet_floatingLabel="highlight"
                app:bet_maxCharacters="10"                 // Max character size
                app:bet_minCharacters="2"                  // Min character size
                app:bet_autoValidate="true"
                app:bet_floatingLabelAlwaysShown="false"
                app:bet_checkCharactersCountAtBeginning="true"
                app:bet_baseColor="@color/colorAccent"
                app:bet_floatingLabelTextSize="20sp"
                app:bet_hideUnderline="true"
                app:bet_helperText="Helper"               // If it needs to help user provide some example
                app:bet_helperTextAlwaysShown="true"
                app:bet_helperTextColor="@color/colorAccent"
                app:bet_primaryColor="@color/accent"/>
Use this class and its necessary properties.
BaseButton
<com.w3engineers.ext.strom.application.ui.widget.BaseButton
            android:id="@+id/btn_show_items"
            android:layout_width="match_parent"
            android:layout_height="wrap_content"
            android:layout_marginTop="10dp"
            android:text="@string/show_data"
            android:padding="10dp"
            app:layout_constraintTop_toBottomOf="@+id/btn_add_item"
            app:layout_constraintLeft_toLeftOf="parent"
            app:layout_constraintRight_toRightOf="parent"
            app:bb_drawable="@drawable/button_gradient_blue"/>
BaseDialog
Base dialog is a custom dialog class, which force developer to set a layout file for custom design
    protected abstract int getLayoutId();
    protected abstract void startUi();
Are the two methods needs to child class implement.
DialogUtil
There are three overloading static methods here
public static void showDialog(Context context, String message, DialogListener listener)
public static void showDialog(Context context, String title, String message, DialogListener listener)
public static void showDialog(Context context, String title, String message, String positiveText, String negativeText, final DialogListener listener)
Developer can call any one as his/her needs. It will show a default dialog
ItemClickListener:
public interface ItemClickListener<T> {
    /**
     * Called when a item has been clicked.
     *
     * @param view The view that was clicked.
     * @param item The T type object that was clicked.
     */
    void onItemClick(View view, T item);
}
Implement this interface in UI (Activity or Fragment) pass its reference to the Adapter
ItemLongClickListener
public interface ItemLongClickListener<T> {
    /**
     * Called when a item has been long clicked.
     *
     * @param view The view that was clicked.
     * @param item The T type object that was clicked.
     */
    void onItemLongClick(View view, T item);
}
For item long click listener implement this interface in UI (Activity or Fragment) and pass its reference to adapter
gradlew.bat
Batch script file to run various tools integrated (checkstyle, playPublish,
pmd, unit test, instrumentation test etc.)
If you face any bug or want any particular feature in framework please go to this link, generate a new issue by putting a excel sheet link of this sample format in the description. Planning doc is here.