Running as a Windows Service
It is possible to run Chaskis as a Windows service.
By default the service is disabled (you need to manually start it) and it runs on the Local System account. You can change these settings under the Services settings in Windows.
Before setting up Chaskis to run as a service, you first need to decide which account to run the service under. Will it be the default system account, or a custom Windows account? The advantage of the default system account is you do not need to create a whole new windows account. However, the disadvantage is you will need Admin privileges to change the Chaskis configuration. This may not be desirable, as admin gives other privileges that you may not wish to give to whoever will maintain Chaskis. With a separate windows account, you can give whoever will maintain Chaskis a username and password and NOT give them Admin.
Chaskis's configuration must live in the Application Data folder of the user running it when running as a service. If running as the default Local System account, this will be located in C:\Windows\System32\config\systemprofile\AppData\Roaming\Chaskis if on a 32-bit system or C:\Windows\SysWOW64\config\systemprofile\AppData\Roaming\Chaskis if on a 64-bit system. If running Chaskis as a custom Windows user, the config will live in C:\Users\YourUserName\AppData\Roaming\Chaskis.
You'll need to bootstrap the configuration. What this means is a default configuration will be created that you must edit so it will work with your desired IRC settings.
Open a command prompt, you'll want to run one of the following commands, depending on how who you want to run the service under:
-
Local System account 64-bit:
C:\Program Files\Chaskis\bin\Chaskis.exe --bootstrap --chaskisroot=C:\Windows\SysWOW64\config\systemprofile\AppData\Roaming\Chaskis
-
Local System account 32-bit:
C:\Program Files\Chaskis\bin\Chaskis.exe --bootstrap --chaskisroot=C:\Windows\System32\config\systemprofile\AppData\Roaming\Chaskis
-
Custom Windows Account:
C:\Program Files\Chaskis\bin\Chaskis.exe --bootstrap --chaskisroot=C:\Users\YourUserName\AppData\Roaming\Chaskis-
C:\Program Files\Chaskis\bin\Chaskis.exe --bootstrapwill work as well if you run the command if you are logged in as that custom Windows user.
Note although there are 32-bit instructions, the official Windows installer is 64-bit only. There is no supported 32-bit version of Chaskis for Windows, you'll need to compile it yourself.
Edit the now boot-strapped default configuration in your favorite text editor (e.g. Notepad, Notepad++, GVim, etc). They are all XML files. Each file has instructions inside on how to properly configure the main Chaskis config and the various plugins.
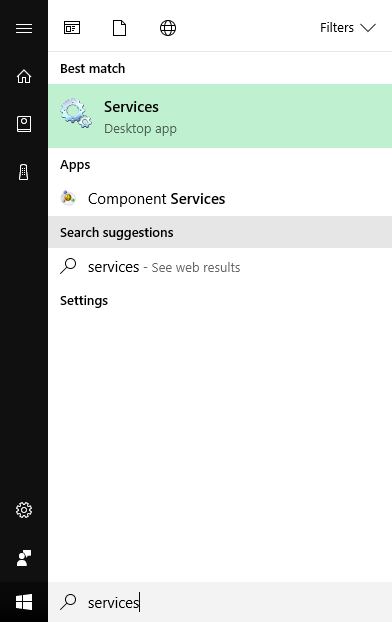
Hit the "Start" button and type "Services".
Hit the "Services" option. You will be greeted with this screen:
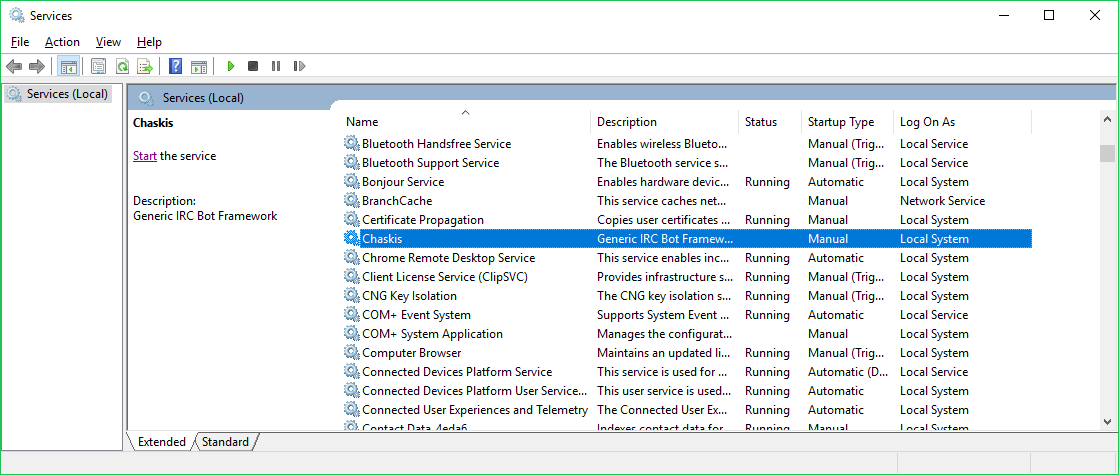
Right click on the "Chaskis" service and hit "Properties". You will be greeted by this screen:

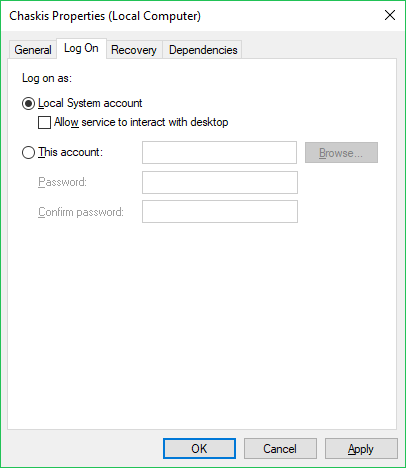
By default, the service is stopped. To start Chaskis when Windows boots, change "Startup Type" from "Manual" to "Automatic (Delayed Start)" or "Automatic"; depending on which is best for your setup.
If you wish to run Chaskis as the Local System Account, you are done here.
If you wish to run Chaskis under a separate user account, go to the "Log On" tab. You will be greeted with this screen:
Hit the "This Account" radio bubble and then the "Browse..." button. Type in the user name you wish to run as an hit the "Check Names" button. If the user was found correctly, you'll see the text change by being underlined (see below).
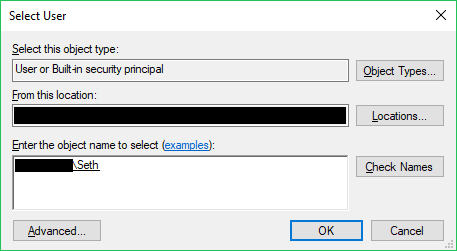
Hit okay on this window. You will then need to give the user's password in the "Password" and "Confirm Password" fields. Hit Ok.
Congratulations! Chaskis is now configured to run as a Windows service!