-
Notifications
You must be signed in to change notification settings - Fork 36
Multipass Rendering quick start guide
Knowledge on how to create (and program) a simple FUSEE Application.
Basic knowledge about the computer graphics pipeline and shader programming.
Usually we have one Rendercall per frame to draw the scene to the screen. With Multipass Rendering we perform two to n Render calls, depending on what we want to achieve. A simple example is a blur effect, applied to our whole render output.
To do this we need two passes. The first one does not render to the screen but to a texture. The second one gets this render texture as input, applies the blur and renders to the screen.
In more advanced scenarios like deferred rendering, it will become neccesary to render into a Framebuffer Object, which is represented as a RenderTarget in FUSEE and is able to store multiple textures. The instructions given here focus on the basics, the usage of RenderTargets are covered in Deferred-Rendering.
The following sections describe how to extend a standard Fusee app (for the creation see NuGet-Fusee, in order to render a blurred scene, like it is described above.
First we need to create a new, standard Fusee app. Secondly we need to add five additional fields to the example class and initialize them in the Init method:
public class MultipassExample : RenderCanvas
{

[...]

private WritableTexture _renderTex;
private ShaderEffect _blurPassEffect;
private SceneContainer _quadScene;
private SceneRendererForward _sceneRendererBlur;
private readonly int _texRes = (int)TexRes.HIGH_RES;

public override void Init()
{
    //Initialize objects we need for the multipass blur effect
    _renderTex = WritableTexture.CreateAlbedoTex(_texRes, _texRes);

    _blurPassEffect = new ShaderEffect(new[]
    {
        new EffectPassDeclaration
        {
            VS = AssetStorage.Get<string>("screenFilledQuad.vert"),
            PS = AssetStorage.Get<string>("blur.frag"),
            StateSet = new RenderStateSet
            {
                AlphaBlendEnable = false,
                ZEnable = true,
            }
        }
    },
    new[]
    {
        new EffectParameterDeclaration { Name = "InputTex", Value = _renderTex},

    });

    _quadScene = new SceneContainer()
    {
        Children = new List<SceneNodeContainer>()
        {
            new SceneNodeContainer()
            {
                Components = new List<SceneComponentContainer>()
                {
                    new ProjectionComponent(ProjectionMethod.PERSPECTIVE, 0.1f, 1, M.DegreesToRadians(45f)),

                    new ShaderEffectComponent()
                    {
                        Effect = _blurPassEffect
                    },
                    new Plane()
                }
            }
        }
    };

_sceneRendererBlur = new SceneRendererForward(_quadScene);

[...]
_renderTex is the texture object we render into in our first pass. WritableTextures are intended to be used on the GPU only. They do not offer access to the pixel data. The WritableTexture class offers a handful of helper methods, intended to easily create special types of textures, e. g. a depth texture or, in our case, a standard albedo texture with the color format RGBA.
The _blurPassEffect is the ShaderEffect for rendering the second pass, that does the blur on the output texture of the first pass. It receives the _renderTex and passes it to the blur shader as a uniform parameter. You can find the two shaders screenFilledQuad.vert and blur.frag in section 4 at the end of the page.
To render the the blurred texture to the screen, we map it to a screen filled quad. Therefor we create the _quadScene, consisting of a simple projection component, the _blurPassEffect and a Plane mesh. We do not need a TransformComponent here because the vertices are mapped to the screen via the vertex shader.
As the last step of the initialization we wrap a SceneRenderer around our _quadScene.
If all of our additional components are initialized we are ready to render the two passes.
To create the correct texture on the GPU we need to set the Viewport width and height to the texture resolution we defined above (_texRes). The boolean parameter in the Viewport method is called renderToScreen. If we render to a texture we set this to false, to tell the engine it shouldn't adjust the projection matrix. To be able to set the widht and height back to the window size we cache the values first.
To render the first pass, all we need to do now is to hand the _renderTex over to the Render call in RenderAFrame`, to let the engine know we want to render into the texture and not to the screen:
var width = Width;
var height = Height;
RC.Viewport(0, 0, _texRes, _texRes, false);
_sceneRenderer.Render(RC, _renderTex);   //Pass 1: render the rocket to "_renderTex", using the standard material.
The second pass is rendered like we already know it, but here we use the _sceneRendererBlur. Additionally we reset the viewport width and height to the cached values:
RC.Viewport(0, 0, width, height);
_sceneRendererBlur.Render(RC);           //Pass 2: render a screen filled quad, using the "_blurPassEffect" material we defined above.
Note: advanced users may create their own SceneRenderer class, that derives from SceneVisitor, and implement the two passes there. The effect would be a single Render call in the app itself, but multiple scene traversals in the custom SceneRenderer.
If you run this now, you should see the blurred Fusee Rocket, as shown in the following picture.

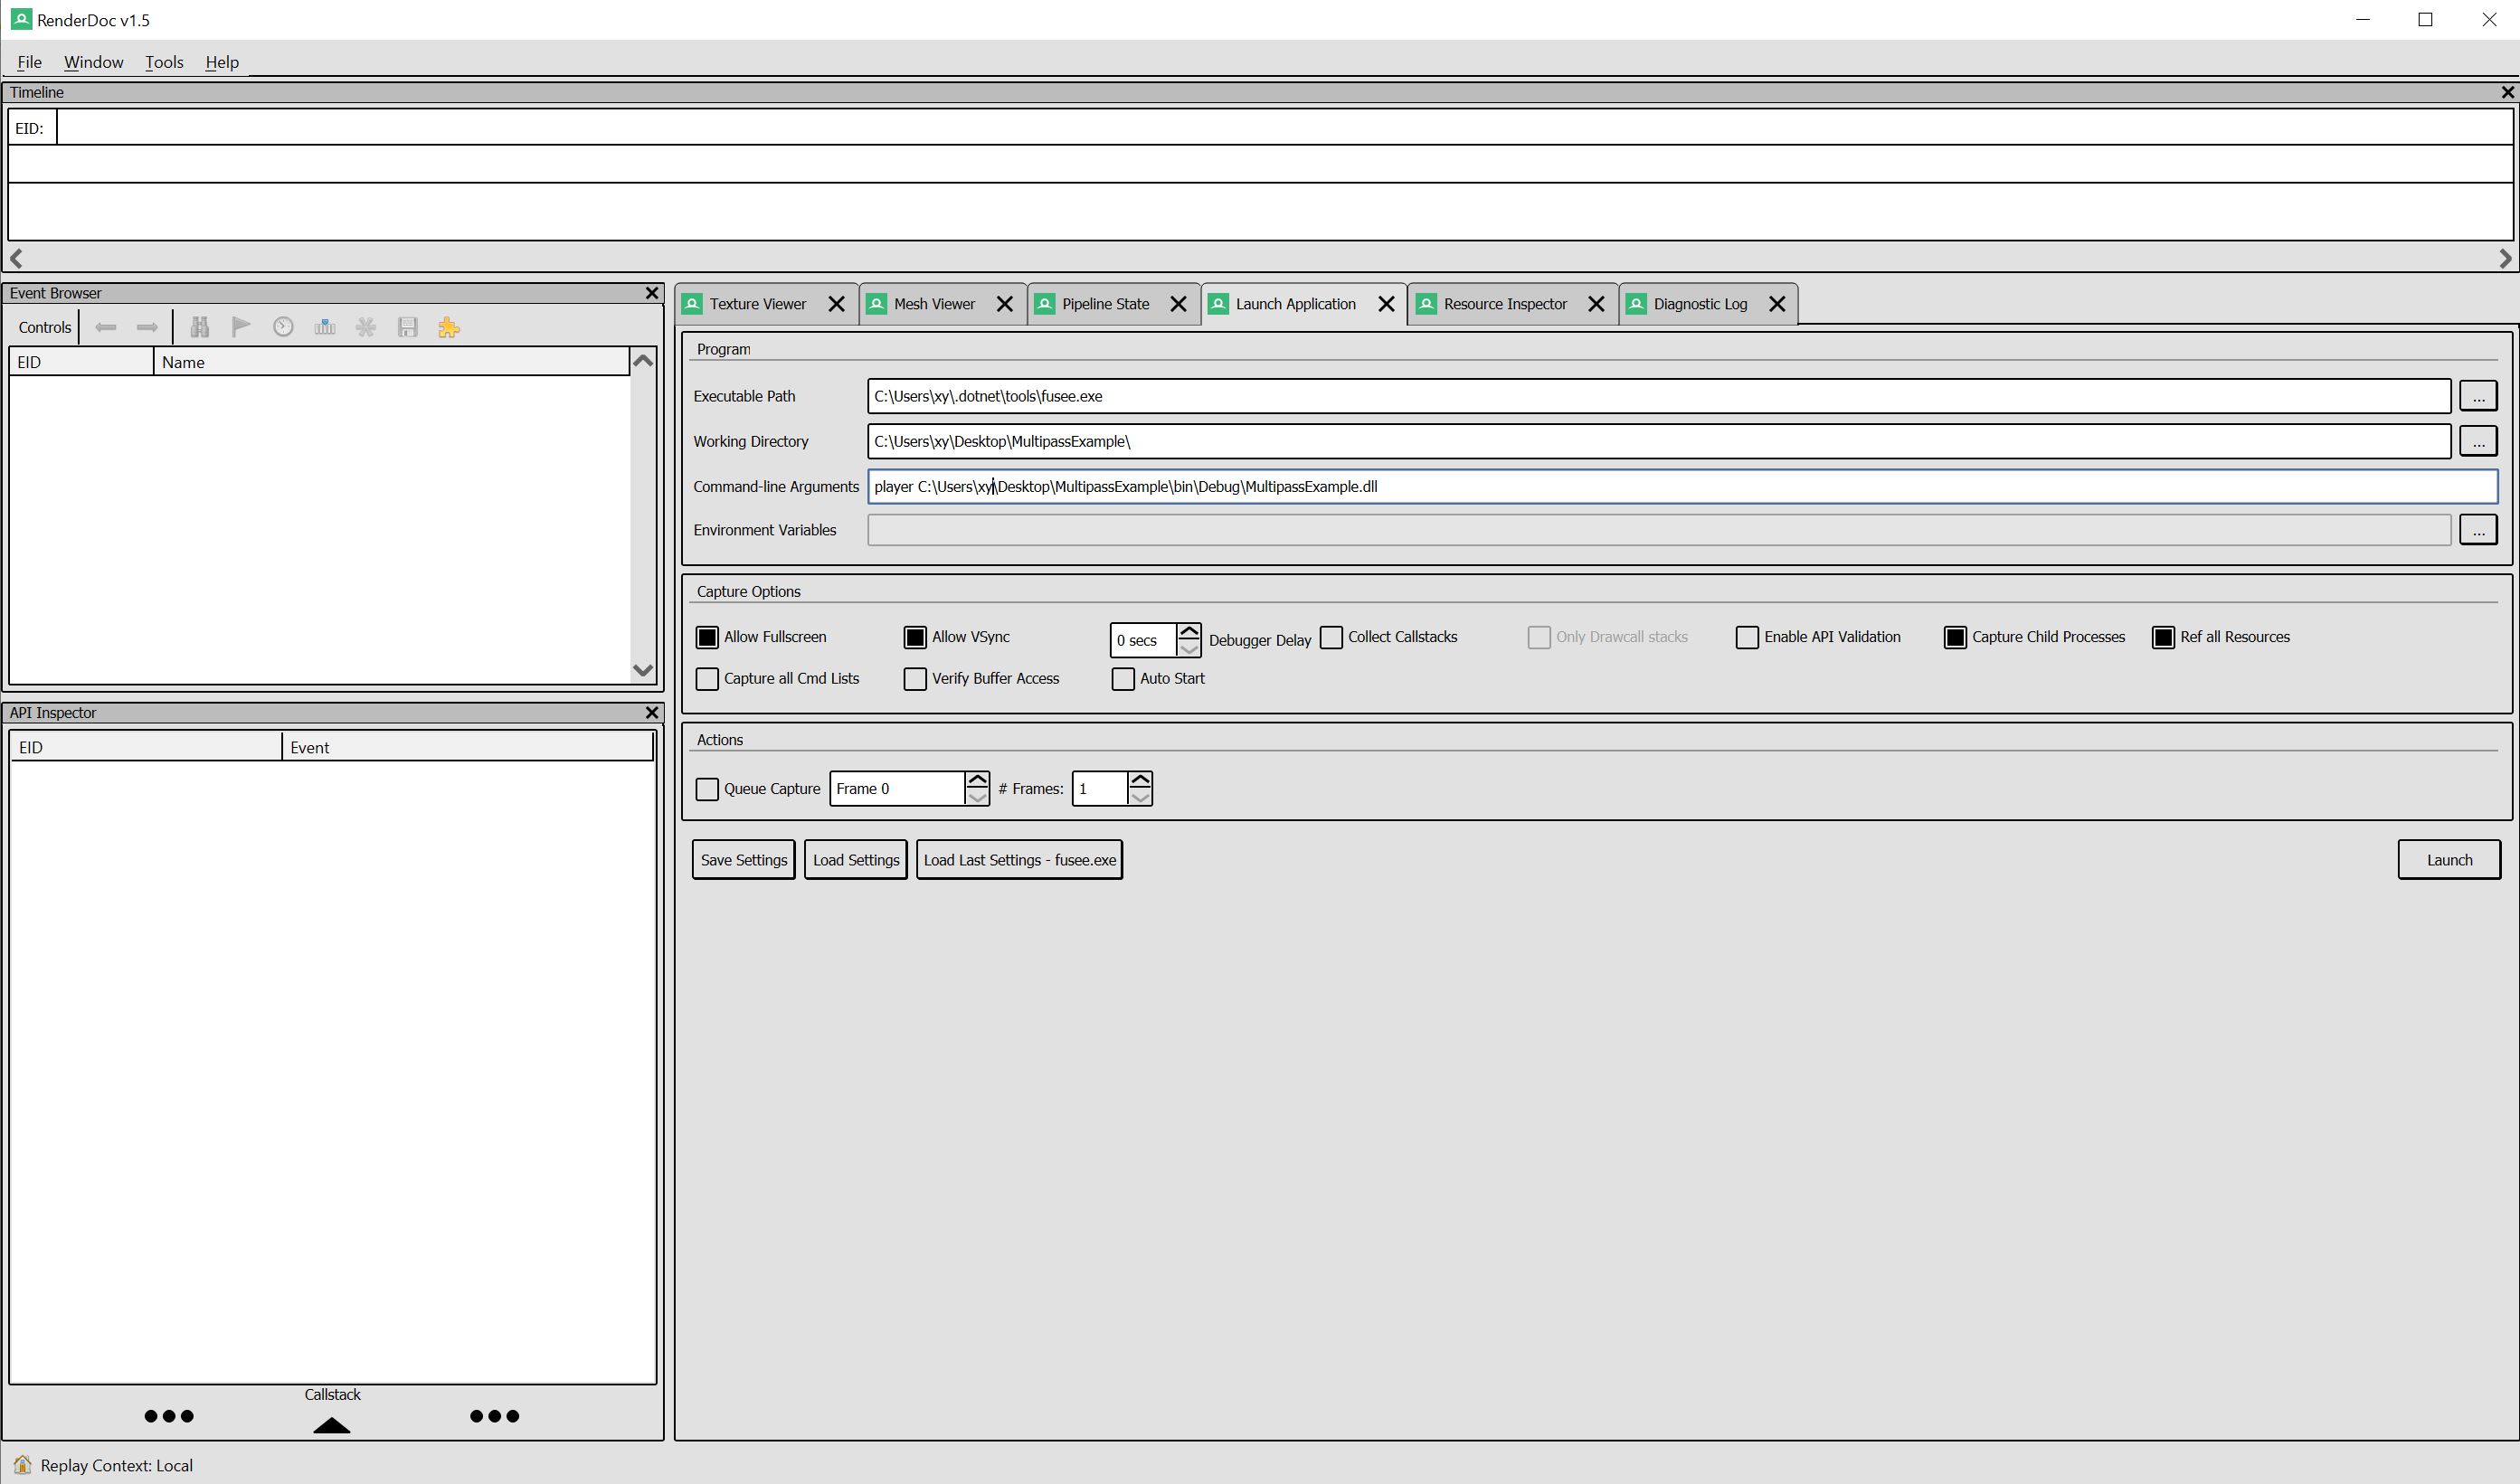
For debugging multipass apps we can use the OpenSource tool RenderDoc. To do this we start our app in RenderDoc via File -> Launch Application.
The Executable Path needs to be the path to the fusee.exe.
The Working Directory needs to be the path to our examples root directory.
As a commandline argument we have to hand over player and the path to the example dll, like it is shown in the picture below.

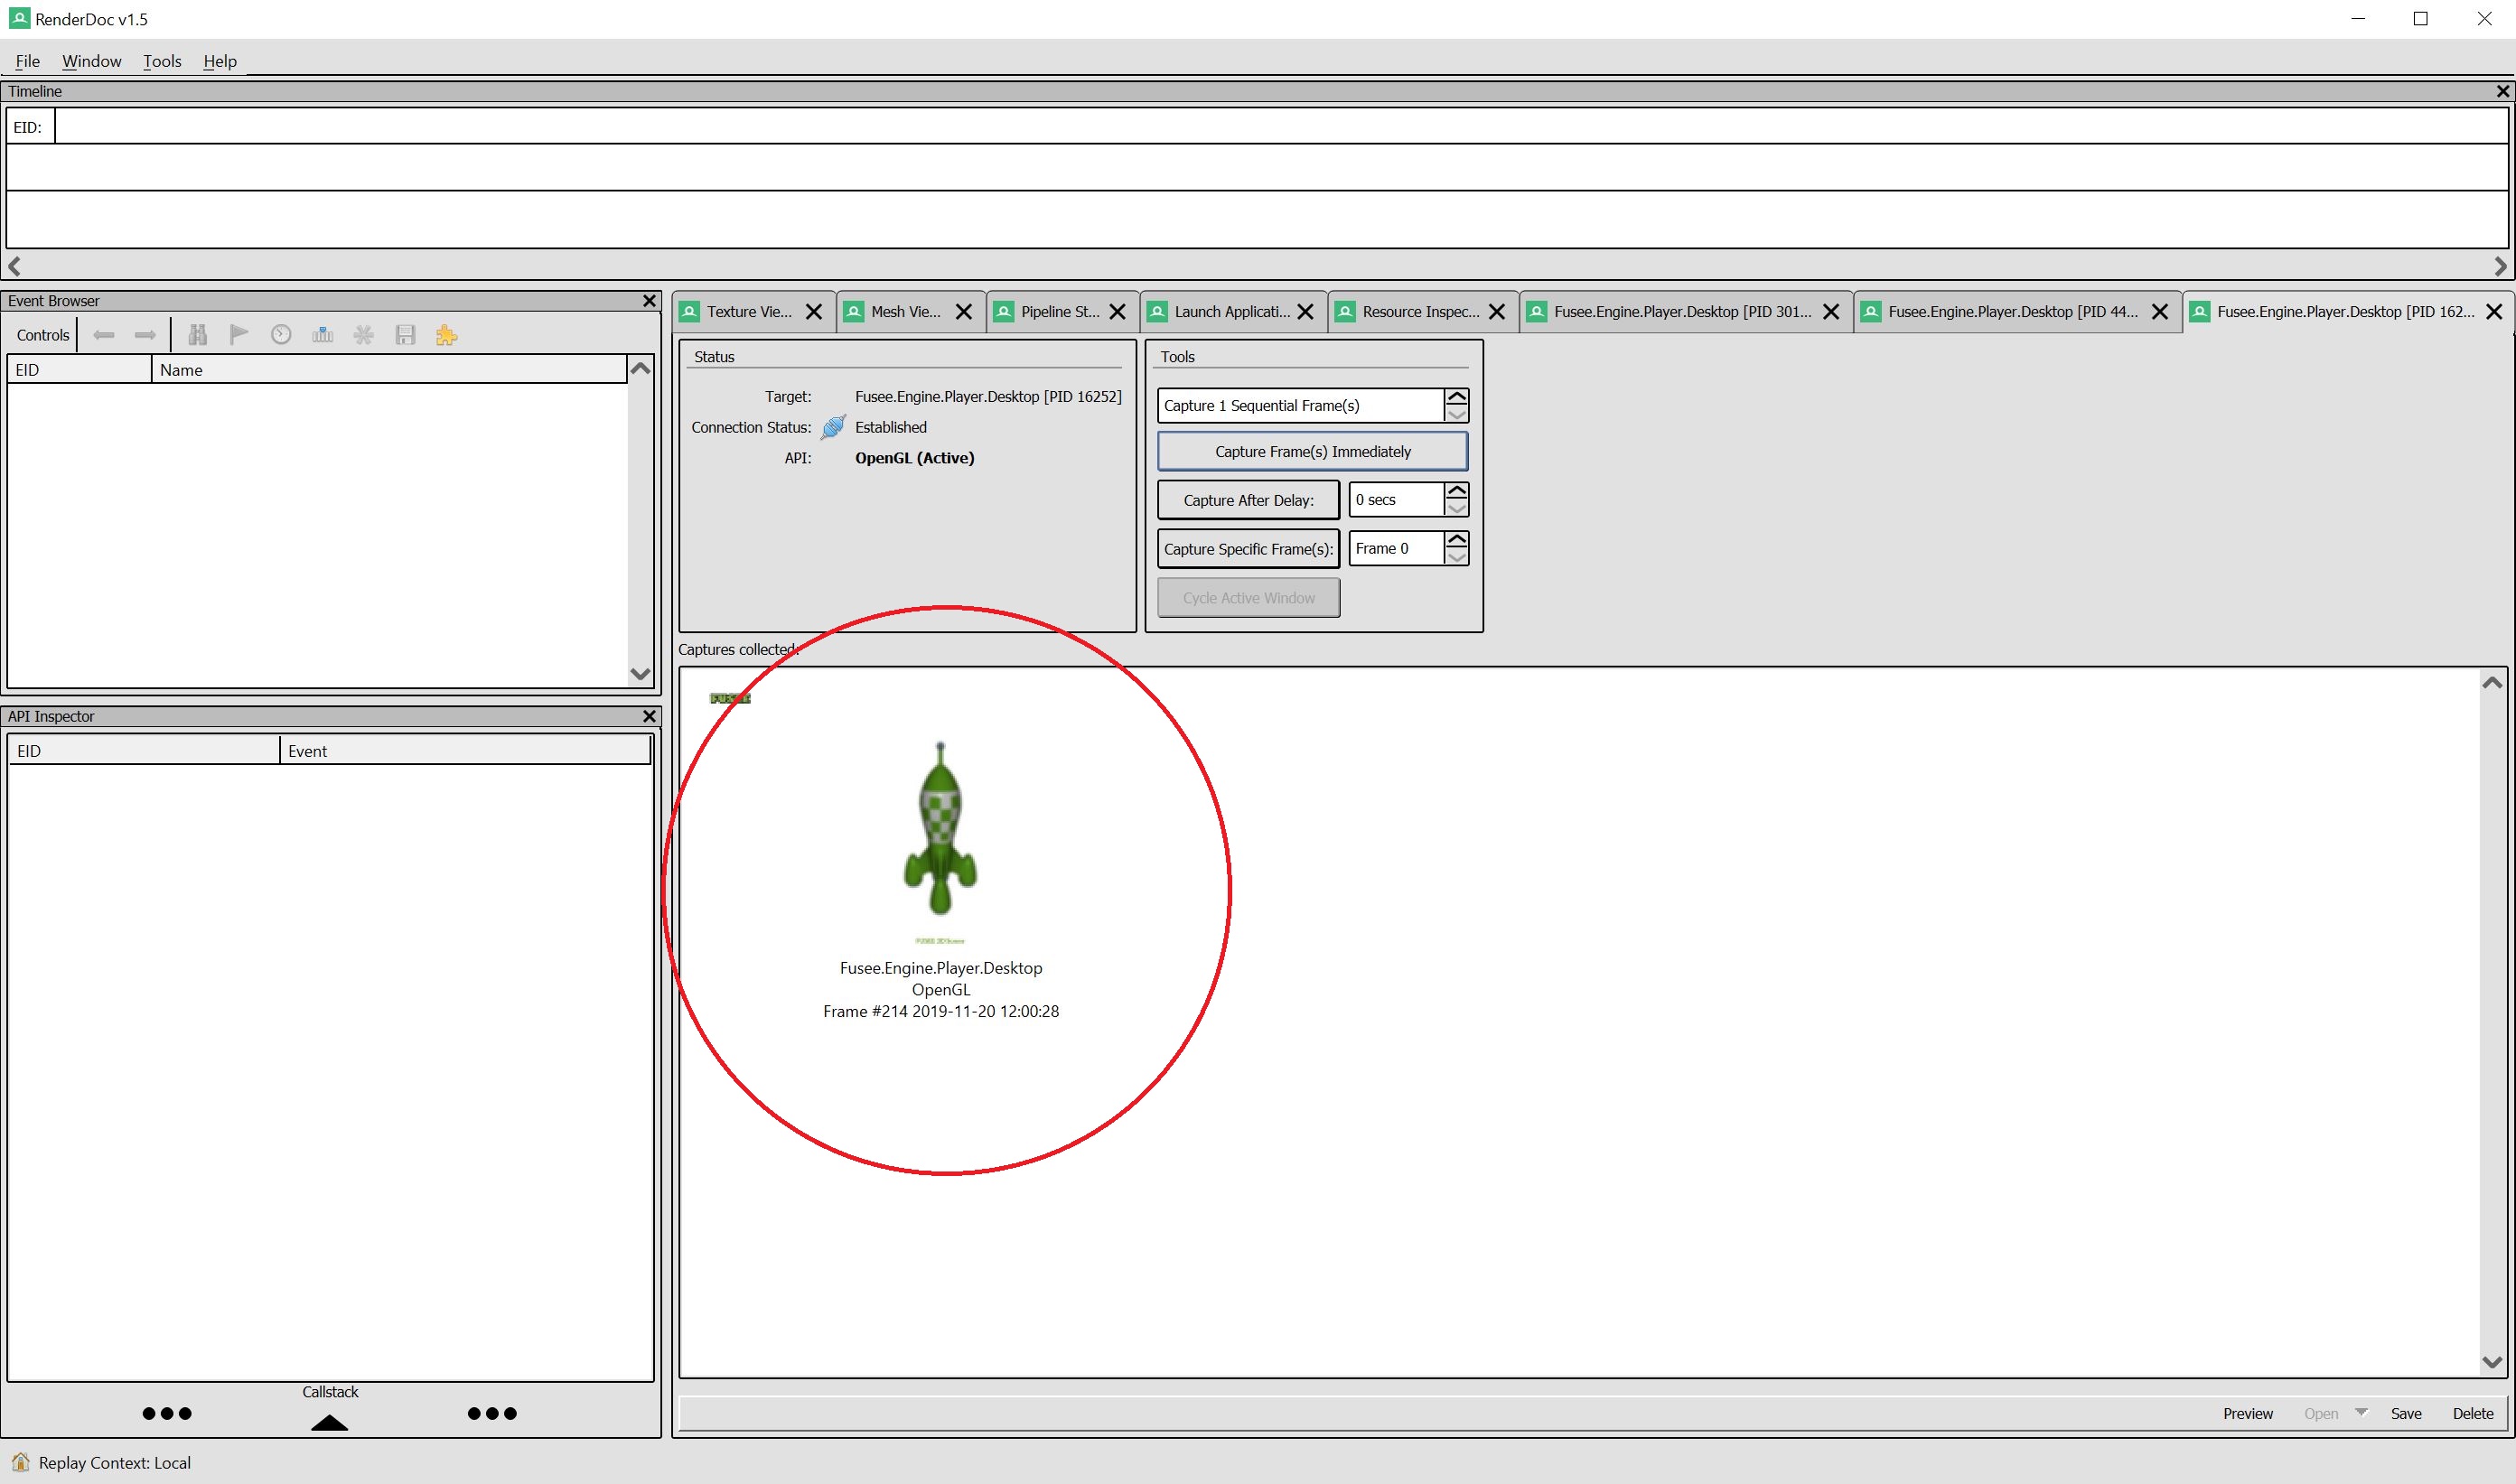
If the application is running we can capture a frame by hitting the Capture Frame(s) Immediately button and open it with a double click on the picture that will be showing up in RenderDoc.
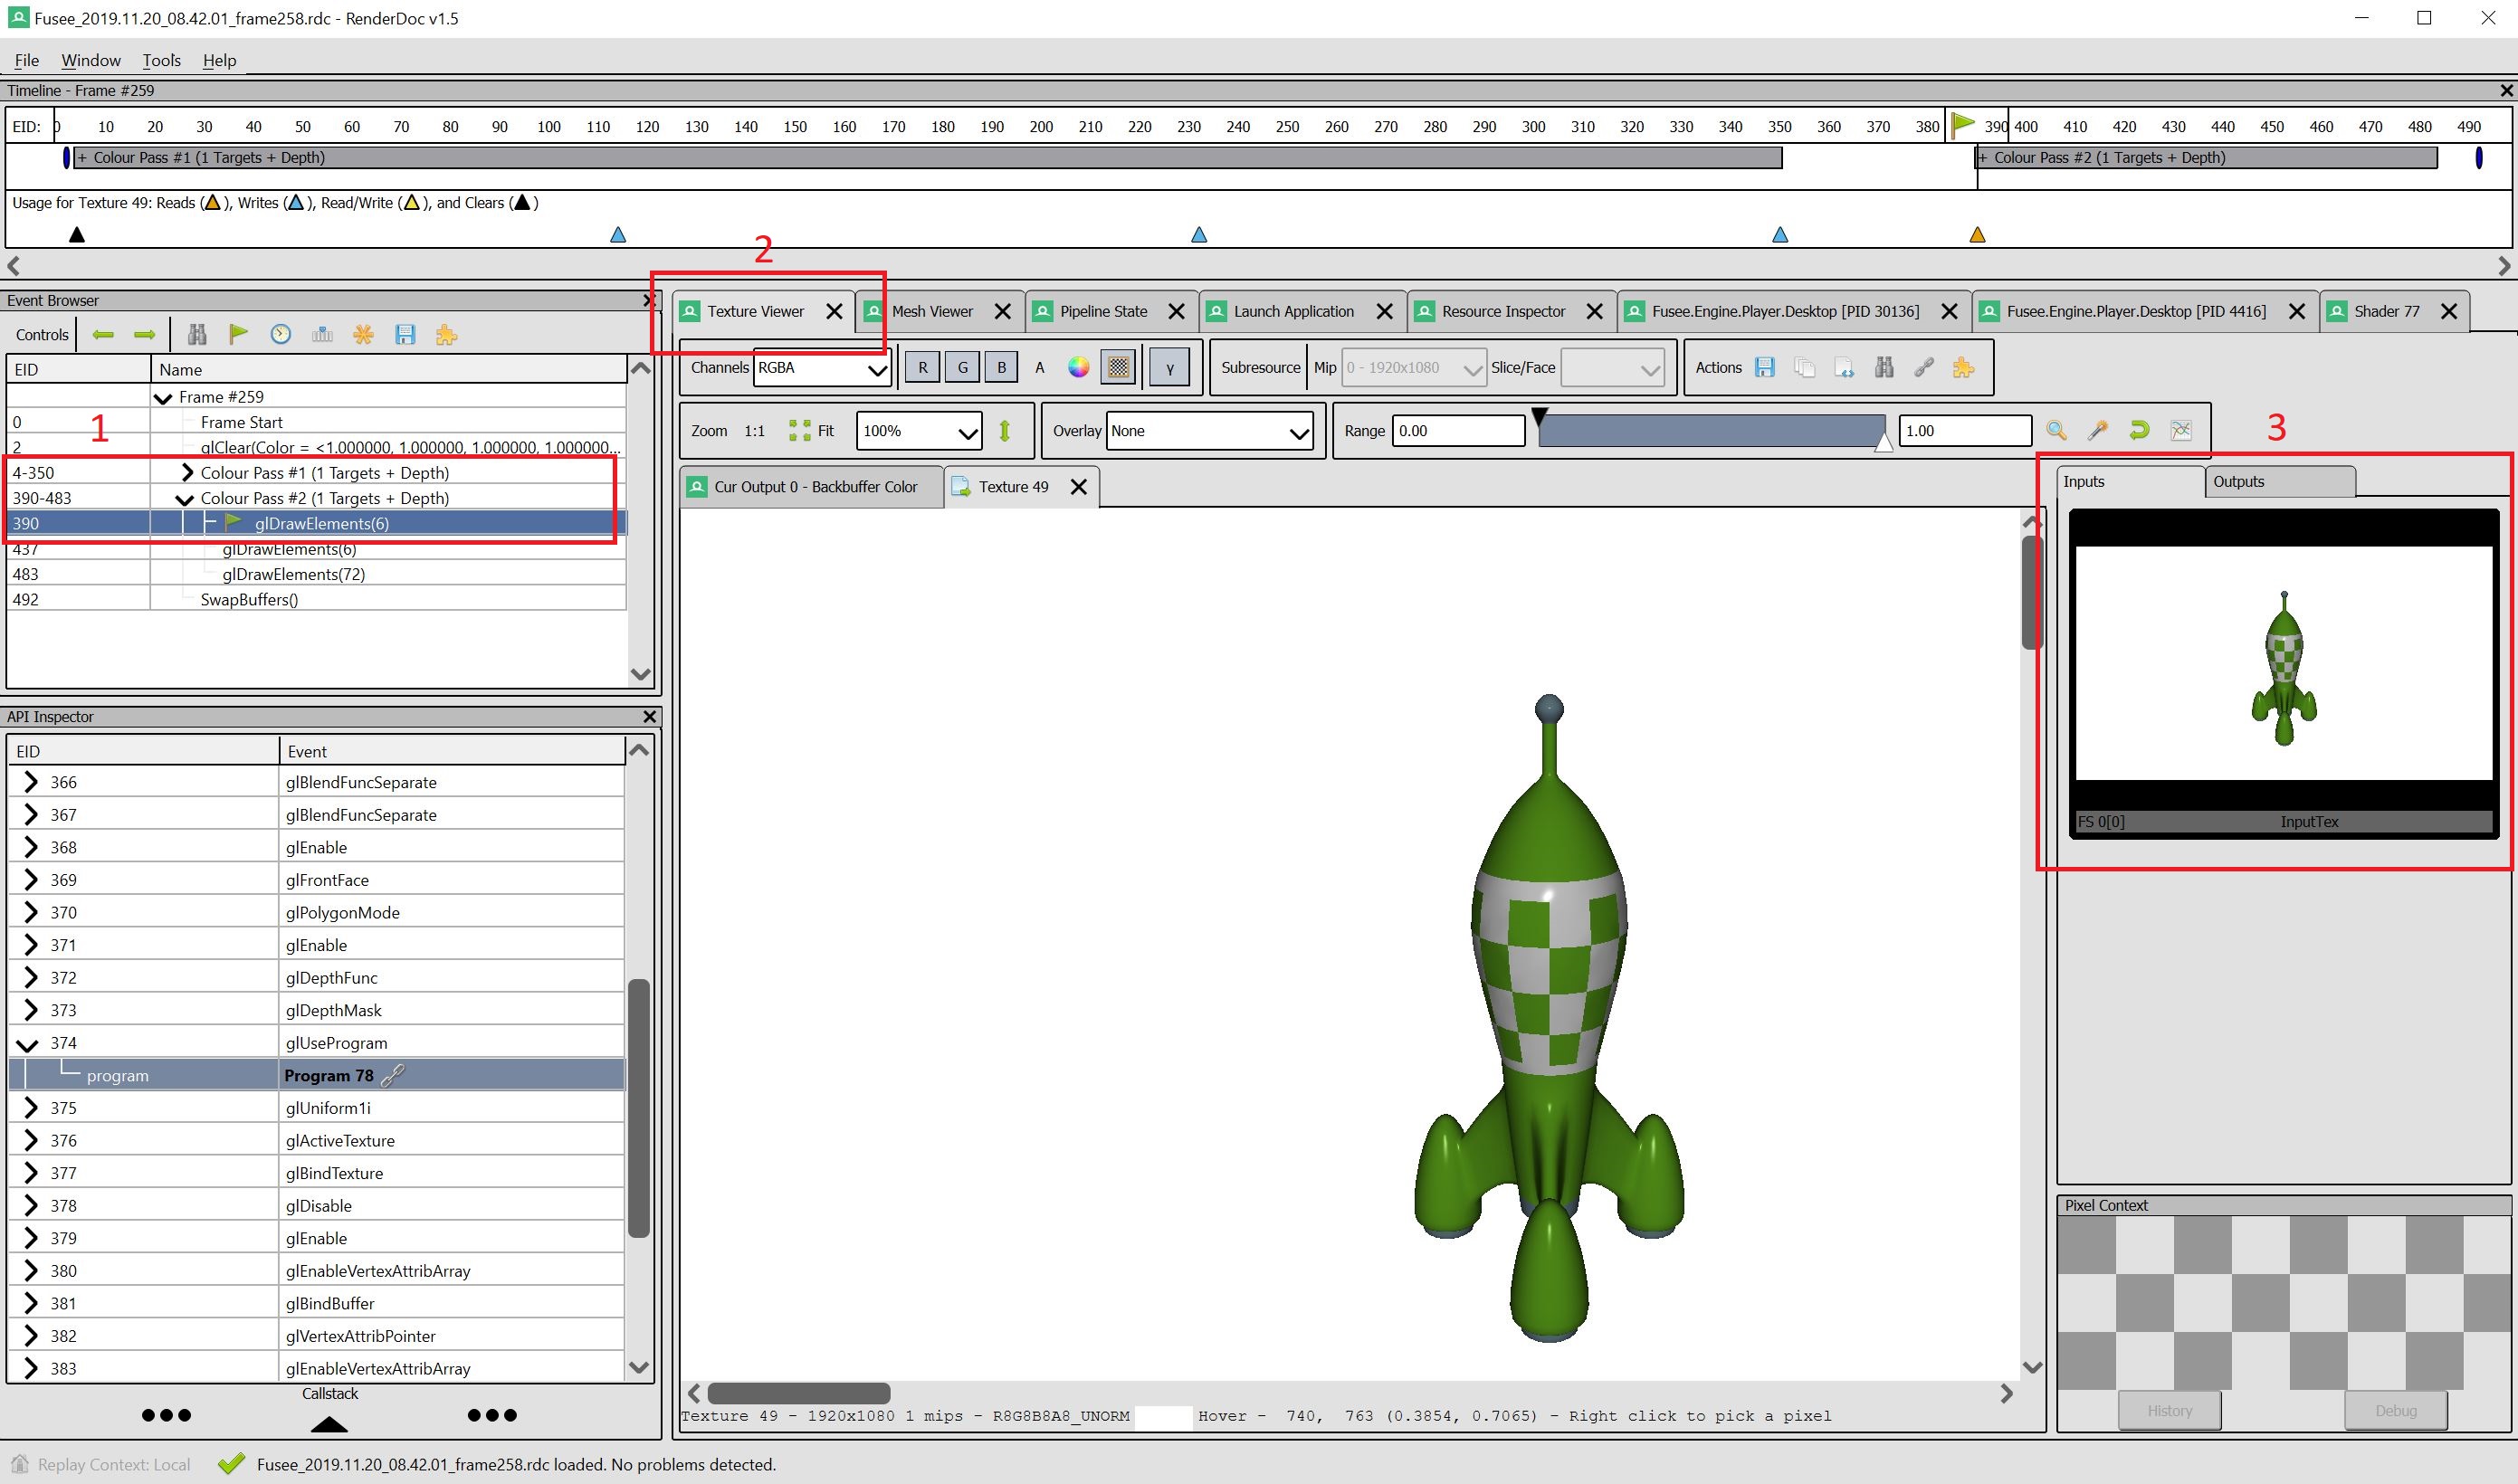
On the upper left side in the Event Browser we can now see our two passes. The two things we will be most interested in while debugging are the graphical output (the textures or the output to the screen) and the shader code.
To debug the graphical output we can open the Texture Viewer by clicking Window -> Texture Viewer. If we choose our blur pass (Color Pass #2) we are able to switch between the input and output textures by clicking the corresponding tabs on the right side.

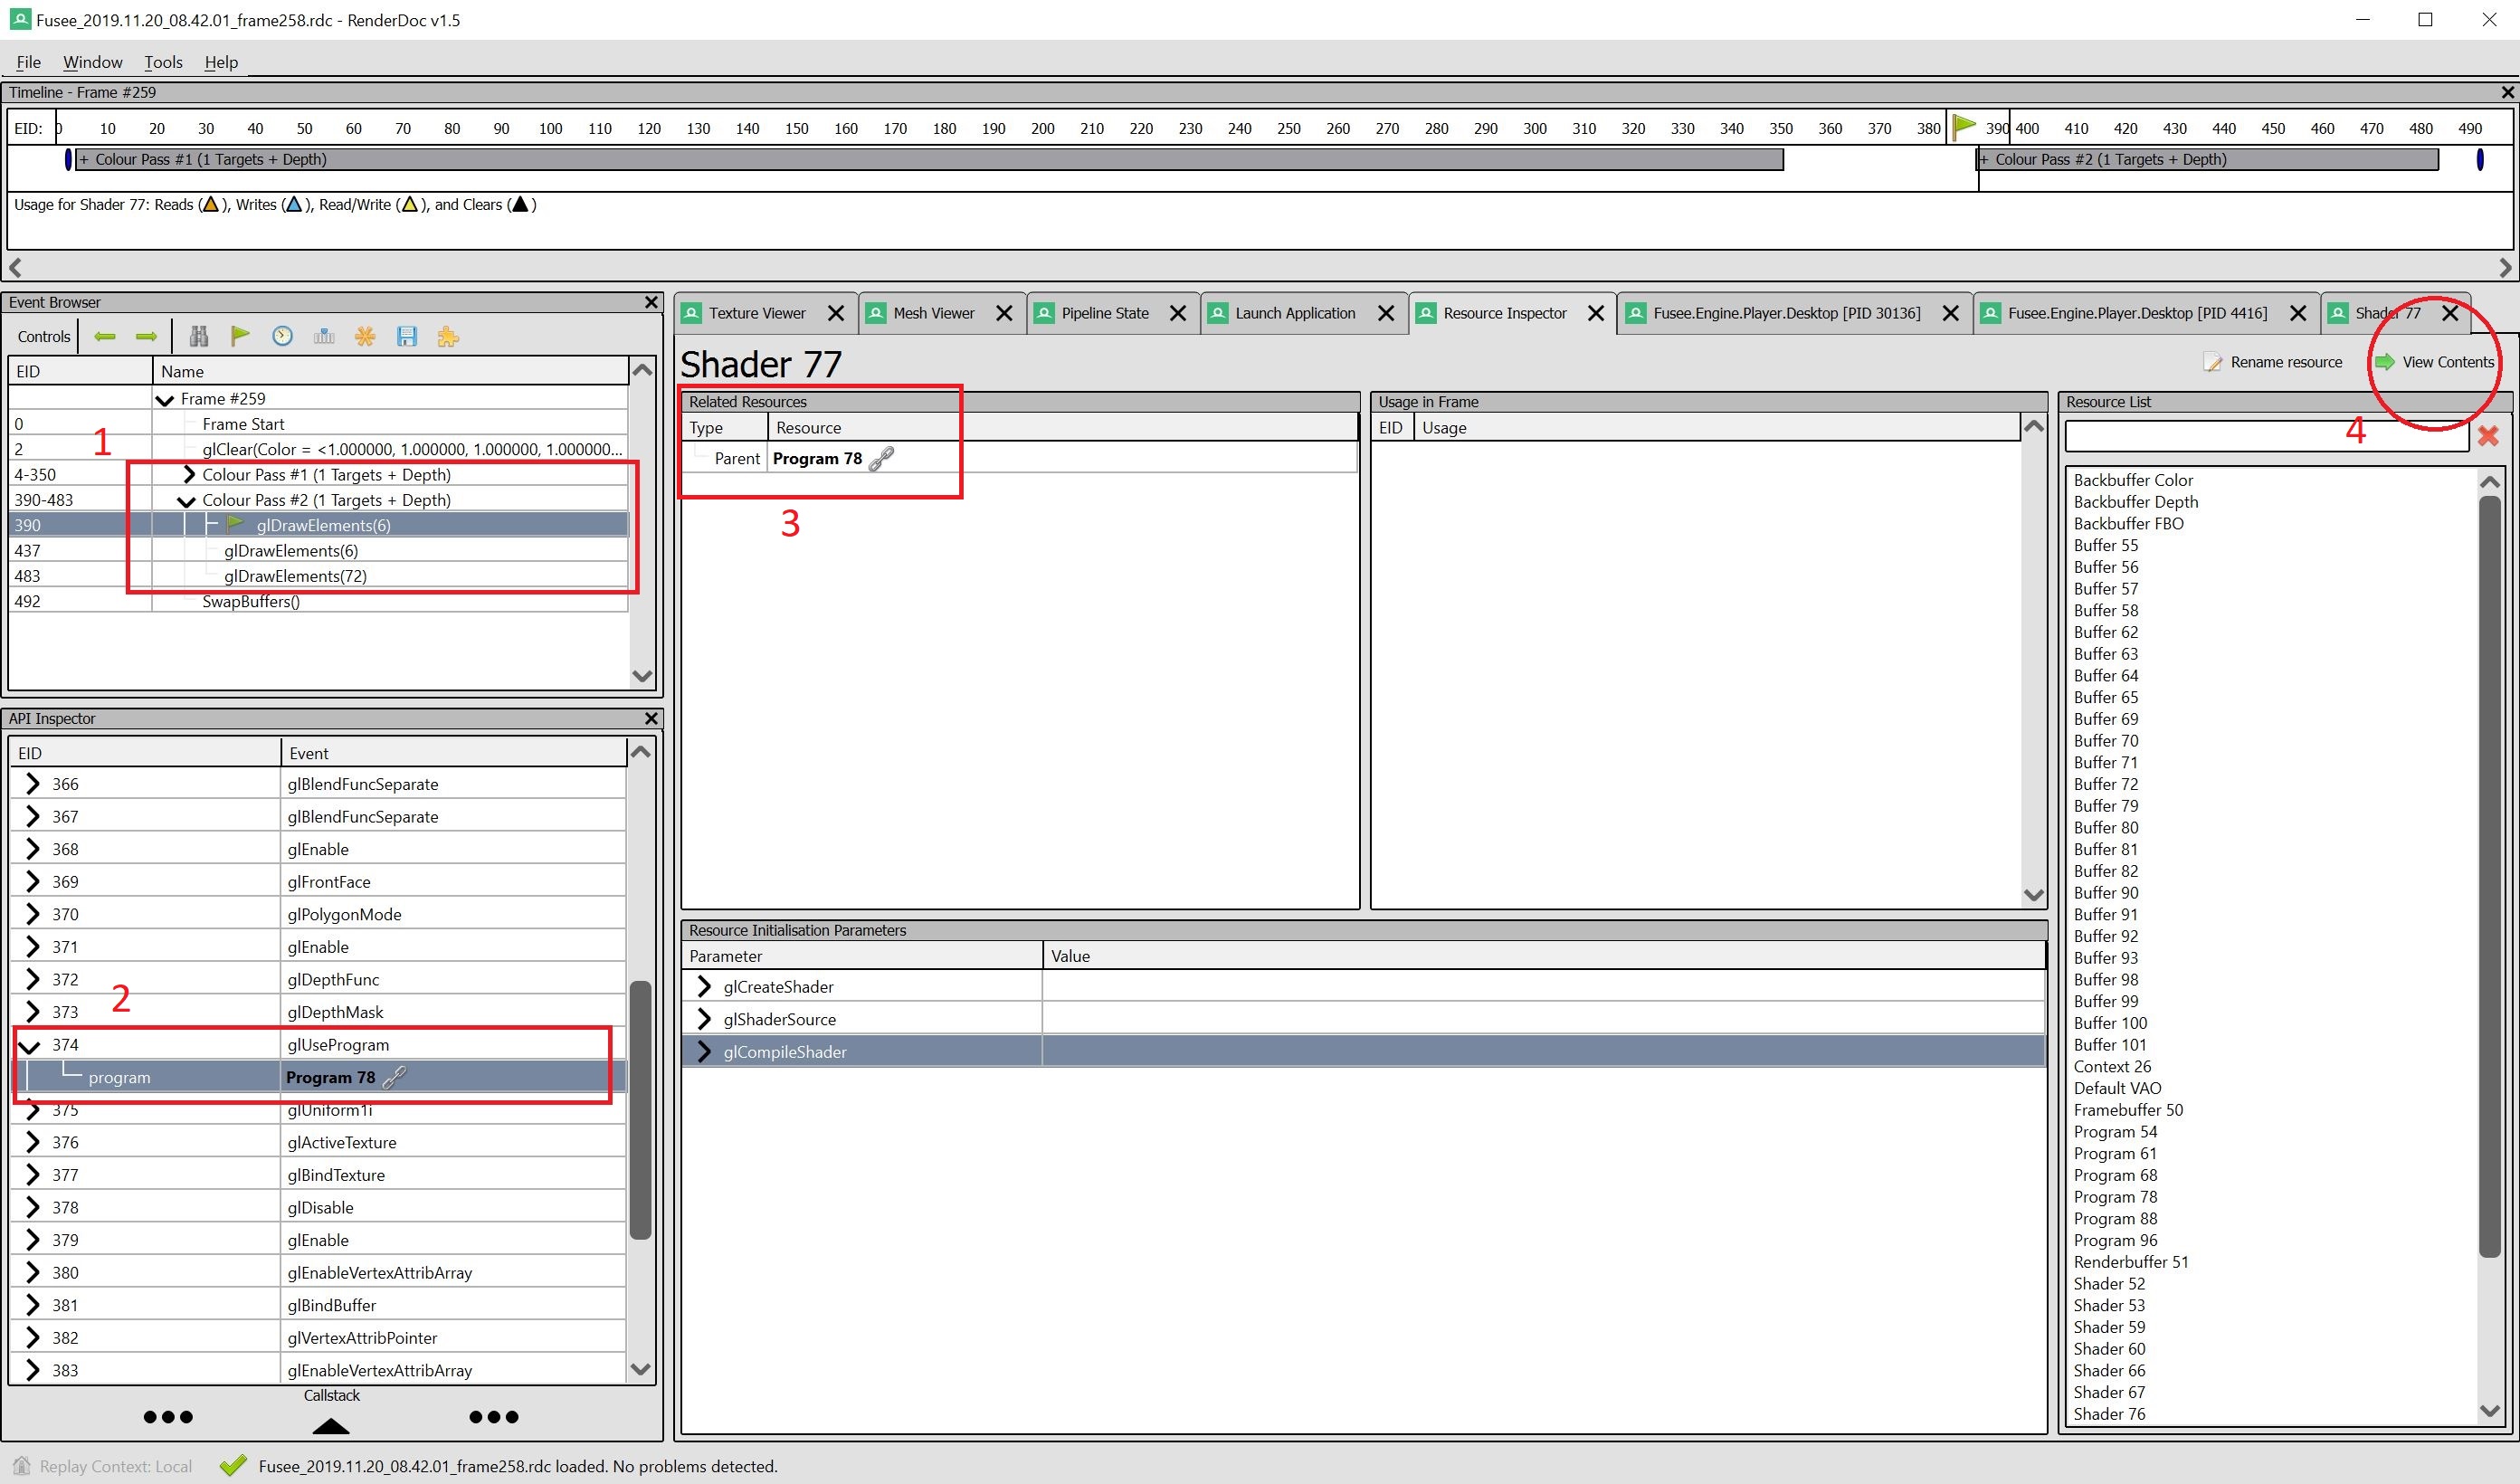
To check the shader code we need to open up the glUseProgram field in the API Inspector at the bottom left of the RenderDoc window. With a click at Program xy there and Shader xy in the Related Resources tab in the middle of the window, we get a new button View Content and a green arrow at the top right. Clicking on it opens the shader code.

The vertex shader maps the vertices of the quad to the screen:
#version 300 es

in vec3 fuVertex;
out vec2 vUV;

void main()
{
    vUV = fuVertex.xy * 2.0 * 0.5 + 0.5;
    gl_Position = vec4(fuVertex.xy * 2.0, 0.0 ,1.0);
}
The fragment shader gets a texture as input and applies a simple blur. Note that we set the kernel size by adding a preprocessor define. This is due to GLSL not supporting dynamic loop variables e.g. such, that are passed as uniforms.
#version 300 es
precision highp float;
#define KERNEL_SIZE_HALF 8

in vec2 vUV;
uniform sampler2D InputTex;
layout (location = 0) out vec4 oBlurred;

void main()
{
	vec2 texelSize = 1.0 / vec2(textureSize(InputTex, 0));
	vec3 result = vec3(0.0, 0.0, 0.0);

	for (int x = -KERNEL_SIZE_HALF; x < KERNEL_SIZE_HALF; ++x)
	{
		for (int y = -KERNEL_SIZE_HALF; y < KERNEL_SIZE_HALF; ++y)
		{
			vec2 offset = vec2(float(x), float(y)) * texelSize;
			result += texture(InputTex, vUV + offset).rgb;
		}
	}

	float kernelSize = float(KERNEL_SIZE_HALF) * 2.0;
	result = result / (kernelSize * kernelSize);

	oBlurred = vec4(result, 1.0);
}- Using FUSEE
- Tutorials
- Examples
- In-Depth Topics
- Input and Input Devices
- The Rendering Pipeline
- Render Layer
- Camera
- Textures
- FUSEE Exporter Blender Add on
- Assets
- Lighting & Materials
- Serialization and protobuf-net
- ImGui
- Blazor/WebAssembly
- Miscellaneous
- Developing FUSEE
