-
Notifications
You must be signed in to change notification settings - Fork 59
Tutorial: Ribbon Tabs
The WordPad template comes with 3 main tabs: Home, View and Print preview. When you use the tree view in the Ribbon Designer to inspect these tabs, you will find that the Ribbon Framework supports the following types of controls:
 A ribbon Tab host the ribbon Groups, which host the ribbon Controls. You can only add tabs to the root "Ribbon" node.
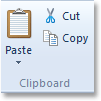 A ribbon Tab contains 1 or more groups. A Group contains the actual controls. A group has two additional properties: Size Definition and Custom Size Definition. In one of the following pages of this tutorial will go into the subject of [sizing and scaling](https://github.com/TurboPack/RibbonFramework/wiki/Tutorial:-Sizing-&-Scaling) in detail.
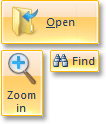 Buttons are the most commonly used controls. They are used for large and small buttons on the ribbon, as well as menu-items in popup menus and the application menu.
 Toggle buttonsThese buttons can be toggled on and off. You can use these control for individual toggle buttons (similar to the Bold, Italic and Underline buttons in the Font group of WordPad) as well as for grouped toggle buttons (like the Align Left, Center, Right buttons for paragraph alignment).
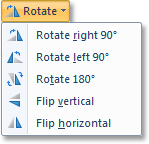 A drop-down button will display a drop-down menu when you click on it. To add menu items to the drop-down menu, right-click the button in the tree view and select the type of control you want to add to the drop-down menu. You cannot only add other buttons (or toggle or drop-down buttons), but also checkboxes, drop-down galleries and color pickers and menu groups. All of these will be discussed later below.
##Split Buttons
 Split buttonA Split Button is a combination of a Button and a Drop-Down Button. The top part of the control acts as a regular button, while the bottom part of the control will show a drop-down menu when clicked. In the tree view, a Split Button has two sub-nodes called "Button (Top) Item" and "Items". To select the command to use for the top part, first go to the Split Button node and select the type of control you want to use for the top part:

Then, the button will appear in the tree view as a sub-node of the "Button (Top) Item" node. To add items to the drop-down menu, right-click the "Items" node.
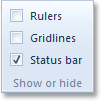 A Check Box is just what the name suggests.
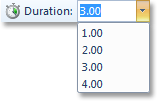 Combo Box is similar to a regular Delphi Combo Box. You can specify the following additional properties:
- Editable: whether the user can enter text in the combo box. If not, the user can only select items from the list.
- Resizeable: whether the user can resize the drop-down list vertically.
- Auto-complete enabled: whether the combo box will use auto-completion.
Note that you cannot specify the items in the combo box here. Those need to be supplied at run-time.
##Spinners
 A spinner allows to user to enter numerical values either through text input or by using the spinner buttons.
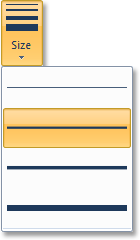
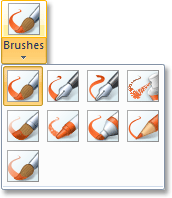
The Ribbon Framework supports 3 types of galleries: Drop-Down Galleries, Split Button Galleries and In-Ribbon Galleries:
 |
 |
 |
|---|---|---|
| Drop-Down Gallery | Split Button Gallery | In-Ribbon Gallery |
A Drop-Down Gallery is similar to a Drop-Down Button, but it shows a gallery on drop-down instead of a menu. Likewise, a Split Button gallery is similar to a Split Button, but shows a gallery on drop-down instead of a menu. Finally, an In-Ribbon Gallery shows the gallery directly inside the ribbon.
All galleries have the following additional properties:
- Gallery Type: whether the gallery will show Items (like the examples above) or Commands. Items will be shown as images with optional text, while Commands will be shown as menu items.
- Text Position: where the text of each item is displayed relative to its image (Top, Left, Right, Bottom, Overlap or Hide).
- ItemWidth/ItemHeight: width and height of the gallery items. Use -1 for default or automatic width/height.
- Has Large Items: check this if the gallery displays large items instead of small items.
-
Layout Type: how the items are laid out in the gallery:
- Default layout: let the Ribbon Framework determine the layout.
- Vertical layout: items are laid out vertically in one column (as in the Drop-Down Gallery image above). You can specify the number of rows in the drop-down (or -1 for default) and whether to drop-down list shows a vertical gripper to resize the list.
- Flow layout: items are laid left-to-right and top-to-bottom (as in the other images above). You must specify the number of columns and you can optionally specify the number of rows. You can also give the drop-down list a vertical gripper (for vertical resizing), a corner gripper (for resizing in two dimensions) or no gripper.
In-Ribbon galleries have the following extra properties:
- Min Columns Large: the minimum number of columns that the gallery displays in the Large group layout, before switching to Medium.
- Min Columns Medium: the minimum number of columns that the gallery displays in the Medium group layout, before switching to Small.
- Max Columns Medium: the maximum number of columns that the gallery displays in the Medium group layout, before switching to Large layout.
- Max Columns: the maximum number of columns that the gallery displays, for example, in the Large group layout drop-down.
- Max Rows: the maximum number of rows for the layout of gallery items.
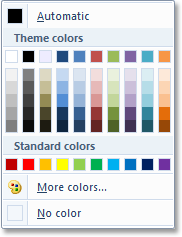
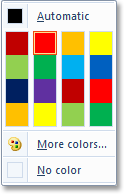
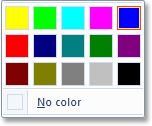
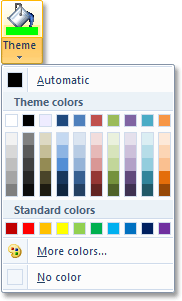 A Drop-Down Color Picker lets you select a color in a variety of ways. You can select a color from a collection of theme colors, standard colors or highlight colors.
At run-time you can change the colors that are displayed in the Theme colors and Standard colors sections. At run-time, you can also change all the captions and tooltips that are displayed in the drop-down.
Also, when the user selects a color, the bar at the bottom of the image icon will reflect the selected color (in this example, this is the green bar below the Paint Bucket image).
With the Ribbon Designer, you can customize the color picker with the following properties:
- Color Template: select one of three available layout templates:
 |
 |
 |
|---|---|---|
| Theme Colors | Standard Colors | Highlight Colors |
- Chip Size: whether the drop-down shows small, medium or large size color swatches.
- Columns: number of columns of color swatches (0 for default).
- Recent Color Rows: whenever a user selects a custom color (that is not part of the displayed color swatches), it will add the color to a "Recent colors" section. Use this property to determine how many rows to display for this section (0 for default).
- Standard Color Rows: number of rows for the Standard colors section.
- Theme Color Rows: number of rows for the Theme colors section.
- Automatic Color button visible: whether the "Automatic" option is available.
- No Color button visible: whether the "No color" option is available.
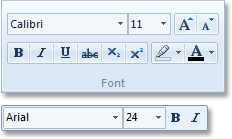 The Font Control is a ready-to-go collection if ribbon controls that you can use to select font properties. There are two different kinds of font controls. When a font control is added to a popup mini toolbar, it will show up as a limited control where you can just select a font, size and Bold or Italic. When a font control is added to a ribbon, you get a more complete selection of controls.
The following properties are available for both font control types:
- Minimum/Maximum font size: the minimum and maximum font size the user can select. This also limits the number of font sizes available in the Font Size combo box.
- Show True Type only: whether the font list will show only True Type fonts.
- Show vertical fonts: whether the font list will also show vertical fonts.
The full-blown font control has these additional properties:
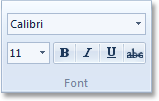
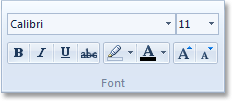
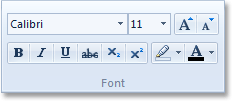
- Font Type: the template to use for the font control:
 |
 |
 |
|---|---|---|
| Font only | Font with Color | Rich Font |
- Strikethrough button visible: whether the Strikethrough button will be available. It is visible by default in all templates. You can only turn it off in the Rich Font template.
- Underline button visible: whether the Underline button will be available. It is visible by default in all templates. You can only turn it off in the Rich Font template.
- Highlight button visible: whether the Text Highlight Color button will be available. It is visible by default in the Font with Color and Rich Font templates. You can only turn it off in the Rich Font template. It will never be available in the Font Only template.
 Use a Control Group to group multiple similar subcontrols together. For example, in WordPad you could use a control group to group the 4 paragraph alignment buttons together.
With the main ribbon tabs completed, we will look next at Context Popups.