-
Notifications
You must be signed in to change notification settings - Fork 1
Editor Classes Window
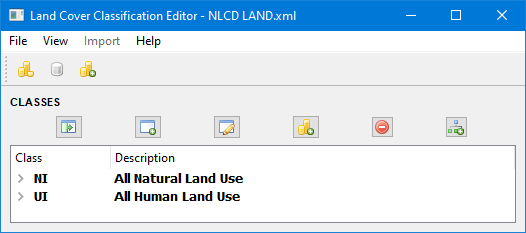
The Classes Window provides an expandable and collapsible view of the classes, class groups, and the land cover values that belong to the classes. This window is used to start, edit, and view the Classes tree with the following buttons:
-
 Start Tree/Add Sibling Class - Start a Classes tree or add a sibling class to the Classes tree
-
 Add Child Class - Add a child class to the Classes tree
-
 Edit Class - Edit a class
-
 Insert Values - Insert values into the Classes tree
-
 Remove Class/Value - Remove class or value from Classes tree
-
 /
/  Expand/Collapse - Expand or collapse the entire Classes tree

Entering a Class
The first step to creating a land classification scheme is to start the Classes tree. Click the Start Tree/Add Sibling Class button ![]() . If there are no entries in the Classes Window, this will be the only button active. The Add Sibling Dialog opens. Here, the user may enter the following:
. If there are no entries in the Classes Window, this will be the only button active. The Add Sibling Dialog opens. Here, the user may enter the following:
- Class (required) - The alphanumeric value to assign to the class. It is recommended that this be a recognizable short (three to five characters) abbreviation of the class description.
- Description (required) - A text description of the class.
- caemField - The abbreviation assigned to the field(s) that represent metrics for the class in the Core and Edge Metrics output table. If left blank, the same abbreviation entered in the Class field is used.
- flcpField - The abbreviation assigned to the field(s) that represent metrics for the class in the Floodplain Land Cover Proportions output table. If left blank, the same abbreviation entered in the Class field is used.
- flcvField - The abbreviation assigned to the field(s) that represent metrics for the class in the Facility Land Cover Views output table. If left blank, the same abbreviation entered in the Class field is used.
- lcospField - The abbreviation assigned to the field(s) that represent metrics for the class in the Land Cover on Slope Proportions output table. If left blank, the same abbreviation entered in the Class field is used.
- lcpField - The abbreviation assigned to the field(s) that represent metrics for the class in the Land Cover Proportions output table. If left blank, the same abbreviation entered in the Class field is used.
- rlcpField - The abbreviation assigned to the field(s) that represent metrics for the class in the Riparian Land Cover Proportions output table. If left blank, the same abbreviation entered in the Class field is used.
- splcpField - The abbreviation assigned to the field(s) that represent metrics for the class in the Sample Point Land Cover Proportions output table. If left blank, the same abbreviation entered in the Class field is used.
Once a class is entered into the Classes tree, a new class may be added by selecting a class and clicking either the Start Tree/Add Sibling Class ![]() or Add Child Class
or Add Child Class ![]() buttons. A "sibling" is a class at the same level as the selected class, while a "child" is a subclass that has membership within the upper-level class. The fields for entry are the same as described above. Once the entry is complete, click OK to accept the class. The class will now be visible in the Classes tree.
buttons. A "sibling" is a class at the same level as the selected class, while a "child" is a subclass that has membership within the upper-level class. The fields for entry are the same as described above. Once the entry is complete, click OK to accept the class. The class will now be visible in the Classes tree.


Editing a Class
To edit a class, click the Edit Class button ![]() . The Edit Class Dialog pop-up will appear, allowing modifications in each of the fields. Press OK to accept the modifications.
. The Edit Class Dialog pop-up will appear, allowing modifications in each of the fields. Press OK to accept the modifications.

Inserting Values into the Classes Tree
The Classes tree is populated with items from the Values table in one of three ways:
- Drag a value from the Values table - Click and hold the mouse cursor on the desired value and drag it to the appropriate class in the Classes Table.
- Insert a value using the Insert Values button
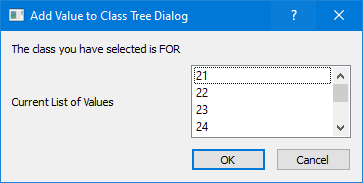
 - Select the class in the Classes Table in which the value is to be inserted. Click Insert Values, which will display the Add Value to Class Tree Dialog. Select the value or values to be inserted and click OK.
 - Right click on the class and select Insert Value - Right-click on the class in which the value is to be inserted. Click Insert Values, which will display the Add Value to Class Tree Dialog. Select the value or values to be inserted and click OK.

Removing a Class or a Value from the Classes Tree
Classes or values may be removed from the classes tree in one of two ways:
- Remove Class/Value button
 - Select the class or value to be removed and click the Remove Class/Value button.
 - Right click on the class and select Remove - Right-click on the class or value to be removed and click Remove.
CAUTION: This action will erase all child classes and values in the tree below the selected class. This action cannot be undone.
NOTE: An alternative way to exclude classes from ATtILA metric calculations is to utilize the exclusion checkboxes in the Values table. This removes all occurrences of the selected values from the Classes tree and therefore should be used with caution. The values may be restored in the Classes tree by unchecking the checkboxes.
Expanding or Collapsing the Class Tree
To expand or collapse the Classes tree, click the Expand/Collapse Tree button. This will expand or collapse the entire tree. To expand or collapse an individual group, click the plus or minus sign next to the class name or double-click the class description.
-
 Expand - Expand all classes in the Classes tree
-
 Collapse - Collapse all classes in the Classes tree
- Home
- Installing ATtILA
- Metrics
- Utilities
- Land Cover Classification
- References
-
Troubleshooting
- Background Processing error
- Excluded Values in Class Definitions
- Failed to execute (AddField)
- Failed to execute (Intersect)
- Failed to execute (TabulateArea)
- Failed to save raster dataset
- {FIELD} already exists error
- {FIELD} does not exist within table error
- Invalid extent error
- Tool appears to run but does not finish
- Unable to Determine Conversion Factor
- Undefined Values in LCC XML Document
- Appendix
 Page
Page