Example 1: Hello 6LBR
Our first example is very simple, and will allow to check that your configuration is working. We will use a RaspberryPi as Border Router platform, and extend it with a TelosB (sky) mote for the 802.15.4 radio interface. On the ethernet side of the RaspberryPi, we connect the RPi ethernet port directly to a development PC. A USB-to-serial cable is used to open a console on the RPi through the UART. Finally, we will use an extra TelosB mote to join the border router over a 802.15.4 network. Conceptually, the network we are setting up will look like this:
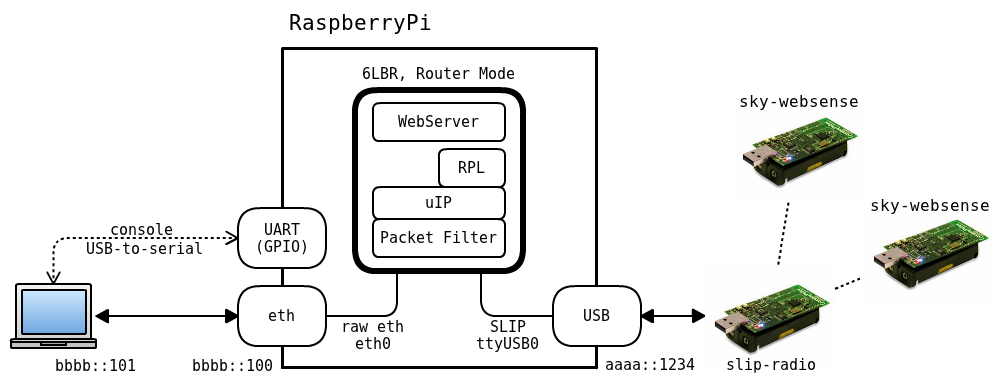
In this simple example setup, we assume that the 6LBR is the only IPv6 router on the Ethernet backbone. This is most likely the case for anyone starting out on this.
- A RaspberryPi
- An SD Card, with an installation of Raspbian and 6LBR. See the installation page for details. Make sure not to miss the specific configuration step for USB Slip-Radio motes.
- A Linux or MacOSX computer with a Contiki Toolchain installed. This computer will be used:
- To compile and upload the required applications to the motes
- As an IPv6 host to interact with the border router and the WSN motes
- A USB-to-serial cable, with USB A male connector and 2.54mm breadboard female connectors
- Two or more Sky/TelosB motes or equivalent
- An RJ-45 cable
- slip-radio. One of the sky motes will serve as a 802.15.4 interface for the RaspberryPi. Connect it (alone) to the Linux/Mac computer, and program it with the slip-radio application.
cd $CONTIKI_HOME/examples/ipv6/slip-radio
make TARGET=sky slip-radio.upload
- sky-websense. Remove the slip-radio mote and connect 1 or more other TelosB motes. These need to be configured to run as nodes of a wireless sensor network. We will use the provided 6lbr-demo application, which is the same as Contiki's sky-websense application with an additional periodic UDP message sent by each node to the sink. In the above diagram, we depict two sky-websense nodes, but any number will do (even 1, as shown in the photograph below). In this example, we will be using nullrdc and CSMA on channel 26, so make sure the CONTIKI_HOME/examples/6lbr-demo/project-conf.h file contains the following lines:
 #define NETSTACK_CONF_MAC   csma_driver
 #define NETSTACK_CONF_RDC   nullrdc_driver
 #define RF_CHANNEL          26
cd $CONTIKI_HOME/examples/6lbr-demo
make TARGET=sky 6lbr-demo.upload
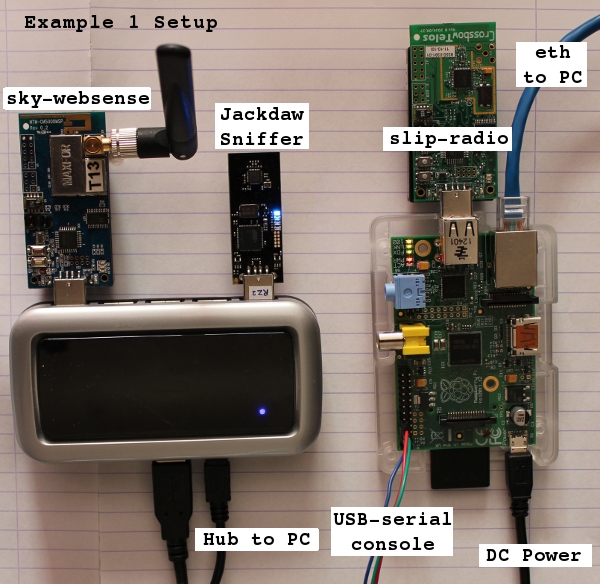
- Attach the slip-radio mote to the RaspberryPi
- Connect the RaspberryPi to the Linux/MacOSX computer with an RJ-45 cable to simulate an IPv6 LAN.
- Connect the sky-websense motes to any USB-powered Hub, or power them on with AA batteries.
- Connect the USB-to-serial cable to the Linux/MacOSX computer, and the female breadboard connectors to the GPIO pins of the RaspberryPi:
- Blue on GROUND
- Green on GPIO 14
- Red on GPIO 15
Assuming you have a properly installed 6LBR for RPi, the 6lbr daemon will start automatically at boot. If it has stopped or if you didn't restart your RPi after the installation, launch the service manually:
sudo /etc/init.d/6lbr start
As we are in router mode, the border router will listen on the ethernet side with the bbbb:100 address. Since we have not yet deployed an IPv6 network on the LAN (our PC is connected directly to the 6LBR), let's cheat for the sake of this example and define an IPv6 address with the same prefix manually (applicable to Unix-based systems):
sudo ip -6 addr add bbbb::101/64 dev eth0
An alternative to this is to enable the following on Host, if Linux (for Windows this is automatic in Windows 7 onwards):
sysctl -w net.ipv6.conf.eth0.accept_ra_rt_info_max_plen=64
At this time, we can send requests to the Border Router's integrated web application. Open a browser on the Linux PC, and access the border router as would any other IPv6 host on the network:
http://[bbbb::100]
This will bring up a multi-tab web interface largely based on the httpd/webserver of Contiki, with extra information such as a graph of the DAG topology, some info on RPL and a configuration page where some parameters can be modified directly through the web interface (click to enlarge).
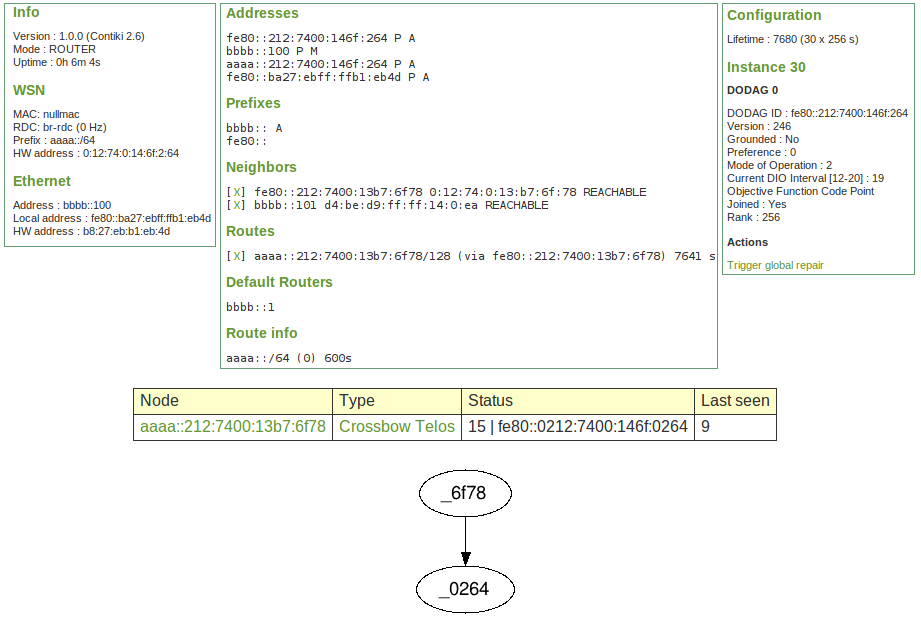
Note that the information on the topology is made possible by the periodic UDP packets sent by each node of the wireless sensor network to the border router. It serves mostly as a demonstration. This could also be done with rplinfo, which also announced RPL information to the sink using a JSON format over CoAP.