-
Notifications
You must be signed in to change notification settings - Fork 2
Install Instructions
This firmware is a community effort and is not affiliated with Tenlog, Hictop, Copymaster, LNL, Nextion, TJC or other distributers. You assume all risk and liability by installing this firmware. It is standard practice for a manufacturer to void your warranty for installing a custom firmware.
WARNING: Turn the power off before unplugging extruder cables.
WARNING: Do not reuse any values from your old firmware.
To install Luxuri firmware, we need to flash both the mainboard and display separately. Firmware is precompiled for most common hardware combinations. Choose your firmware file based on your machine's hardware configuration using the flags listed below. If you need help determining your hardware configuration, find it here.
Example: If you have a Tenlog D3 Pro with 2209 Drivers, a BMG extruder, and a BL-Touch Probe, you would choose the file Luxuri_2.1.X_TenlogD3_TMC2209Drivers_BMGExtruder_BLTouchProbe.hex
File Name Reference:
Printer Models:
  Tenlog Hands 2 = TenlogHands2
  Tenlog D3 Pro, Hictop D3 Hero, Copymaster = TenlogD3
  Tenlog D5 = TenlogD5
  Tenlog D6 = TenlogD6
Stepper Drivers:
  Allegro A4988 = A4988Drivers
  TMC 2208 = TMC2208Drivers
  TMC 2209 = TMC2209Drivers
Y Endstop Type:
  Optical = (default)
  Leaf Switch = LeafSwitchYEndstop
Power Switch Type:
  Momentary = (default)
  Maintained = MaintainedPowerSwitch
Probes:
  Antclabs BL-Touch = BLTouchProbe
Extruders:
  Stock = (default)
  BMG = BMGExtruder
  Hictop Titan Extruder = HictopTitanExtruder
Acessories:
  PFTE Hotend = (default)
  All Metal Hotend = AllMetalHotend
  AC Mains Heat Bed = ACBed
Verify you have a compatible hardware configuration. This page can help you identify your hardware. Take pictures of the insides of your machine and submit them to #machine-pics in the Discord channel if you are unsure.
If you have a TJC Display, use the following instructions to install Luxuri firmware. If you have a DWIN screen, this install is outside the scope of these instructions, you can find more information on this page.
-
The display firmware is located here. Choose the correct firmware for your screen type.
-
Power off the printer.
-
Open the bottom cover of the printer to access the microSD card reader on the TJC display board. WARNING: When removing the bottom cover, be careful of the fan wires.
-
Insert the microSD card into the reader on the TJC display and power on the printer, then wait for the screen to finish flashing.
-
Remove the microSD card.
-
Proceed to install mainboard firmware.
There are several ways to load the firmware onto the mainboard. These instructions are only going to discuss using PrusaSlicer, but it is possible to use Cura or xloader or numerous other programs.
-
The Luxuri firmware binary is is linked from the releases page. The binary file will be a
.hexfile or possibly.binfile. You can also compile from source. -
If you do not have PrusaSlicer with drivers installed on a computer, install that next.
-
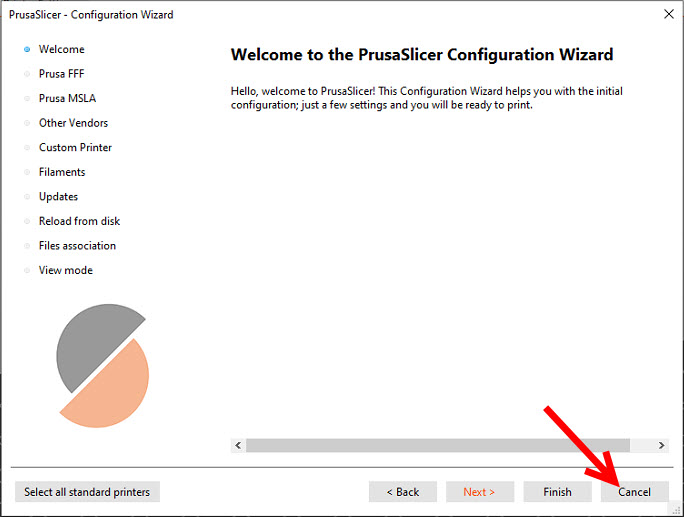
Run PrusaSlicer. If the Configuration Wizard window pops up, you can click
Cancelto skip this step.

-
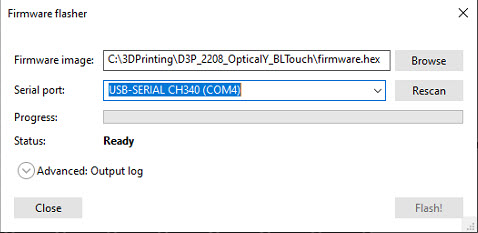
In PrusaSlicer, navigate to Configuration -> Flash Printer Firmware
-
In the window that appears, select the firmware binary file you downloaded, and select the COM port that represents your printer. It may lookdocs/the example below.

-
Click the
Flash!button to start installing firmware. -
Wait for the flash procedure to finish.
-
Proceed to post-install configuration.
Before using your new firmware, there are some configuration tasks that must be completed.
-
Reset Settings - On the TJC display, navigate to Settings and press
Reset- This will reformat the EEPROM storage to be compatible with the new firmware. -
PID Autotune - On the TJC display, navigate to Settings -> PID Tune, and run the automated procedure - This sets the parameters that allow the heating algorithm to maintain a consistent temperature.
-
Print the external touch screen mount - Mount the touch screen externally for easy firmware updates. Download the stl
Congratulations! You've got a fine machine there, and we wanna see it! Post a pic of your completed machine in #machine-pics in our Discord Server and then come and hang out.